(03-01-8113) Adjustment of door and side windows, CV
|
TECHNICAL NEWS
|
|
Bulletin Nbr:
|
03-01-8113
|
|
Date:
...........
|
Mars 2003
|
|
Market:
|
Alla
|
|
|
Adjustment of door and side windows, CV
|
Saab 900 CV M94-98 and 9-3 CV M98-M03
Updated method for door window and side window adjustment. Replaces previous methods and will be available in the next edition of WIS.
Make sure the following items are completed properly:
|
-
|
Door alignment is correct according to WIS instructions.
|
|
-
|
Soft top longitudinal alignment is correct according to WIS instructions.
|
|
-
|
Soft top up-stop alignment is correct according to WIS instructions.
|
|
-
|
Soft top lateral alignment is correct according to WIS instructions (see also Technical Advice 811-X116).
|
|
-
|
Alignment of soft top seals is correct according to WIS (see also Technical Advice 84472-02-045).
|
|
-
|
Alignment of windscreen frame seal is correct according to WIS (see also Technical Advice 84472-02-044).
|
Note
|
|
Whenever work is performed on the door and/or side windows together with these instructions, the entire process must be completed. Adjustment of door or side windows must be checked/completed each time an integral component has been replaced or modified (this applies to both the door window and side window). Furthermore, adjustment of both the door window and side window must be performed simultaneously. This means that if, for example, the door window alignment is changed in any way, the side window alignment must also be checked/adjusted.
|
|
Note
|
|
Numbered alignment points and their effect on door windows or side windows are described under the following headings: “Adjustment points for the door window” and “Adjustment points for the side window”.
|
|
|
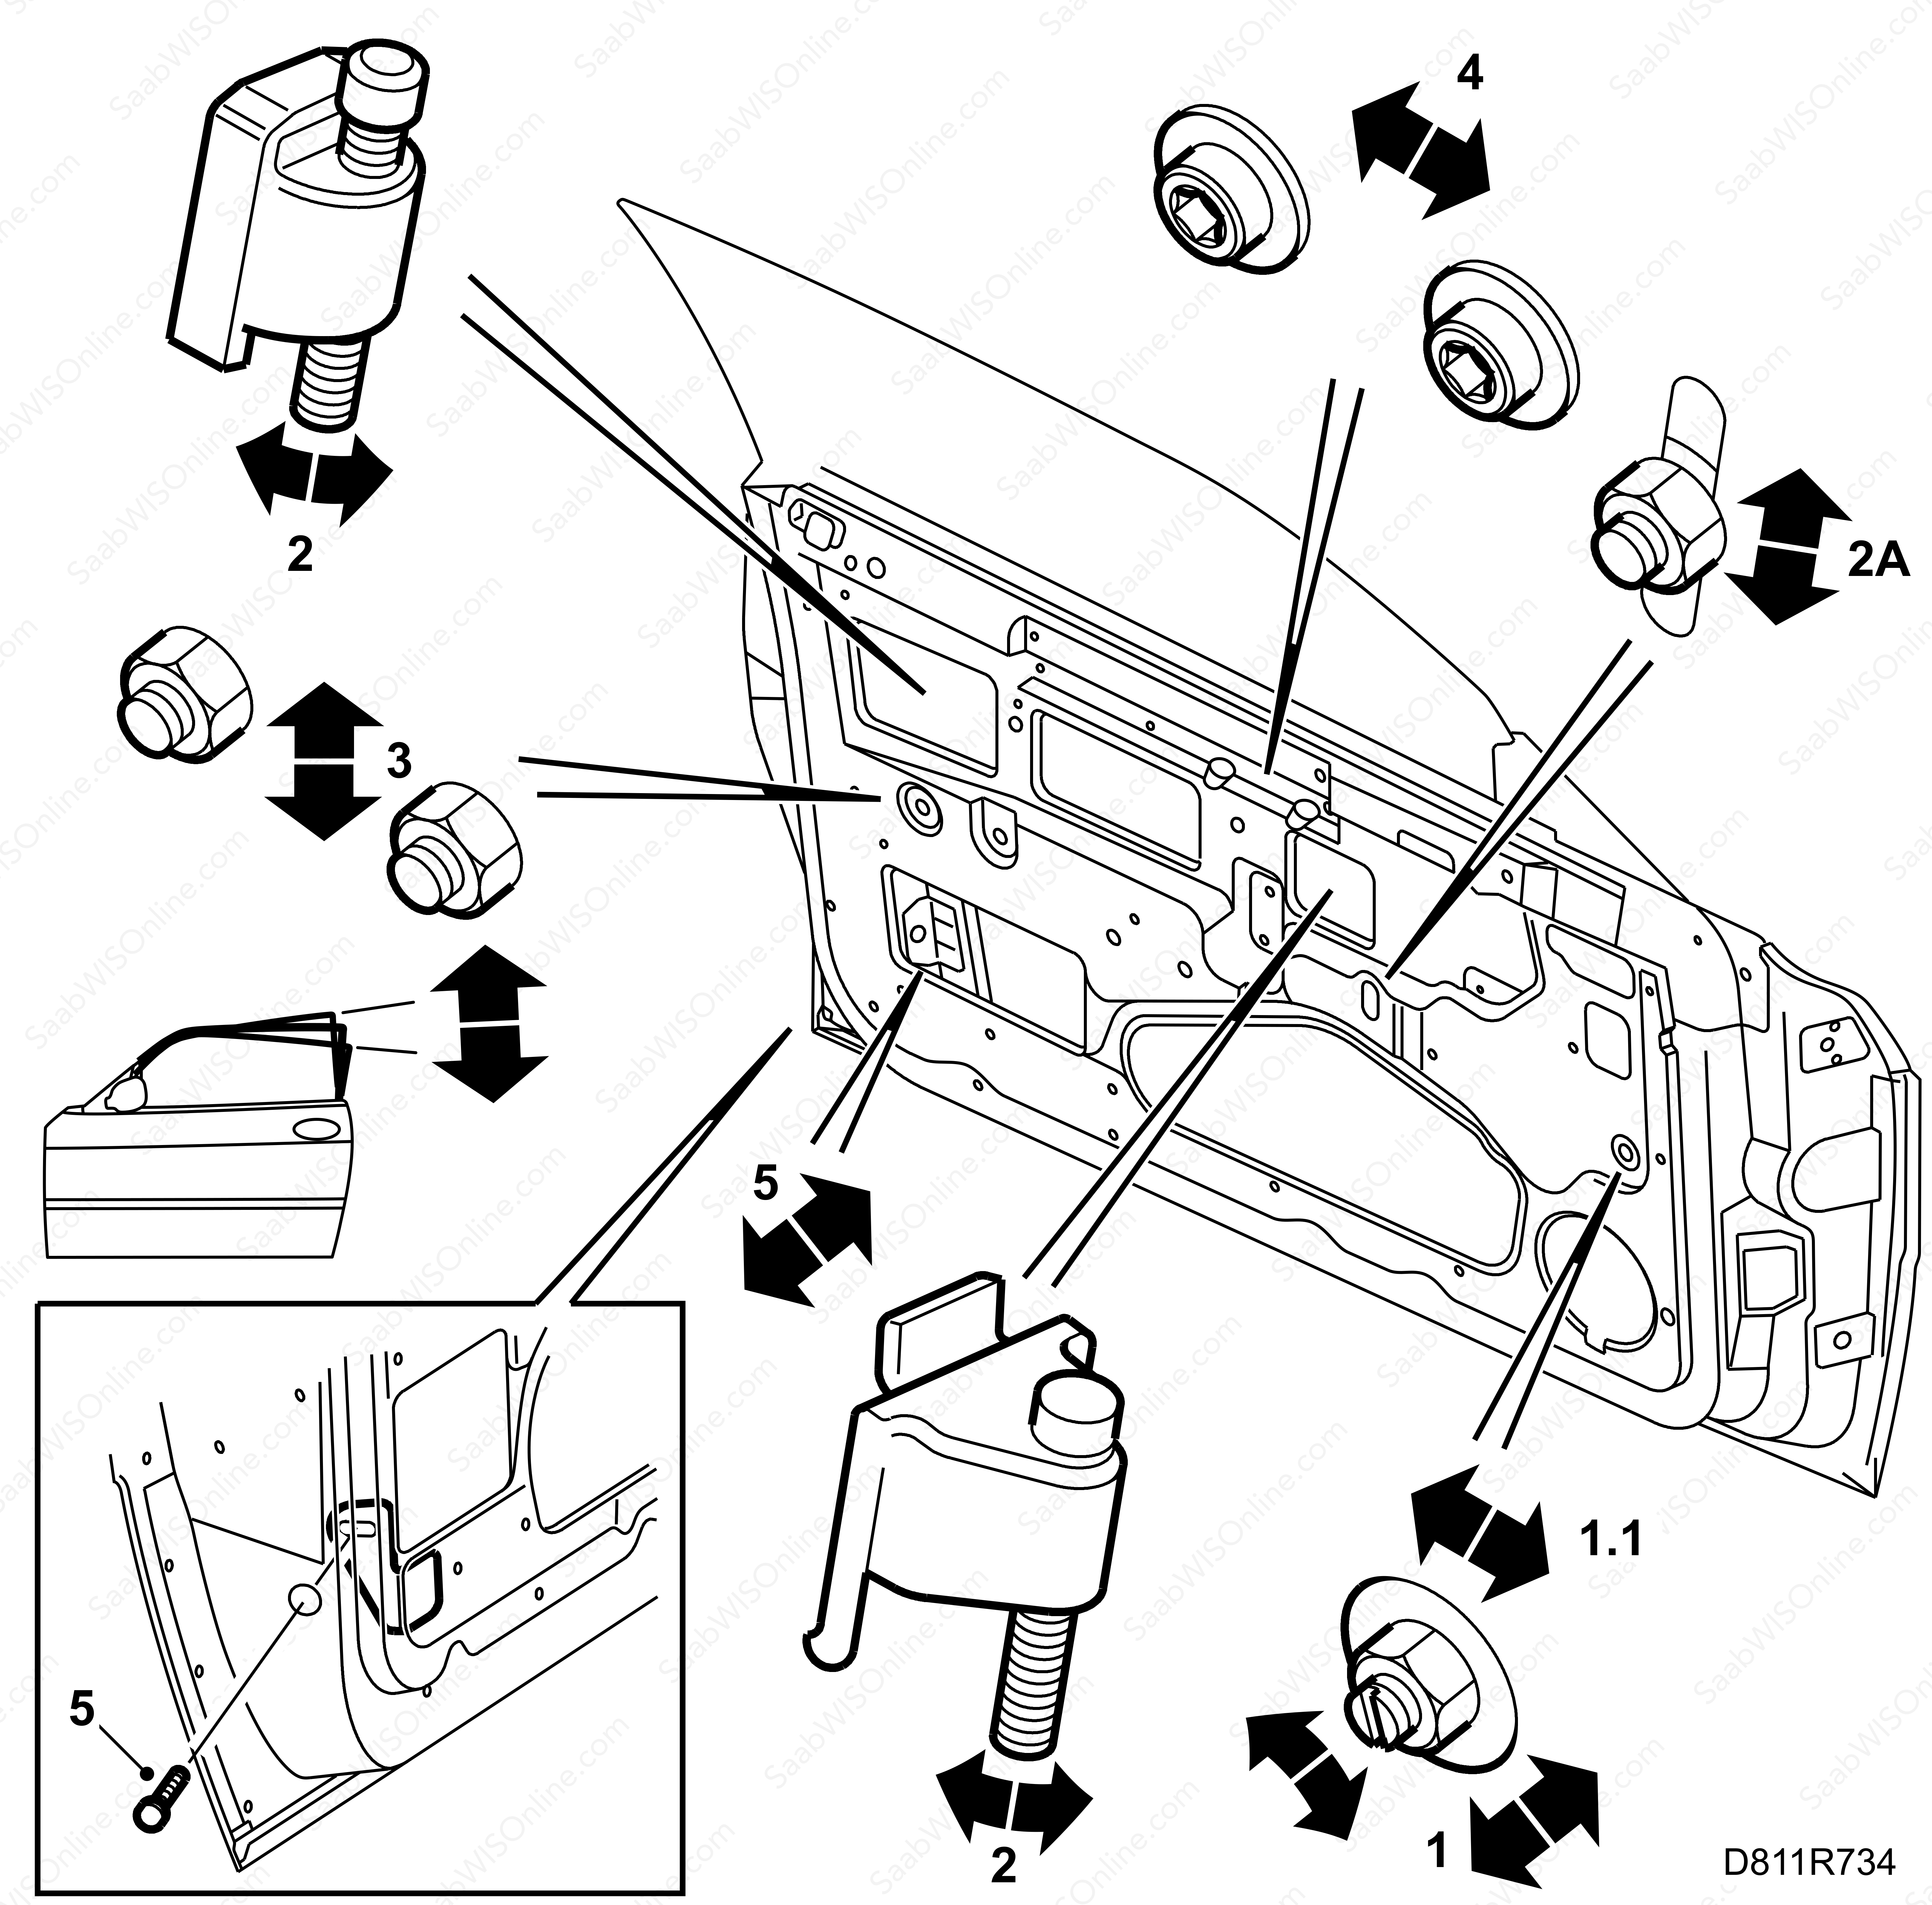
Adjustment points for the door window
|
Adjustment 1. Alignment of front support rail
|
1.
|
Lateral alignment affects the lateral position of the door window at the front edge.
|
|
|
1.1.
|
Longitudinal alignment affects the support of the door window provided by the support rail.
|
Adjustment 2. Alignment of the upper door window stops.
|
-
|
Alignment affects the vertical door window position when it is in the up position.
|
|
Note
|
|
There are two versions of the upper door window stops:
|
|
A.
|
There is only one upper stop before VIN 17008621, ADJUSTMENT 2A.
|
|
C.
|
There are two extra upper stops from VIN 17008621, ADJUSTMENT 2, which are supplements to the previous upper stop, ADJUSTMENT 2A.
|
Adjustment 3. Alignment of the door window mechanism.
|
-
|
Alignment affects the door window's longitudinal inclination, the height of the door window's rear edge and distribution of the forces exerted by the mechanism on the front and rear lifting arms.
|
Adjustment 4. Alignment of the door window mounting.
|
-
|
Alignment affects the longitudinal door window position.
|
Adjustment 5. Alignment of the rear support rail.
|
-
|
Lateral alignment affects the lateral position of the door window at the rear edge.
|
|
Adjustment points for the side window
|
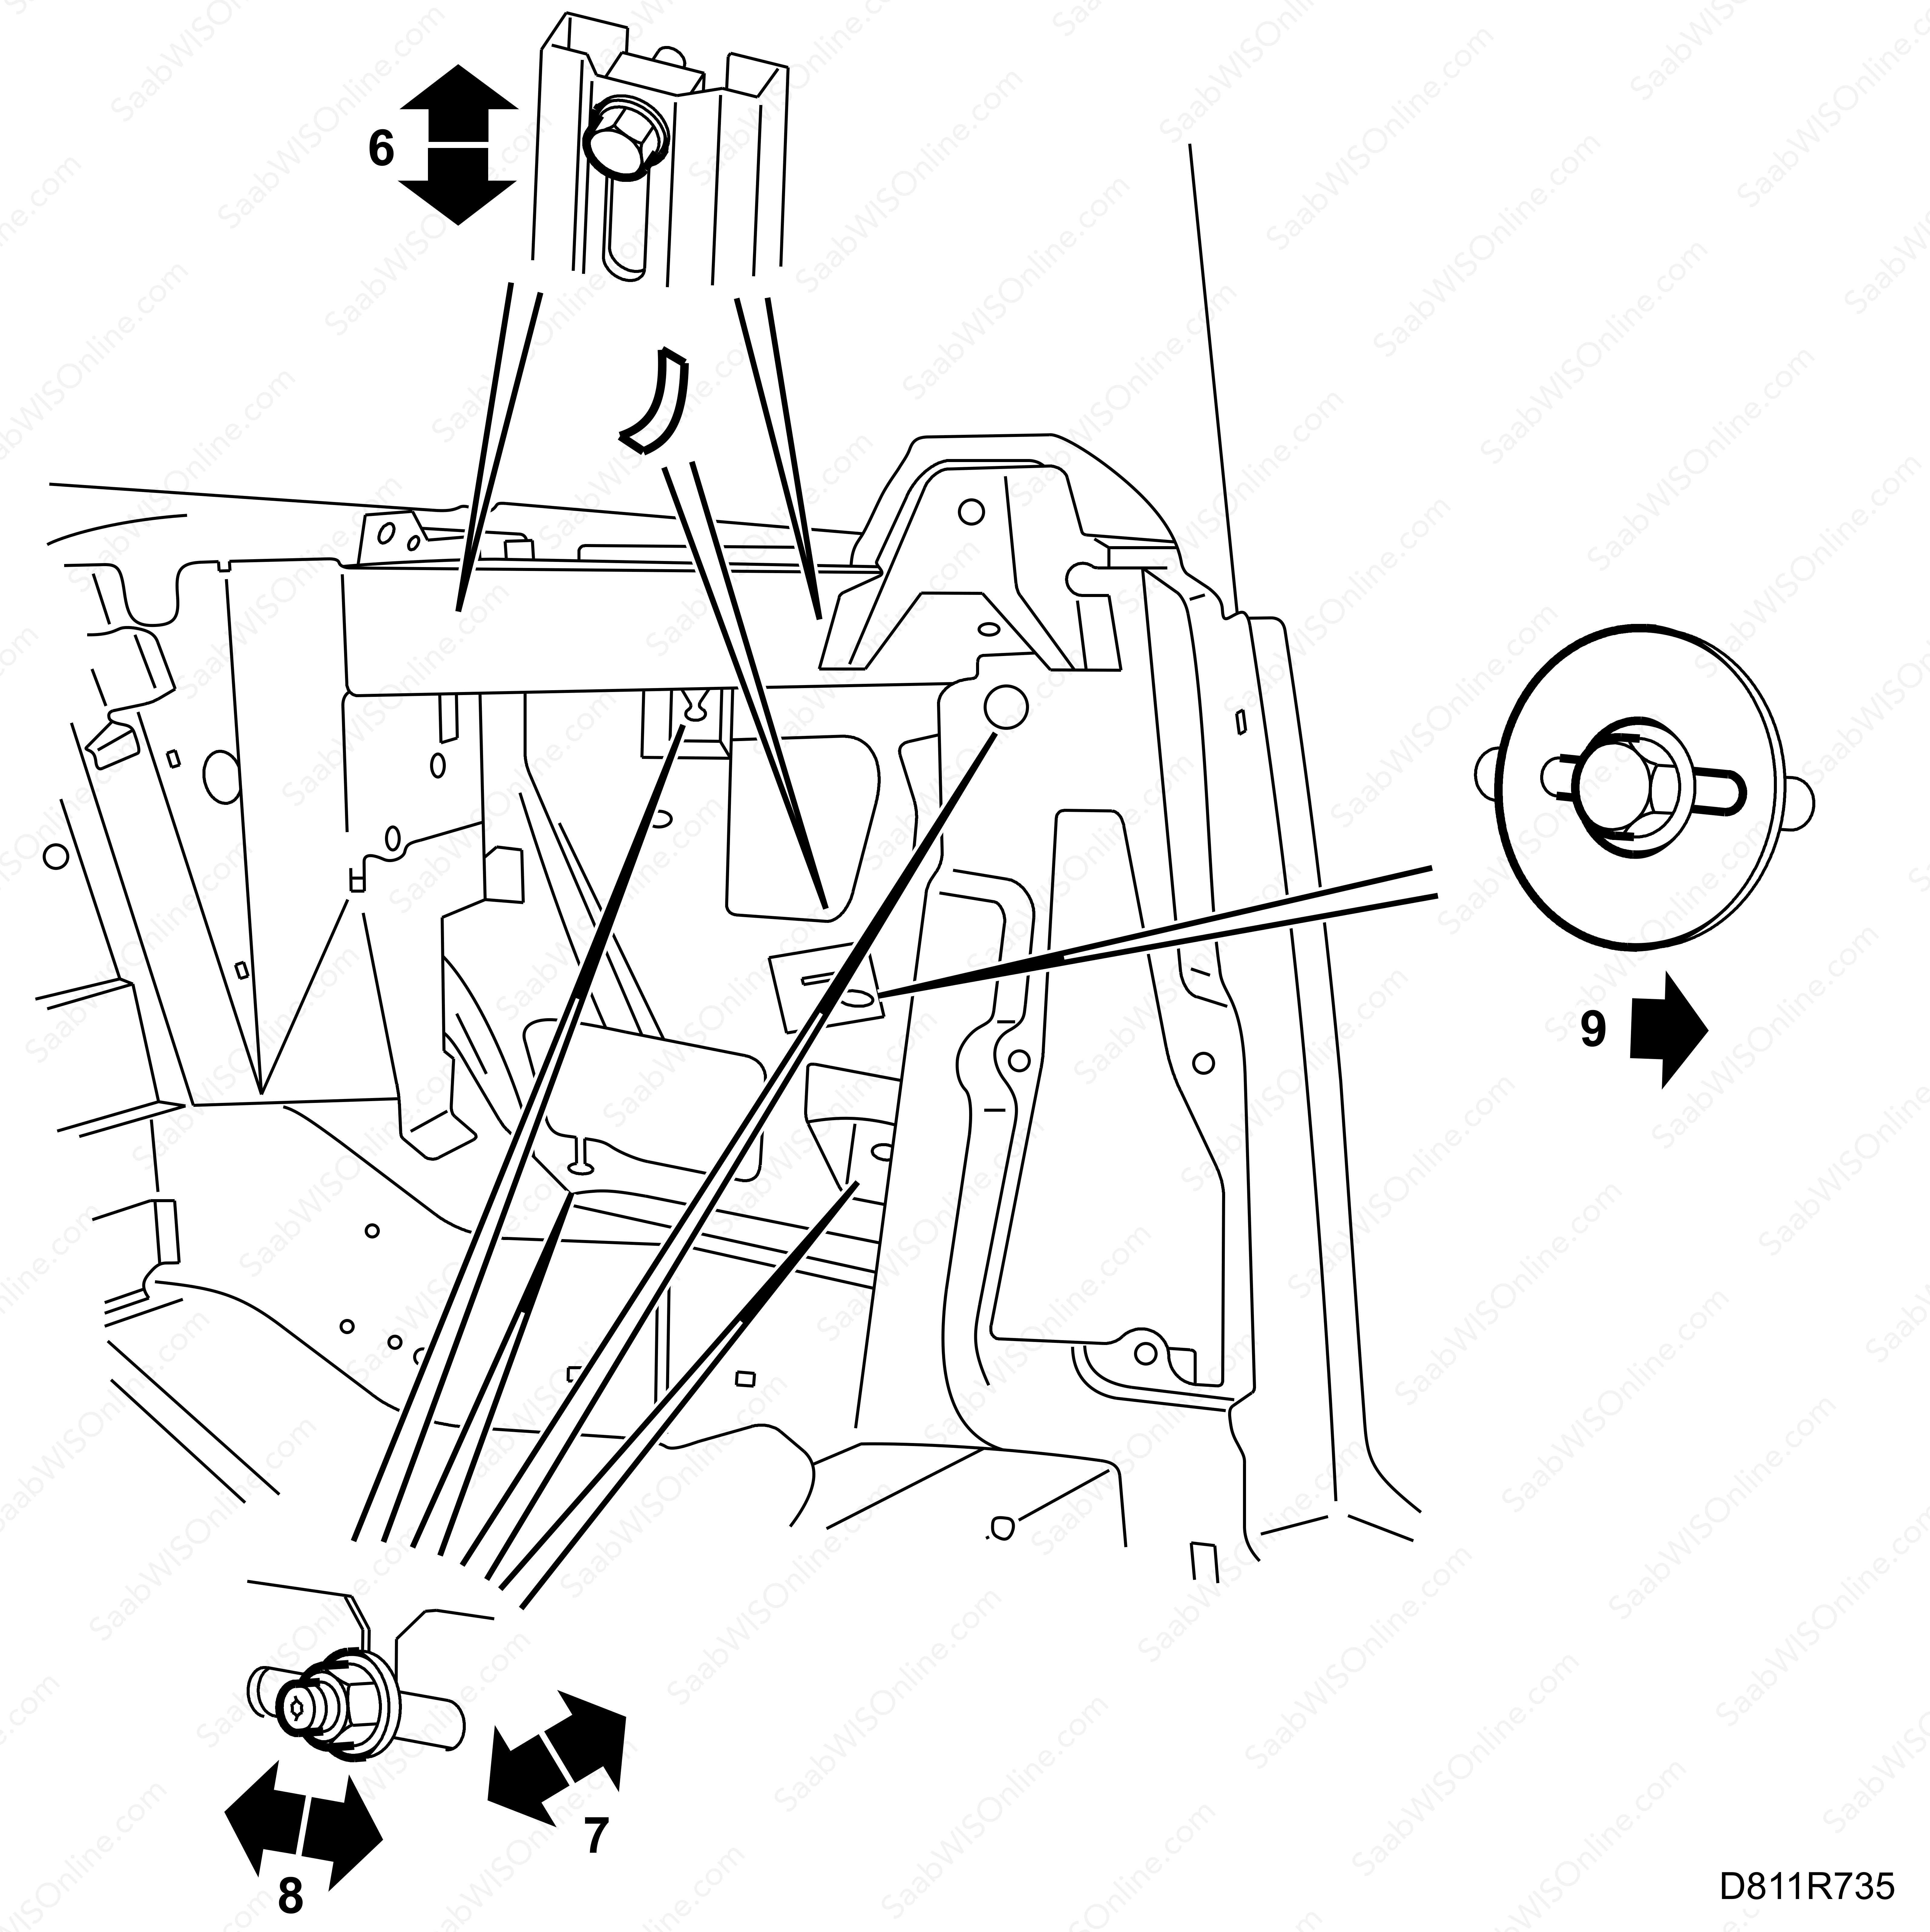
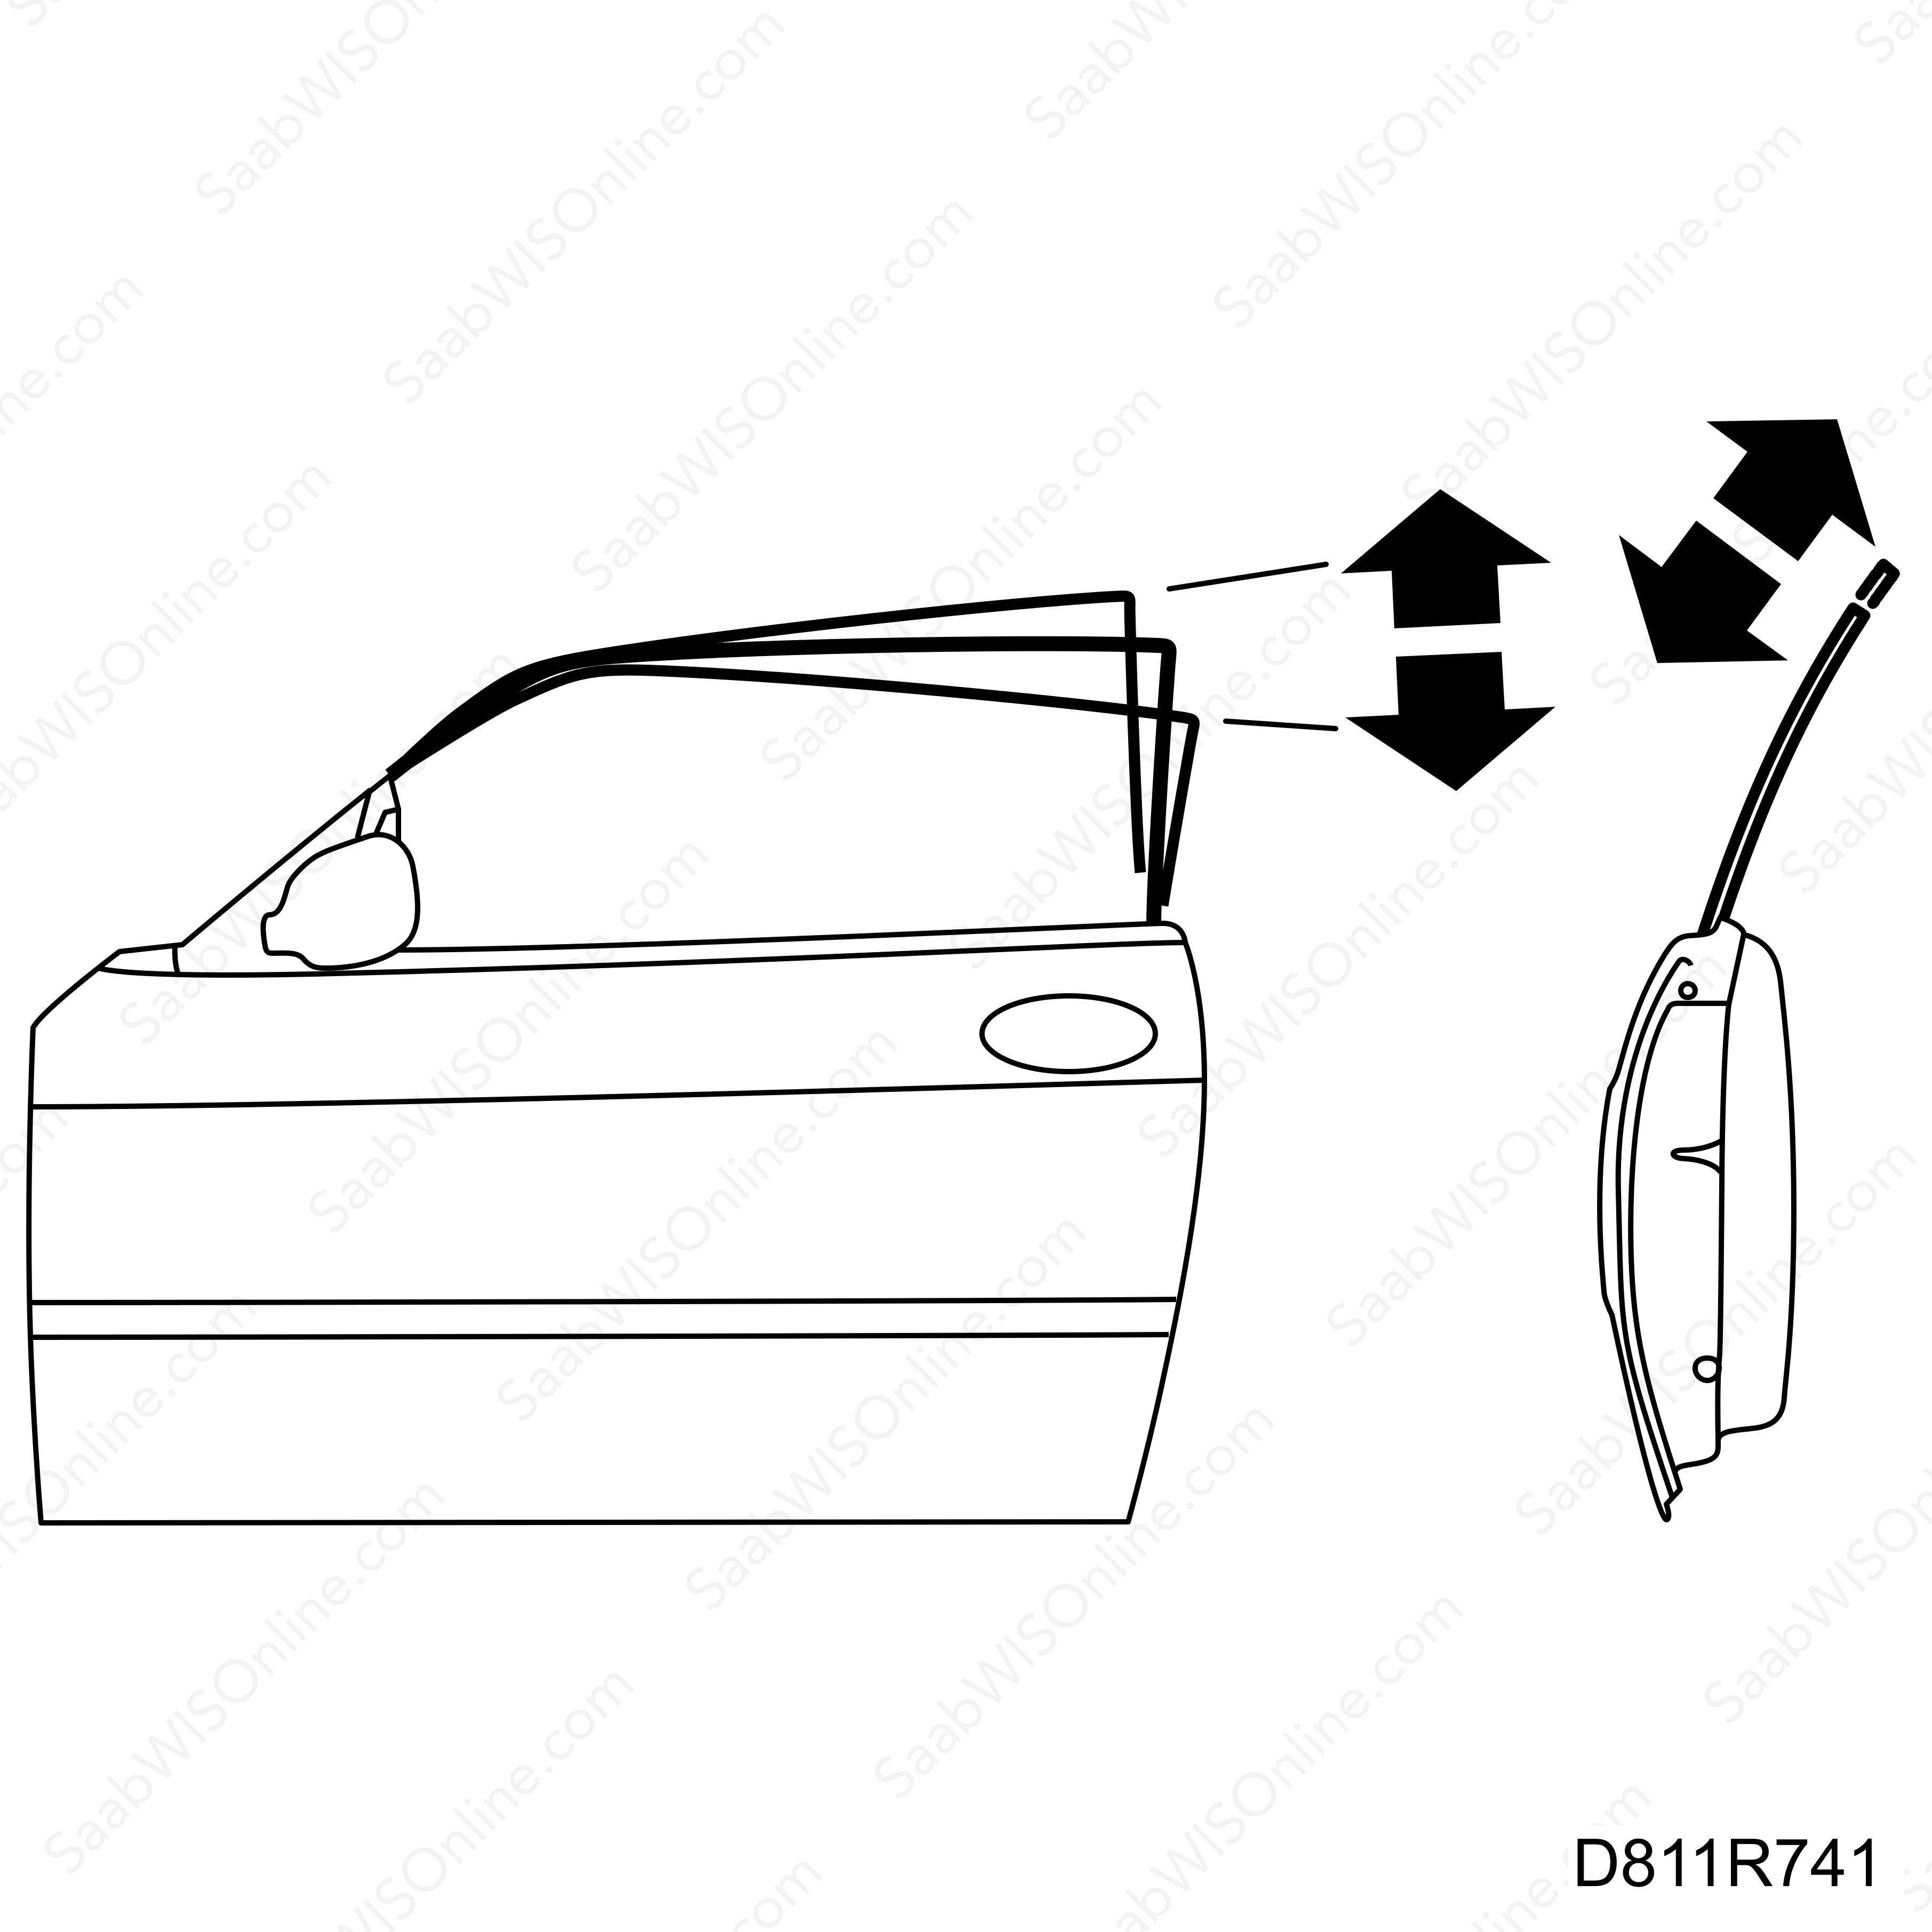
Adjustment 6. Alignment of the upper side window stops.
|
-
|
Alignment affects the vertical side window position when it is in the up position. See also ADJUSTMENT 9.
|
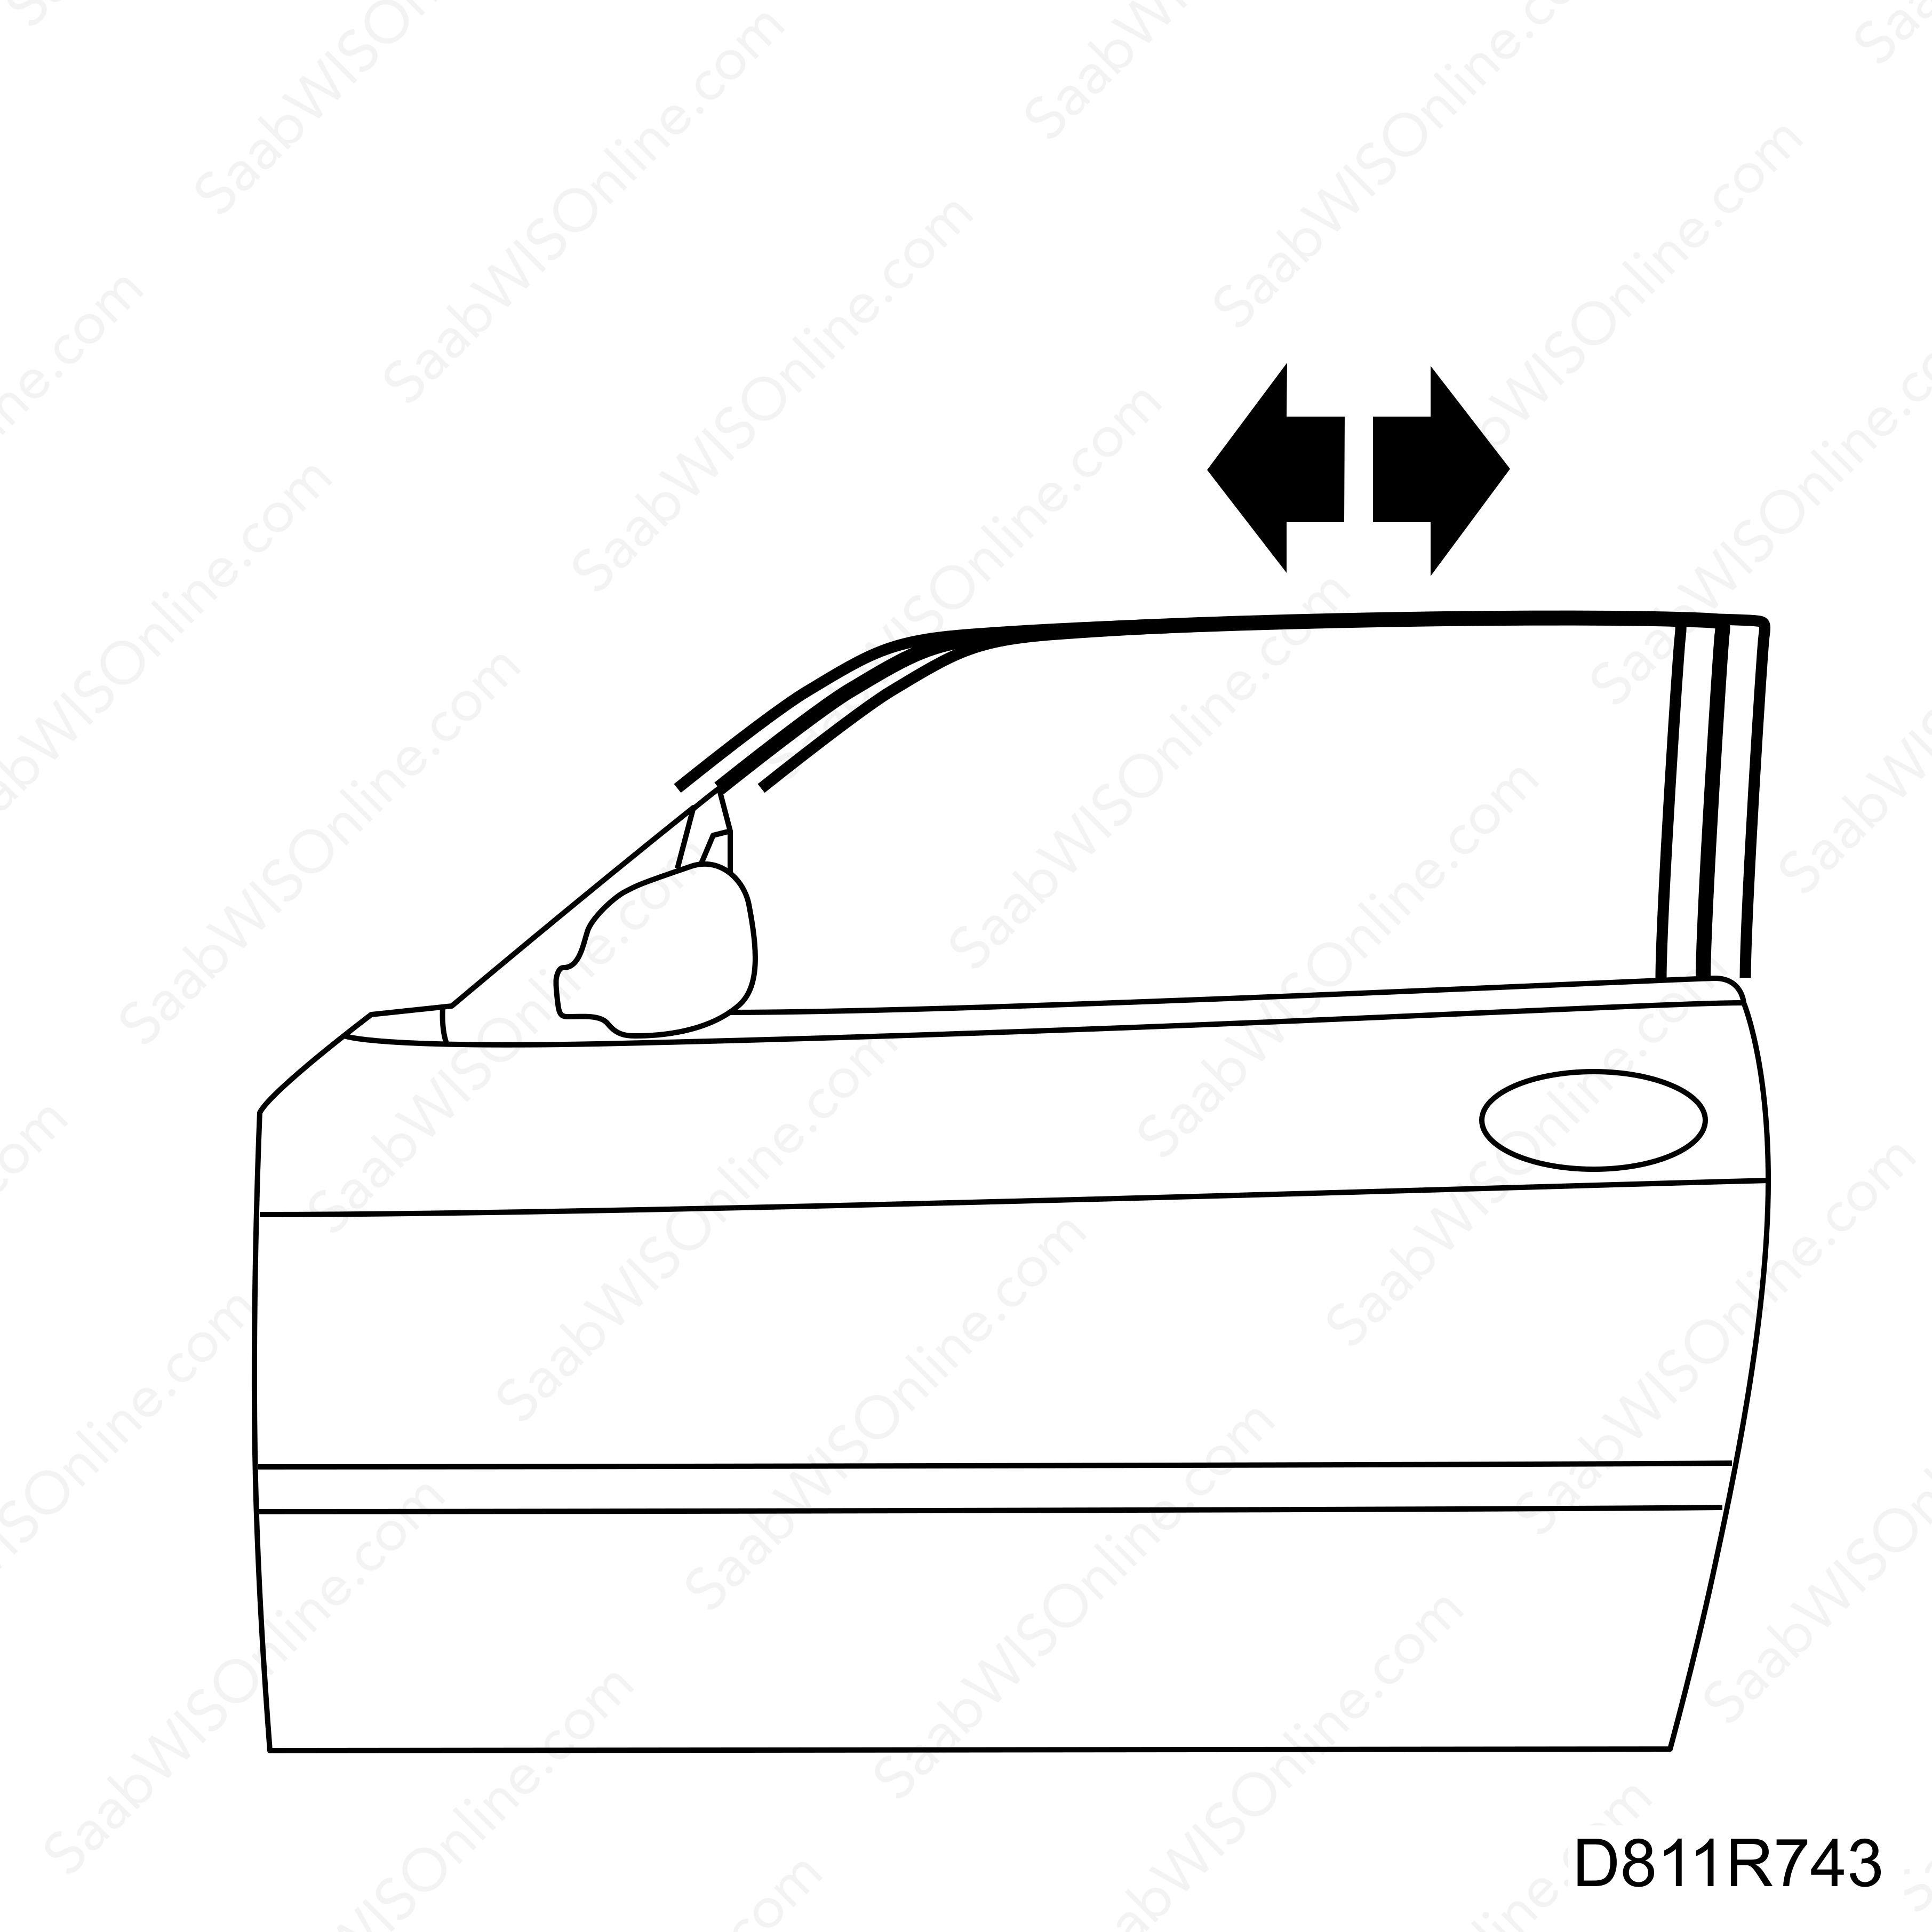
Adjustment 7. Lateral alignment of the side window mountings.
|
-
|
Alignment affects the lateral position of the side window at the upper edge.
|
Adjustment 8. Longitudinal alignment of the side window mountings.
|
-
|
Alignment affects the longitudinal side window position.
|
Adjustment 9. Alignment of the side window's extra upper stops.
|
-
|
Alignment affects the vertical side window position when it is in the up position as a supplement to ADJUSTMENT 6. See also ADJUSTMENT 6.
|
|
Note
|
|
There are two versions of the upper side window stops:
|
|
A.
|
There are only two upper stops before VIN W7055419/X7002872, ADJUSTMENT 6.
|
|
C.
|
There is one extra upper stop from VIN W7055419/X7002872, ADJUSTMENT 9, which is a supplement to the previous upper stops, ADJUSTMENT 6.
|
|
Note
|
|
References to the alignment points in "Adjustment points for the door window" can be found in the following instructions.
|
|
1.
|
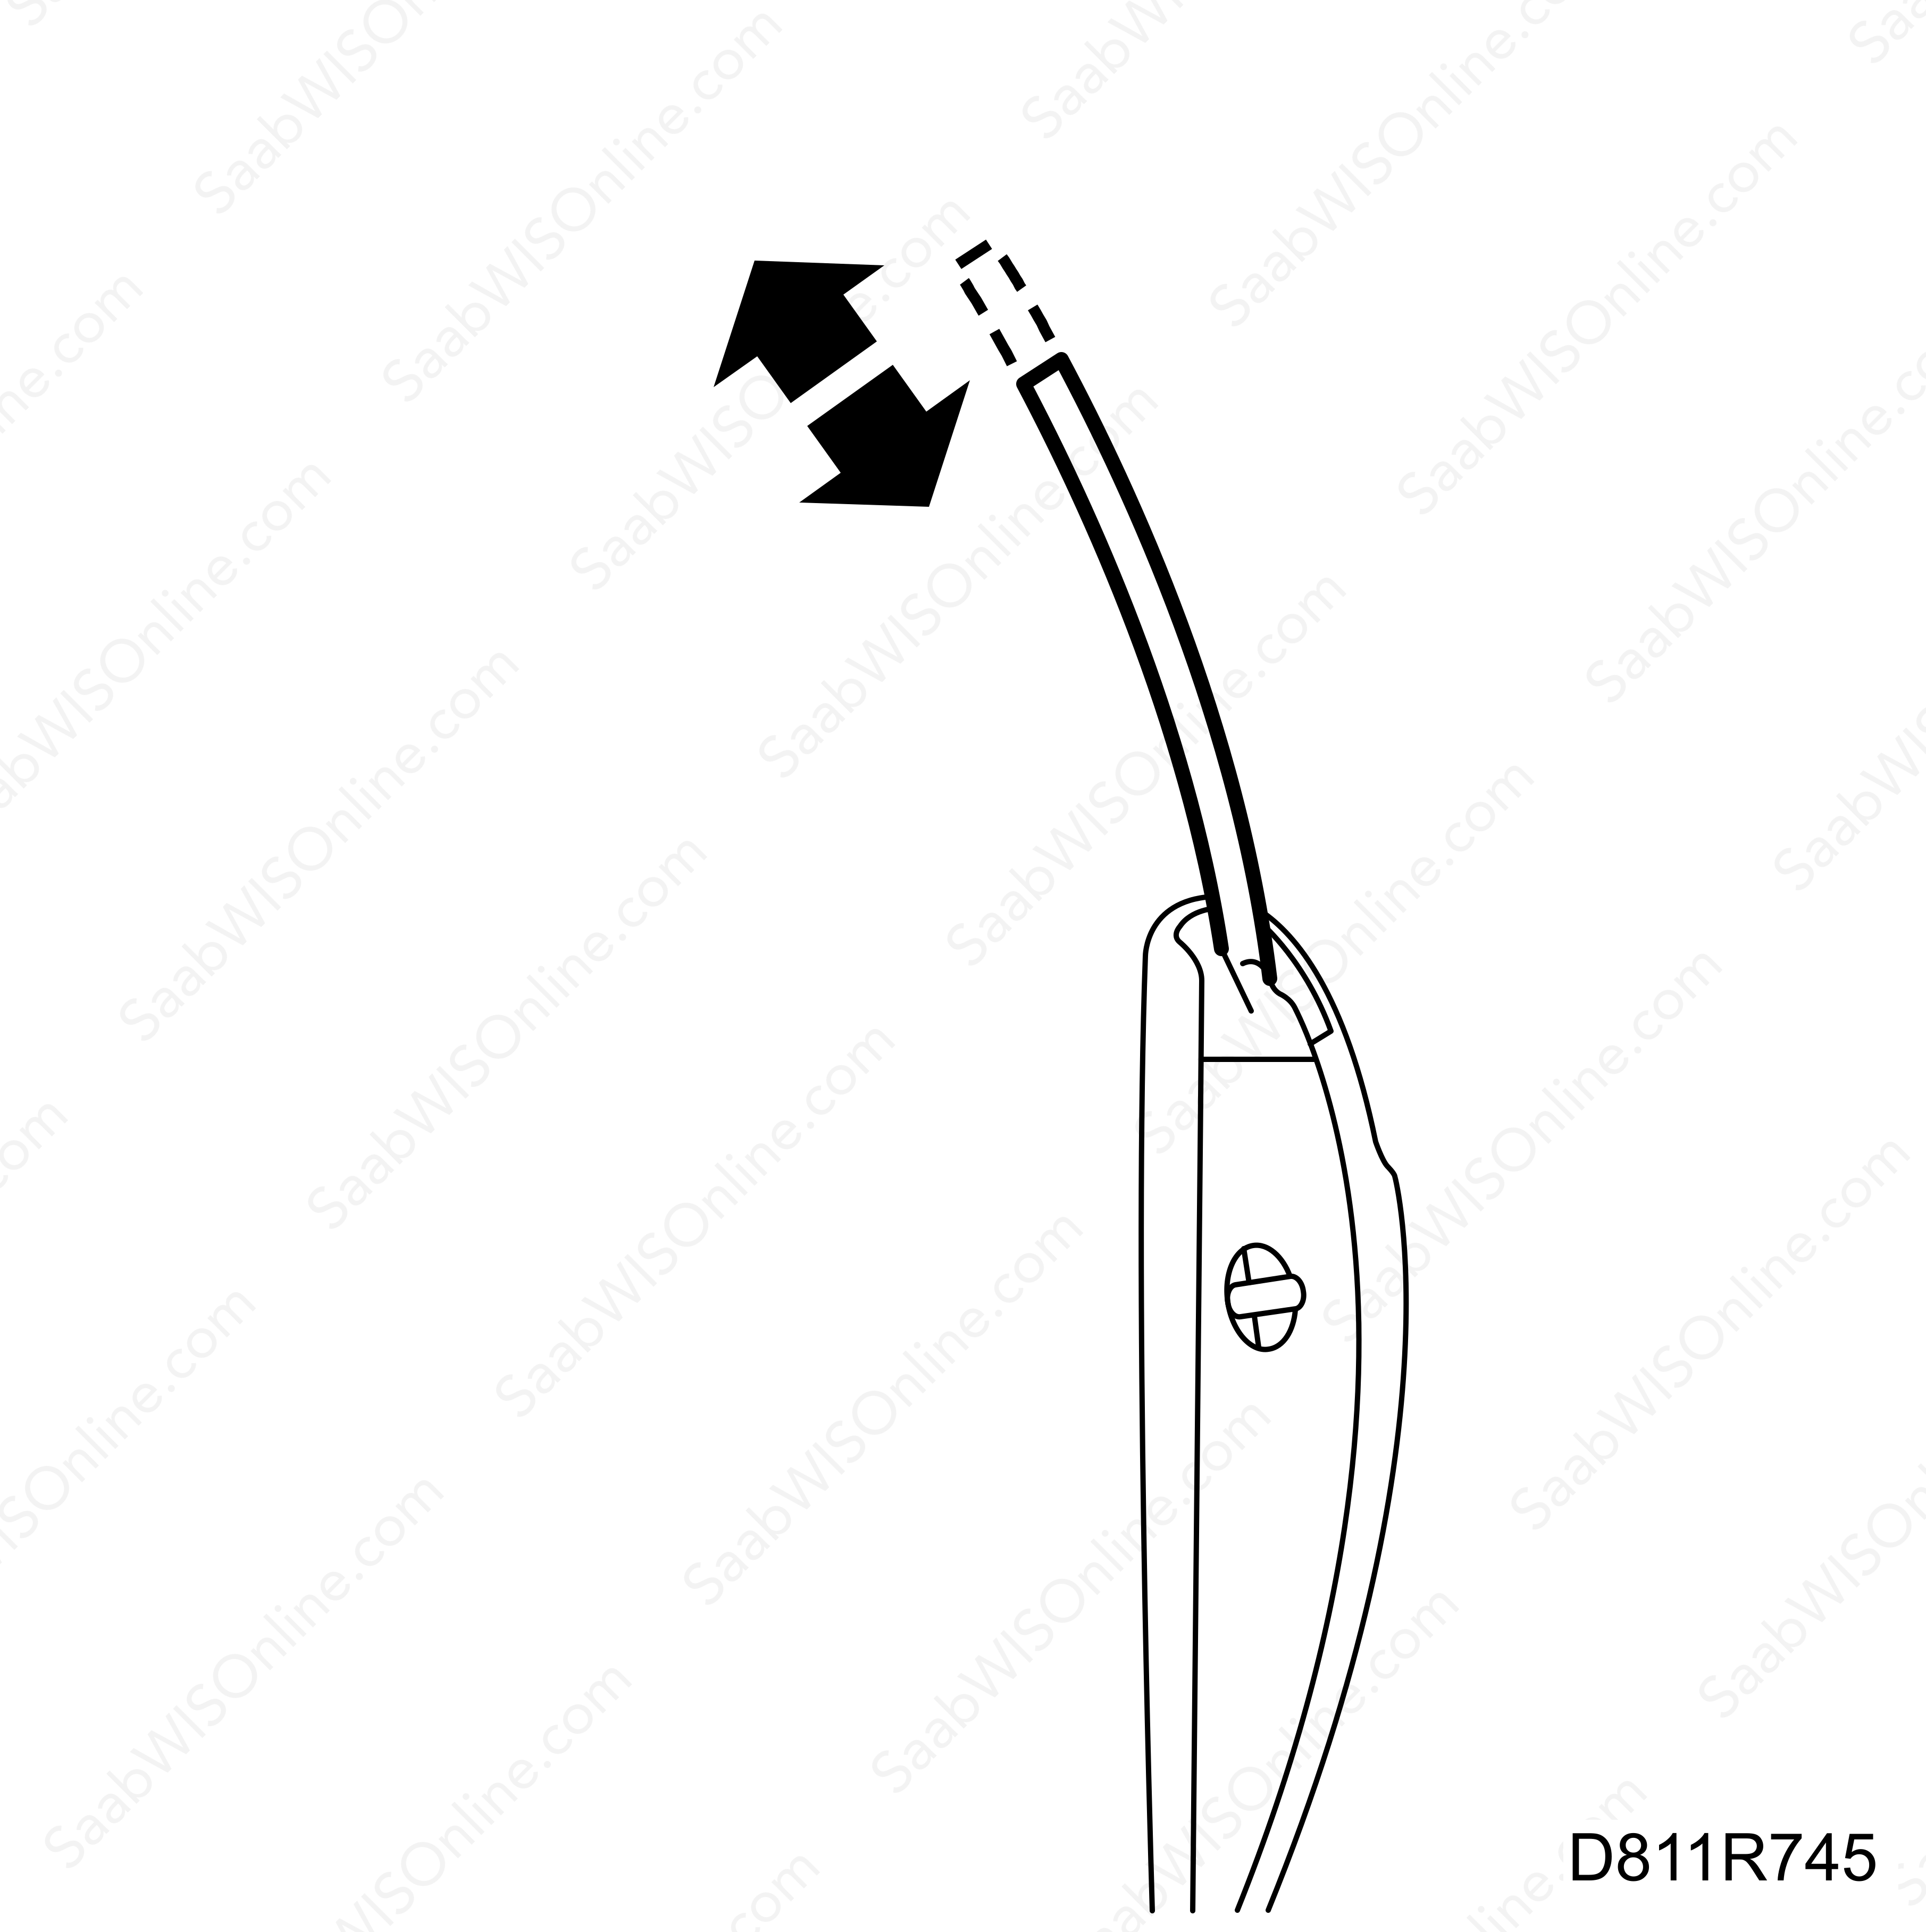
Check/adjust the lateral alignment of the front support rail. ADJUSTMENT 1. Alignment affects how hard the door window presses against the windscreen frame seal.
The door window should press against the windscreen frame seal when the door is closed. The edge of the door window should be positioned beneath the lip of the seal.

|
|
2.
|
Check/adjust the longitudinal alignment of the front support rail. ADJUSTMENT 1.1 Alignment affects the support of the door window provided by the support rail.
The support rail must be adjusted longitudinally towards the rear as far as possible.
Before VIN 27004929:
If this adjustment is not sufficient, see TN 03-01-8112
|
|
3.
|
Check/adjust the upper door window stops. ADJUSTMENT 2 and ADJUSTMENT 2A.
|
|
4.
|
Before VIN 17008621, ADJUSTMENT 2A:
Alignment affects the vertical door window position.
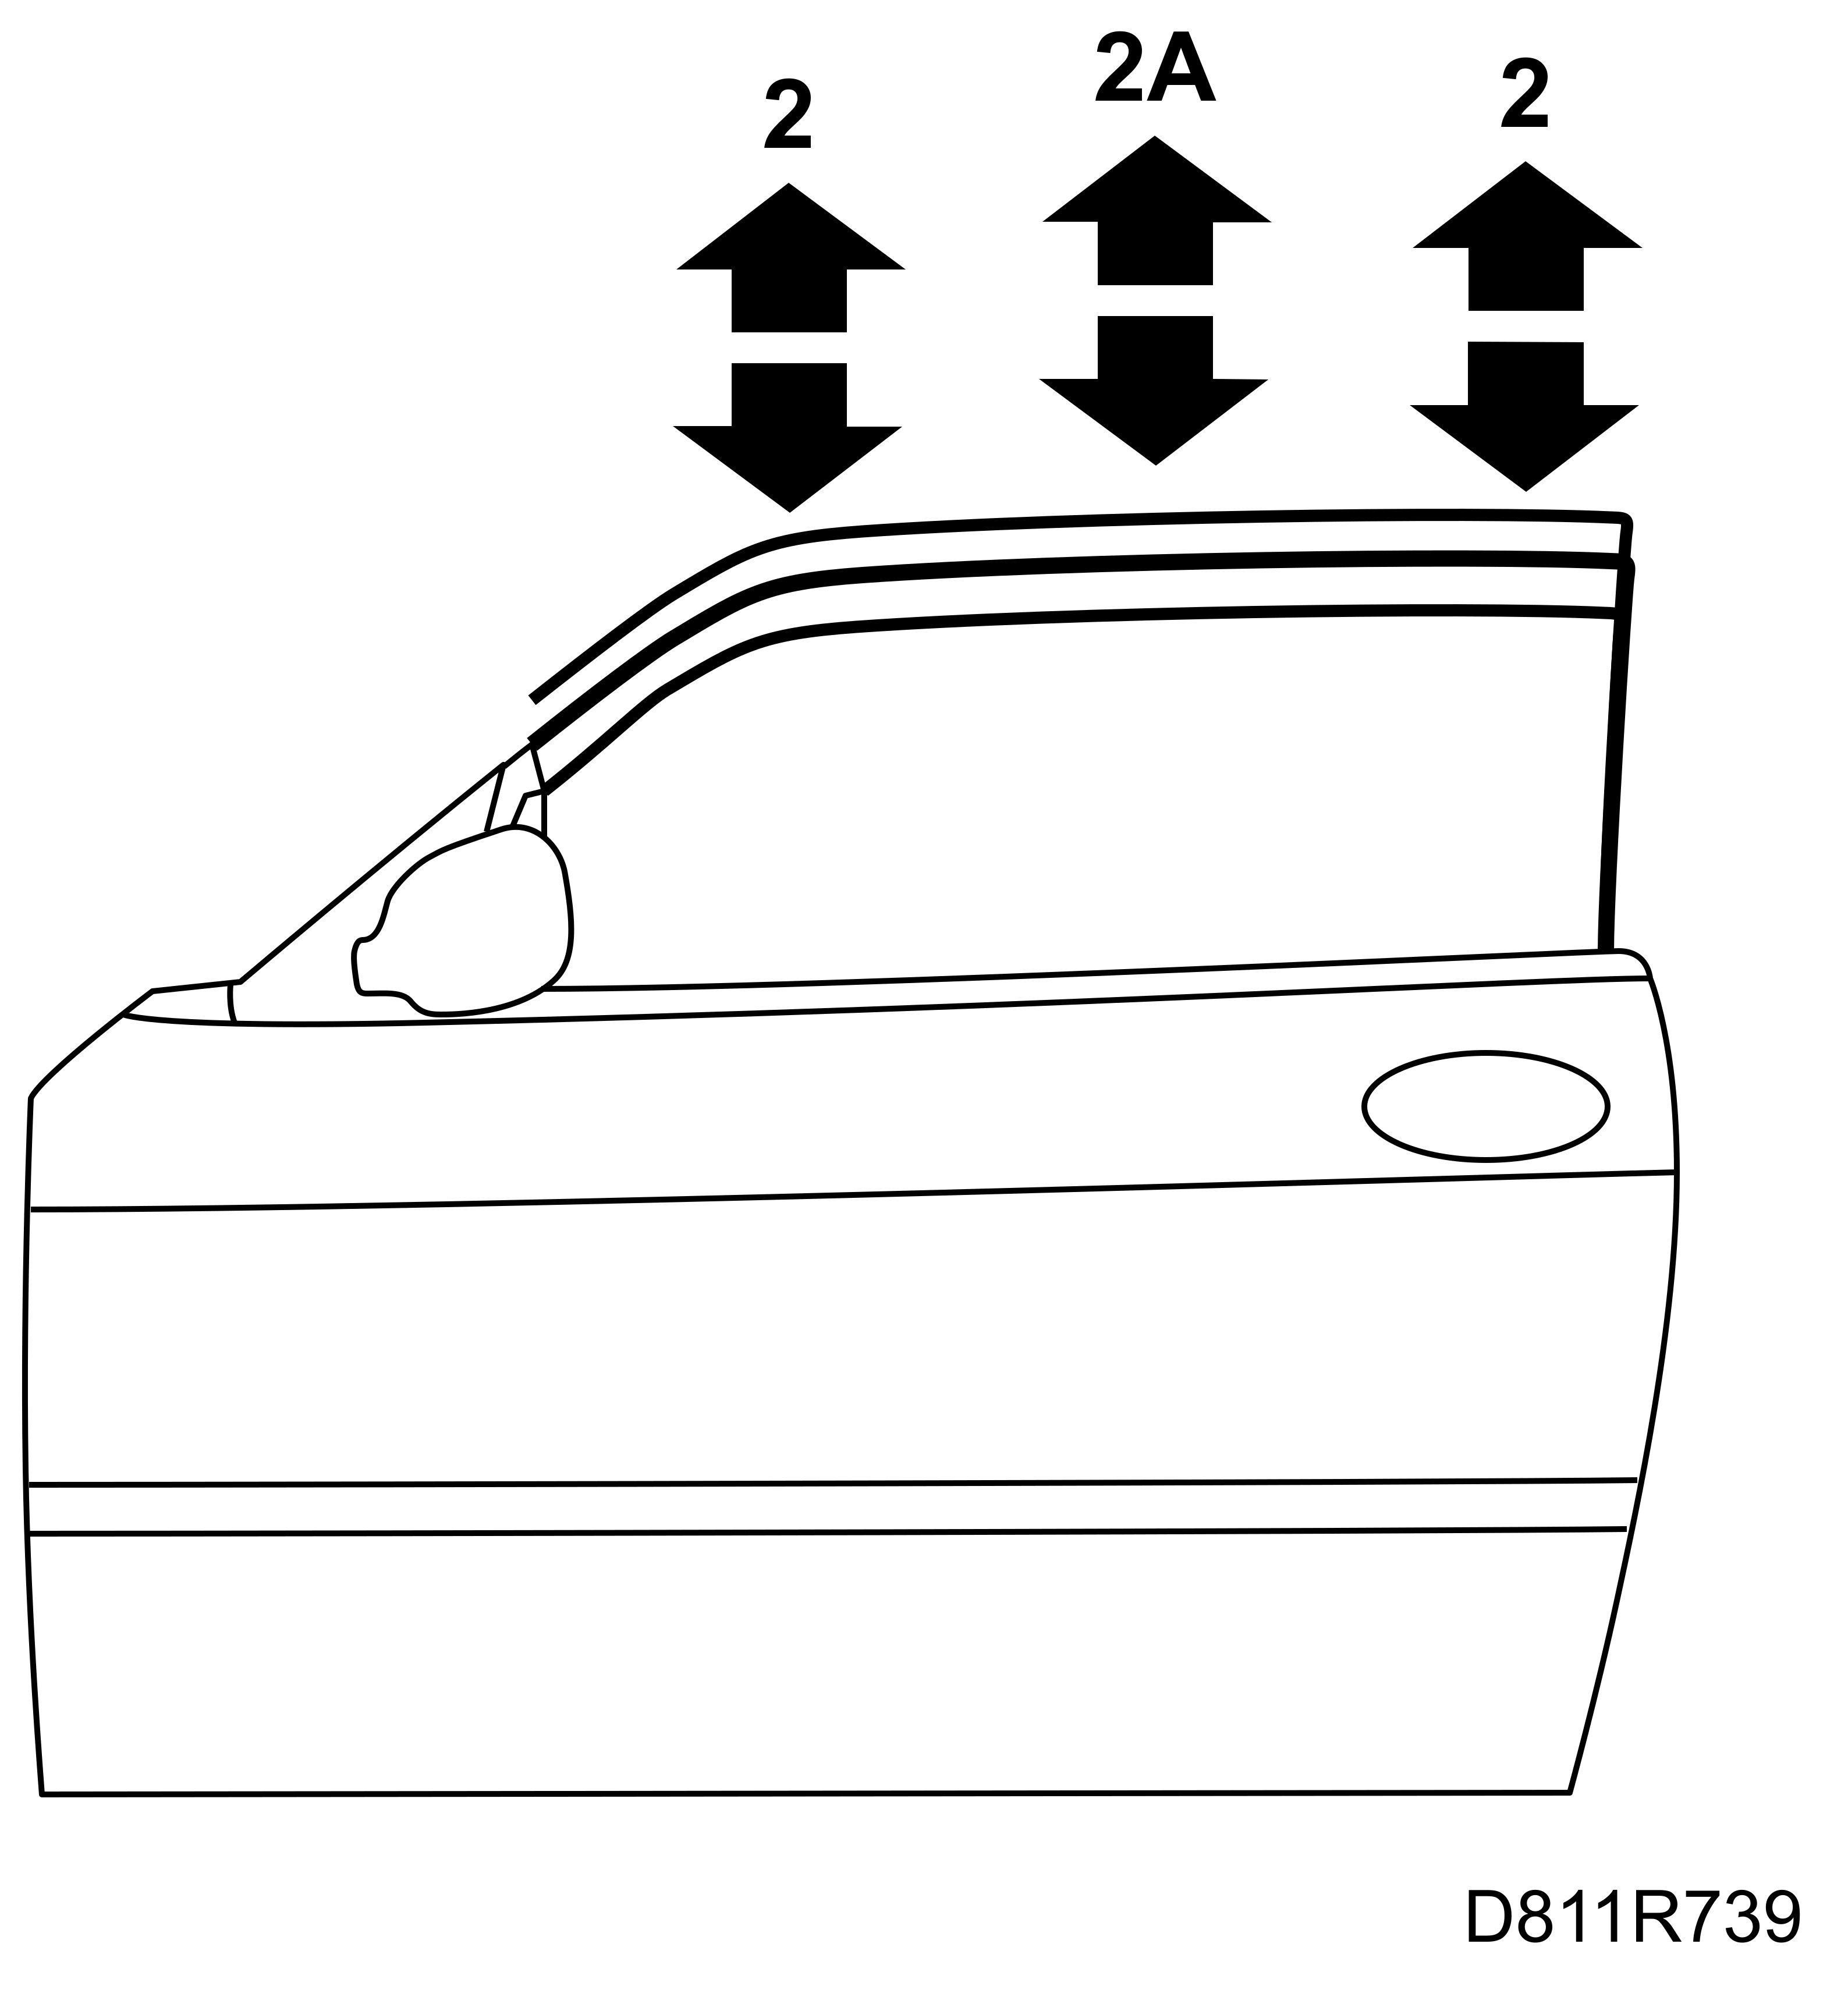
The height of the door window must be even with the soft top seals so that the pressure against them is equal from the front edge to the rear edge of the door window. The edge of the door window should be positioned under the lip of the seals. See step 9 under "Door window alignment". After adjustment, proceed directly to step 9.

|
|
5.
|
From VIN 17008621, ADJUSTMENT 2 and ADJUSTMENT 2A:
Alignment affects the vertical door window position separately with regard to the front and rear sections of the door window's upper edge.
The height of the door window must be even with the soft top seals so that the pressure against them is equal from the front edge to the rear edge of the door window. The edge of the door window should be positioned under the lip of the seal. See step 9 under "Door window alignment".
|
|
6.
|
From VIN 17008621, ADJUSTMENT 2 and ADJUSTMENT 2A:
Loosen the adjusting nut for ADJUSTMENT 2A and raise the door window to the up position.
|
|
7.
|
From VIN 17008621, ADJUSTMENT 2 and ADJUSTMENT 2A:
Align both upper stops for ADJUSTMENT 2; lower and raise the door window again and check the alignment. One turn of the adjuster screw corresponds to a 1 mm height adjustment of the door window's upper edge.
|
|
8.
|
From VIN 17008621, ADJUSTMENT 2 and ADJUSTMENT 2A:
Check that the setting screws make contact with the stops in the door when the door window is in the up position. If there is any play between the setting screws and the stops, loosen the nuts for the door window's longitudinal alignment, ADJUSTMENT 4, so that the door window can be adjusted to the correct position. Secure the setting nuts (ADJUSTMENT 4) and check the upper stops.
|
|
9.
|
Check/adjust the door window mechanism. ADJUSTMENT 3.
Alignment affects the door window's longitudinal inclination, the height of the door window's trailing edge and distribution of the forces exerted by the mechanism on the front and rear lifting arms.
|
|
10.
|
The force exerted by the mechanism must be distributed equally between the front and rear lifting arms. The pressure exerted by the door window against the soft top seals must be even. The edge of the door window should be positioned under the lip of the seals.
|
|
11.
|
Lower and raise the door window. The front section of the door window's upper edge is permitted to rise slightly before the rear section of the upper edge. If the front edge of the door window is pushed strongly inwards when the door window reaches the upper stops (can be seen alongside the seal for the front support rail), excess force is exerted on the front lifting arm. Adjust by distributing more force to the rear lifting arm.
|
|
12.
|
Check the door window alignment.
Before VIN 17008621:
This check is not completed, proceed to step 13 under "Door window alignment".
From VIN 17008621:
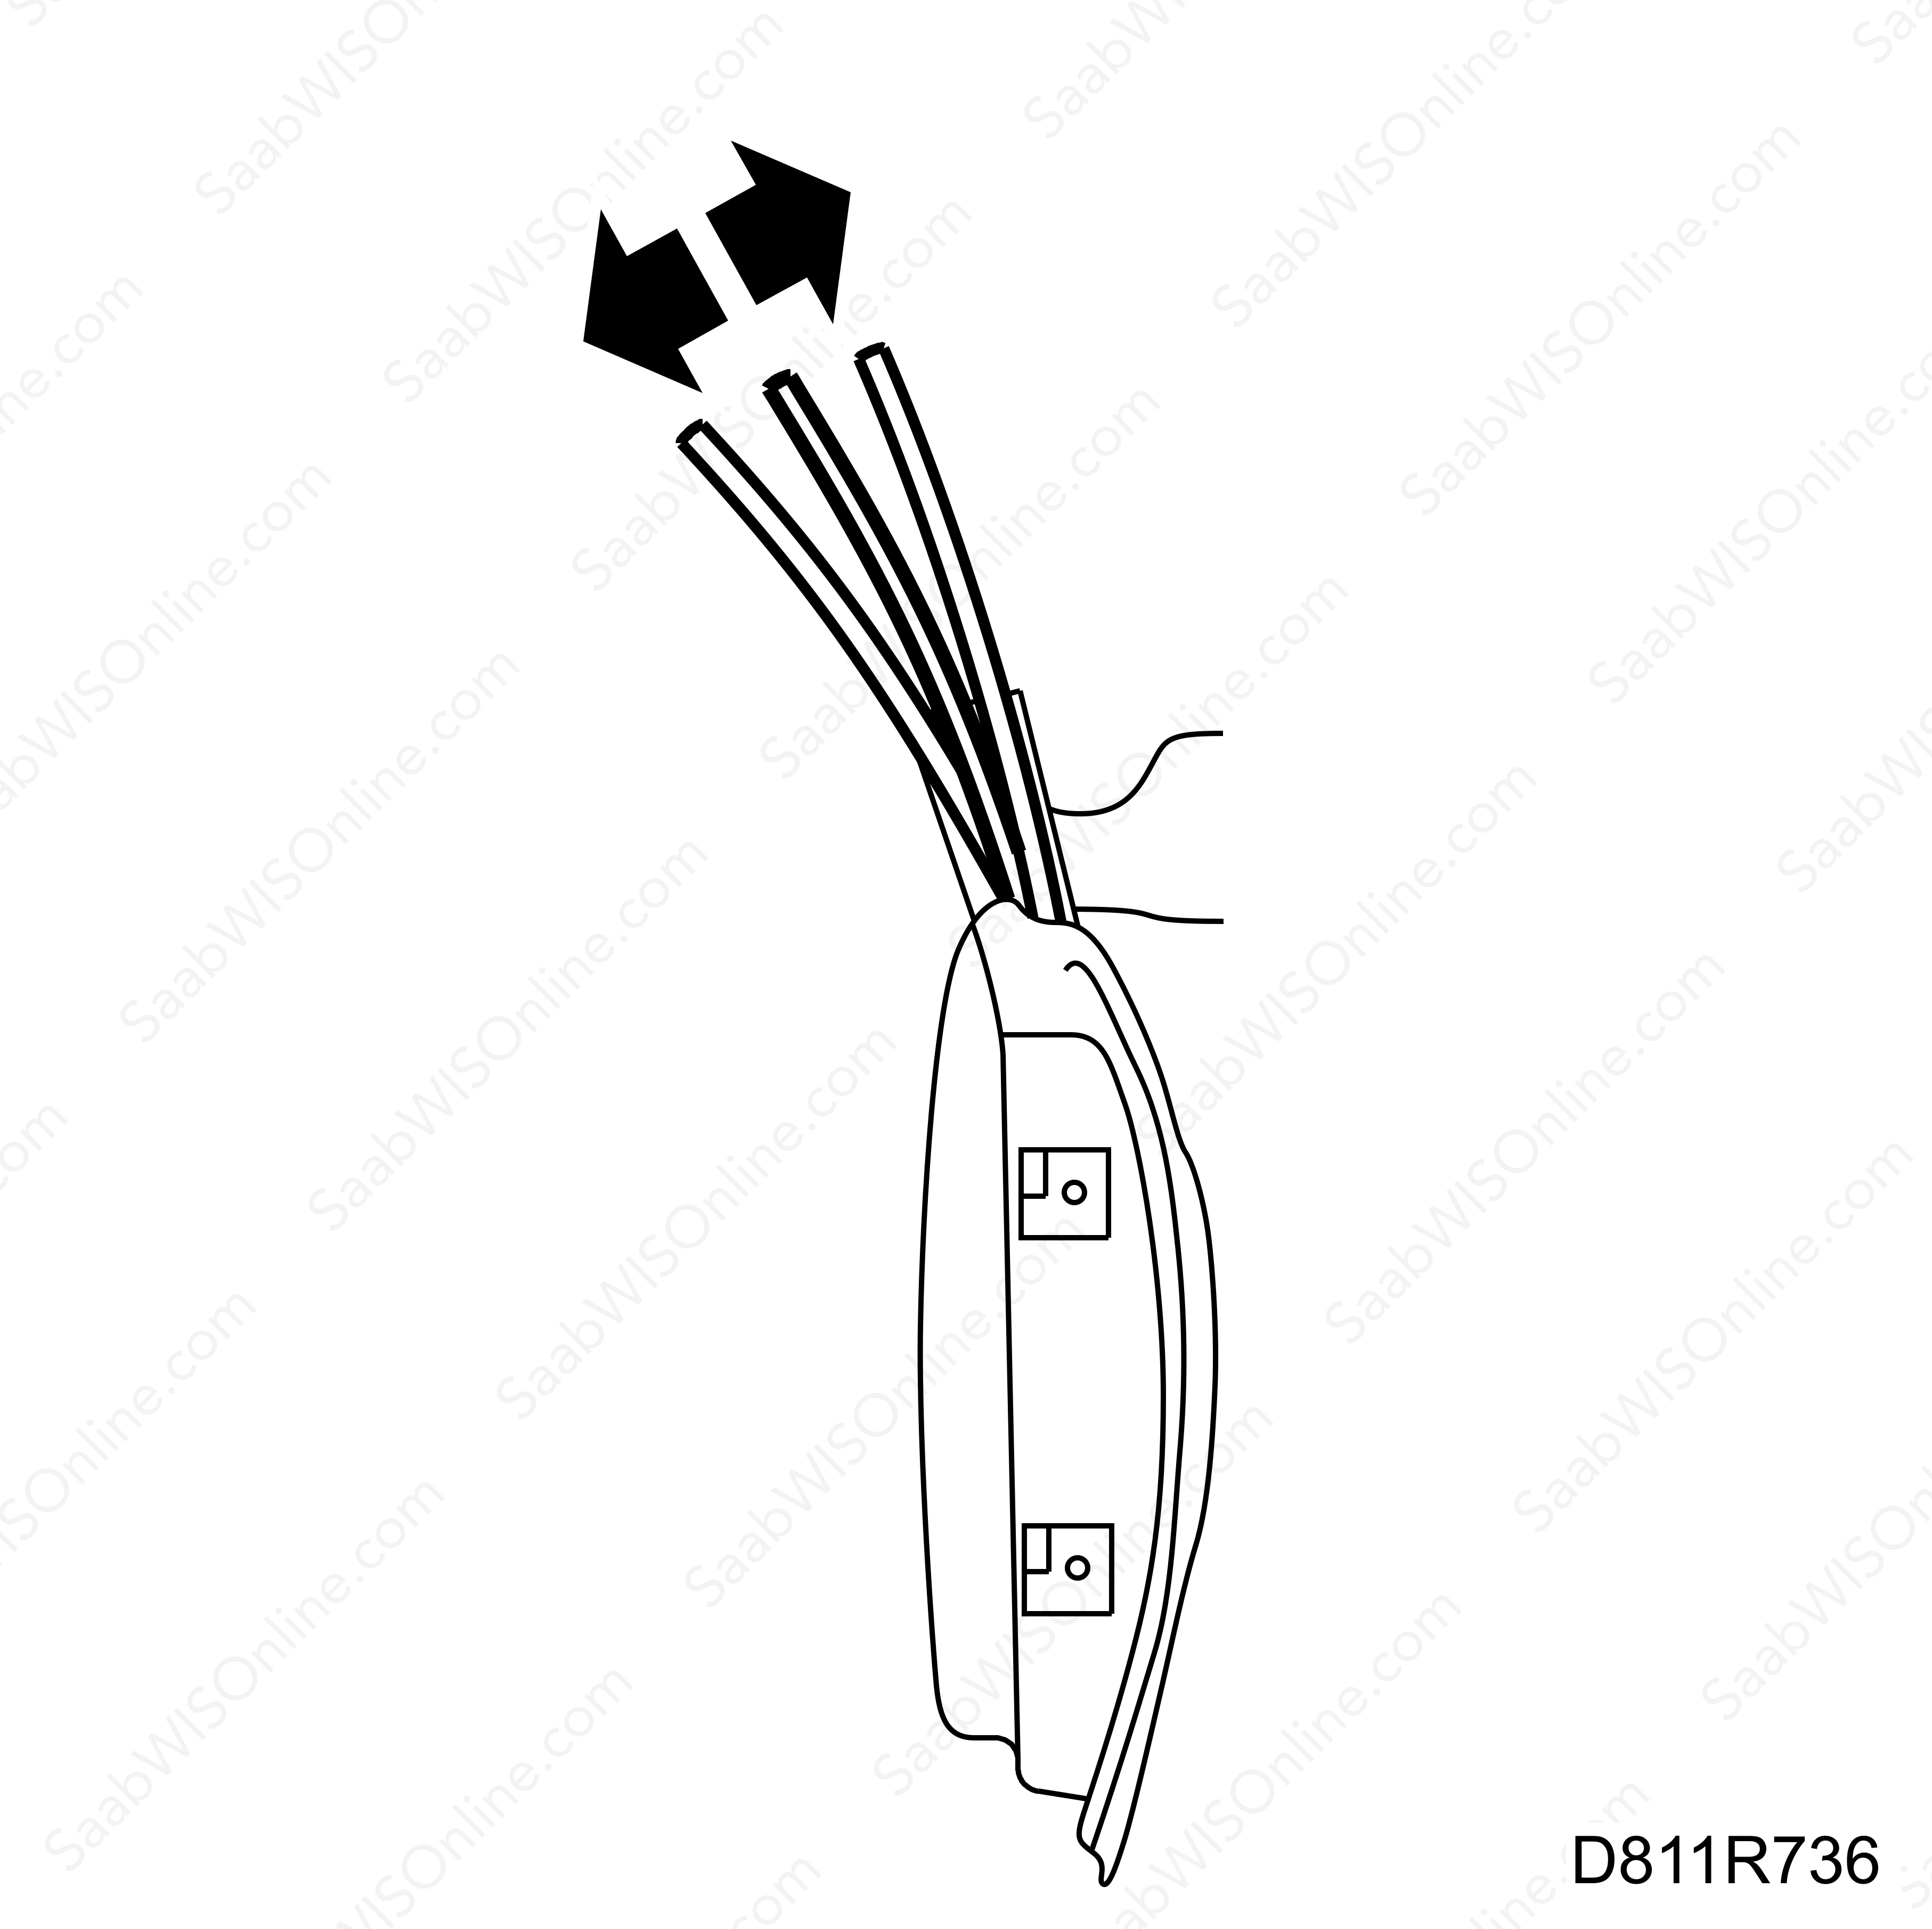
Raise the door window to its up position with the door closed. Place two pieces of tape on the door window directly above the outer seal at the approximate positions of both upper stops.
From VIN 17008621:
Open the door and close it again. Check the distance between the pieces of tape and the outer seal. If the distance between one of the pieces of tape and the outer seal is greater than the other, the force exerted by the lifting arm is insufficient. Increase the force of the lifting arm with help from ADJUSTMENT 3, see steps 9-13 under "Door window alignment".
|
|
13.
|
Secure the upper door window stops. ADJUSTMENT 2A.
Before VIN 17008621:
This check is not completed, proceed to step 14.
From VIN 17008621:
Secure the upper door window stops, ADJUSTMENT 2A.
|
|
14.
|
Check/adjust the door window mounting. ADJUSTMENT 4. Alignment affects the longitudinal door window position.
|
|
15.
|
The pressure against the windscreen frame seal must be equal. The front edge of the door window should be flush with the front support rail seal at the front edge of the door.
|
|
16.
|
If the longitudinal door window position requires adjustment, check that the setting screws for the upper stops make contact with the stops in the door when the door window is in the up position after adjusting, see step 3 under "Door window alignment".
|
|
17.
|
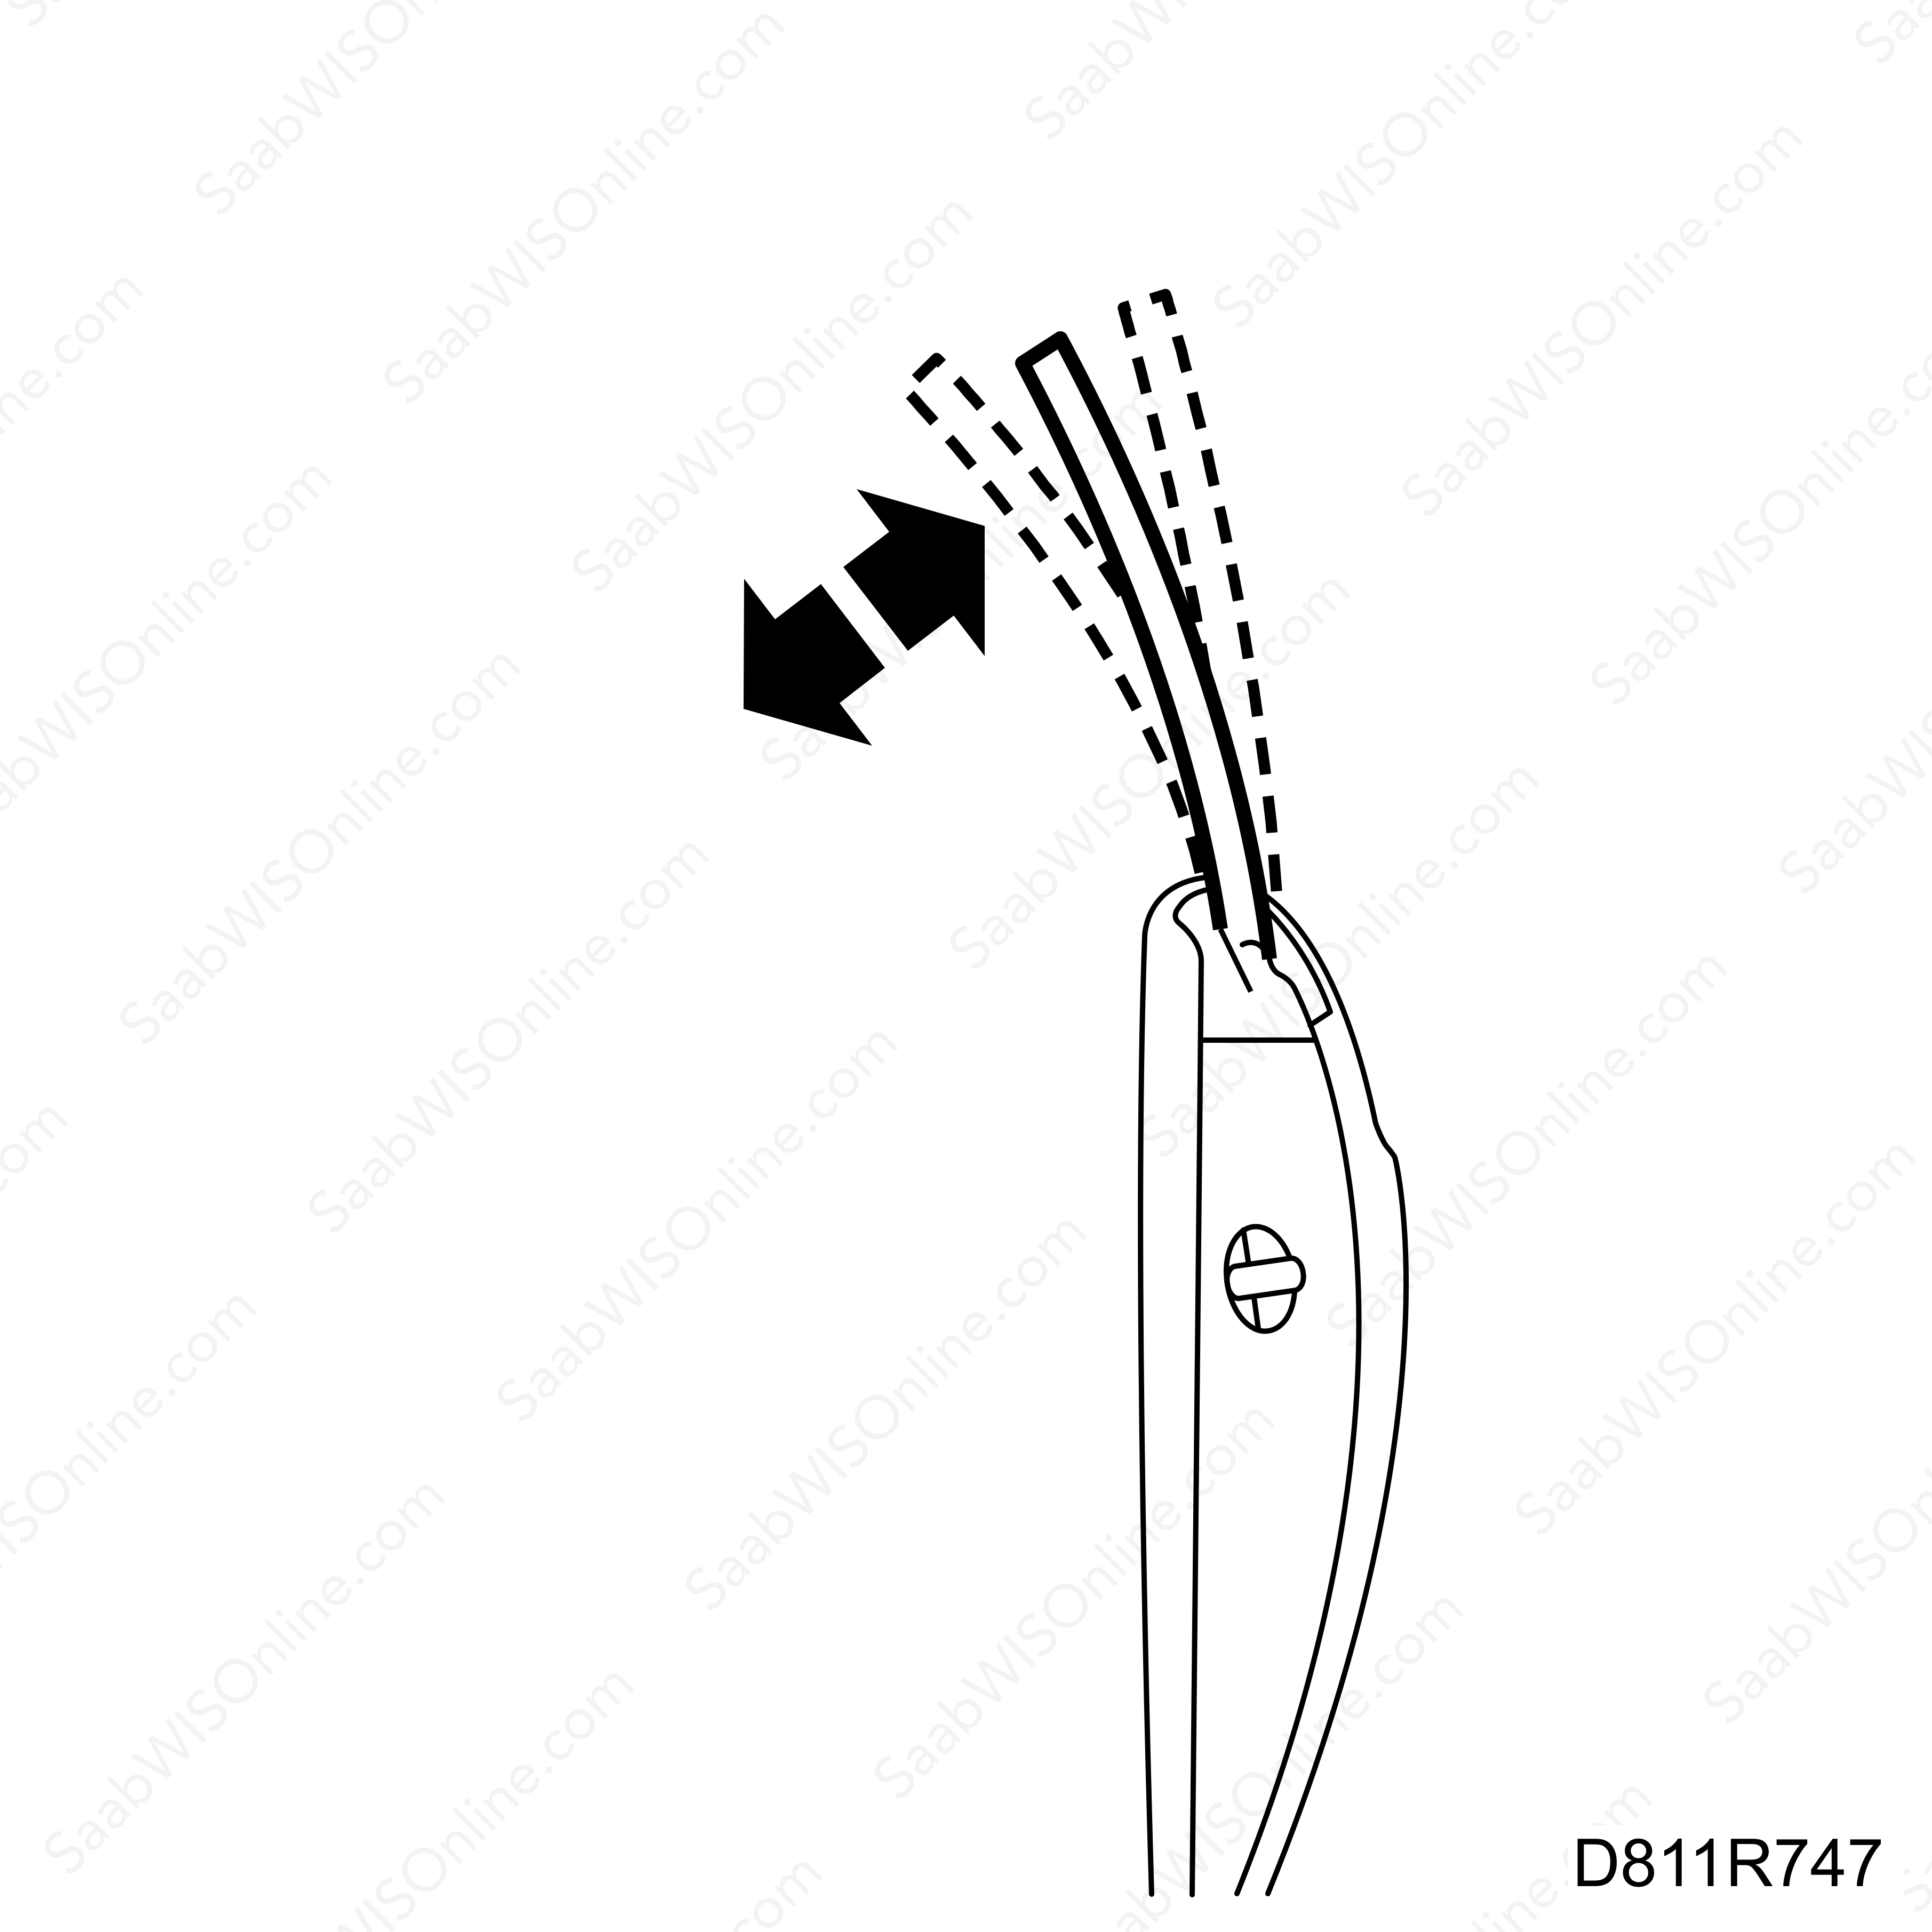
Check/adjust the rear support rail, ADJUSTMENT 5. Lateral alignment affects the amount of pressure exerted by the upper door window edge against the soft top seals.

|
|
18.
|
The door window should press the soft top seals inwards when the door is closed. The edge of the door window should be positioned under the lip of the seals.
|
|
Note
|
|
References to the alignment points in "Adjustment points for the side window" can be found in the following instructions.
|
|
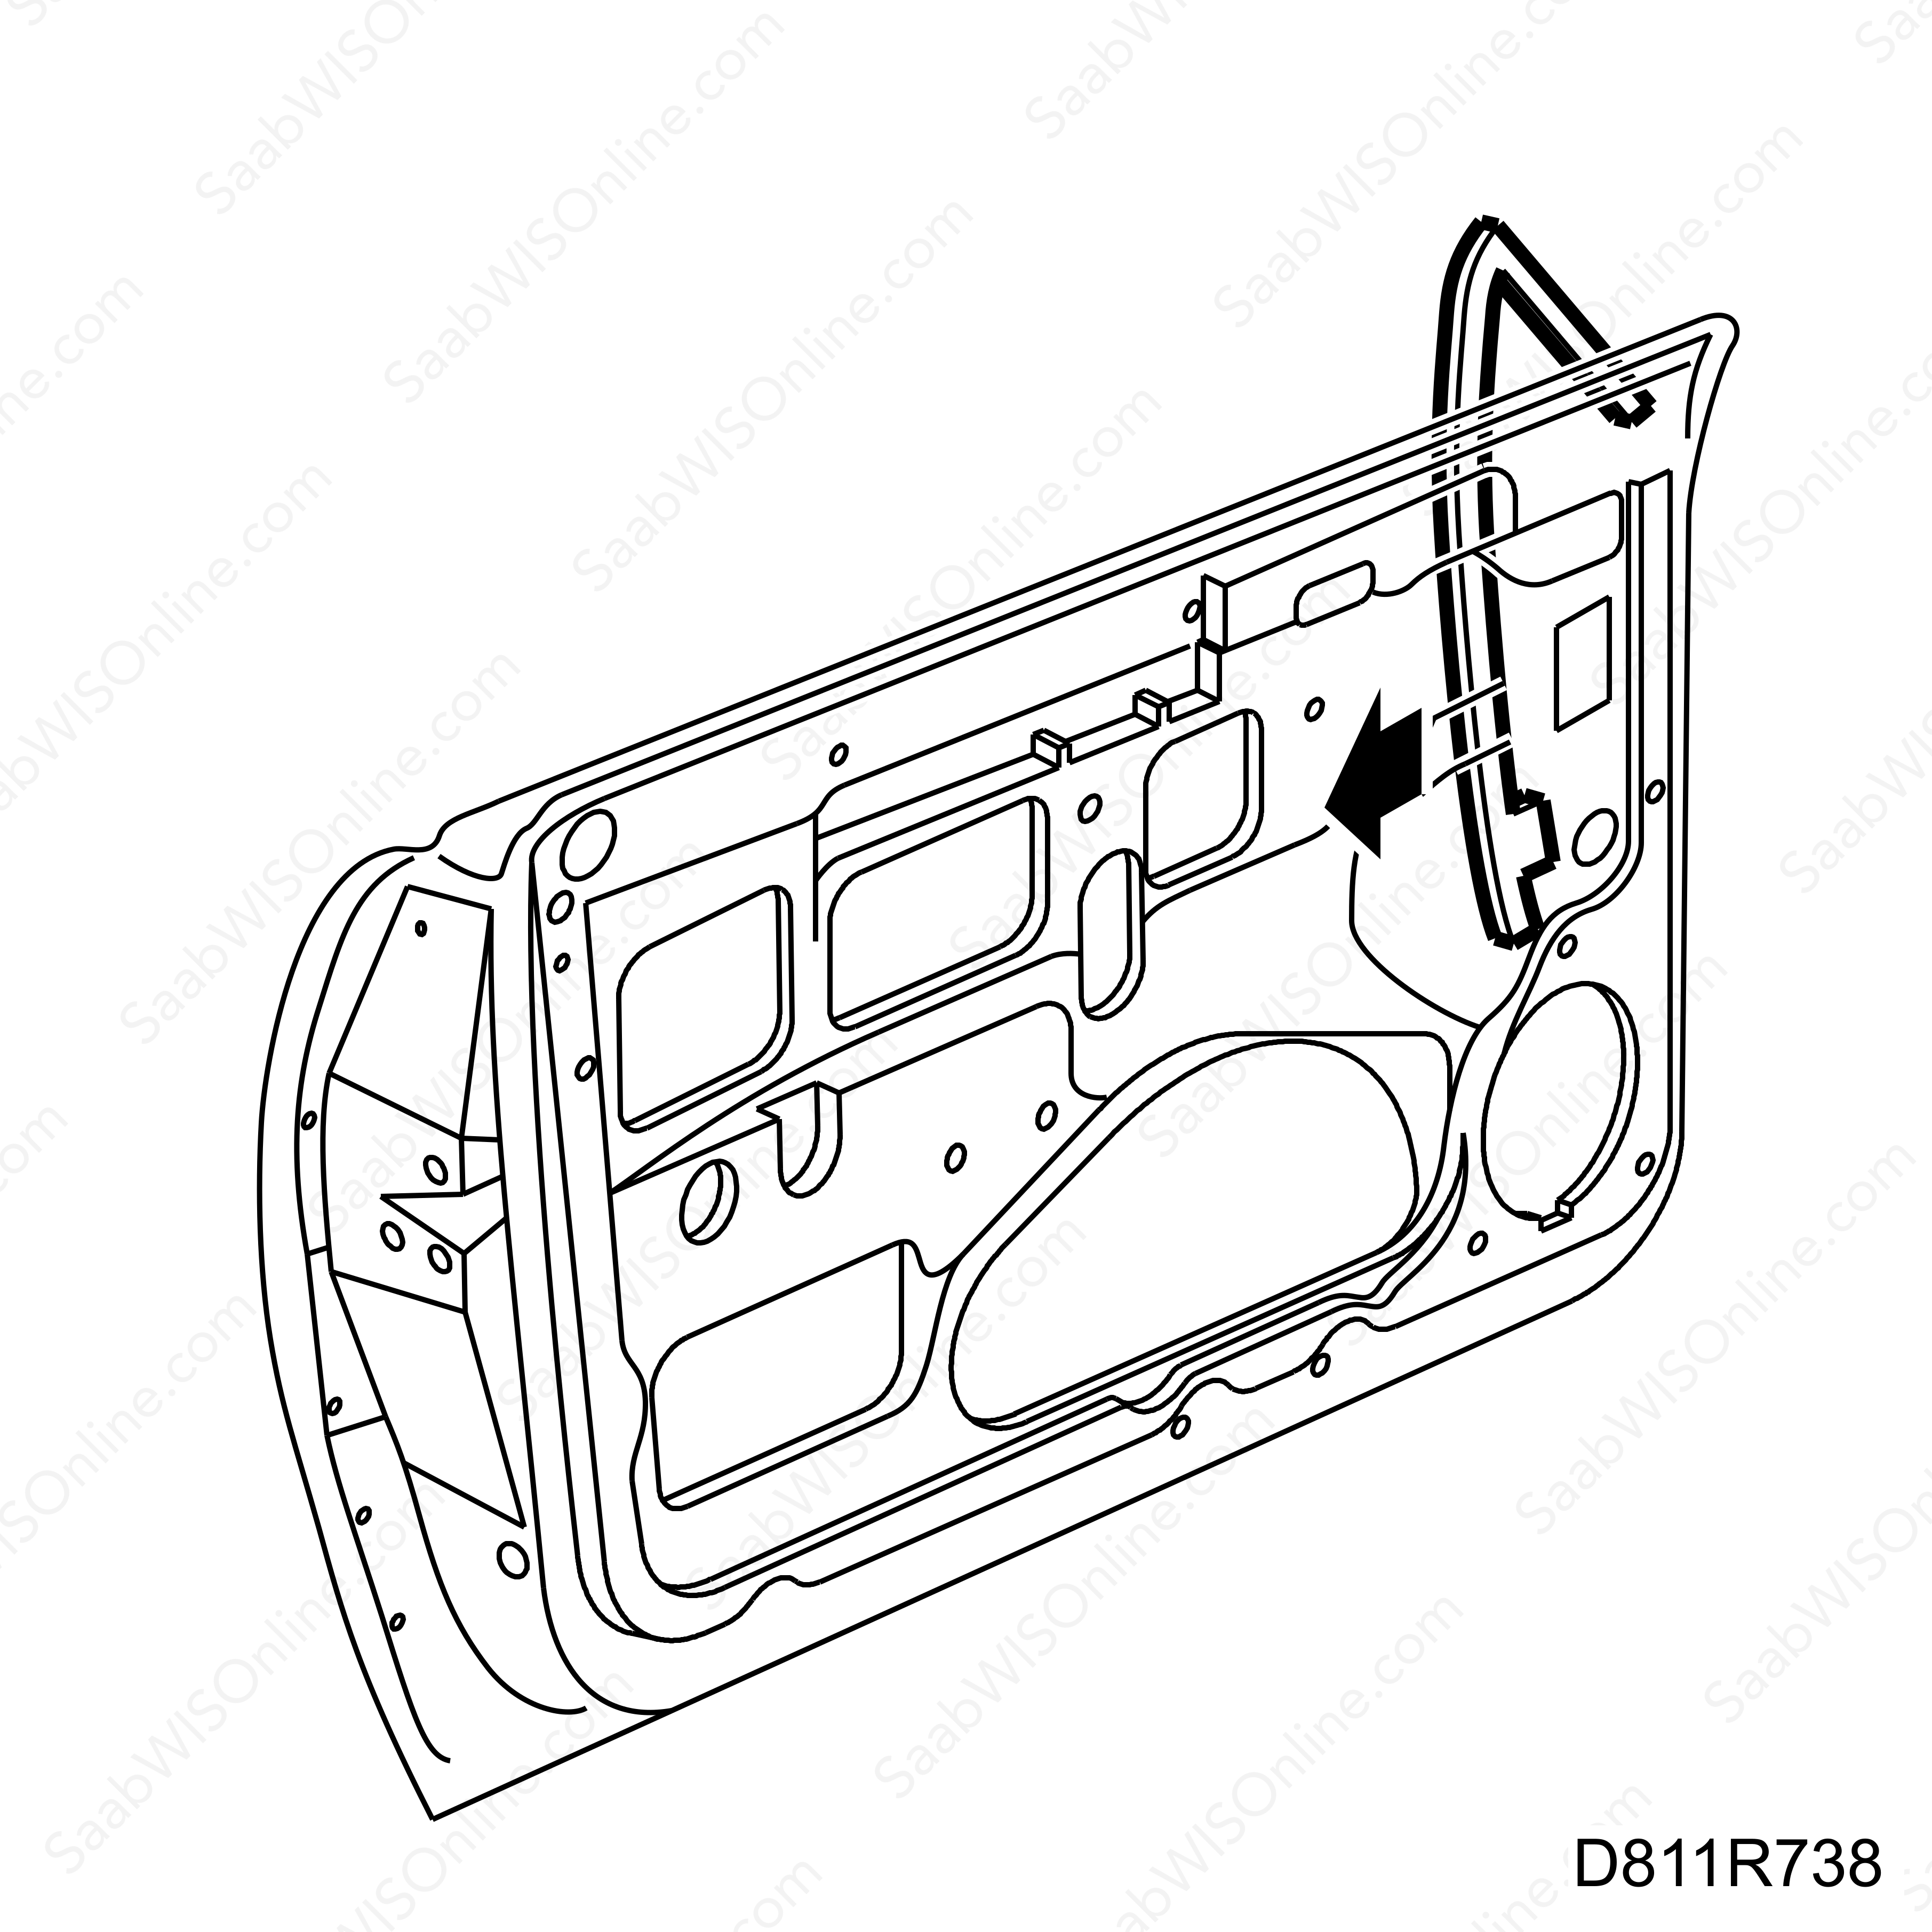
Note
|
|
In order to check/adjust the side window, the interior equipment, rear speaker and inner seal must be removed.
|
|
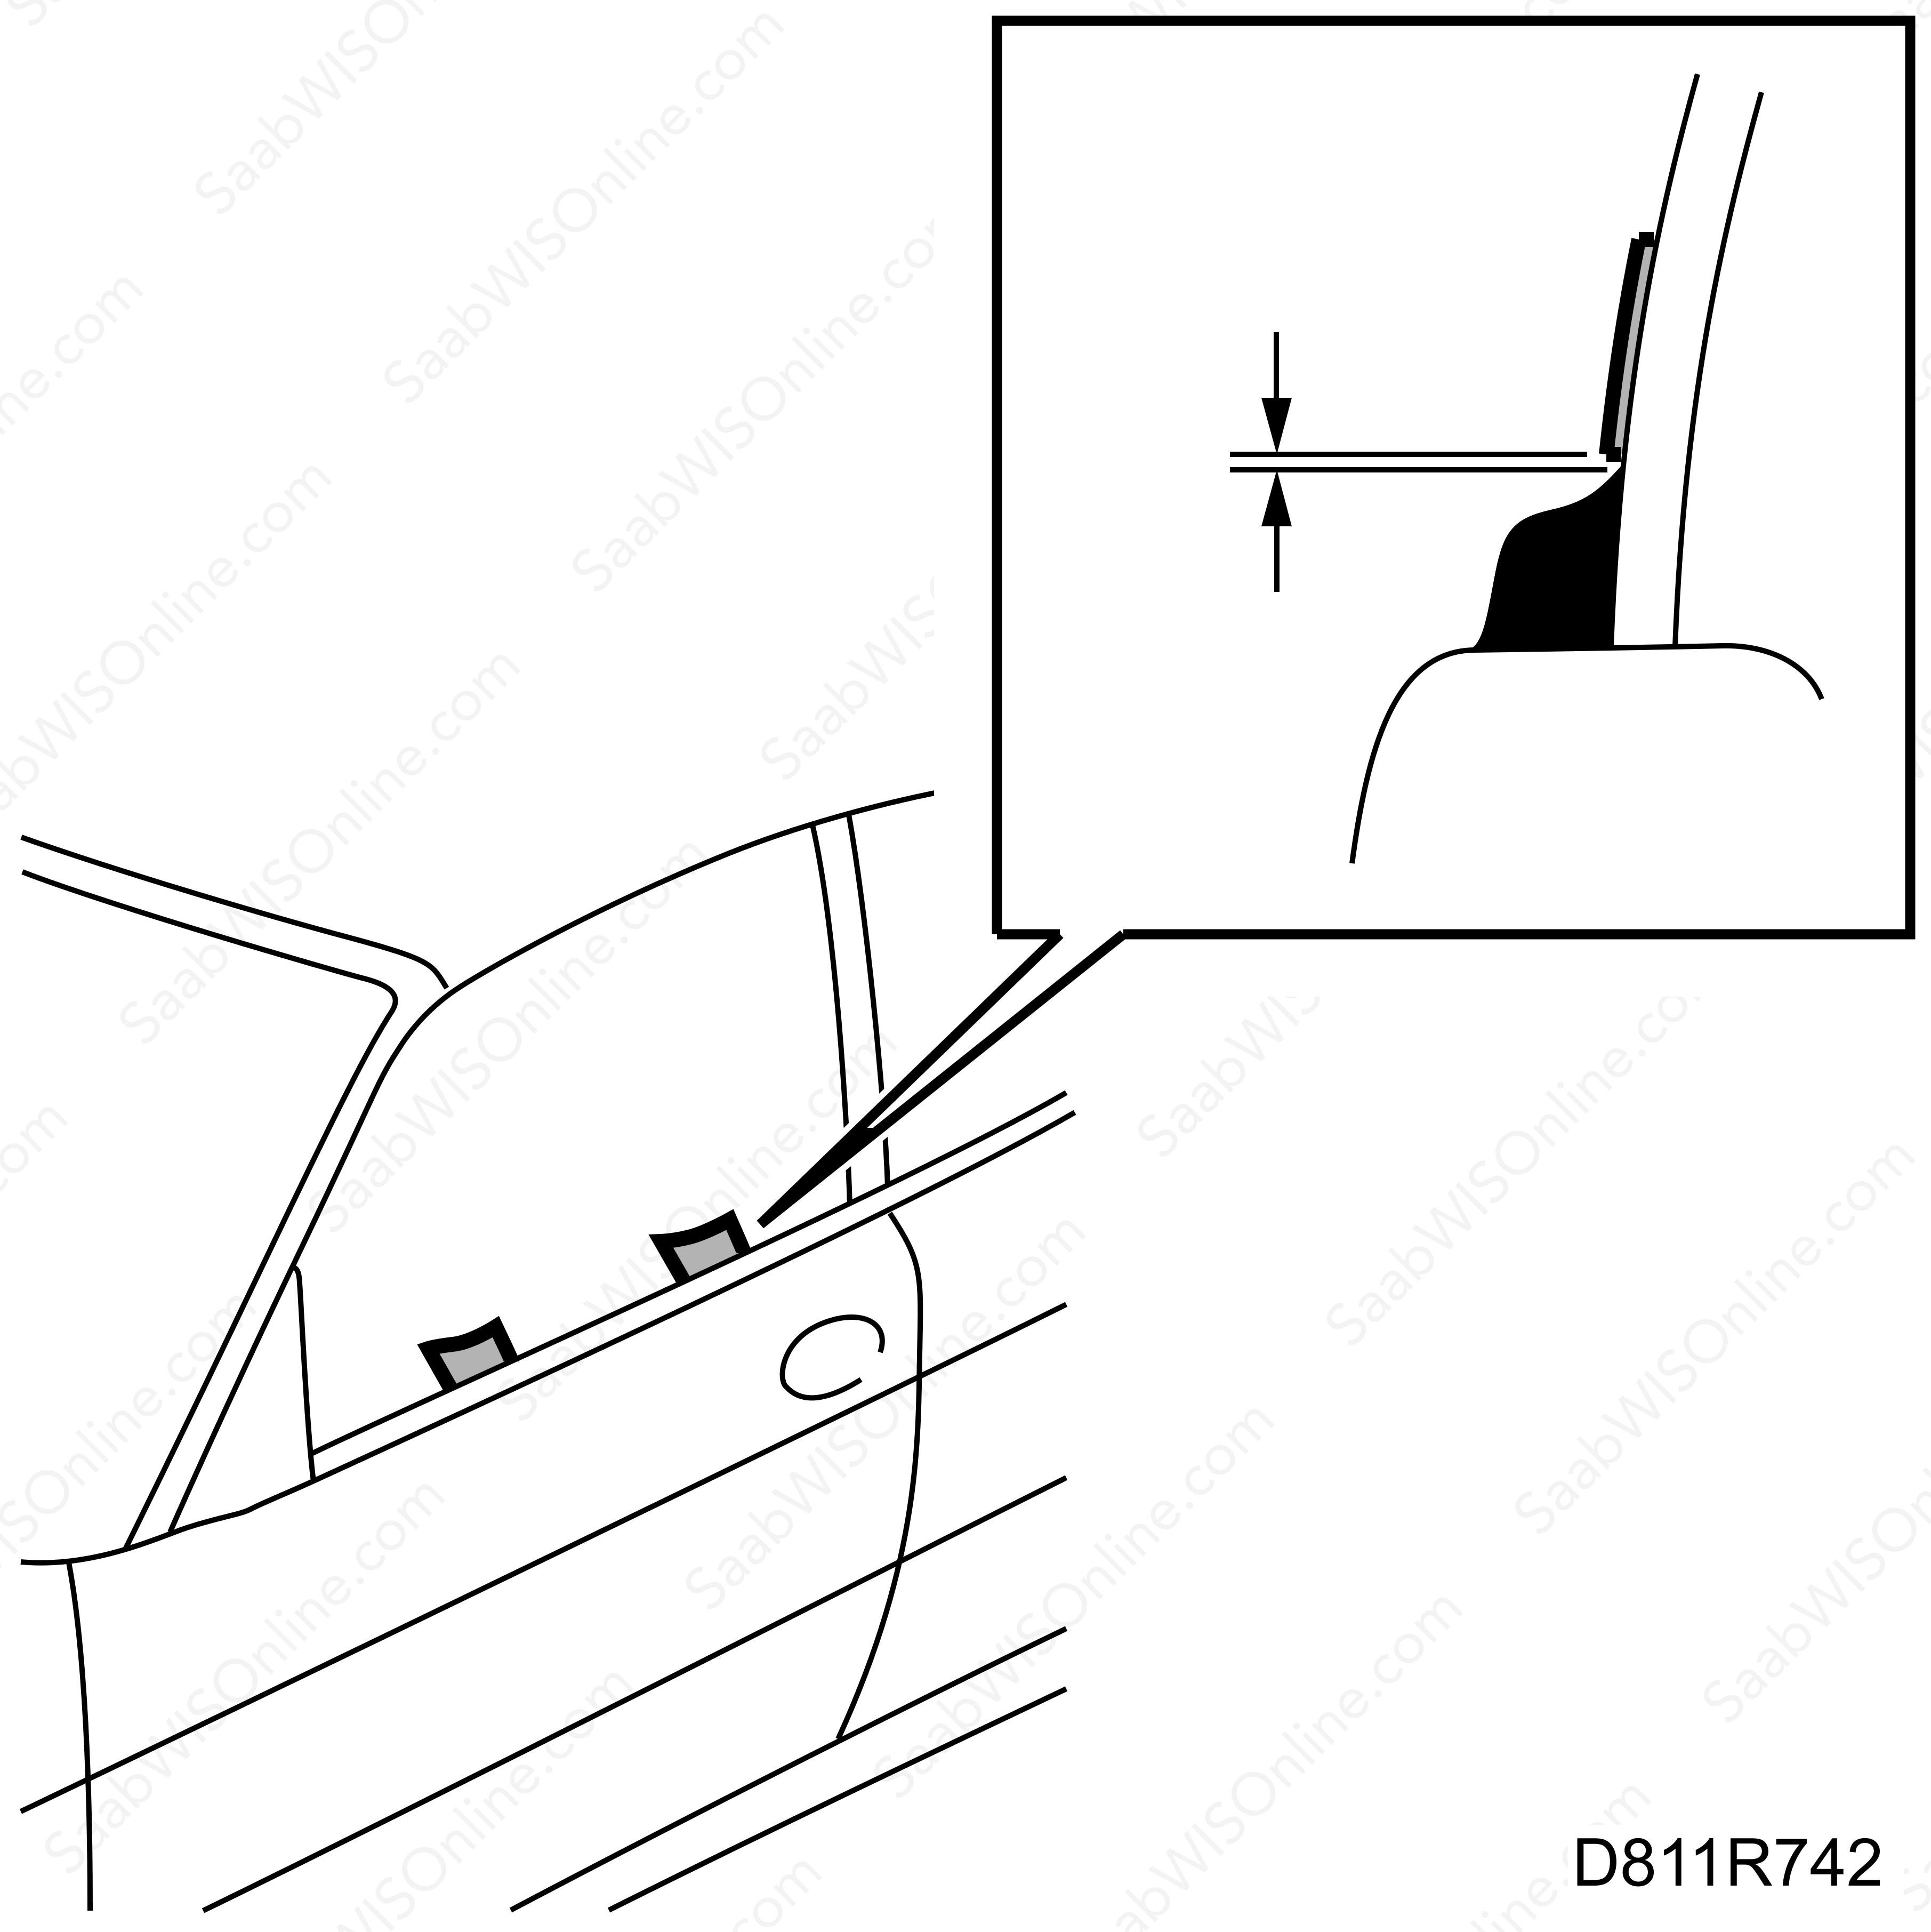
1.
|
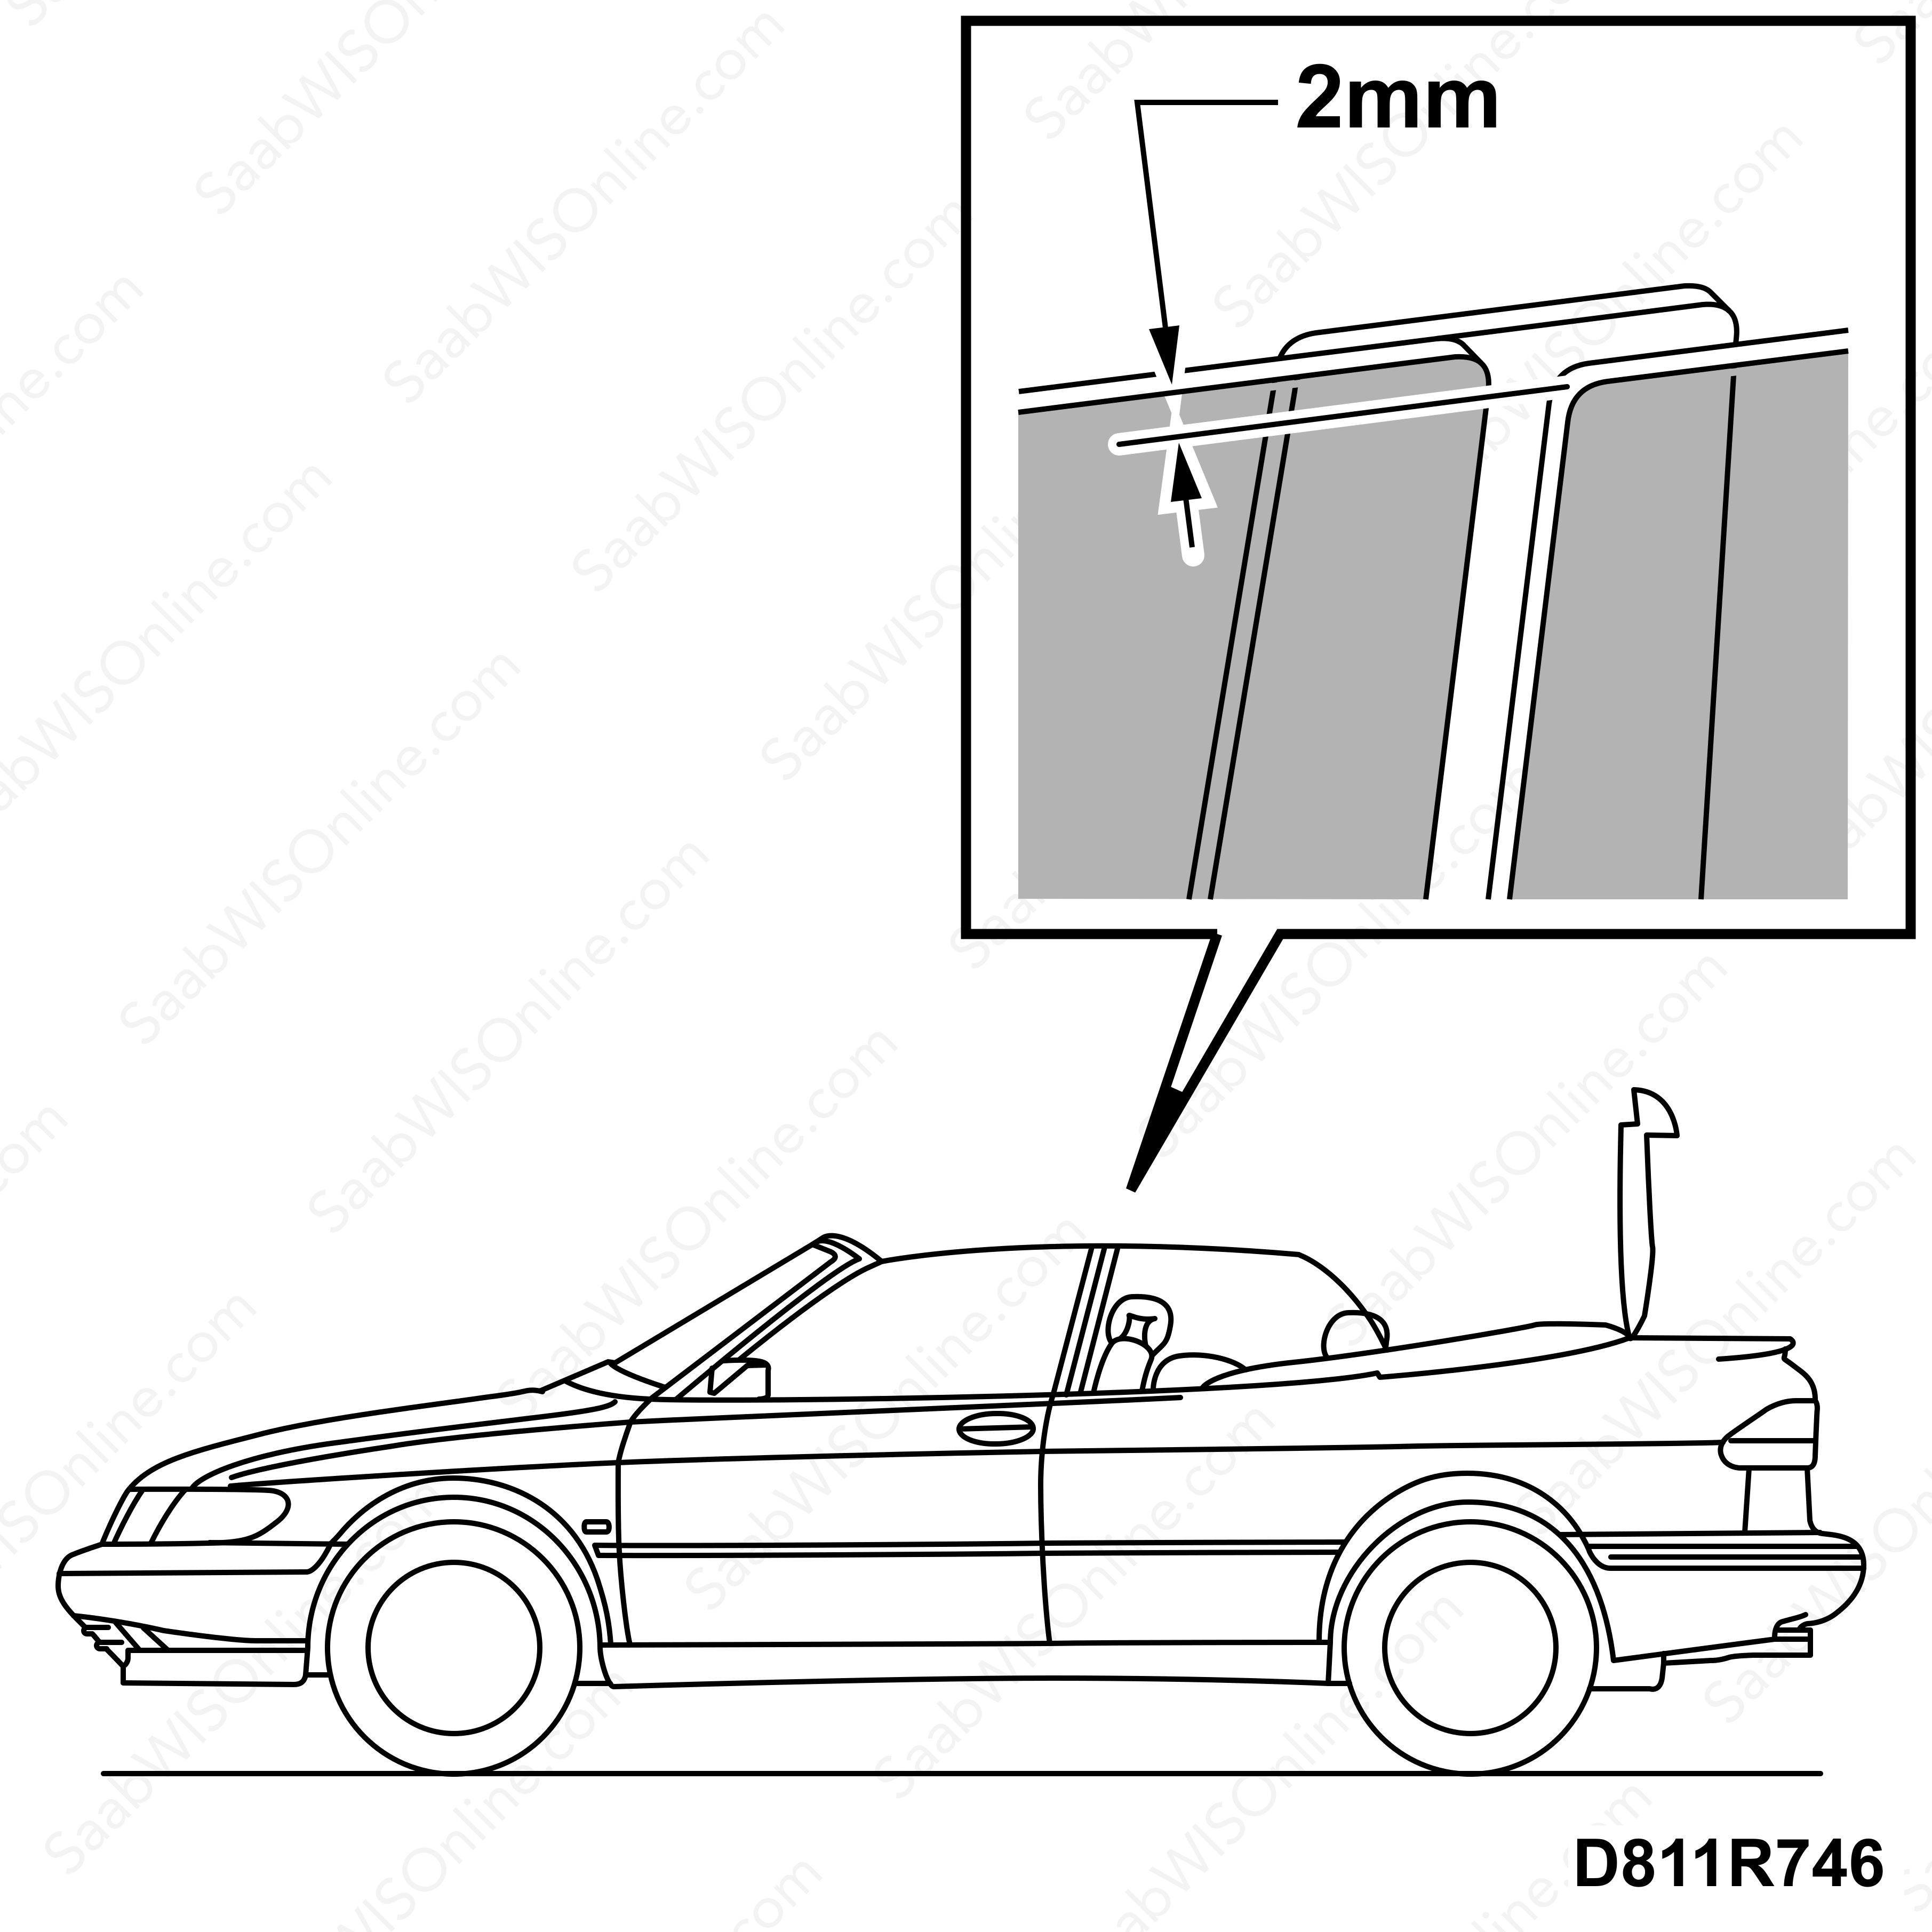
Check/adjust the upper side window stops and extra upper stop. ADJUSTMENT 6 and ADJUSTMENT 9.
Before VIN W7055419/X7002872, ADJUSTMENT 6:
Alignment affects the vertical side window position.
Adjust the height of the side window's upper edge so that it is 2 mm below the upper edge of the door window when both the door window and the side window are in the up position. Check the adjustment with an open soft top.
From VIN W7055419/X7002872, ADJUSTMENT 6 and ADJUSTMENT 9:
Alignment affects the vertical side window position.
Remove the piece of tape near the water separator and loosen the extra upper stop, ADJUSTMENT 9.
Adjust the height of side window's upper edge with the two upper stops, ADJUSTMENT 6, so that it is 2 mm below the upper edge of the door window when both the door window and the side window are in the up position.
Check the adjustment with an open soft top. Raise the side window.
Move the extra stop, ADJUSTMENT 9, forwards and secure the nut. Cover the hole in the water separator with a piece of tape.
|
|
2.
|
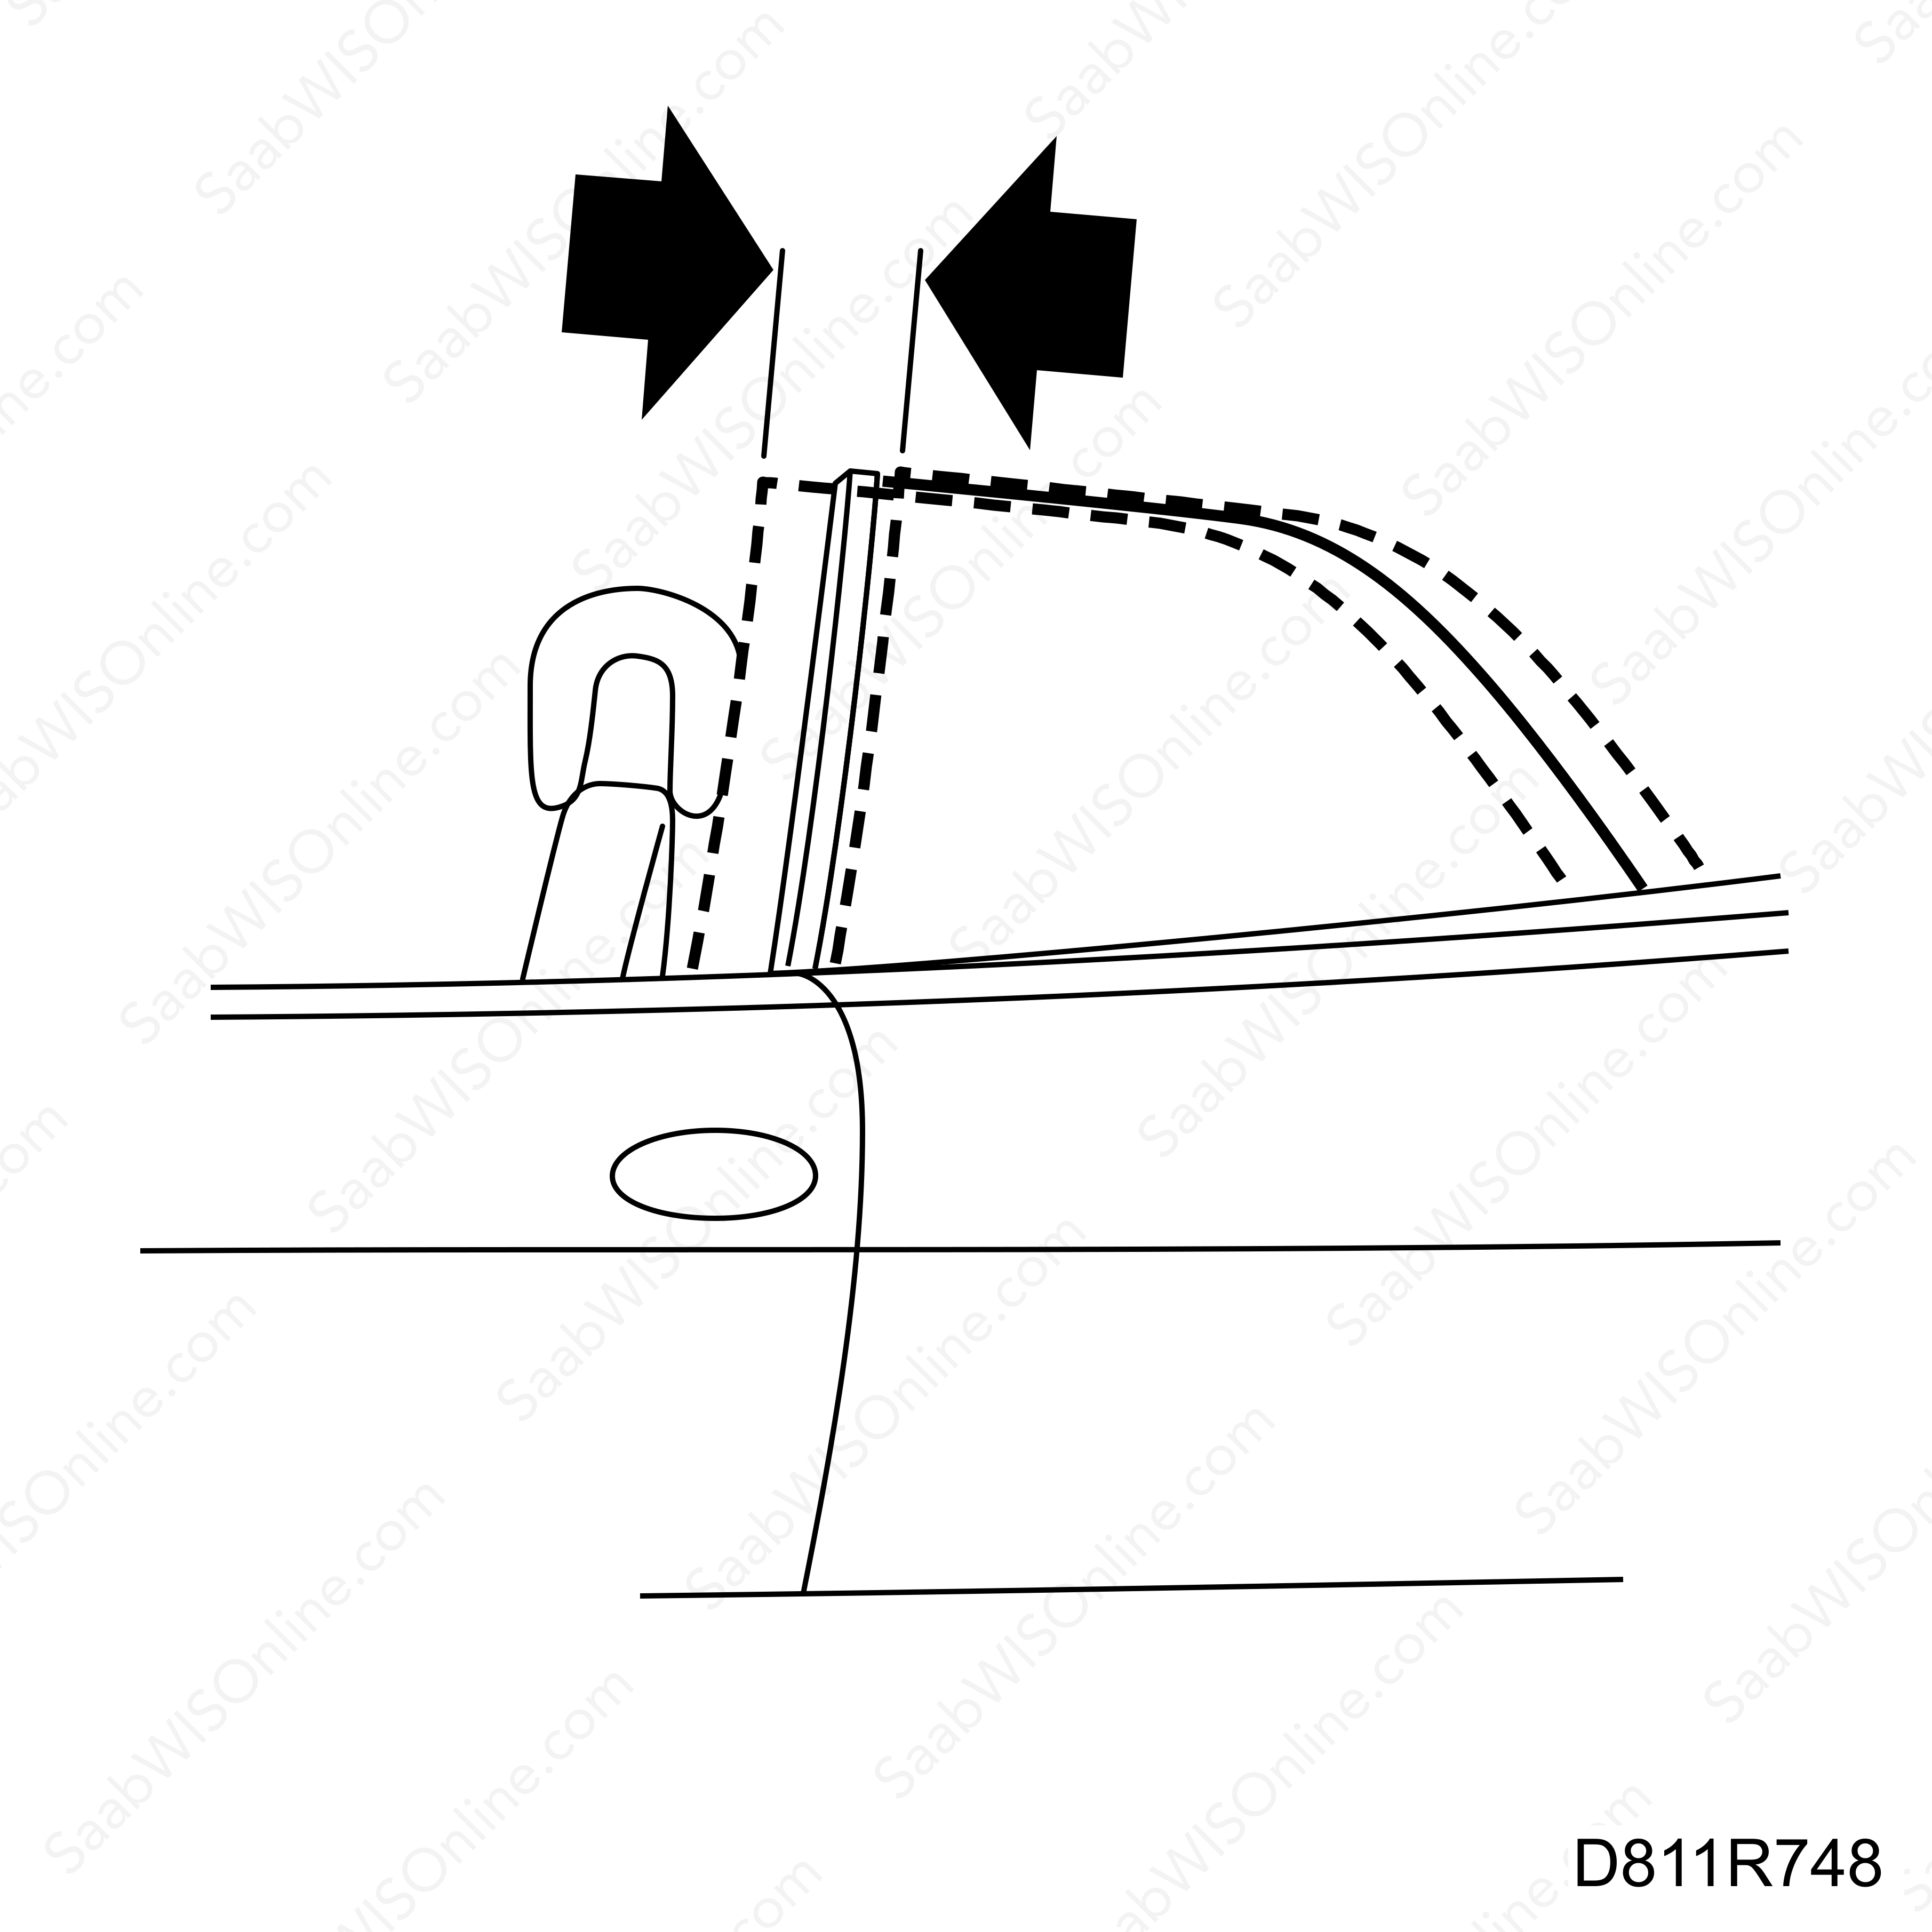
Check/adjust the lateral alignment of the side window mountings. ADJUSTMENT 7. Alignment affects how hard the side window presses against the soft top seals.
The side window should press the soft top seals inwards. The edge of the side window should be positioned under the lip of the seals. The pressure against the soft top seals should be the same as for the door window.
|
|
3.
|
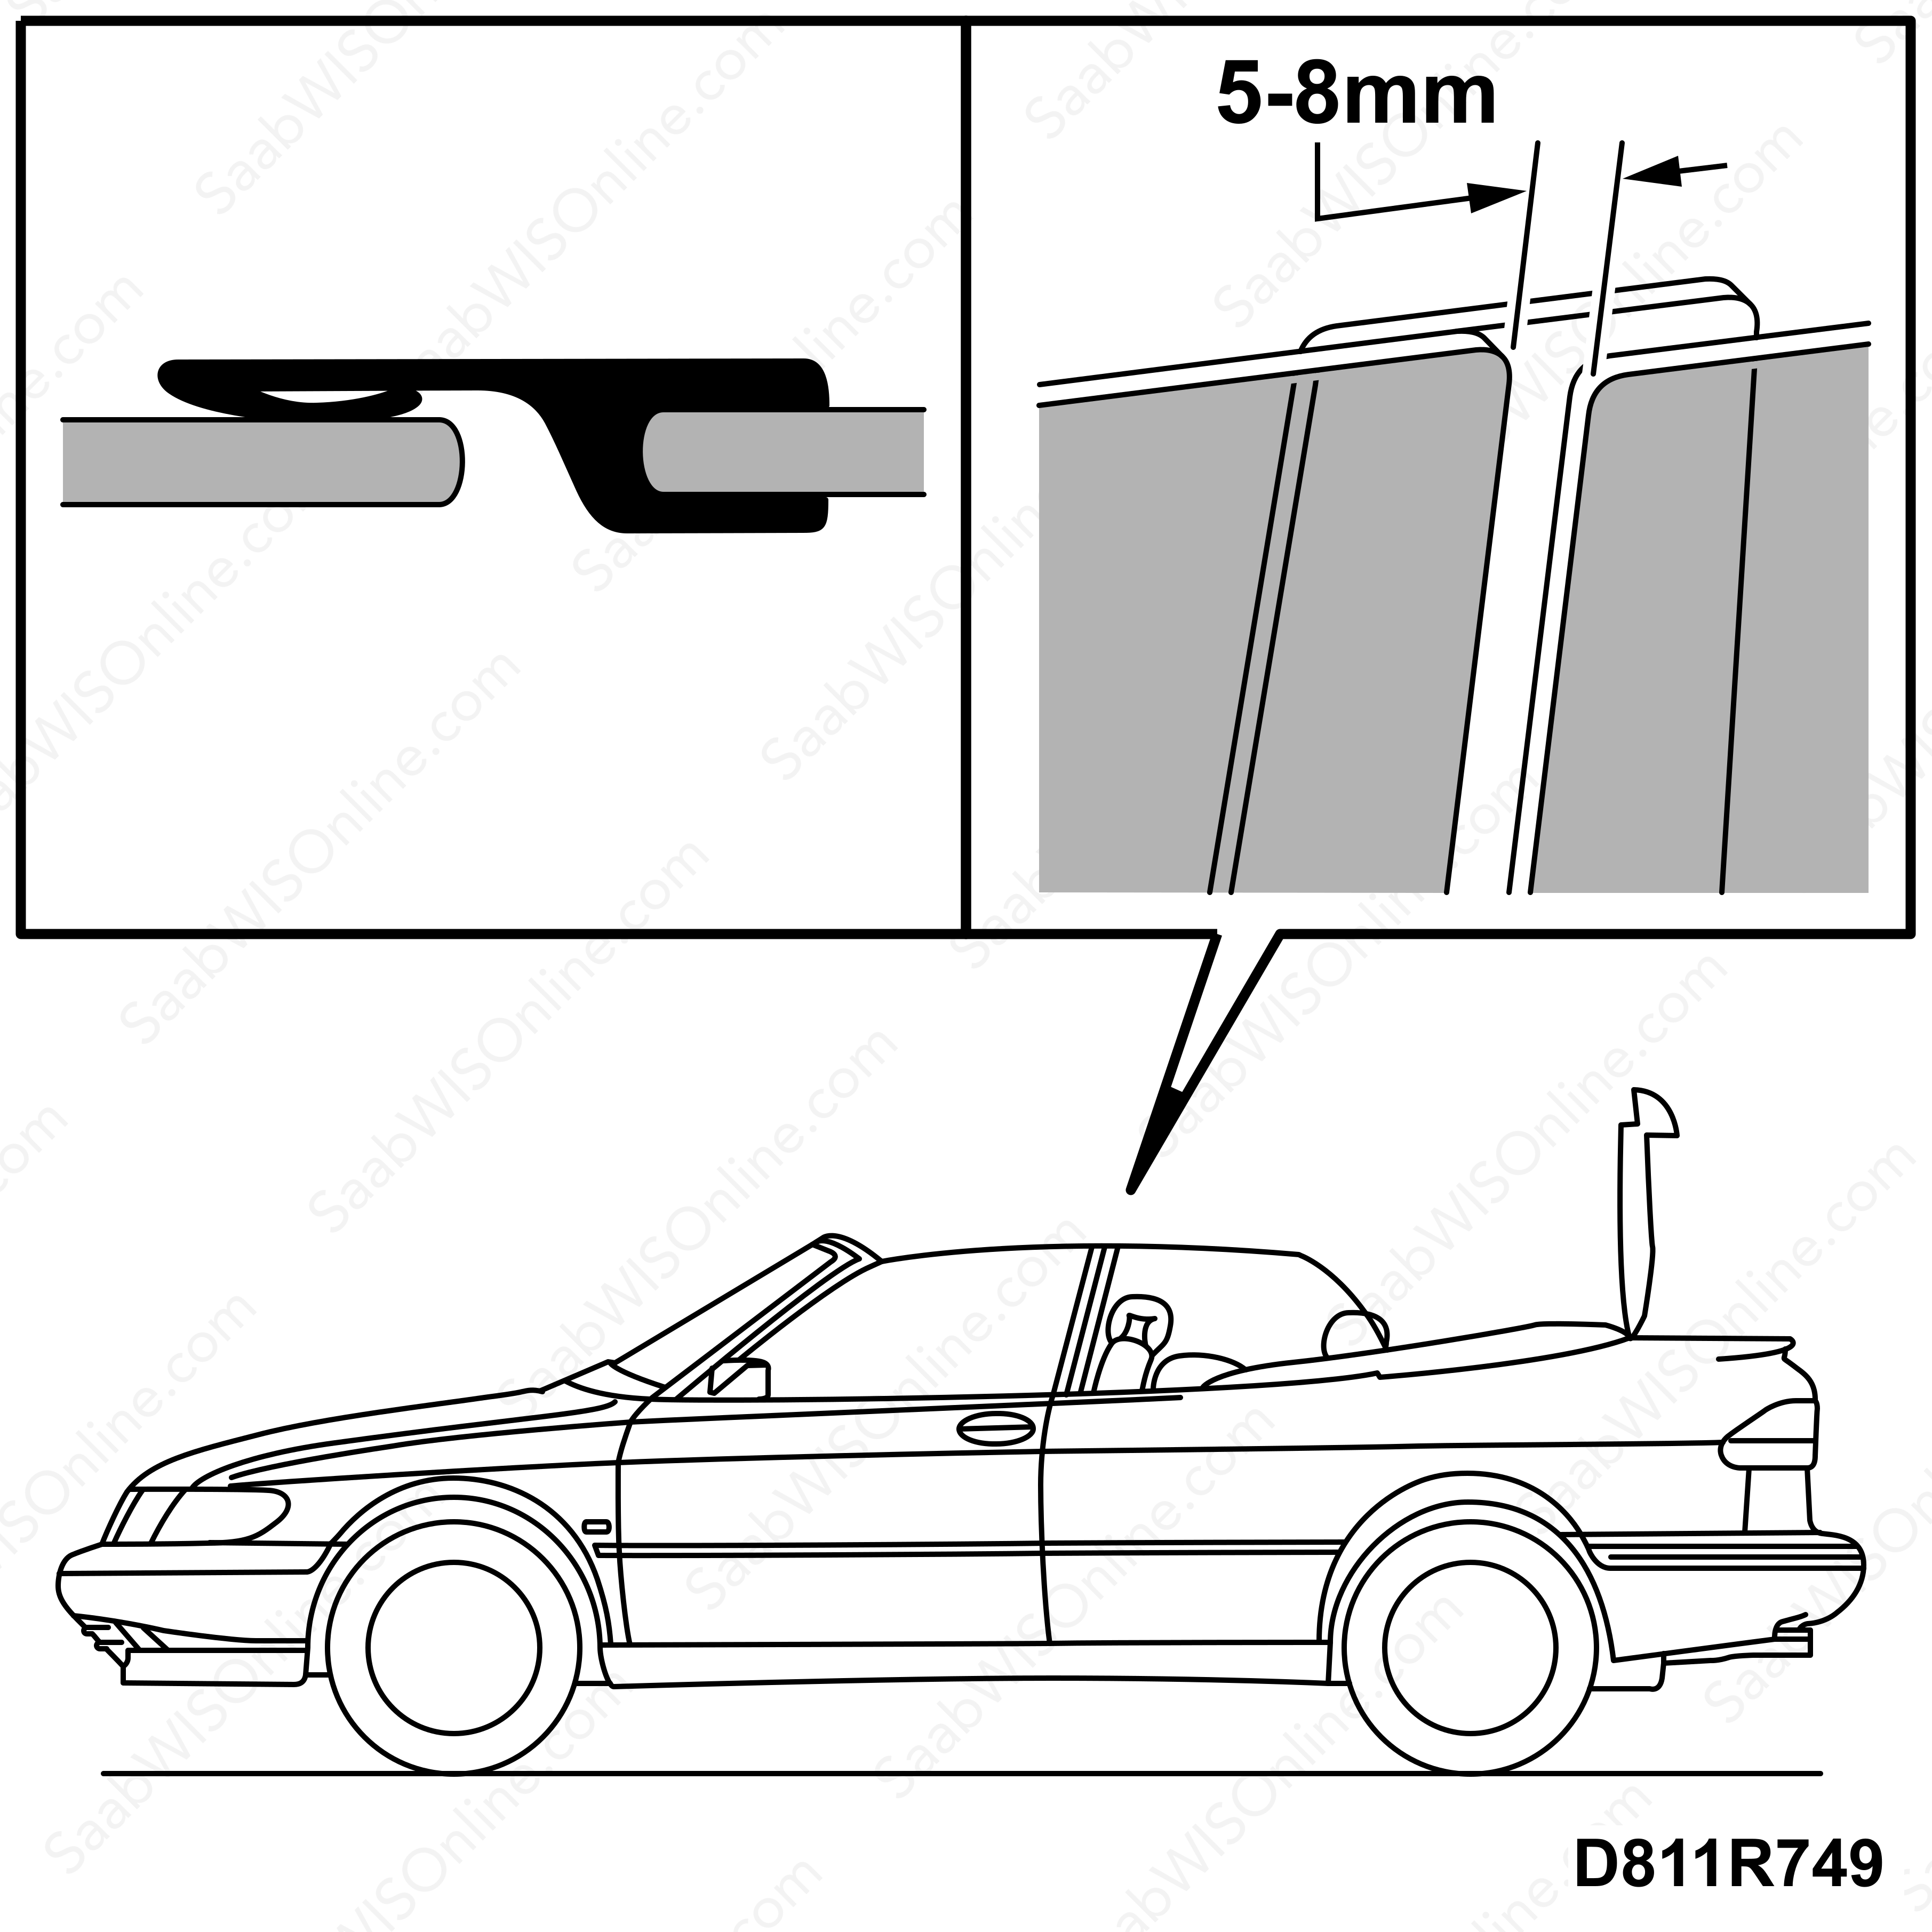
Check/adjust the longitudinal alignment of the side window mountings. ADJUSTMENT 8. Alignment affects the longitudinal side window position and the distance between the door window and the side window.
The distance between the door window's rear edge and the front edge of the side window seal must be equal and between 5-8 mm. Check the adjustment with an open soft top.
|
|
4.
|
Checking the adjustment.
With closed soft top and door:
Lower the door window and raise the side window to the up position. Check that the door window and side window do not collide. The door window and side window should not cross.
Lower the side window and raise the door window to the up position. Check that the door window and side window do not collide. The door window and side window should not cross.
|
|
5.
|
Checking the adjustment.
With open soft top and closed door:
Lower the door window and raise the side window to the up position. Check that the door window and side window do not collide. The door window and side window should not cross.
Lower the side window and raise the door window to the up position. Check that the door window and side window do not collide. The door window and side window should not cross.
If substantial collisions or crossing occurs, check the adjustment of the door window and side window.
|
|
6.
|
Fit the door's water separator and interior equipment. Fit the side window's inner seal, rear speaker and interior equipment.
|
|
7.
|
Lower and raise the door and side windows several times with a closed soft top and door.
|
|
8.
|
If squeaking or any other noise is emitted by the seals, apply 30 19 312 Anti-friction agent.
|
|
9.
|
Work the agent into the seals with clean hands, wait and check that the sound has disappeared.
|
|
10.
|
Check for water leaks by spraying with water from above. Do not use high pressure.
|
|
11.
|
If water leakage occurs, check the adjustment of the soft top, seals, door windows and side windows.
|


