Improvement measures for door windows, CV
|
|
Improvement measures for door windows, CV
|
|
Note
|
|
The method below is described for one side of the car, but the method should be applied to both sides.
|
|
1.
|
Remove the front door trim as described in WIS 8. Body - Equipment - Adjustment/replacement - Door trim, CV
 Warning
|
|
A damaged water separator must be changed to safeguard the function of the side airbag.
|
|
|
|
|
|
|
|
2.
|
Remove the rear-view mirror as described in WIS 8. Body - Glass, windows and mirrors - Adjustment/replacement - Rear-view mirror CV.
|
|
3.
|
Remove the door window as described in WIS 8. Body - Glass, windows and mirrors - Adjustment/replacement - Door window, CV.
|
|
4.
|
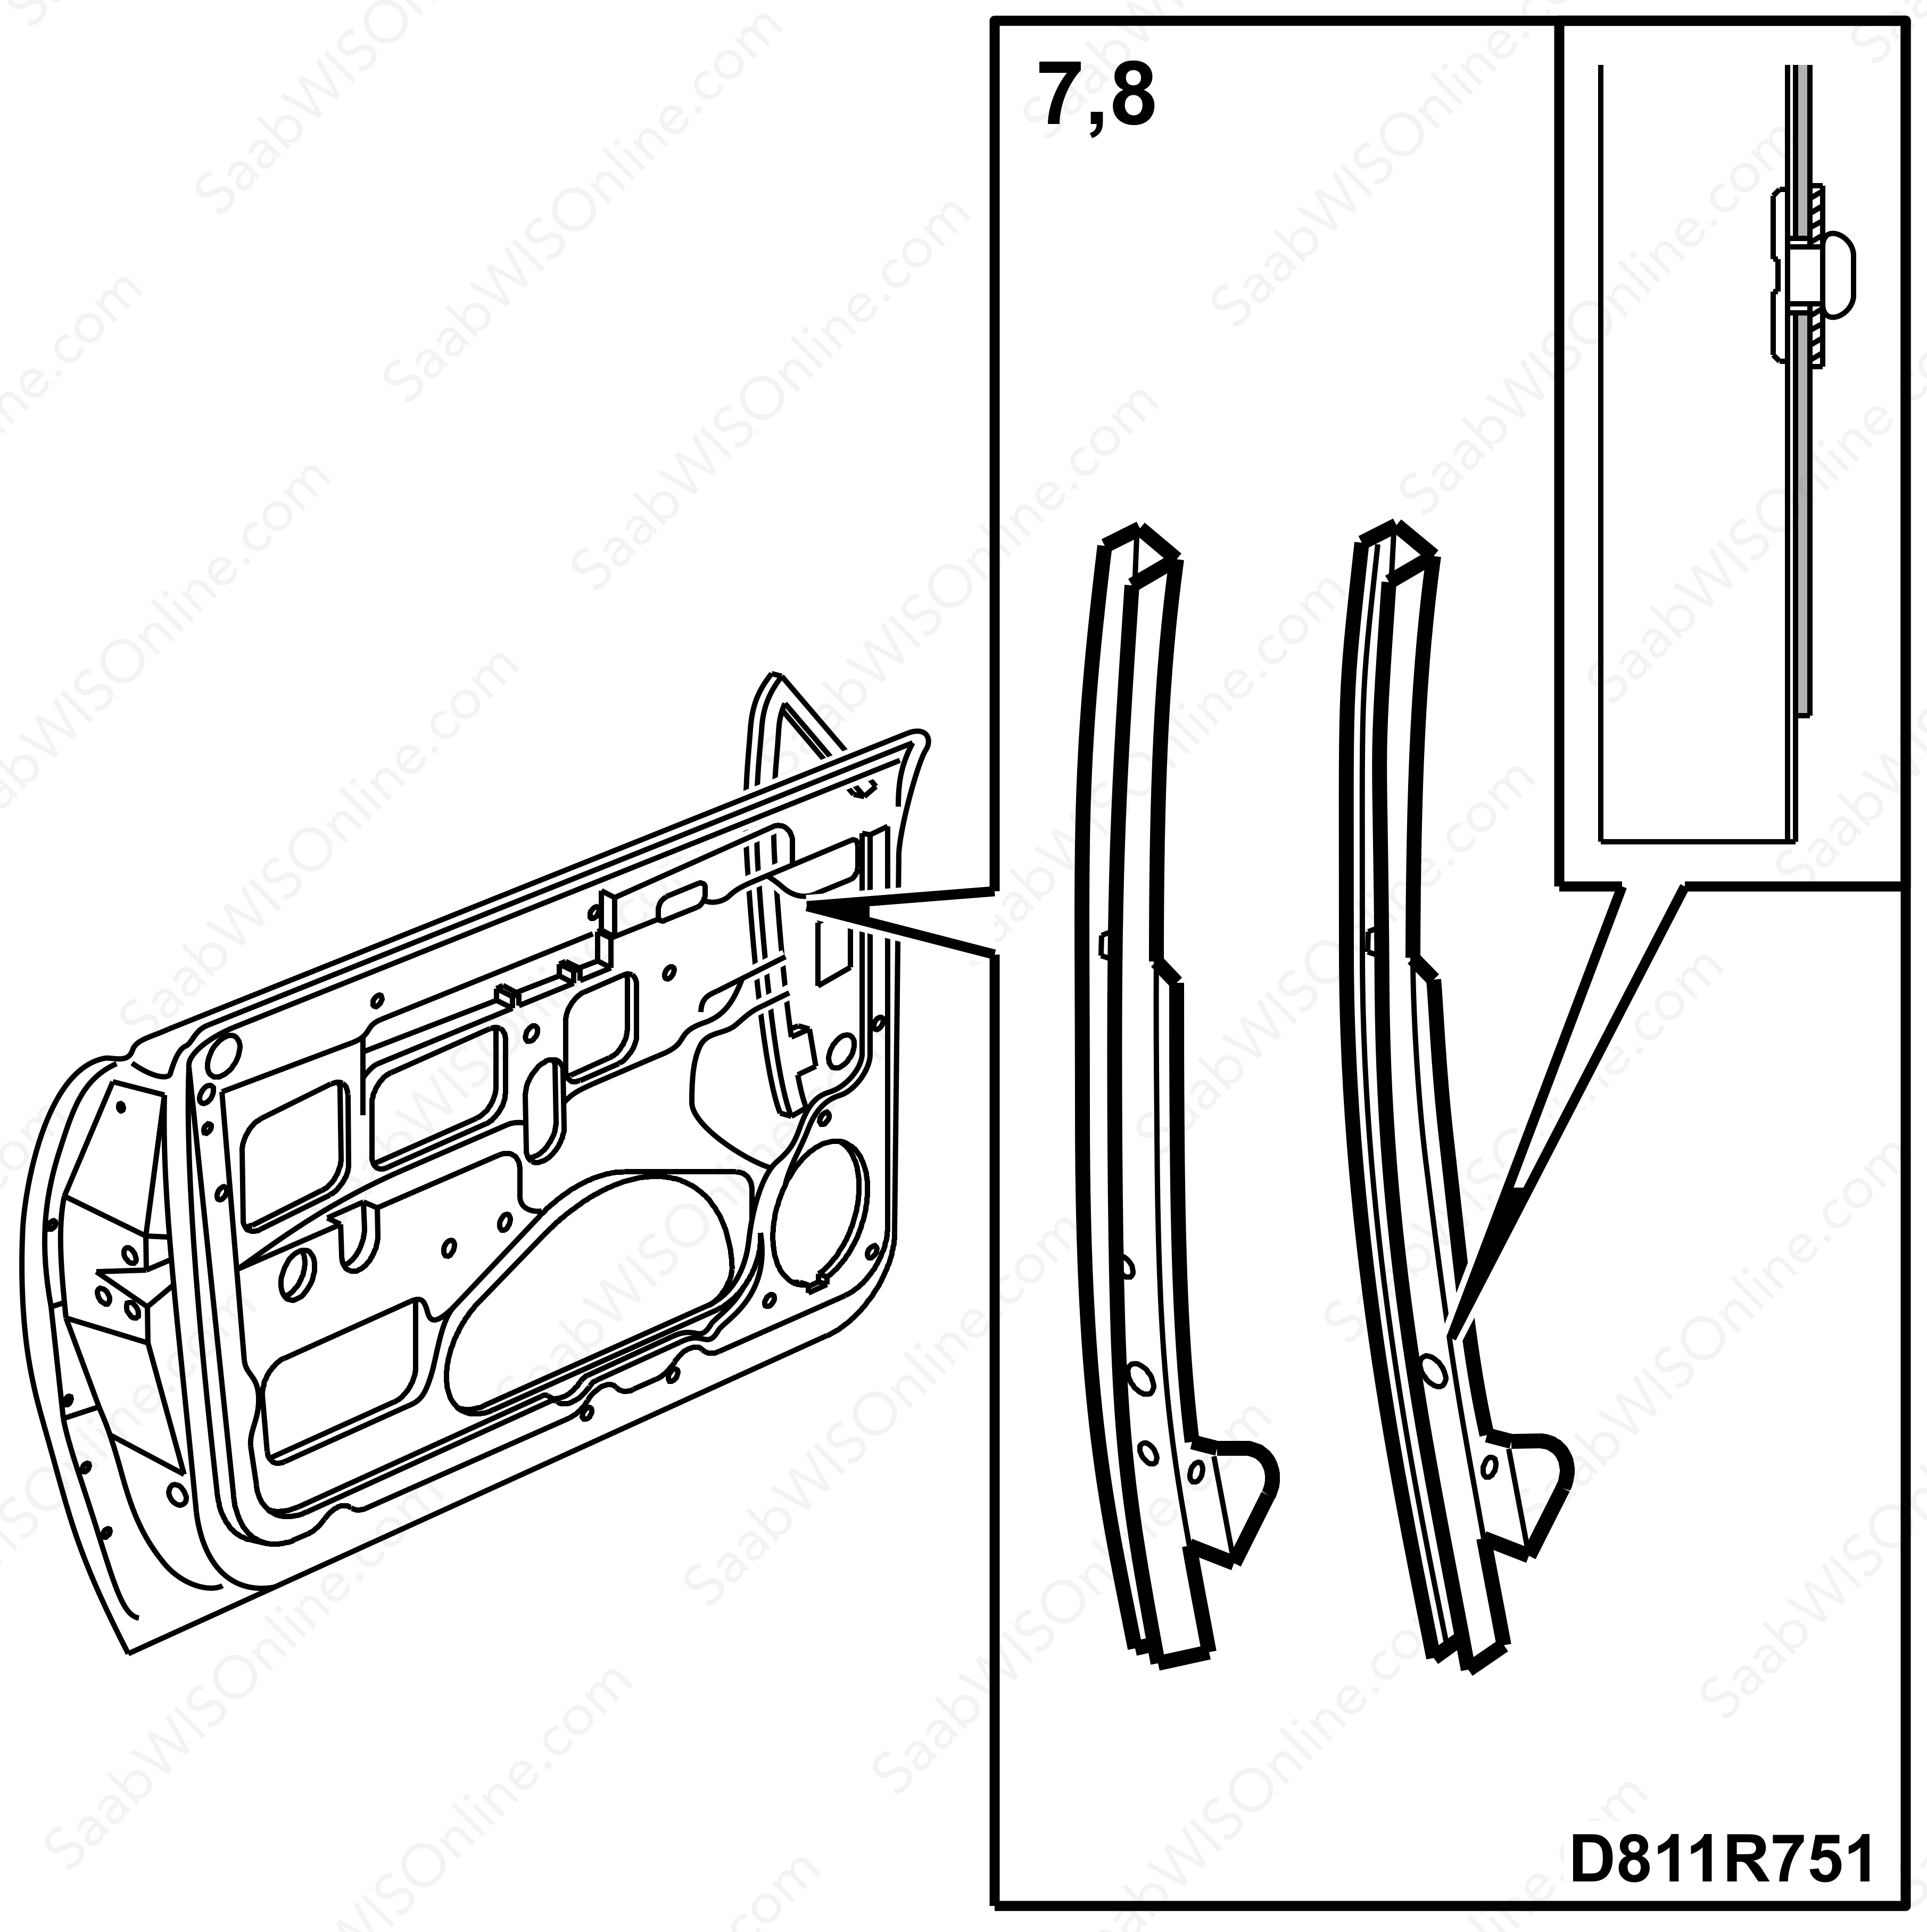
Remove the seal from the front supporting rail.
|
|
5.
|
Check that the front supporting rail is not twisted and that the spot welds are intact.
|
Note
|
|
The front door window support rail has been reinforced with extra and larger spot welds from VIN No. 27006517. For vehicles after this VIN number, simply check the support rail as instructed below.
|
|
|
6.
|
Release the lower mounting adjustment nut.
|
|
7.
|
If the support rail is twisted, straighten the rail so it is straight along the car.
|
|
8.
|
If one or more of the spot welds are broken, fit a pop rivet, part no. 82 35 178, in the hole in the rail and a washer, part no. 70 88 073, on the back, and rivet together. The pop rivet should hold the support rail to the reinforcement. If necessary a hole can be drilled in the upper part of the support rail and another pop rivet fitted there.
|
|
9.
|
Check the front support rail lower mounting.
The lower mounting for the door window front support rail has been moved back (approx. 3 mm). This has been done as a provisional solution by grinding out the adjustment hole from VIN no. 27003542. For the definitive solution, the plate with the adjustment hole will be moved from VIN no. 27004929. For vehicles after this VIN number, check the support rail as instructed in point 14 and proceed to point 15.
|
|
10.
|
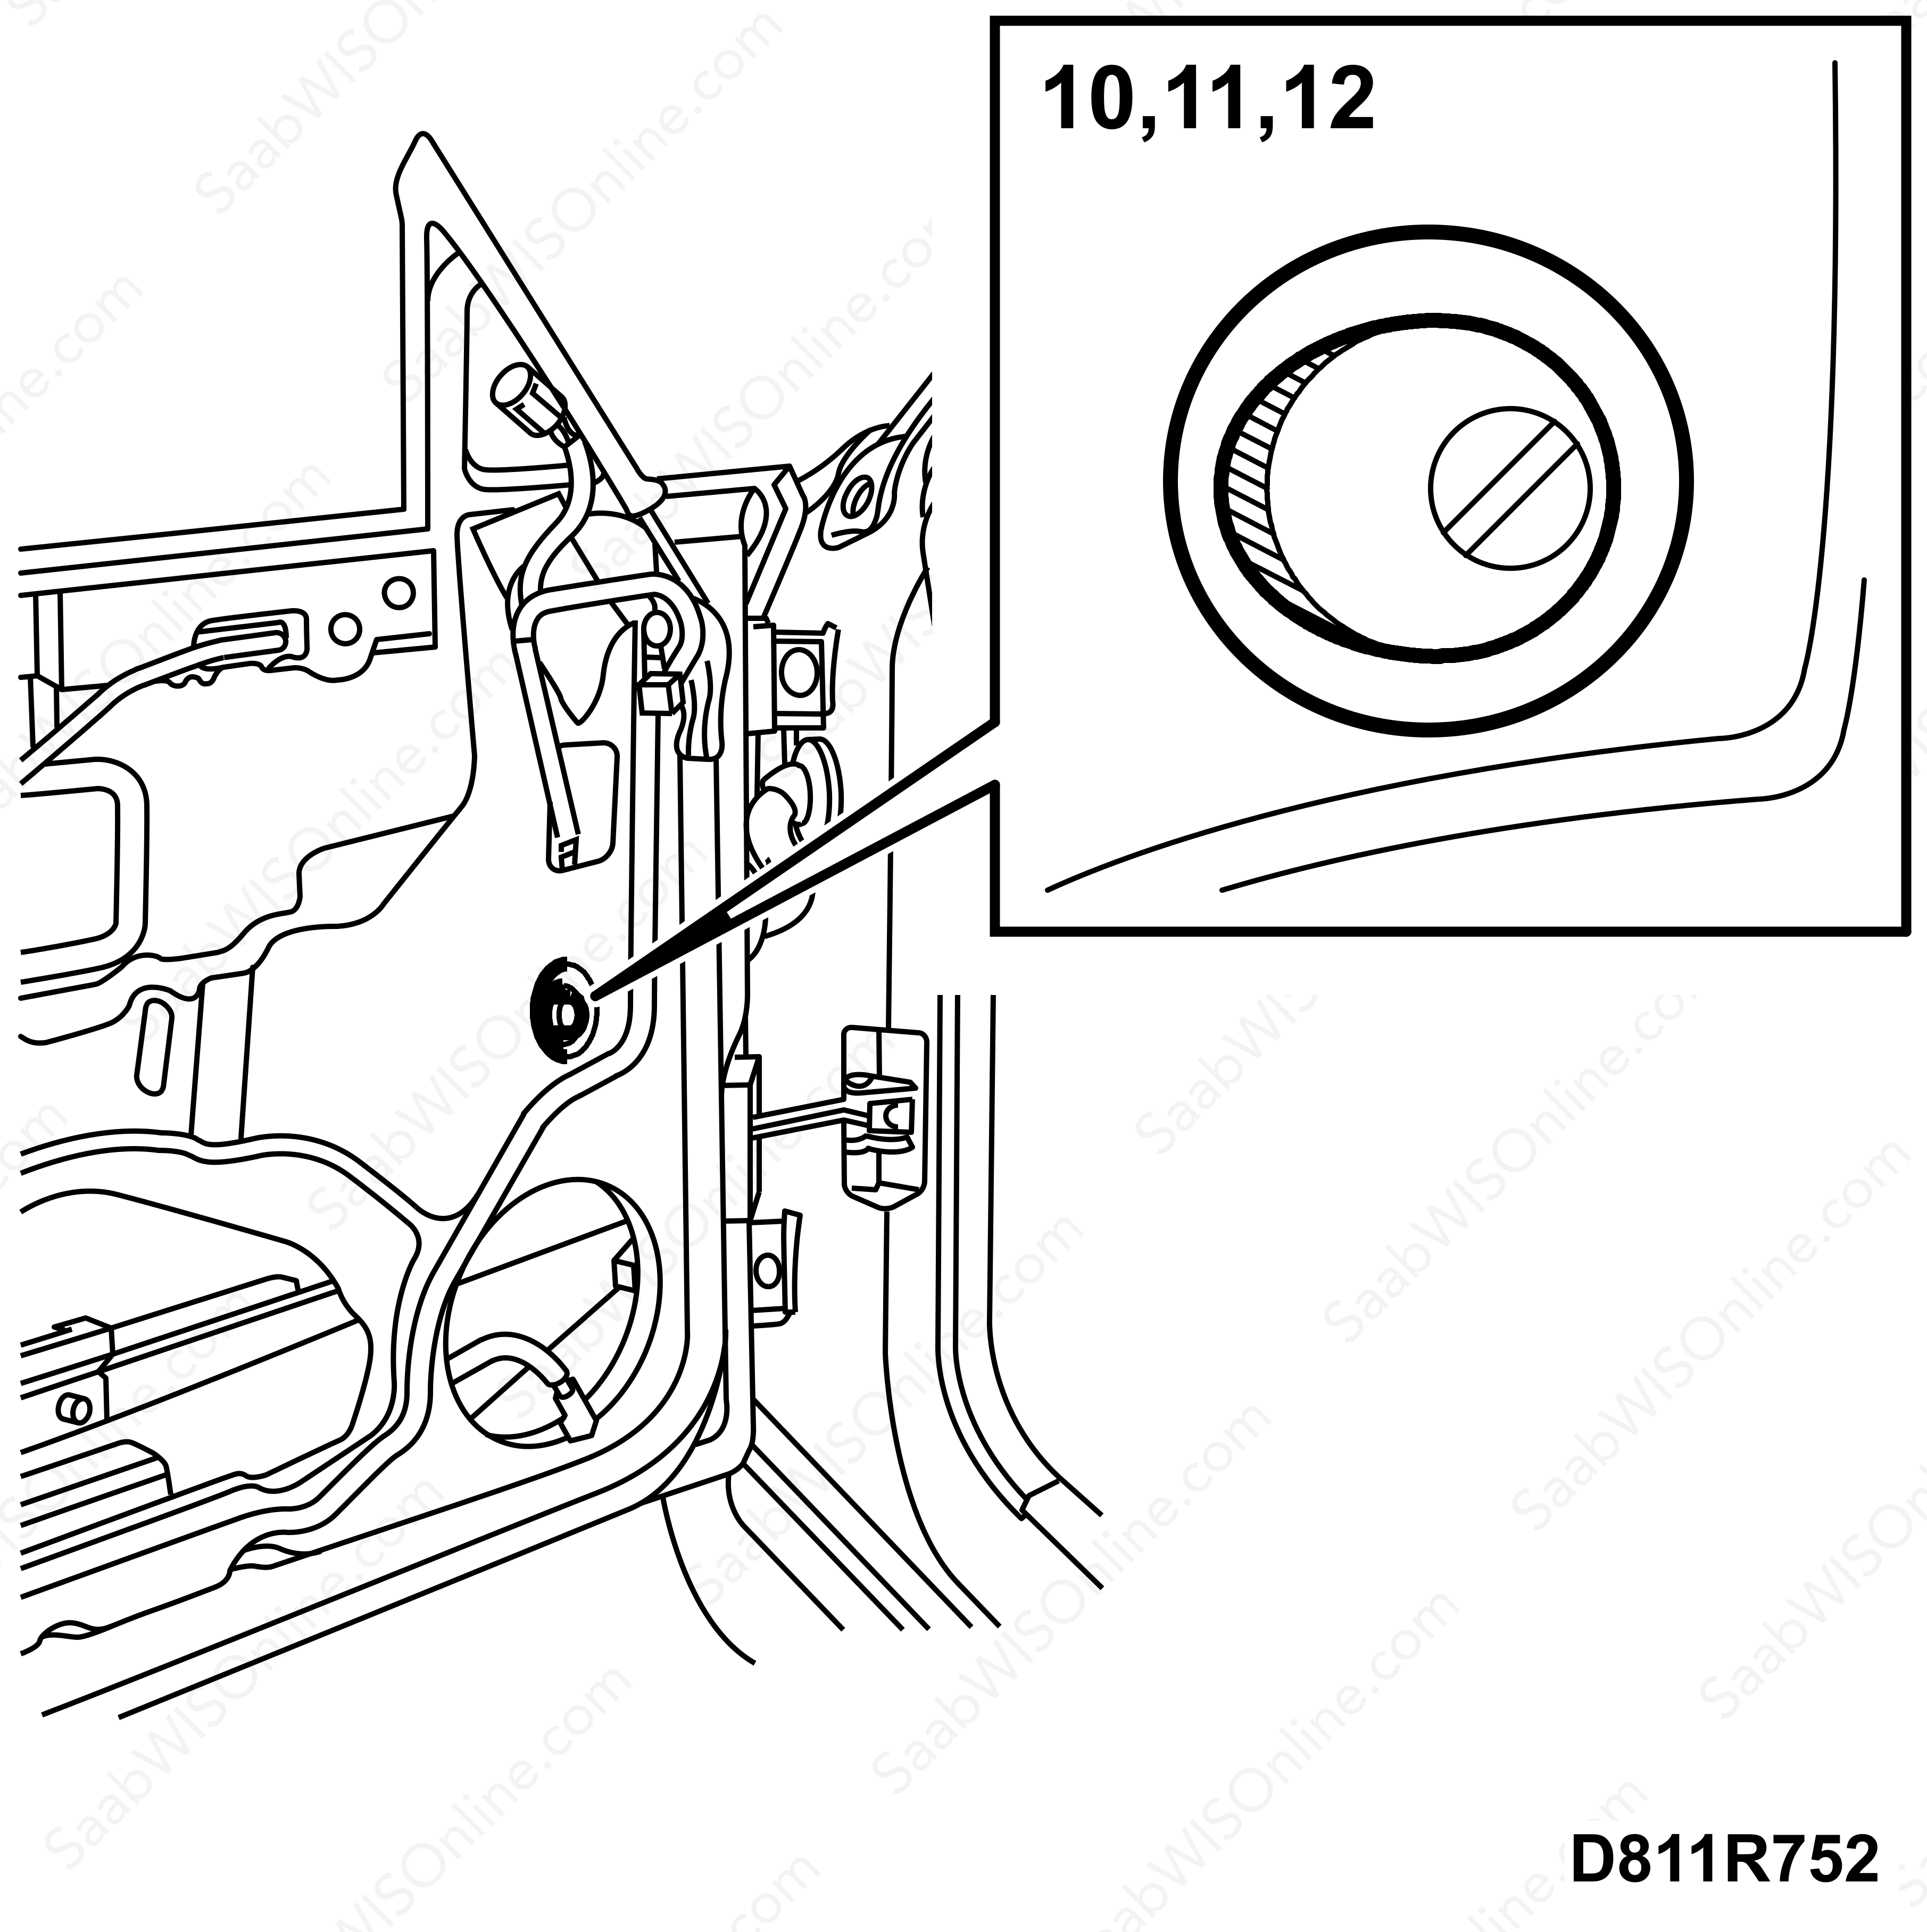
Remove the lower mounting adjustment nut completely and screw in the adjustment screw. Carefully bend the support rail straight ahead.
|
|
11.
|
Modify the adjustment screw hole with a round file. The aim is to increase the adjustment capacity by 3 mm to the rear.
|
|
12.
|
Protected the modified area against corrosion.
|
|
13.
|
Fit the adjustment screw and nut, and adjust the support rail as far back as possible.
|
|
14.
|
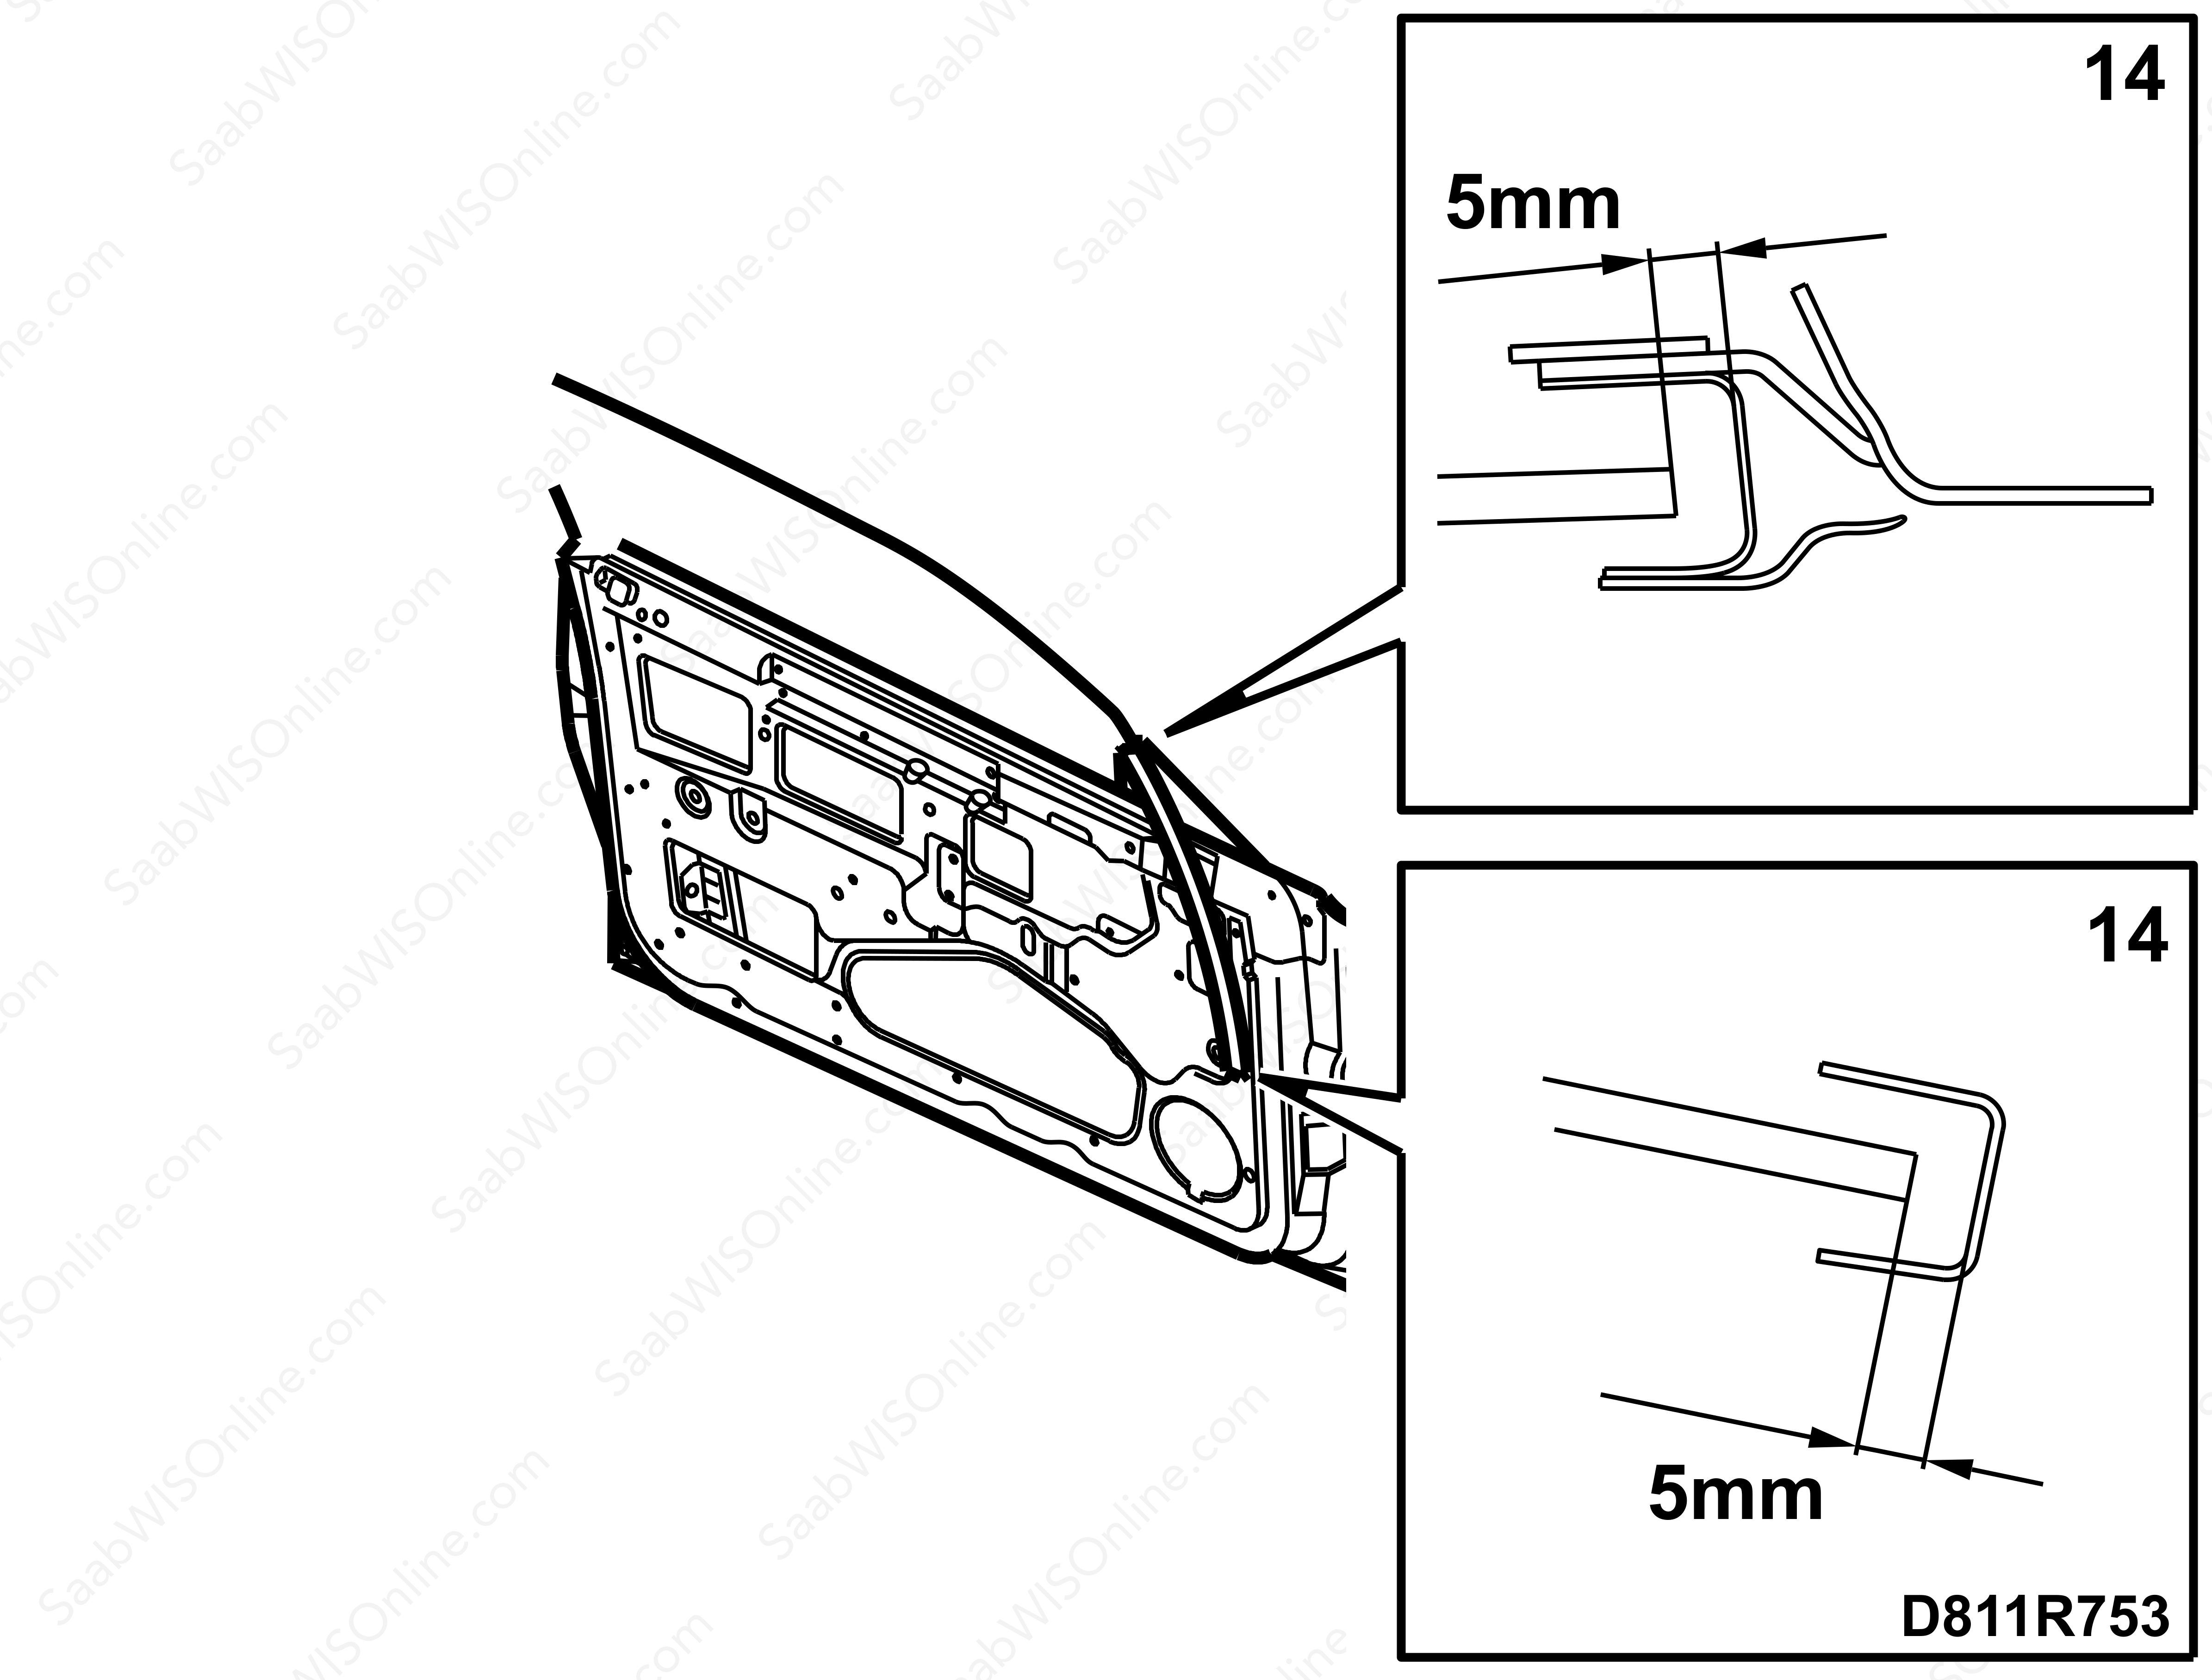
Fit the door window and check the tolerance to the support rail. Measure the distance from the support rail base to the front edge of the door window when the window is in its lower position. Then measure the distance with the door window raised, and measure to the upper end of the support rail. The distance should be approx. 5 mm. Measure without seals.
If the distance measured is considerably more than 5 mm, return to point 9.
|
|
15.
|
Remove the door window.
|
|
16.
|
Check the door window bushes for wear and/or cracks. Replace the bushes with new ones if necessary. The bushes can also be replaced if they are noisy.
|
Note
|
|
The bushes in the door window have been changed twice, once to grey from VIN no. X7057279 and once to black from VIN no. 27016225. For cars after VIN no. 27016225 check the bushes and replace only if necessary.
|
|
|
|
-
|
Use only the new black bushes, part no. 53 61 910.
|
|
17.
|
Fit the new bushes, see also point 18.
|
Note
|
|
No lubricants or similar may be applied to the bushes or the vertical rear support rail. Any lubricant should be removed by cleaning the rail and bushes carefully.
|
|
|
18.
|
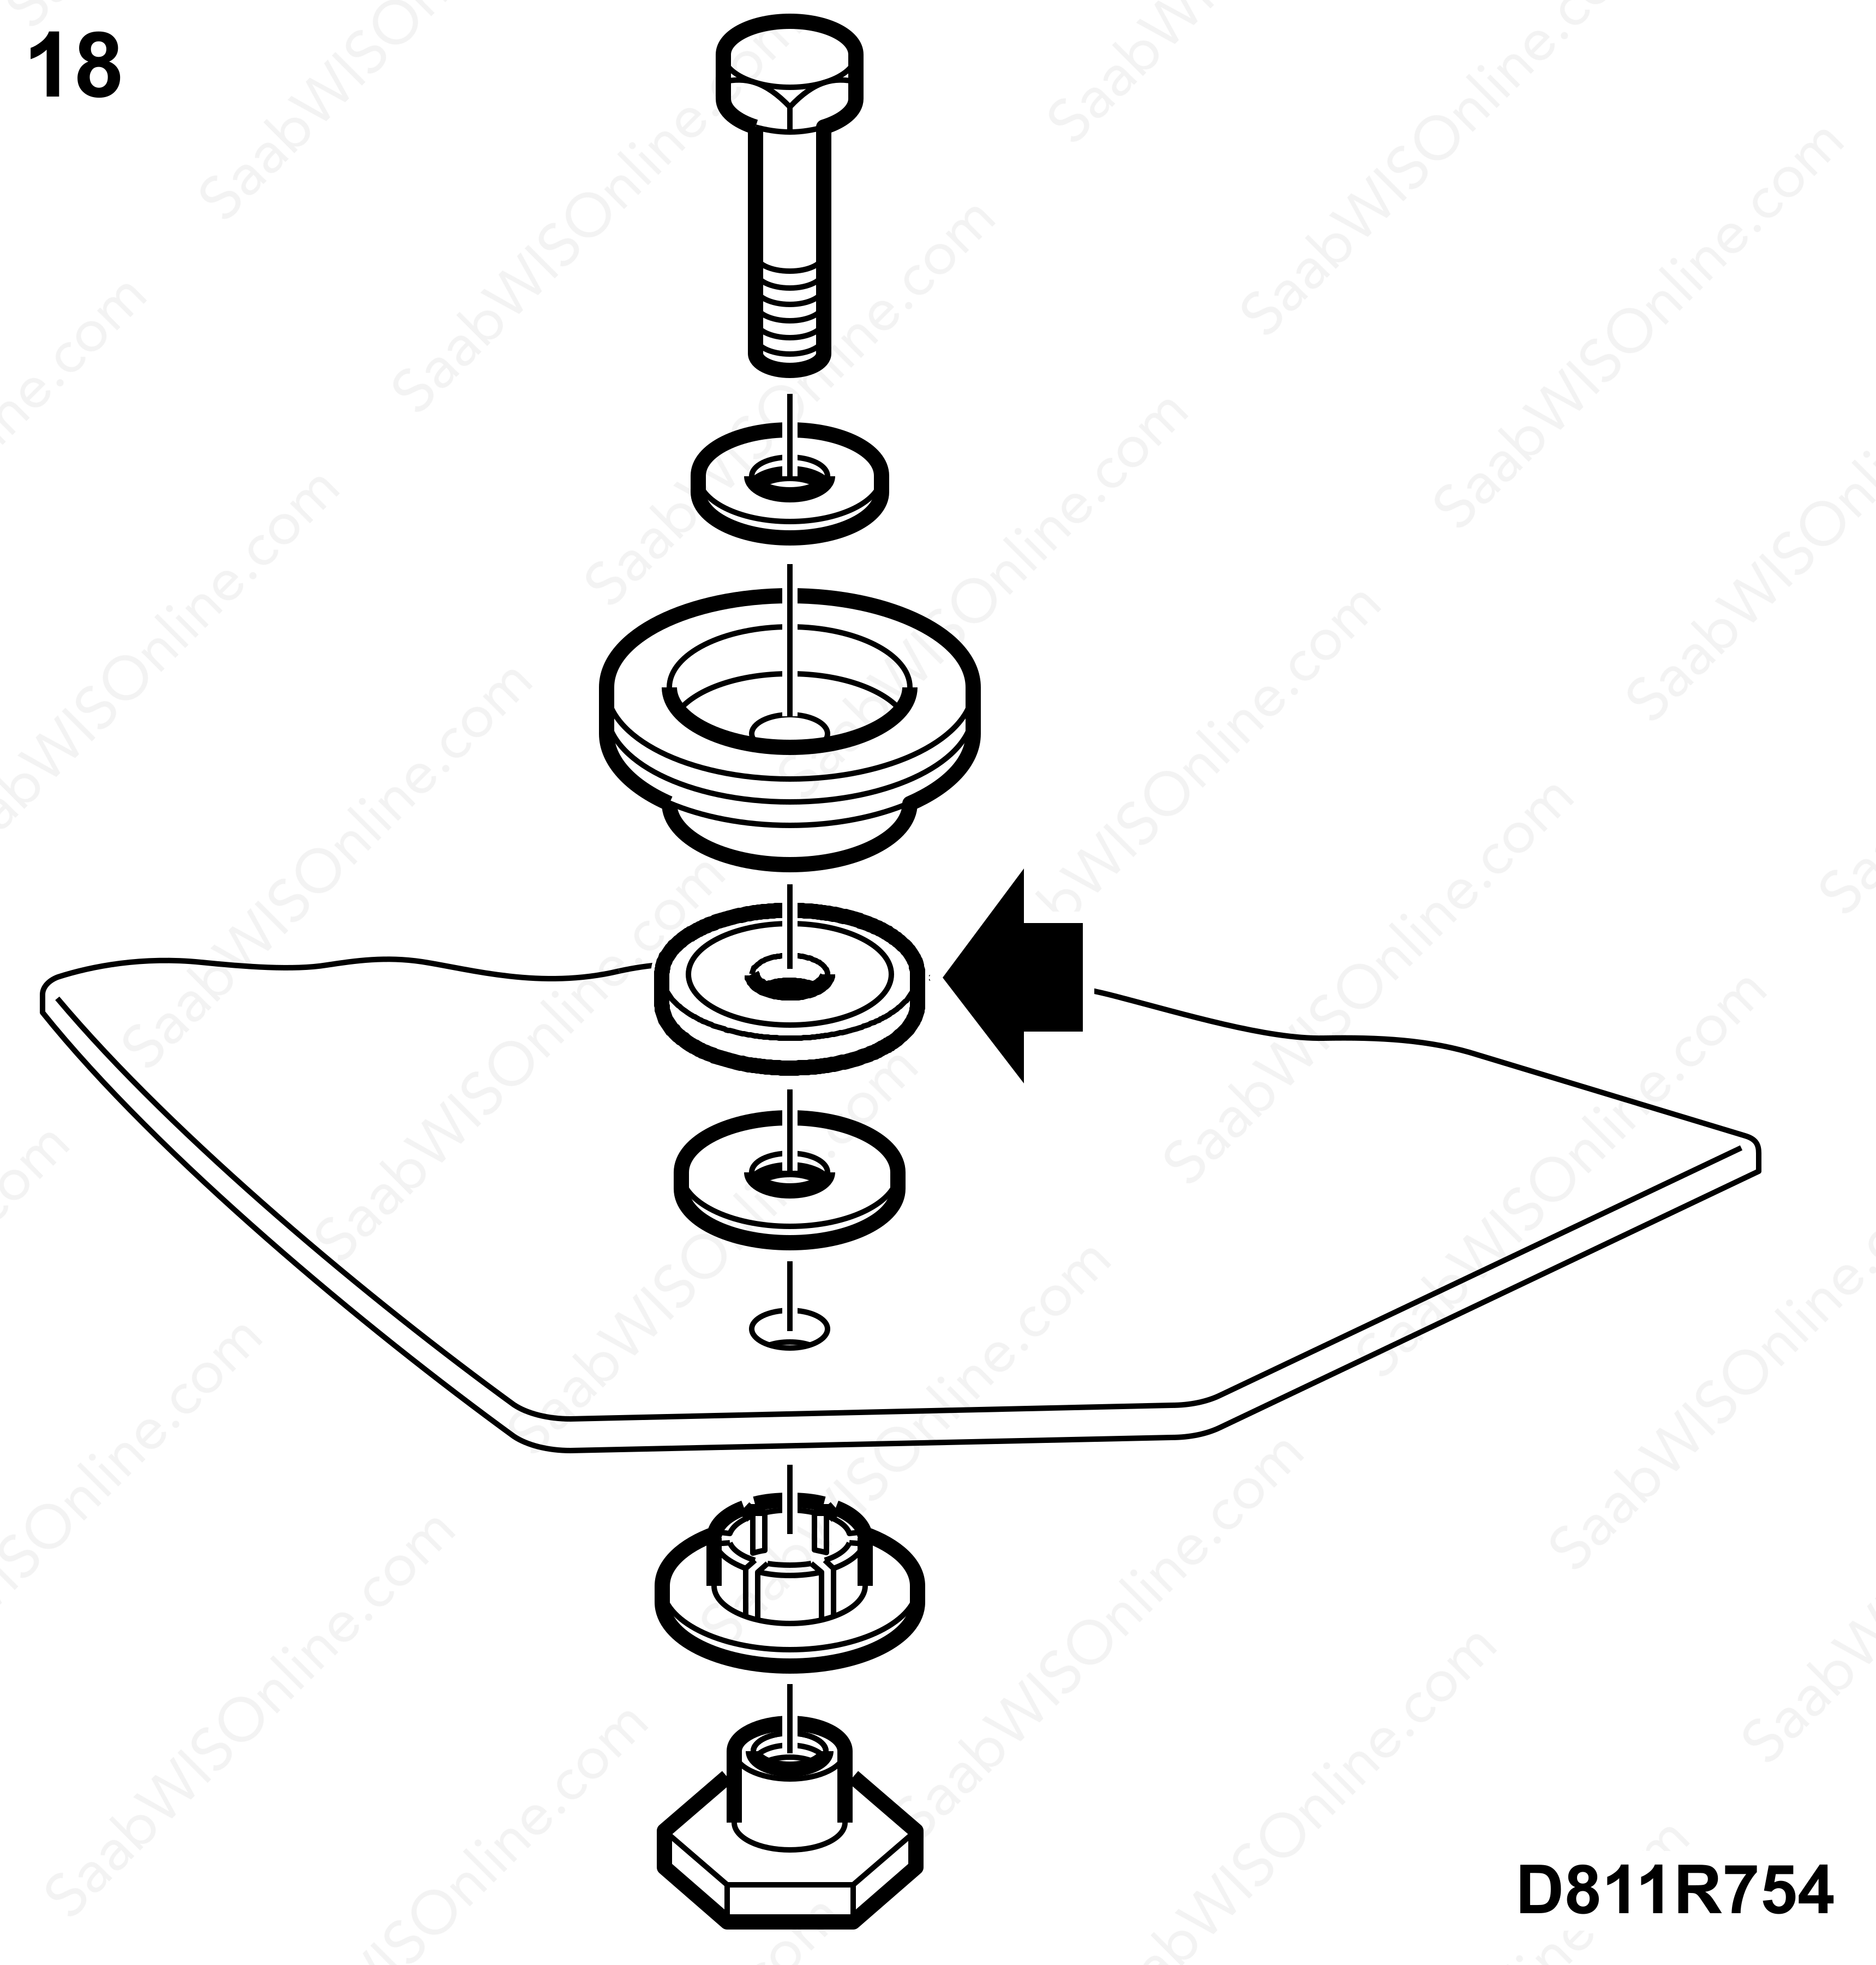
If the door window runs sluggishly or presses too hard against the sealing strip, fit a plastic washer below the upper bush on the door window.
|
Note
|
|
The door windows have been optimised with a plastic washer under the upper bush from VIN no. 27015384. The plastic washer has not been fitted to all door windows and may also be found on one side of the car only. For cars after this VIN number, check the function and only perform this point if required.
|
|
|
19.
|
Remove the upper bush.
|
|
20.
|
Fit a plastic washer under the bush.
|
|
21.
|
Use 69 36 371 plastic washer.
|
|
23.
|
Fit the seal to the front support rail.
|
Important
|
|
Fit the seal carefully so that it is completely inside the rail.
|
|
|
|
|
24.
|
Fit the door window and outer seal, and check the function by running the window down and up a few times.
|
|
25.
|
If noise occurs, check the following points and perform the measures described.
|
|
26.
|
Check the bush in the mechanism lifting arms. Lubricate if necessary.
|
|
27.
|
Check the motor and cog segment in the mechanism. Lubricate if necessary.
|
|
28.
|
Check the guide bush in the mechanism's horizontal rail (green or white bush). Clean and lubricate if necessary.
|
|
29.
|
Check the clip for the guide bushes in the horizontal rails. Modify the clips if necessary. The clip may move on the rails when the door window is lowered/raised, and cause a creaking and/or scraping noise. Use white Vaseline to lubricate, item no. 79 97 851.

|
Important
|
|
The door window bushes and vertical rear support rail must not be lubricated. Thoroughly clean away any lubricant present on the rail and bushes.
|
|
|
|
|
30.
|
Fit the front door trim as described in WIS 8. Body - Equipment - Adjustment/replacement - Door trim, CV
|
|
31.
|
Adjust the door and side windows as described in TN 03-01-8113.
|


