Intake manifold, removing a fitting
|
|
Intake manifold, removing a fitting
|
|
1.
|
Remove the engine protection cover.
|
|
4.
|
Undo the lower generator bolt (2).

|
|
5.
|
Remove the generator bracket (1) - move back the generator.
|
|
6.
|
Remove the intake manifold support (3) from the intake manifold and detach it from the engine block - move the support to one side.
|
|
7.
|
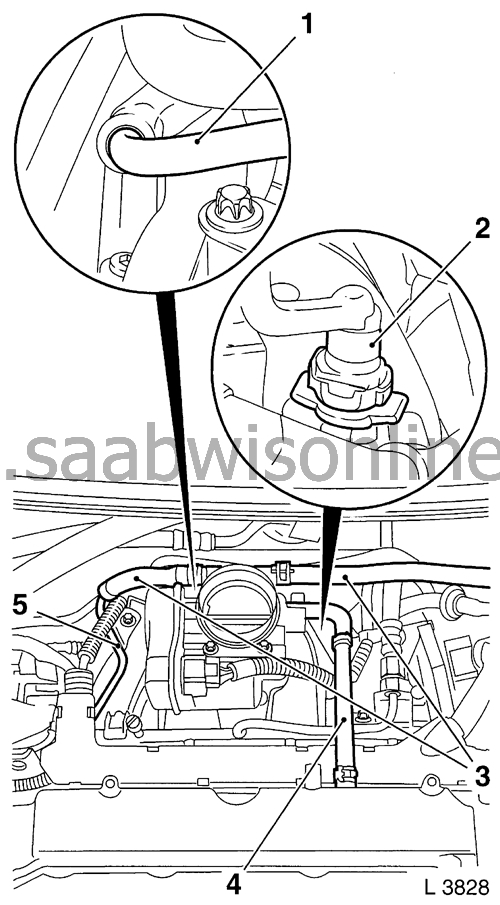
Remove the engine ventilation hose (4) from the camshaft cover.
|
|
8.
|
Pull the tank vent valve line (1) from the throttle valve connection.
|
|
9.
|
Remove the coolant hoses (3) from the throttle valve connection - collect the coolant.
|
|
10.
|
remove the coolant line (5) from the intake manifold and the camshaft cover and lay to one side.
|
|
11.
|
Remove the brake server vacuum line (2) from the intake manifold.
|
|
12.
|
Pull off the cable set connector from the throttle valve connection.
|
|
13.
|
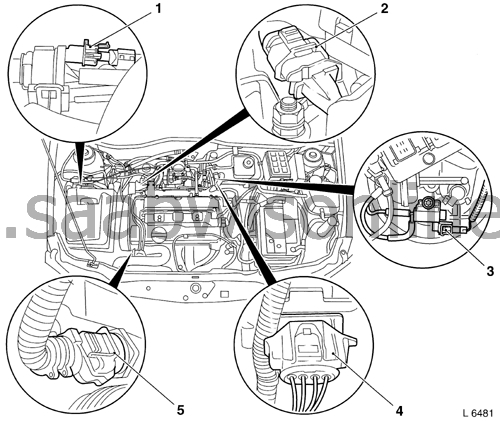
Undo or detach the following cable set connectors:
|
1.
|
tank vent valve
|
|
2.
|
camshaft sensor
|
|
3.
|
solenoid valve switch throttle
|
|
4.
|
Catalytic converter lambda sensor
|
|
5.
|
coolant temperature sensor
|
|
|
14.
|
Undo the cable set connector (1) and pull it off from the engine control unit.

|
|
15.
|
Undo the knock sensor cable set connector (2).
|
|
16.
|
Remove the holder (4) and ground cable (3) from the engine control unit.
|
|
17.
|
Remove the bolt (5) from the engine transport bracket.
|
|
18.
|
Pull off the connector strip together with the cable duct from the injectors and put them to one side.
|
|
19.
|
Lower the fuel pressure using pressure tester
83 94 744 Adapter, fuel pressure gauge
via the test connector - collect the fuel that runs out in a suitable container - observe safety regulations and national stipulations.
|
|
20.
|
Remove the fuel delivery line (6) from the fuel rail.
|
|
21.
|
Undo quick coupling (1) and remove the coolant hose (heating element) (2) - collect the coolant.

|
|
22.
|
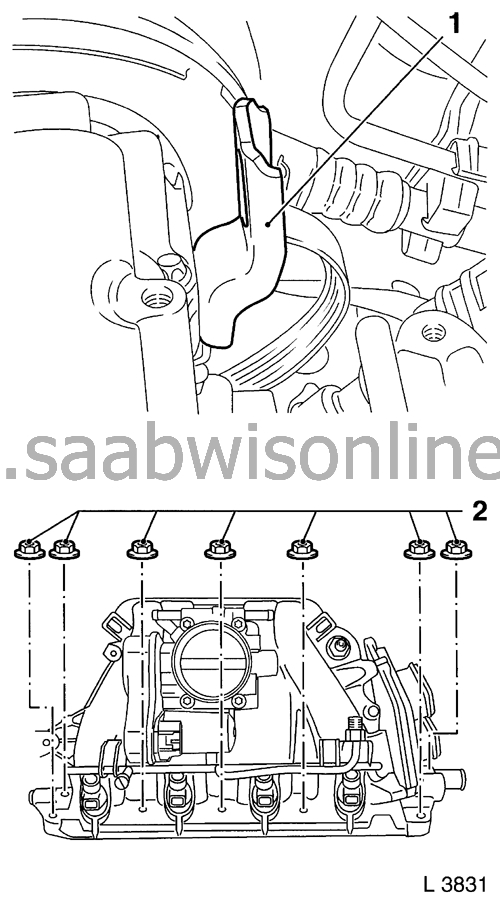
Remove the engine rear transport bracket (1) from the cylinder head.
|
|
23.
|
Unscrew the retaining nuts (2) - remove the intake manifold.
|
|
24.
|
When changing the intake manifold: Transfer the components.
|
|
1.
|
Clean the sealing surfaces.
|
|
2.
|
Fit the intake manifold together with a new seal and new retaining nuts on the cylinder head - tightening torque 20 Nm.
|
|
3.
|
Fit the rear lifting eye onto the cylinder head - tightening torque 25 Nm.
|
|
4.
|
Fasten the brake servo vacuum line on the intake manifold.
|
|
5.
|
Fit the coolant line onto the intake manifold and camshaft cover - tightening torque 8 Nm.
|
|
6.
|
Fit coolant hoses onto throttle body and intake manifold.
|
|
7.
|
Fit the coolant hose (heating element).
|
|
8.
|
Remove the tank vent valve line from the throttle valve connection.
|
|
9.
|
Fit the ground cable and the holder to the engine control unit. Connect the knock sensor cable set connector and fasten it in the holder.
|
|
10.
|
Fit and lock the cable set connector for the engine control module.
|
|
11.
|
Fit the fuel line on the fuel rail - tightening torque 15 Nm.
|
|
12.
|
Fit the contact rail on the injectors - the contact rail should go on with an audible snap.
|
|
13.
|
Fit the contact strip retaining screw on the engine transport bracket.
|
|
14.
|
Couple or plug in the cables connected to the injector contact rail.
|
|
15.
|
Fit the engine vent hose on the camshaft cover.
|
|
16.
|
Fit the intake manifold support onto the intake manifold - tightening torque 20 Nm.
|
|
17.
|
Pull the intake manifold support off the cylinder head - tightening torque 35 Nm.
|
|
18.
|
Fit the generator bracket on the cylinder head, the intake manifold and the generator - tightening torque 20 Nm.
|
|
19.
|
Tighten the bottom generator retaining bolt - tightening torque 35 Nm.
|
|
22.
|
Fit the engine cover.
|
