PRE-RELEASE
Crankshaft front sealing ring, change
| Crankshaft front sealing ring, change |
| To remove |
| 1. |
Open the bonnet
|
|
| 2. |
Disconnect the battery.
Remove the ground cable. 
|
|
| 3. |
Remove the engine cover
Unscrew the lid on the oil filler connection 2x Unscrew Screw on the lid on the oil filler connection |
|
| 4. |
Undo the front right wheel
5x Undo bolt |
|
| 5. |
Raise the car
|
|
| 6. |
Remove the right front wheel.
5x Undo bolt |
|
| 7. |
Raise the car
|
|
| 8. |
Remove the wing liner

|
|
| 9. |
Remove the multi-belt
Tension the multi-belt tensioning device in the direction of the arrow - Use KM-913-A (2) or a 15 mm flex-head spanner Insert KM-6130 (1) or a 4.5mm drift. Mark the direction of rotation 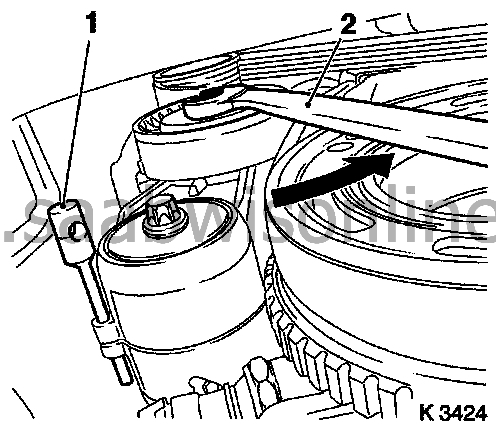
|
|
| 10. |
Remove the multi-belt tension device
Tighten the multi-belt tension device - Remove KM-6130 (2) or the drift Undo the multi-belt tension device Undo the bolt (1) 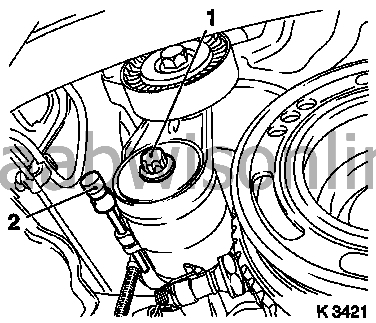
|
|
| 11. |
Remove the crankshaft multi-belt pulley
Prise loose the front screw plug from the oil pan Use KM-911 ( 83 96 327 Holder tool, fixing of flywheel ) Undo the bolt Remove KM-911 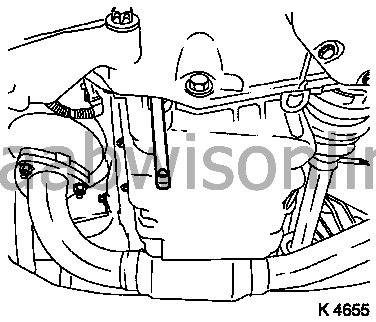
|
|
| 12. |
Lower the car
|
|
| 13. |
Remove the top part of the tooth belt cover
3x Unscrew (1) Detach from the rear tooth belt cover 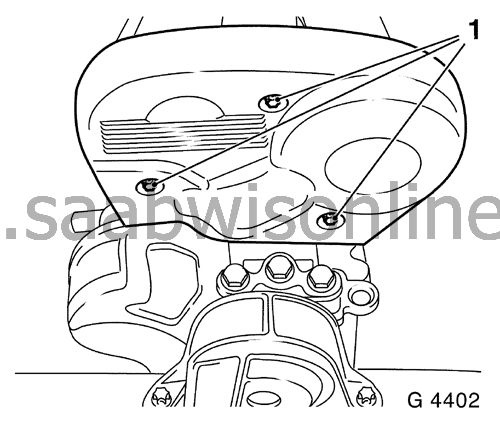
|
|
| 14. |
Remove the camshaft sensor.
|
|
| 15. |
Raise the car.
|
|
| 16. |
Remove the bottom of the tooth belt cover
Undo the bolt (arrow) Detach from the rear tooth belt cover 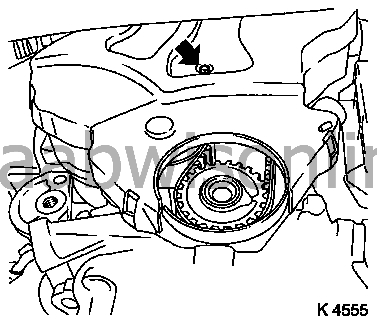
|
|
| 17. |
Set ignition TDC cylinder 1
Screw tight the bolt for the crankshaft multi-belt pulley Set the crankshaft to the mark - Turn the crankshaft at a steady rate. Instruction: The markings on the tooth belt pulley and rear tooth belt cover (III) must correspond Fix the camshaft sprockets. Instruction: the markings must be in front of each other and agree with the top of the cylinder head (I) - Use KM-852 (83 96 319 Holder tool, fixing of camshaft sprocket Z18XE ) (ll) 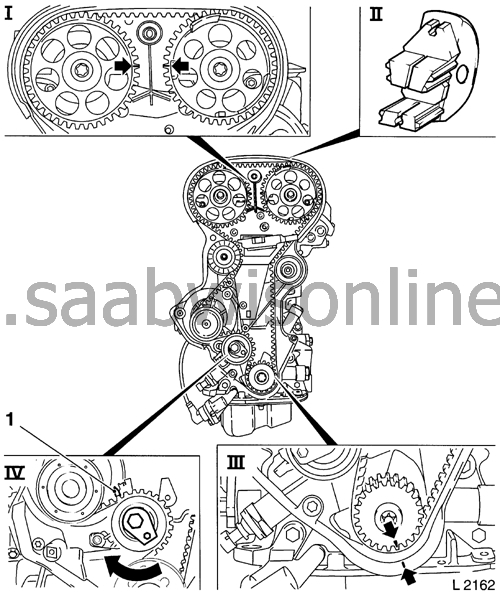
|
|
| 18. |
Remove the tooth belt
Undo the tooth belt tension roller (IV) - Undo the bolt - Turn the setting eccenter in the direction of the arrow (clockwise) until the pointer(1) on the tooth belt tension roller is just short of the left-hand end position. |
|
| 19. |
Pull off the tooth belt sprocket
|
|
| 20. |
Remove the front crankshaft sealing ring (1) Important: do not damage the sealing surface
Prise loose the sealing ring 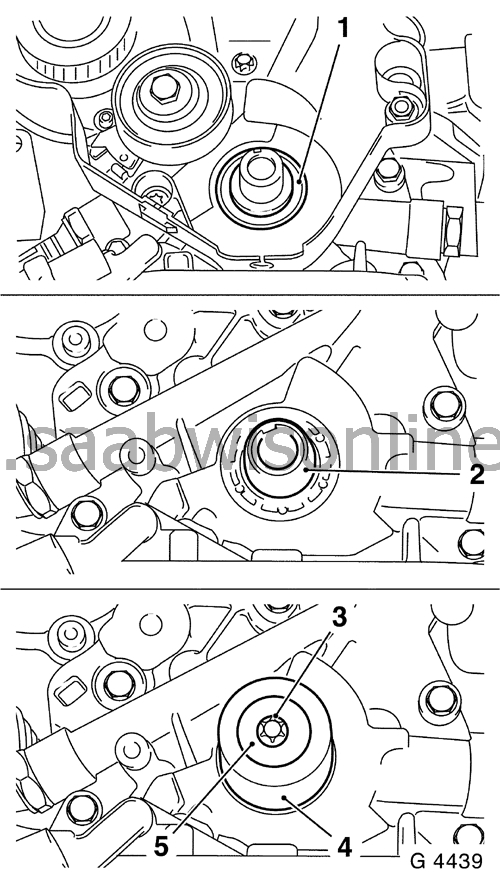
|
|
| 21. |
Clean the sealing service
Oil pump |
|
| 22. |
Fit the crankshaft front sealing ring
Moisten the sealing lip with grease Use KM-6010 ( 83 96 343 Fitting tool front crankshaft seal, Z18XE) Instruction: Place KM-6010 (2) onto the crankshaft journal and push on the sealing ring Remove KM-6010 Pull in the crankshaft front sealing ring - With KM-6010 (4), bolt (3) and the washer for the crankshaft multi-belt pulley (5) |
|
| 23. |
Fit the tooth belt sprocket
Screw tight the bolt for the crankshaft multi-belt pulley |
|
| 24. |
Lower the car
|
|
| 25. |
Set ignition TDC cylinder 1
Screw tight the bolt for the crankshaft multi-belt pulley Set the crankshaft to the mark - Turn the crankshaft at a steady rate. Instruction: The markings on the tooth belt pulley and rear tooth belt cover must correspond |
|
| 26. |
Put on the tooth belt
Instruction: the pull side must be taut (I). Note the fitting position 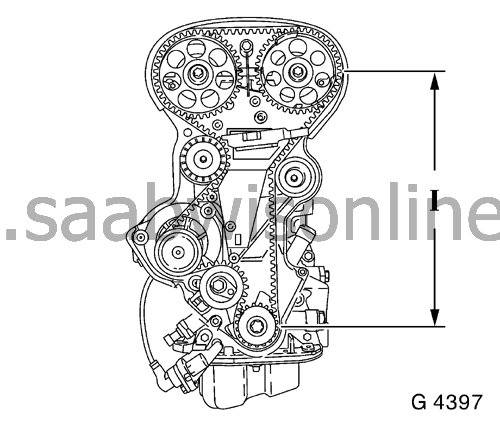
|
|
| 27. |
Tension the tooth belt
Tension the tooth belt tensioning pulley - Turn the setting eccenter in the direction of the arrow (anticlockwise) until the pointer on the tooth belt tension roller is just short of the right-hand end position Fasten the bolt for the tooth belt tensioning pulley (1) 
|
|
| 28. |
Remove KM-852
|
|
| 29. |
Valve timing, check
Turn the crankshaft (720°) - on the bolt for the crankshaft multi-belt pulley Instruction: in the direction of rotation of the engine Put the crankshaft on the mark Instruction: The markings on the tooth belt pulley and rear tooth belt cover must correspond (III) Put in KM-852 ( 83 96 319 Holder tool, fixing of camshaft sprocket Z18XE ) (II) Instruction: The markings must be in front of each other and agree with the top edge of the cylinder head (I) 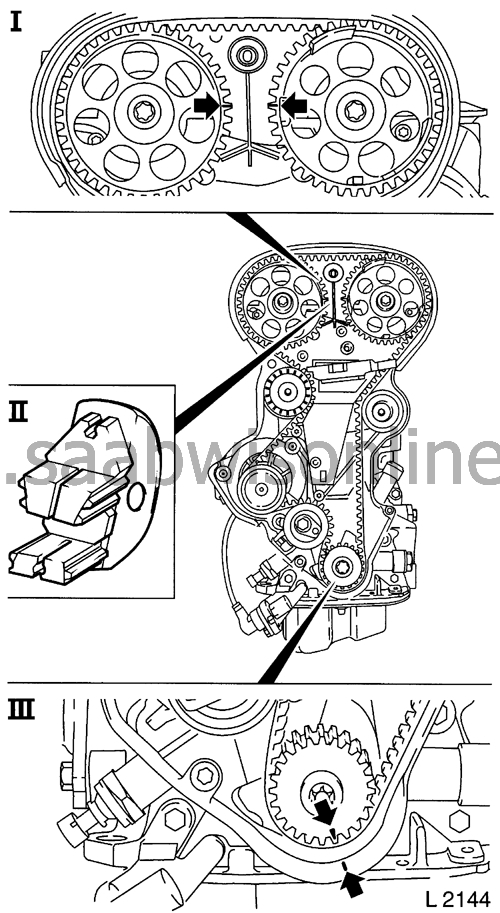
|
|
| 30. |
Remove KM-852
|
|
| 31. |
Tooth belt tension, setting
Undo the tooth belt tensioning pulley - Undo the bolt Turn the setting eccenter in the direction of the arrow (clockwise) until the pointer (1) on the tooth belt tensioning pulley corresponds with the groove (2) - Adjust a used tooth belt to the USED mark - Adjust a new tooth belt to the NEW mark Tighten the bolt for the tooth belt tensioning pulley - Tightening torque 20 Nm 
|
|
| 32. |
Tooth belt tension, check
Turn the crankshaft (720°) Instruction: The pointer on the tooth belt tensioning pulley and the groove must agree - Adjust a used tooth belt to the USED mark - Adjust a new tooth belt to the NEW mark |
|
| 33. |
Fit the bottom of the tooth belt cover
Fasten the rear tooth belt cover Tighten the bolt - Tightening torque 4 Nm |
|
| 34. |
Fit the top of the tooth belt cover
Fasten the rear tooth belt cover 3x Tighten bolt - Tightening torque 4 Nm |
|
| 35. |
Raise the car
|
|
| 36. |
Fit the multi-belt tensioning device
Tighten the bolt - Tightening torque 35 Nm Tension the multi-belt tensioning device - Use KM-913-A or a 15 mm flex head spanner Insert KM-6130 or a 4.5mm drift. |
|
| 37. |
Fit the crankshaft multi-belt pulley
Put in KM-911 Change the bolt Tighten the bolt - Tightening torque 95 Nm + 30° + 15° Remove KM-911 Fit the front screw plug |
|
| 38. |
Fit the multi-belt
Instruction: Observe the rotation direction and fitting position Loosen the multi-belt tensioning device - Use KM-913-A or a 15 mm flex head spanner Remove drift KM-6130 
|
|
| 39. |
39. Fit the wing liner
|
|
| 40. |
Lower the car
|
|
| 41. |
Fit the front right wheel
|
|
| 42. |
Lower the car
|
|
| 43. |
Replace the engine cover.
Unscrew the lid on the oil filler connection 2x Tighten bolt - Tightening torque 8 Nm Screw on the lid on the oil filler connection |
|
| 44. |
Connect the battery.
|
|
| 45. |
Check and adjust the engine oil level.
Note the prescribed engine oil volume |
|
| 46. |
Program erased memories
|
|
