PRE-RELEASE
Tooth belt, removing and fitting
| Tooth belt, removing and fitting |
| Change |
| 1. |
Open the bonnet
|
|
| 2. |
Disconnect the battery and remove the ground cable
|
|
| 3. |
Remove the engine cover.
Unscrew the lid on the oil filler connection 2x Unscrew Screw on the lid on the oil filler connection |
|
| 4. |
Remove
Air filter housing, air control
Remove the mass air flow sensor connector. remove the cable clip from the air filter housing. Remove the crankcase ventilation hose and the intake manifold. |
|
| 5. |
Undo the front right wheel
5x Undo bolt |
|
| 6. |
Raise the car
|
|
| 7. |
Remove the right front wheel.
5x Undo bolt |
|
| 8. |
Raise the car
|
|
| 9. |
Remove the wing liner.

|
|
| 10. |
Remove the multi-belt
Turn the multi-belt tension device in the direction of the arrow - use a 15 mm flexi-head spanner (2) Insert KM-6130 (1) or a 4.5mm drift. Mark the direction of rotation 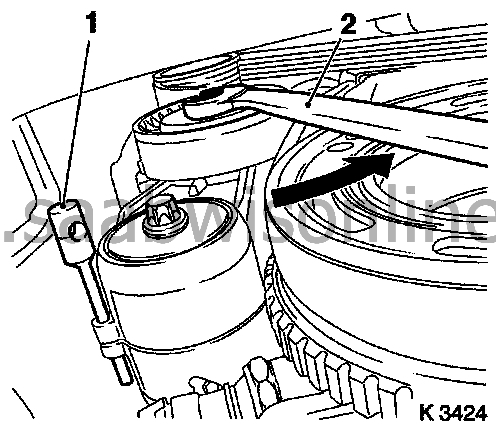
|
|
| 11. |
Remove the multi-belt tension device
Tighten the multi-belt tension device. Remove KM-6130 or the drift (2) Undo the multi-belt tension device Undo the bolt (1) 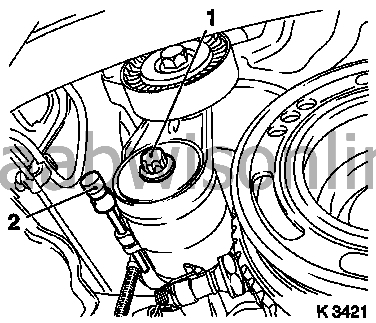
|
|
| 12. |
Remove the crankshaft multi-belt pulley
Prise loose the front screw plug from the oil pan Use KM-911 ( 83 96 327 Holder tool, fixing of flywheel ) Undo the bolt Remove KM-911 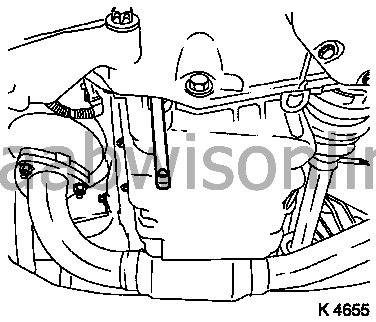
|
|
| 13. |
Fit KM-6313 (
83 96 145 Centring fixture, subframe - engine
with
83 96 368 Additional kit for centring fixture
) (1)
Place 83 96 145 Centring fixture, subframe - engine to the left of the front axle member (arrows, picture I) Instruction: The guide bolt must be in the hole in the front axle member Put both right-hand holders onto the front axle member (arrows, picture II) Instruction: The guide bolt must be in the hole in the front axle member (arrow, picture III) 2x Tighten bolt 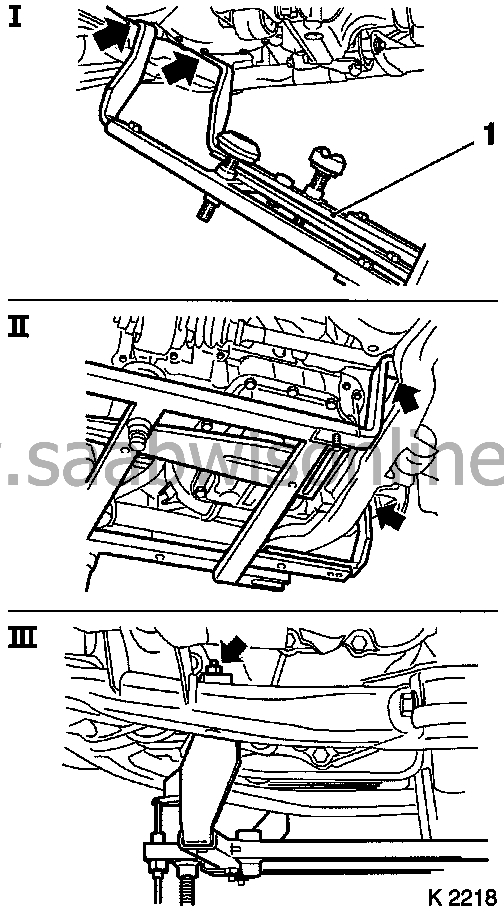
|
|
| 14. |
Fit the support. Adjust the support bracket.
Screw on the nut 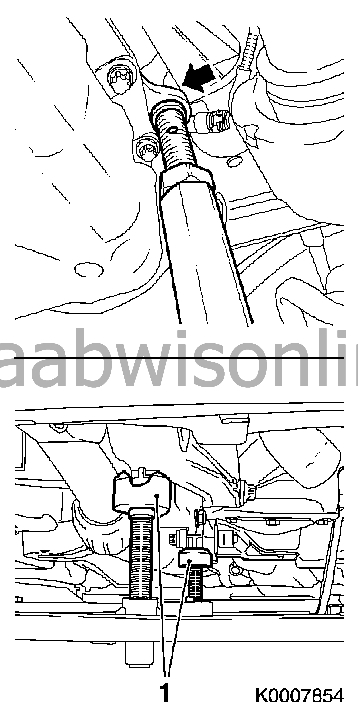
|
|
| 15. |
3x Adjust the support
Gearbox end, Instruction: Turn the spindle until the brackets (1) are firmly against the guide pins Engine control end, Instruction: Insert the support pin firmly into the engine block hole (arrow). Tighten the bolts, nut and support |
|
| 16. |
Lower the car
|
|
| 17. |
Remove the right-hand engine pad
Undo the engine holder adapter - 3x Unscrew bolt (1) Undo the engine pad - 2x Unscrew bolt - Unscrew nut (2) 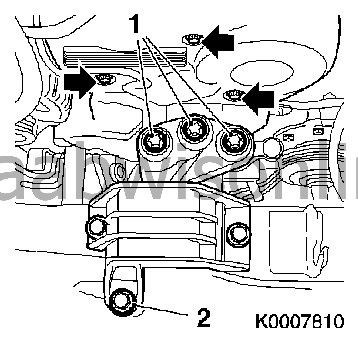
|
|
| 18. |
Remove the top part of the tooth belt cover
3x Unscrew the bolt (arrows) Detach from the rear tooth belt cover |
|
| 19. |
Remove the bottom of the tooth belt cover
Undo the bolt (arrow) Detach from the rear tooth belt cover 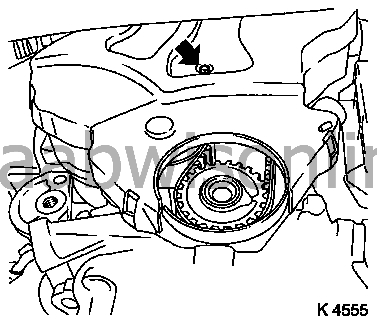
|
|
| 20. |
Remove the camshaft sensor (1)
2x Unscrew bolt (2) Instruction: Place the camshaft sensor to one side 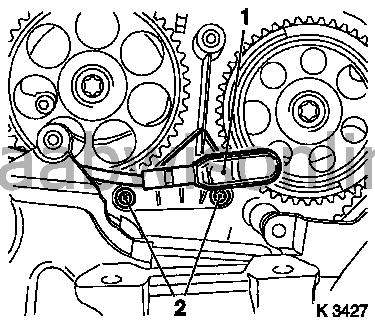
|
|
| 21. |
Set ignition TDC cylinder 1
Screw tight the bolt for the crankshaft multi-belt pulley Put the crankshaft on the mark - Turn the crankshaft at an even rate Instruction: The marks on the tooth belt sprocket and the rear tooth belt cover must agree (III) Fix the camshaft sprocket. Instruction: The marks must be in front of each other and correspond with the top of the cylinder head (I) - use KM-852 83 96 319 Holder tool, fixing of camshaft sprocket Z18XE ) (ll) 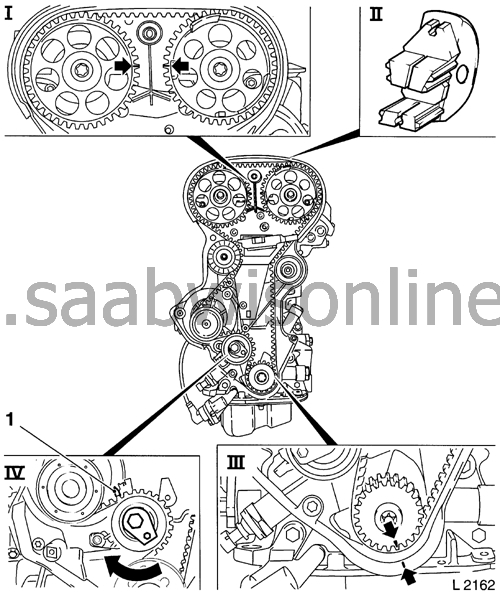
|
|
| 22. |
Remove the tooth belt
Undo the tooth belt tensioning pulley (IV) - Undo the bolt - Turn the setting eccenter in the direction of the arrow (clockwise) until the pointer(1) on the tooth belt tensioning pulley is just short of the left-hand end position. |
|
| 23. |
Put in the tooth belt, Instruction: Check the fitting position.
|
|
| 24. |
Fit the right-hand engine pad
Fasten the engine holder adapter - 3x Tighten bolt - Tightening torque 55 Nm - Fasten the engine pad - 2x Tighten bolt - Tightening torque 55 Nm - Tighten nut - Tightening torque 55 Nm |
|
| 25. |
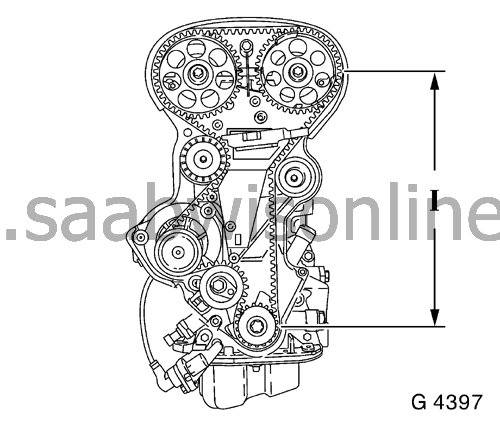
Put on the tooth belt Instruction: The pulling side must be taut (I)
|
|
| 26. |
Tension the tooth belt
Tension the tooth belt tensioning pulley - Turn the setting eccenter in the direction of the arrow (anticlockwise) until the pointer on the tooth belt tension roller is just short of the right-hand end position Fasten the bolt for the tooth belt tensioning pulley (1) 
|
|
| 27. |
Remove KM-852
(83 96 319 Holder tool, fixing of camshaft sprocket Z18XE)
|
|
| 28. |
Valve timing, check: Turn the crankshaft (720°) in the direction of engine rotation with the bolt for the crankshaft multi-belt sprocket
Put the crankshaft on the mark Instruction: The marks on the tooth belt sprocket and the rear tooth belt cover must agree (III) Put in KM-852 (II) Instruction: The marks must be in front of each other and correspond with the top of the cylinder head (I) 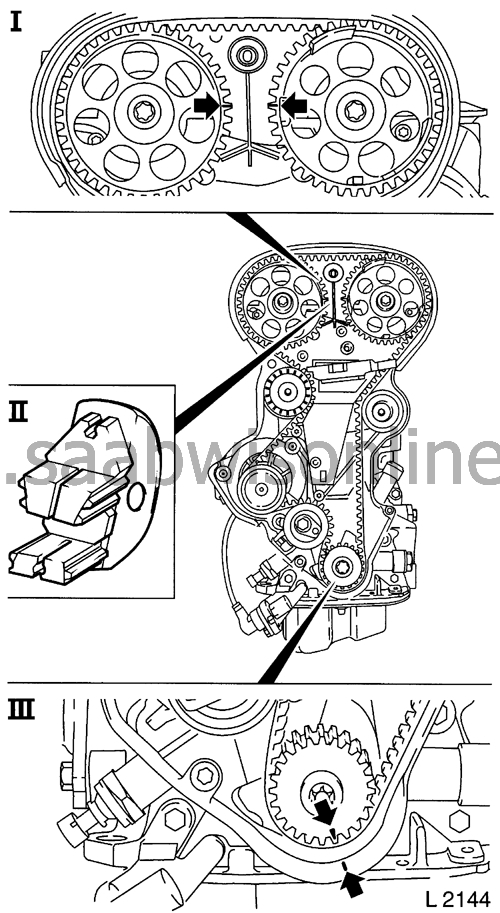
|
|
| 29. |
Remove KM-852
|
|
| 30. |
Tooth belt tension, setting
Undo the tooth belt tensioning pulley - Undo the bolt Turn the setting eccenter in the direction of the arrow (clockwise) until the pointer (1) on the tooth belt tensioning pulley corresponds with the groove (2) - Adjust a used tooth belt to the USED mark - Adjust a new tooth belt to the NEW mark Tighten the bolt for the tooth belt tensioning pulley - Tightening torque 20 Nm 
|
|
| 31. |
Tooth belt tension, check
Turn the crankshaft (720°) Instruction: The pointer on the tooth belt tensioning pulley and the groove must agree - Adjust a used tooth belt to the USED mark - Adjust a new tooth belt to the NEW mark |
|
| 32. |
Clean the threads.
2x Clean threads - For camshaft sensor |
|
| 33. |
Fit the camshaft sensor Instruction: Fit the bolts with locking compound (red)
2x Tighten bolt - Tightening torque 8 Nm |
|
| 34. |
Fit the bottom of the tooth belt cover
Tighten the bolt - Tightening torque 4 Nm |
|
| 35. |
Fit the top of the tooth belt cover
Fasten the rear tooth belt cover 3x Tighten bolt - Tightening torque 4 Nm |
|
| 36. |
Raise the car
|
|
| 37. |
Remove the support for the engine
|
|
| 38. |
Remove
83 96 145 Centring fixture, subframe - engine
.
|
|
| 39. |
Fit the multi-belt tensioning device
Tighten the bolt - Tightening torque 35 Nm Tension the multi-belt tensioning device - Use KM-913-A or a flex-head spanner Insert KM-6130 or a 4.5mm drift. |
|
| 40. |
Fit the crankshaft multi-belt pulley
Put in KM-911 ( 83 96 327 Holder tool, fixing of flywheel ) Change the bolt Tighten the bolt - Tightening torque 95 Nm + 30° + 15° Remove KM-911 Fit the front screw plug |
|
| 41. |
Fit the multi-belt
Instruction: Observe the rotation direction and fitting position Undo the multi-belt tensioning device - Use KM-913-A Remove KM-6130 
|
|
| 42. |
Fit the wing liner.
|
|
| 43. |
Lower the car
|
|
| 44. |
Fit the front right wheel
|
|
| 45. |
Fit the air filter housing
Fit the intake hose Fit the engine vent hose Connect cable set connector Fasten the cable set |
|
| 46. |
Fit the engine cover
Unscrew the lid on the oil filler connection 2x Tighten bolt - Tightening torque 8 Nm Screw on the lid on the oil filler connection |
|
| 47. |
Connect the battery.
|
|
| 48. |
Close the bonnet
|
|
| 49. |
Program erased memories
|
|
