PRE-RELEASE
Camshaft drive, B284 (new version)
| Camshaft drive, B284 (new version) |
| To remove |
| Note | ||
|
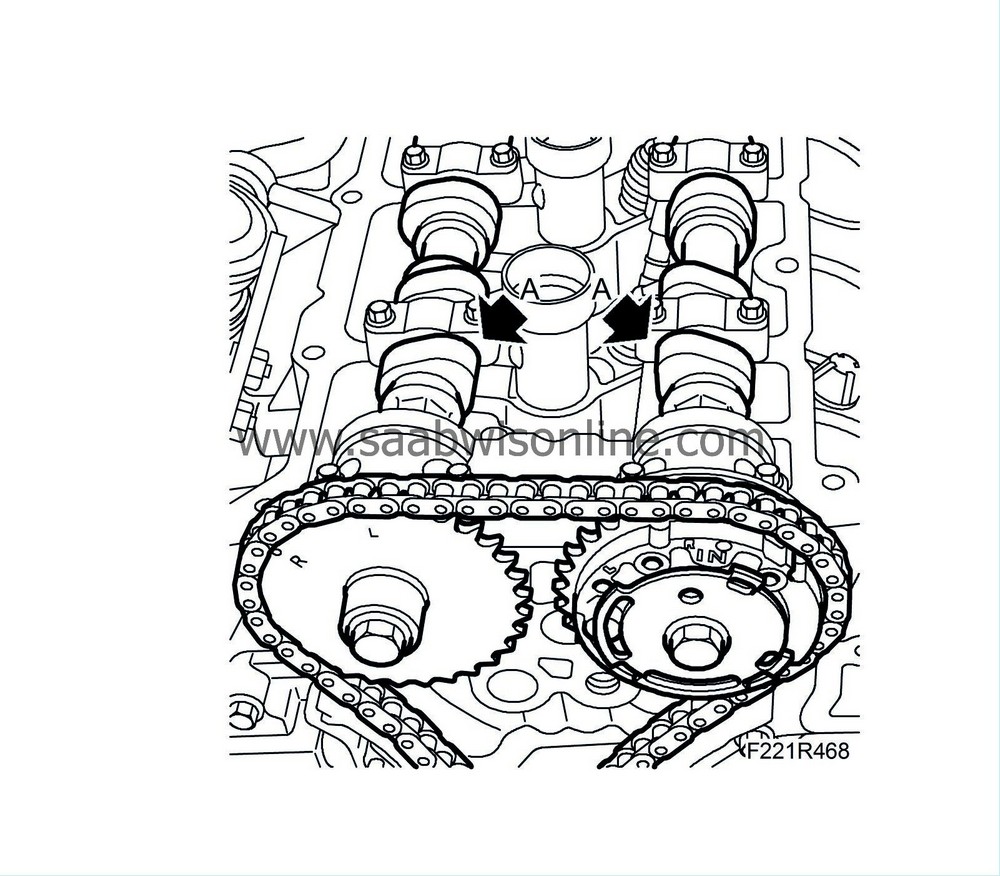
There is no marking for checking valve timing on the camshafts and cylinder heads. The timing chains and primary chain have white markings on the links which should correspond with the markings on the sprockets. |
| 1. |
Remove the
Timing cover
.
|
|
| 2. |
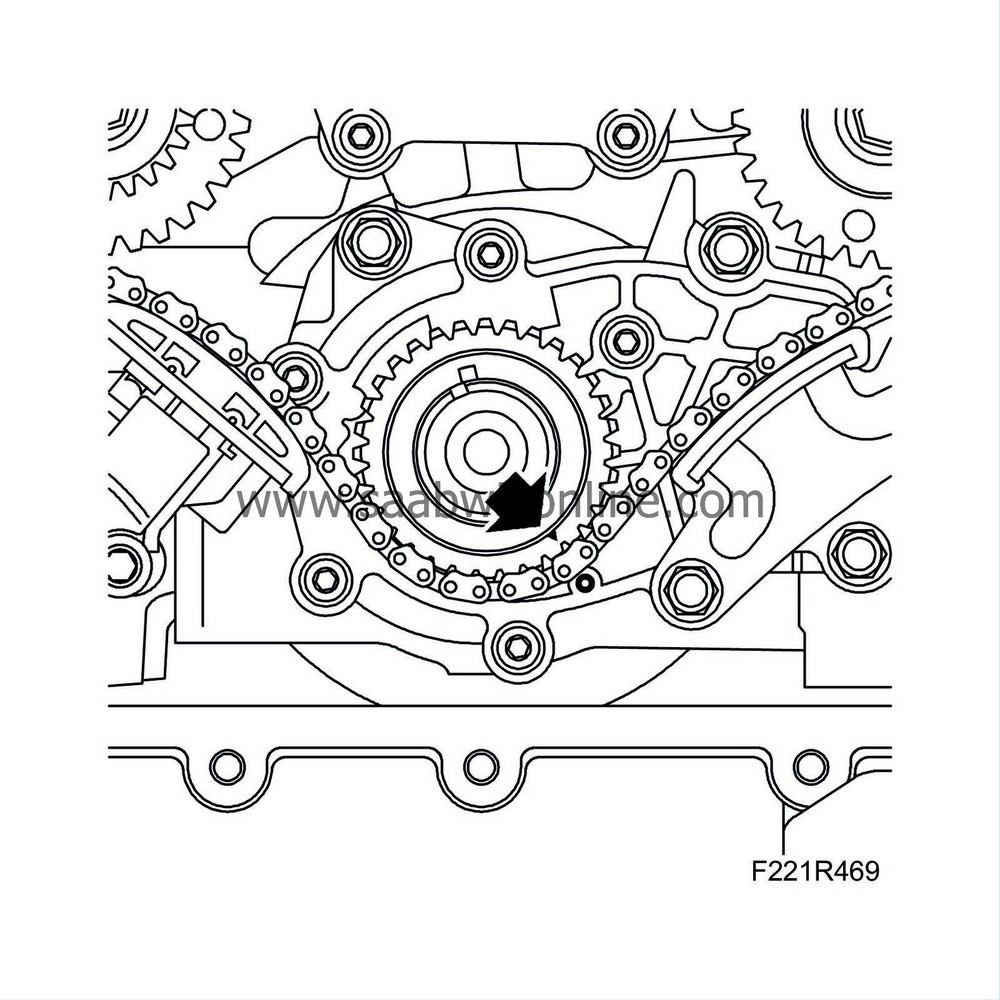
Rotate the crankshaft so that the cams (A) of cylinder 1 point upward and inward at an angle, thus aligning the installation marks on the crankshaft sprocket and the oil pump. When the engine is approx. 15 degrees ATDC, use
EN-46111 Sleeve
to turn the engine.
|
|
| 3. |
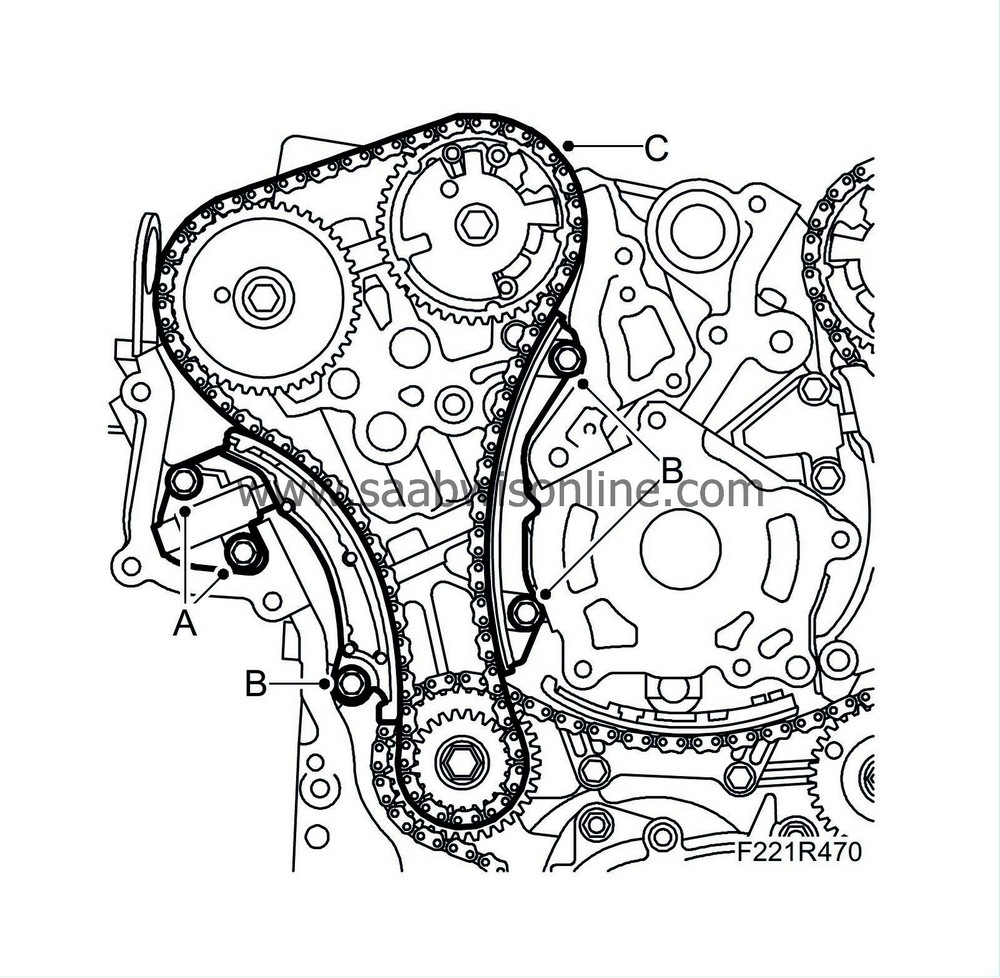
Remove the timing chain tensioner for the rear cylinder bank (A).
|
|
| 4. |
Remove the chain tensioner gasket.
|
||||||||||
| 5. |
Remove the guides (B) and lift off the chain (C).
|
|
| 6. |
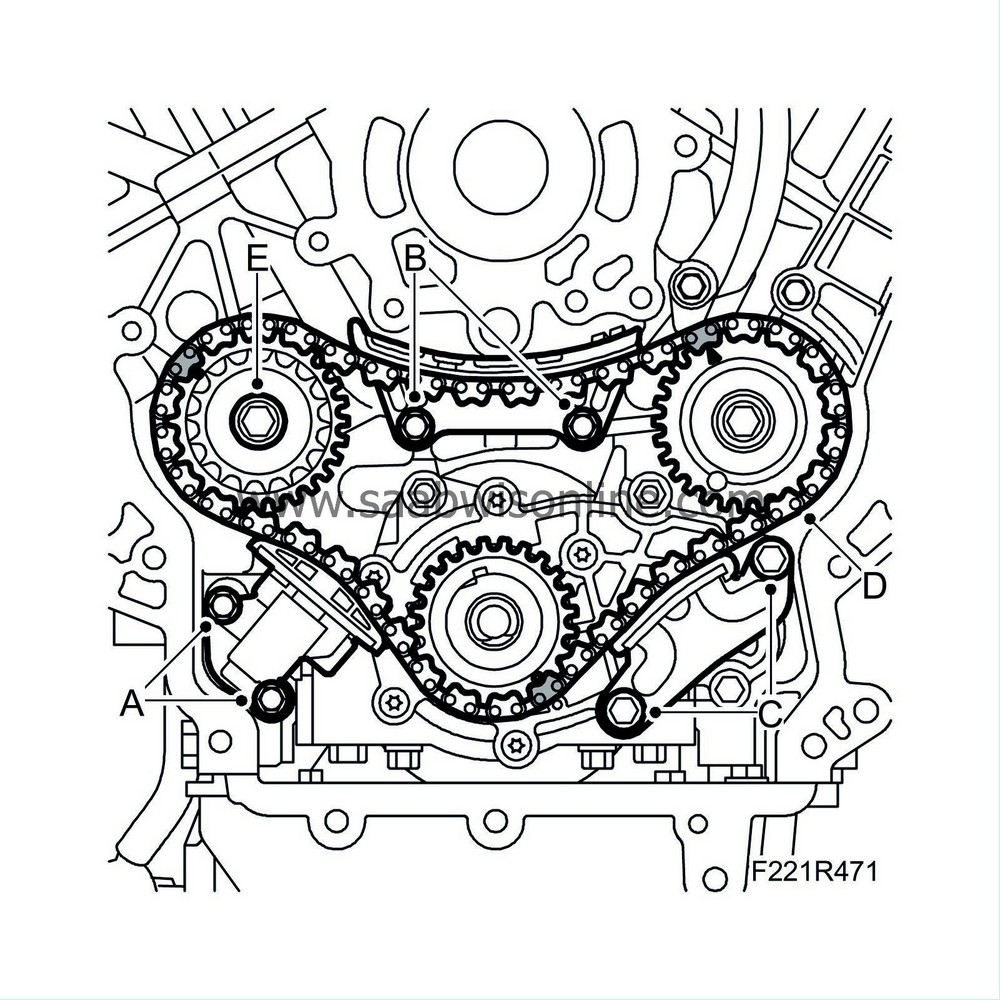
Remove the chain tensioner (A) for the primary circuit and remove the gasket.
|
|
| 7. |
Remove the guides (B), (C) and lift off the chain (D).
|
|
| 8. |
Remove the rear primary sprocket (E).
|
|
| 9. |
Remove the timing chain tensioner (A) for the front cylinder bank and remove the gasket.

|
|
| 10. |
Remove the guides (B) and lift off the front primary sprocket (C). Lift off the chain (D).
|
|
| 11. |
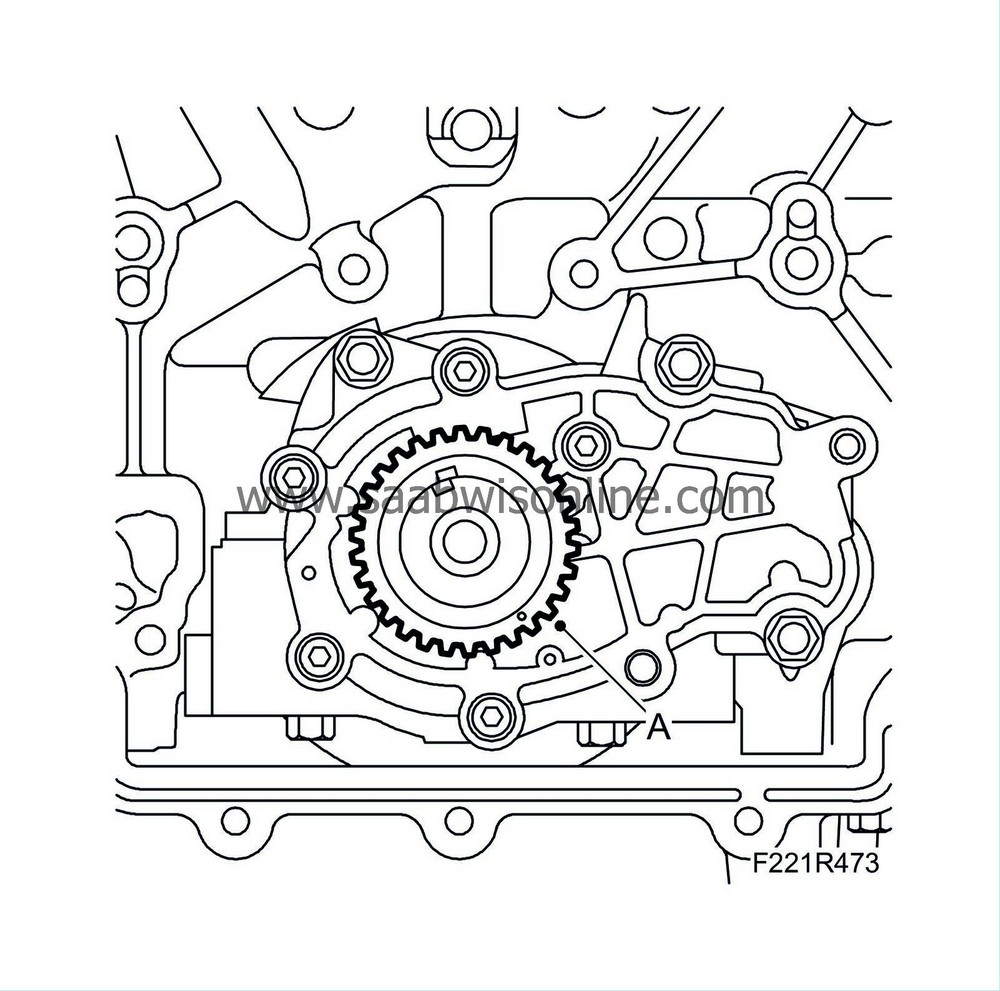
Remove the crankshaft sprocket (A).
|
|
| To fit |
| 1. |
Fit the camshafts' sprockets (B) and bolts (A) (x 4), counterholding with a fixed spanner on the camshaft flats.
Tightening torque: 65 Nm (48 lbf ft) 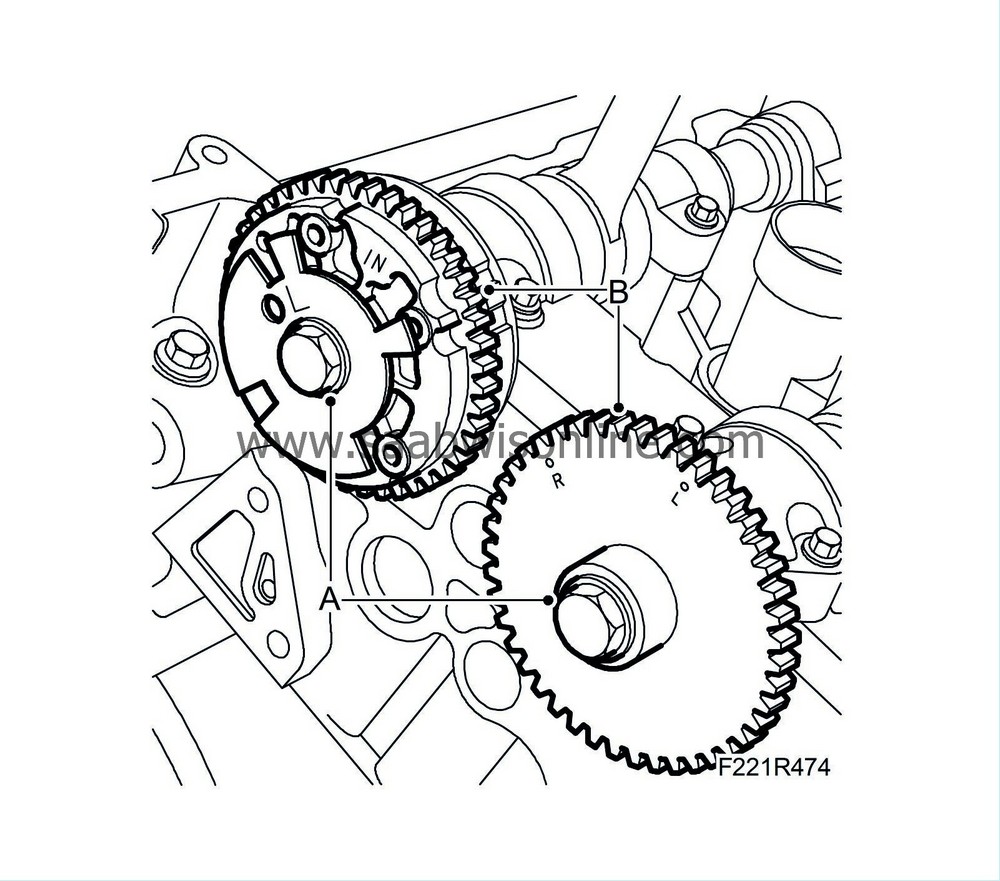
|
|||||||
| 2. |
Fit the sprocket (A) on the crankshaft. The marking must be turned outwards. Check that the fitting markings on the crankshaft sprocket and oil pump are aligned. Use
EN-46111 Sleeve
to adjust the position of the crankshaft.
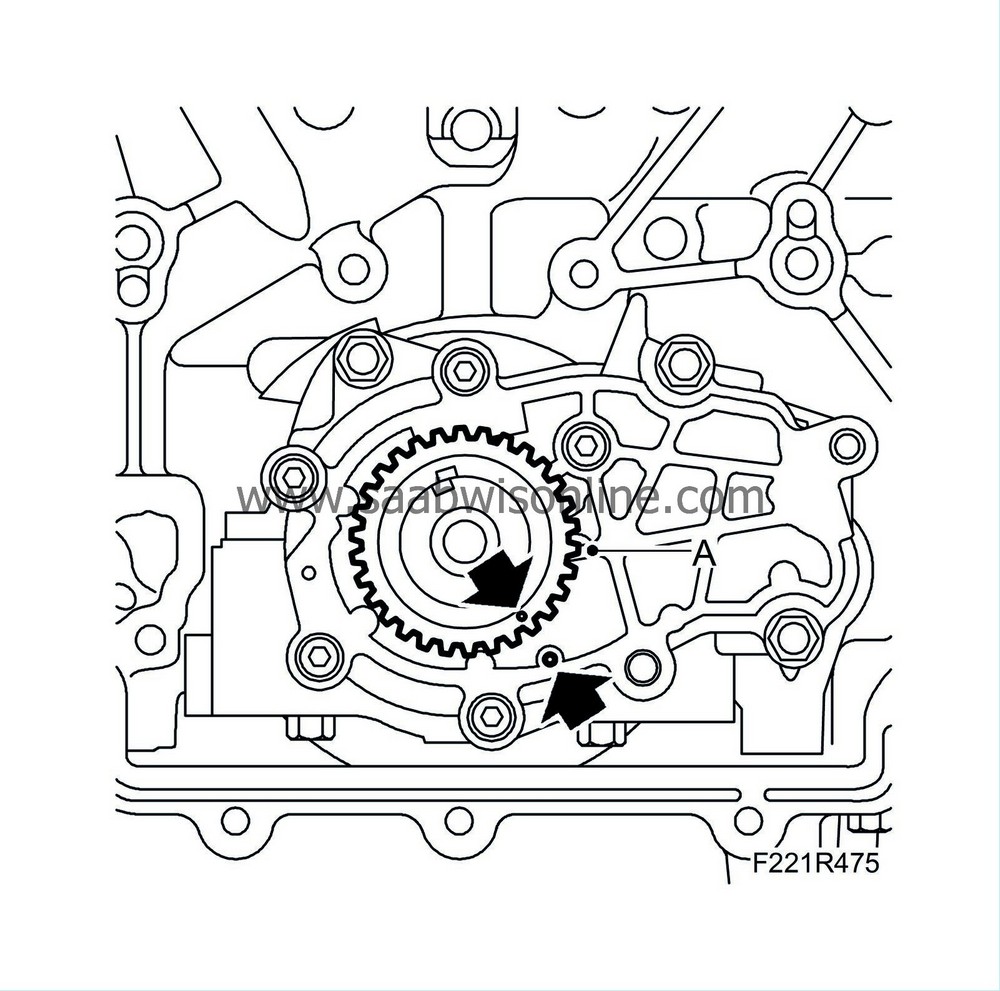
|
||||||||||
| 3. |
Fit the front primary sprocket (C).
Tightening torque: 65 Nm (48 lbf ft) 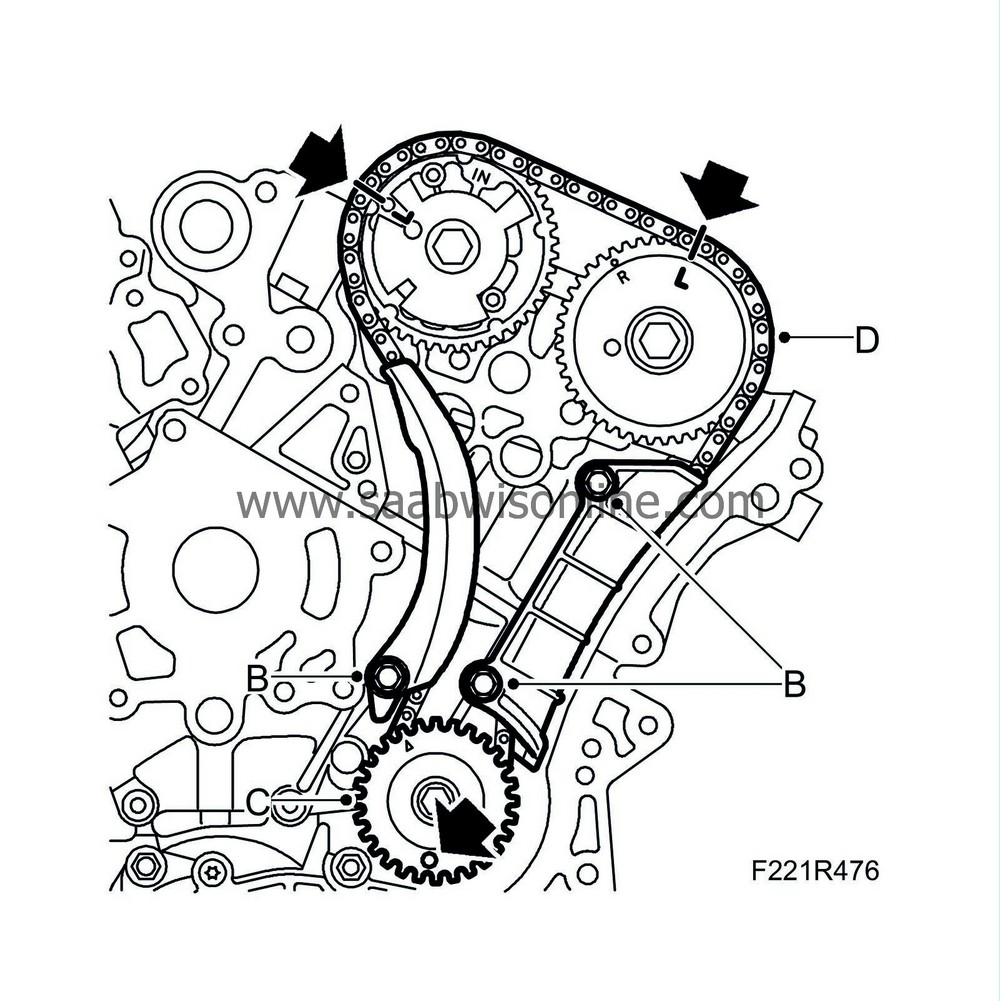
|
|
| 4. |
Fit the camshaft drive for the front cylinder bank. Position the chain (D) on the camshaft sprockets so that the links with white marking align with the markings on the sprockets. The front cylinder bank sprockets are marked with an L.
|
|
| 5. |
Fit the chain guides (B). The link with white marking must be visible through the hole (arrow) in the primary sprocket. The link must be right in front of the hole.
Fit the thread adhesive on the moving guide's bolt. Tightening torque 23 Nm (17 lbf ft) |
|
| 6. |
Restore the chain tensioner to its previous position by removing the piston and turning the spring clockwise until it engages in the inner position. Use a screwdriver. Refit the piston in the tensioner and check that the groove in the piston is vertical so that is fits with the tensioner guide.
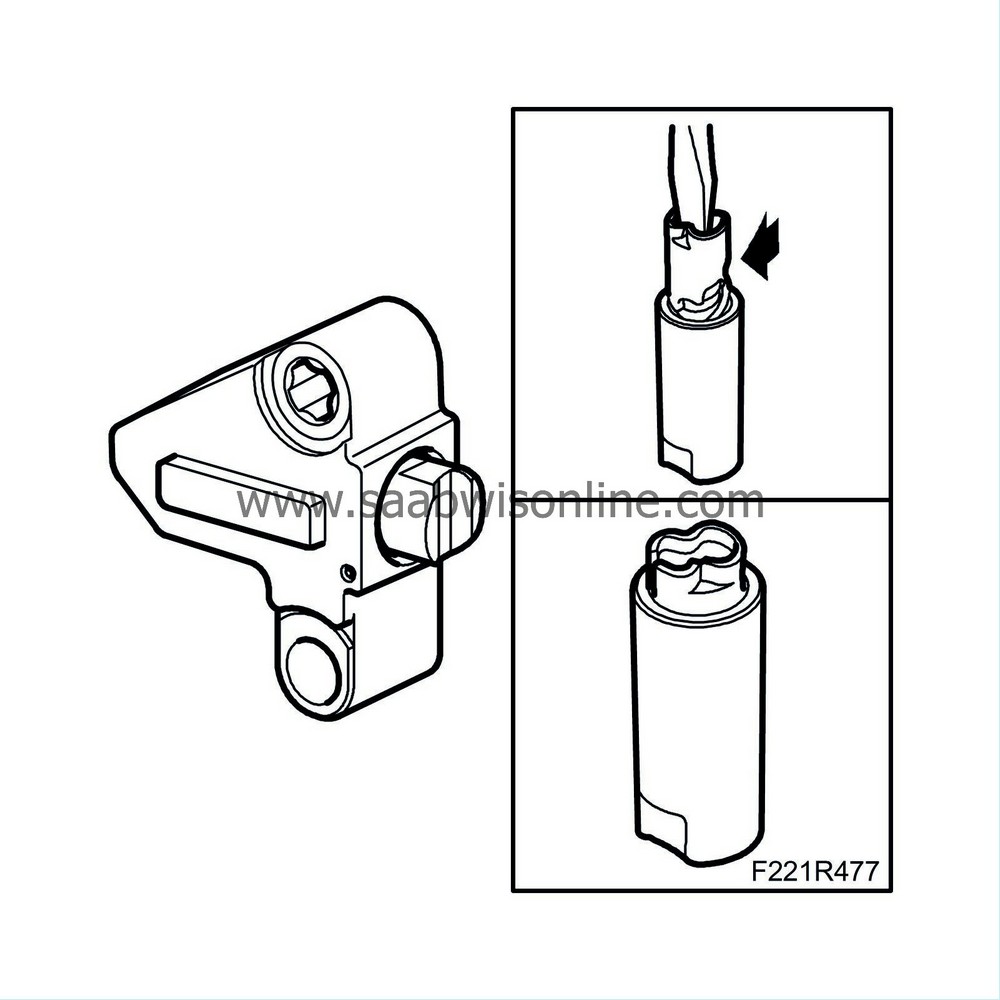
|
|
| 7. |
Fit the chain tensioner (A) with a new gasket. Note the position of the gasket.
Tightening torque 23 Nm (17 lbf ft) 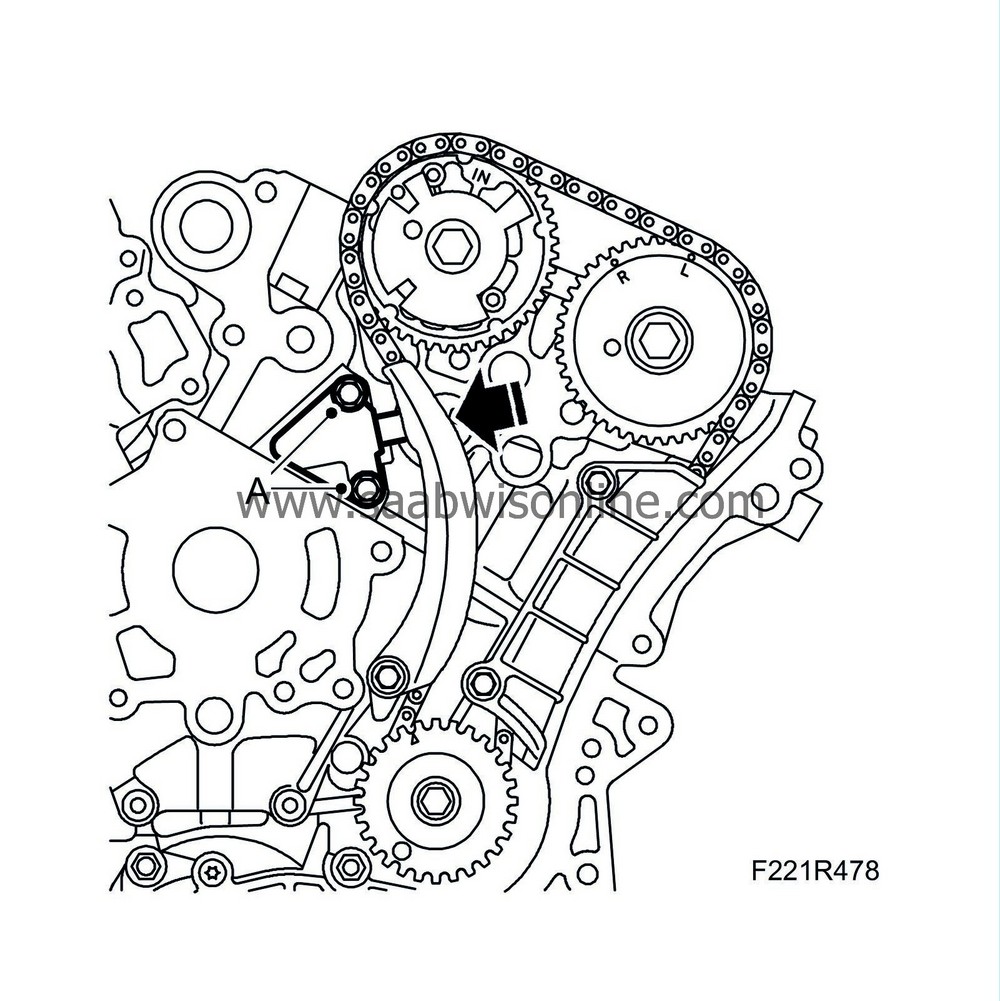
|
|
| 8. |
Trigger/activate the chain tensioner by carefully pressing on the timing chain or guide.
|
|
| 9. |
Fit the rear primary sprocket (E).
Tightening torque: 65 Nm (48 lbf ft) 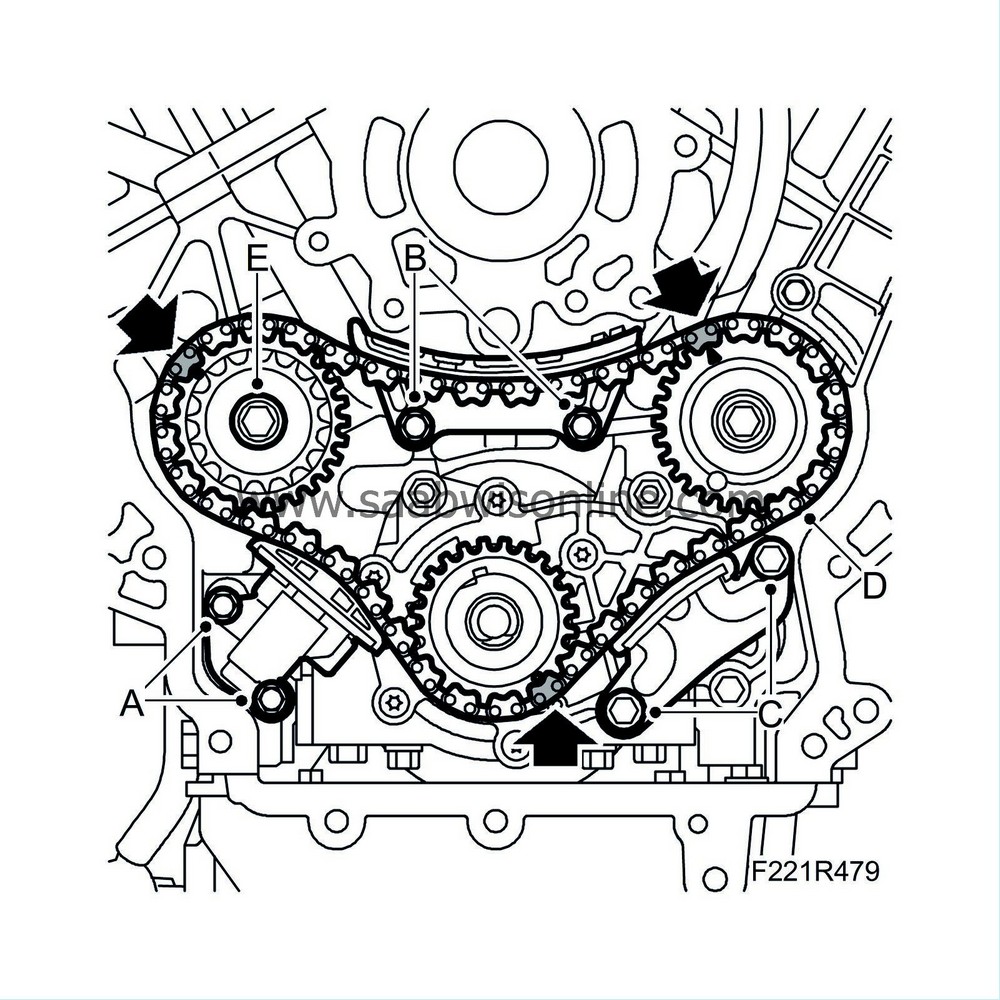
|
|
| 10. |
Fit the primary chain (D) so that the white links align with the markings on the primary sprockets and crankshaft sprocket.
|
|
| 11. |
Fit the front chain guide (C).
Tightening torque 13 Nm (10 lbf ft) |
|
| 12. |
Fit the upper guide (B).
Tightening torque 23 Nm (187 lbf ft) |
|
| 13. |
Restore the chain tensioner to its previous position by removing the piston and turning the spring clockwise until it engages in the inner position. Use a screwdriver. Refit the piston in the tensioner. Check that the groove in the piston is vertical so that is fits with the tensioner guide.

|
|
| 14. |
Fit the chain tensioner (A) with new gasket. Note the position of the gasket.
Tightening torque 23 Nm (17 lbf ft) |
|
| 15. |
Trigger/activate the chain tensioner by carefully pressing on the timing chain or guide.
|
|
| 16. |
Rotate the camshafts of the rear cylinder bank forward slightly and fit
EN-48383-3 Adjustment tool
on the camshafts.

|
|
| 17. |
Rotate the crankshaft forward approx. ¼ turn, approx. 100° ATDC, so that the marking on the crankshaft sprocket is aligned with the marking on the oil pump (A).

|
|
| 18. |
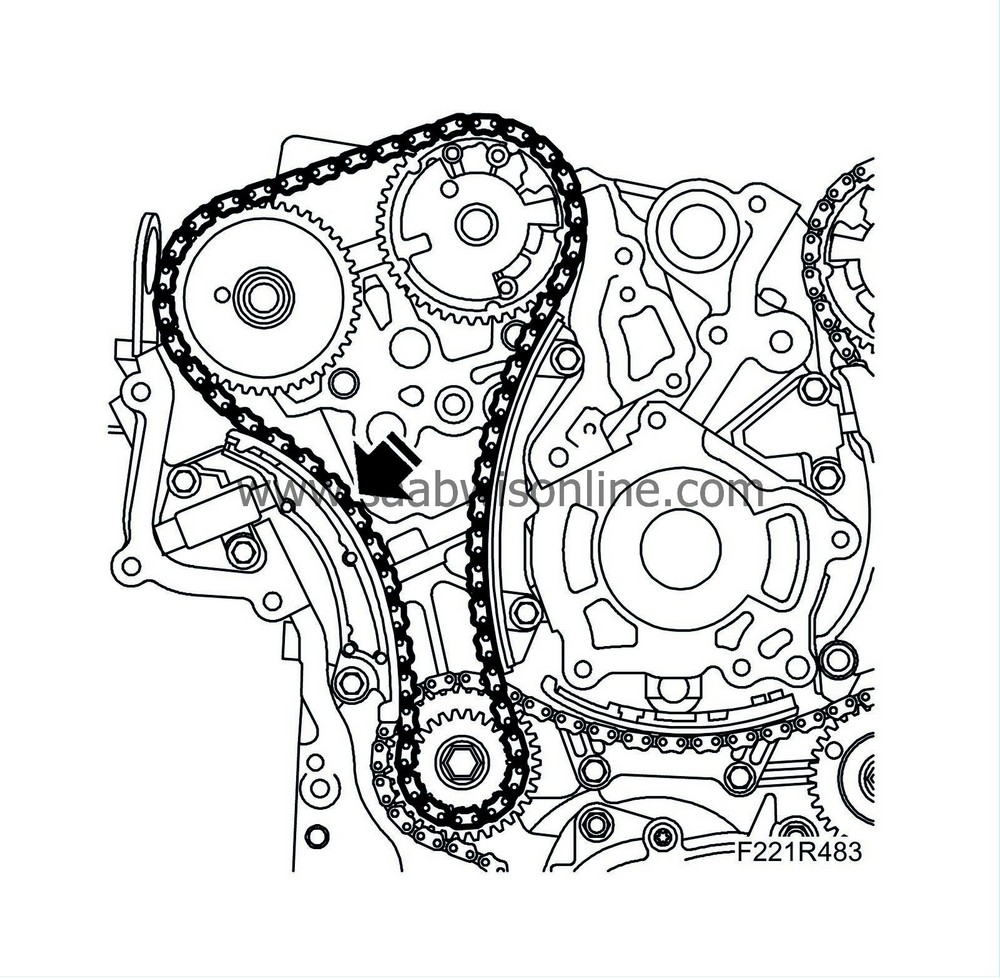
Position the chain (C) on the camshaft sprockets so that the white links align with the markings on the sprockets. The rear cylinder bank sprockets are marked with an R.

|
|
| 19. |
Fit the chain guides. (B)
Fit the thread adhesive on the moving guide's bolt. Tightening torque 23 Nm (17 lbf ft) |
|
| 20. |
Restore the chain tensioner to its previous position by removing the piston and turning the spring clockwise until it engages in the inner position. Use a screwdriver. Refit the piston in the tensioner. Check that the groove in the piston is vertical so that is fits with the tensioner guide.

|
|
| 21. |
Fit the chain tensioner (A) with a new gasket. Note the position of the gasket.
Tightening torque 23 Nm (17 lbf ft) |
|
| 22. |
Trigger/activate the chain tensioner by carefully pressing on the timing chain or guide.
|
|
| 23. |
Remove EN-48383-3 and rotate the crankshaft 1 3/4 turns to check and ensure that all chain tensioners have been triggered and that the chain is correctly seated in the guides.
|
|
| 24. |
Set the crankshaft sprocket's marking against the oil pump's marking.

|
|
| 25. |
Check that
EN-48383-2 Adjustment tool
(A) fits on the rear bank camshafts and
EN-48383-3 Adjustment tool
(B) fits on the front bank camshafts.
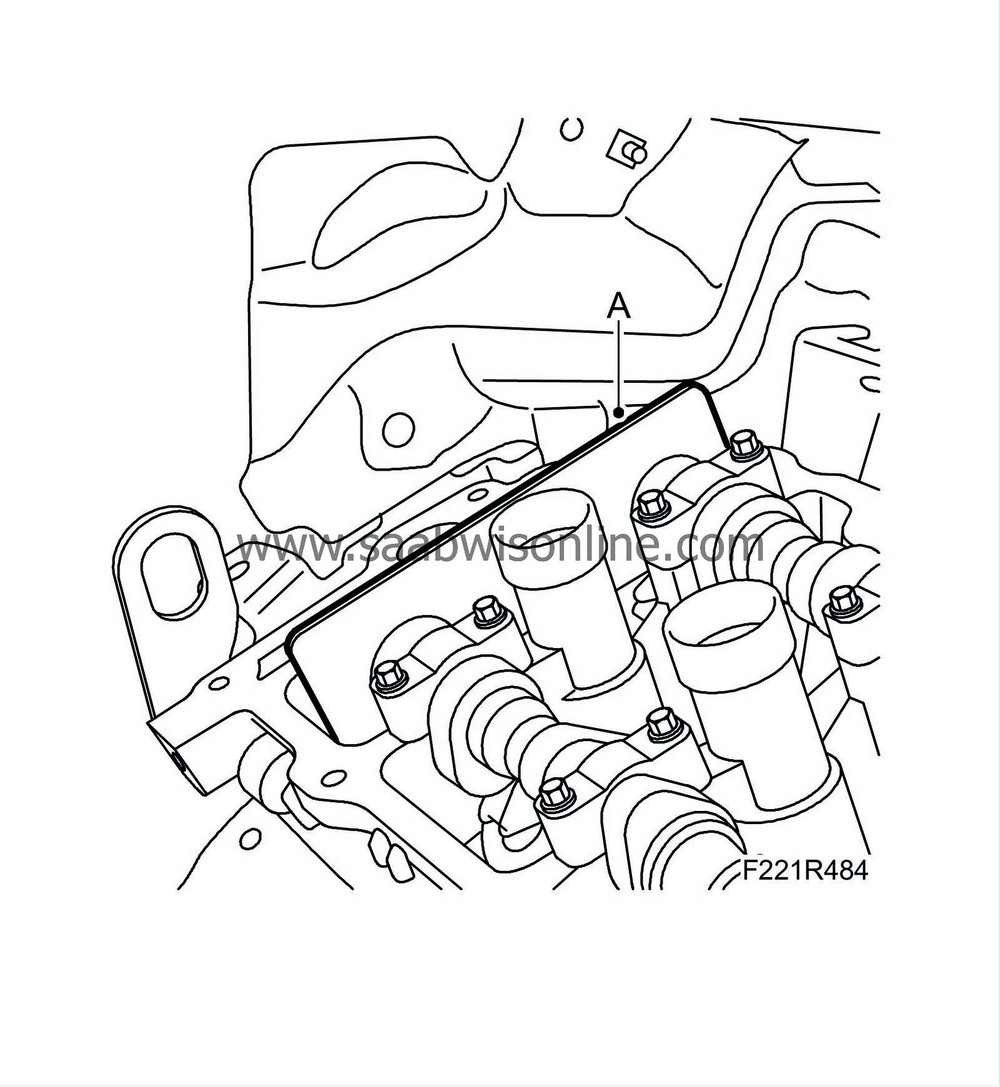
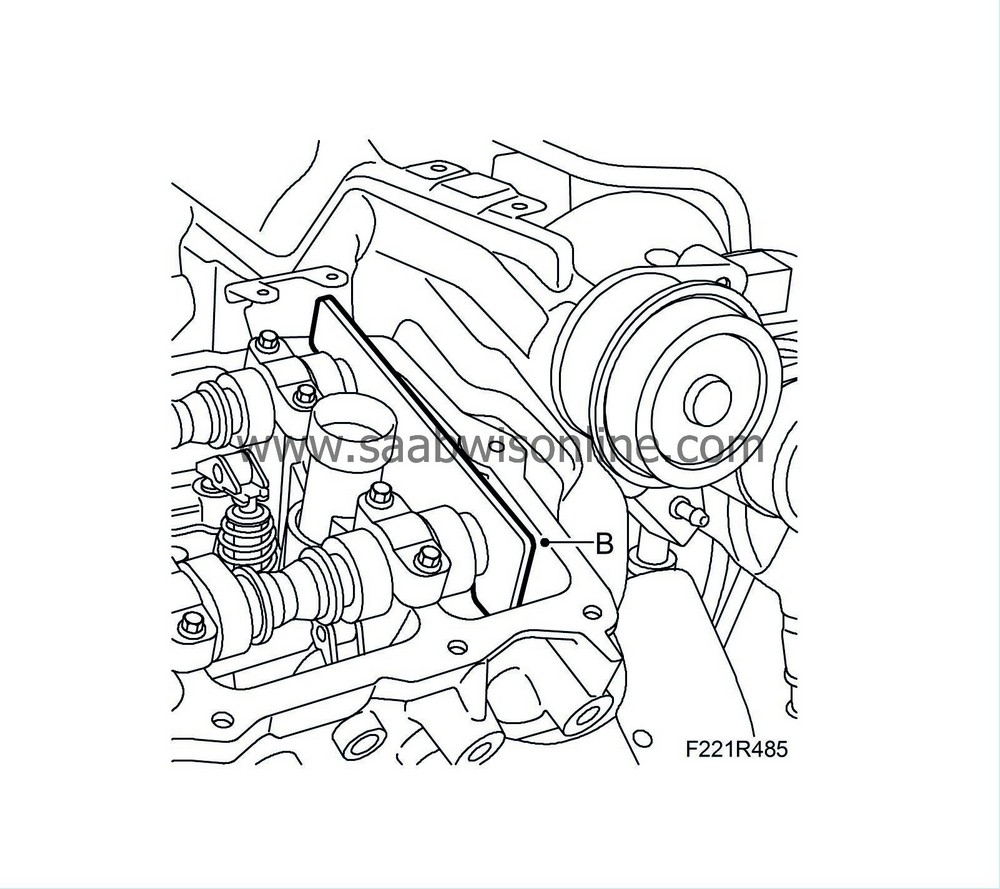
|
|
| 26. |
Remove EN-48383-2 and EN-48383-3.
|
|
| 27. |
Fit the
Timing cover
.
|
|


