PRE-RELEASE
Right engine pad, change
| Right engine pad, change |
| Change |
| 1. |
Open the bonnet
|
|
| 2. |
Remove the engine cover
Unscrew the lid on the oil filler connection 2x Unscrew Screw on the lid on the oil filler connection |
|
| 3. |
Remove the air cleaner casing (1)
Pull off the cable set connector (2) - mass air flow sensor Undo the cable set (arrows) Detach the engine ventilation hose (3) Detach the intake hose (4) 
|
|
| 4. |
Raise the car
|
|
| 5. |
Remove the wing liner.

|
|
| 6. |
Fit KM-6313
(83 96 145 Centring fixture, subframe - engine
with
83 96 368 Additional kit for centring fixture
)
Place KM-6313 to the left of the front axle member (arrows, picture I) Instruction: The guide bolt must fit in the hole in the front axle member Put both right-hand holders onto the front axle member (arrows, picture II) Instruction: The guide bolt must be in the hole in the front axle member (arrow, picture III) 2x Tighten bolt 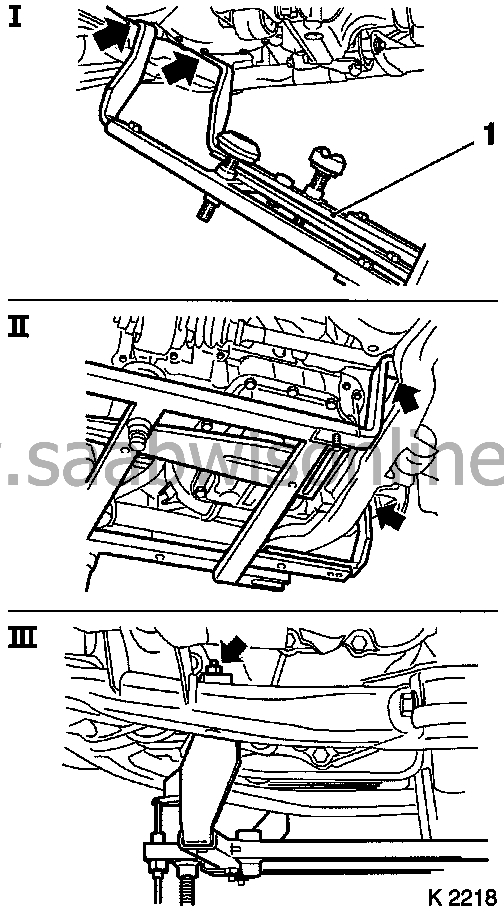
|
|
| 7. |
Fit support
On KM-6313 - Adjust the support mounting Screw on the nut 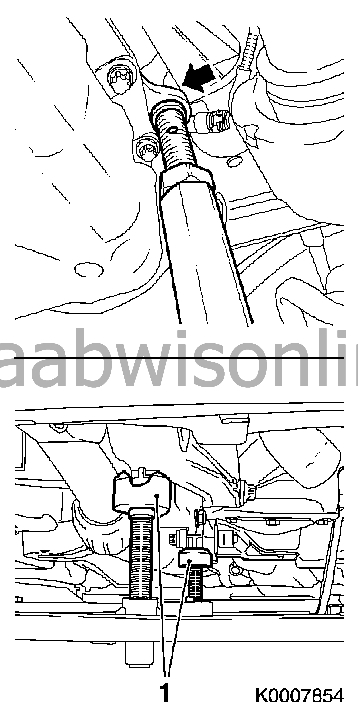
|
|
| 8. |
3x Adjust the support
Gearbox end Instruction: Turn the spindle until the brackets (1) are firmly against the guide pins Engine control end Instruction: Insert the support pin firmly into the engine block hole (arrow). Tighten the bolts, nut and support |
|
| 9. |
Lower the car
|
|
| 10. |
Remove the right-hand engine pad
Undo the engine holder adapter - 3x Unscrew bolt (1) Undo the engine pad - 2x Unscrew bolt - Unscrew nut (2) 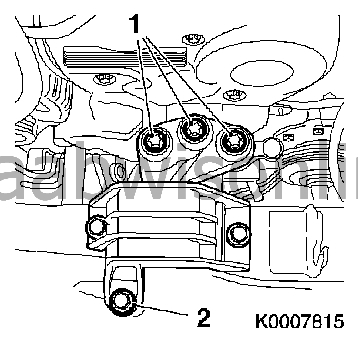
|
|
| 11. |
Fit the right-hand engine pad
Fasten the engine holder adapter - 3x Tighten the bolt - Tightening torque 55 Nm Fasten the engine pad - 2x Tighten the bolt - Tightening torque 55 Nm - Tighten the nut - Tightening torque 55 Nm |
|
| 12. |
Raise the car
|
|
| 13. |
Remove the support
Engine control side |
|
| 14. |
Remove KM-6313
|
|
| 15. |
Fit the wing liner.
|
|
| 16. |
Lower the car
|
|
| 17. |
Fit the air filter housing
Fit the intake hose Fit the engine vent hose Connect cable set connector Fasten the cable set |
|
| 18. |
Replace the engine cover.
Unscrew the lid on the oil filler connection 2x Tighten bolt - Tightening torque 8 Nm Screw on the lid on the oil filler connection |
|
| 19. |
Close the bonnet
|
|
