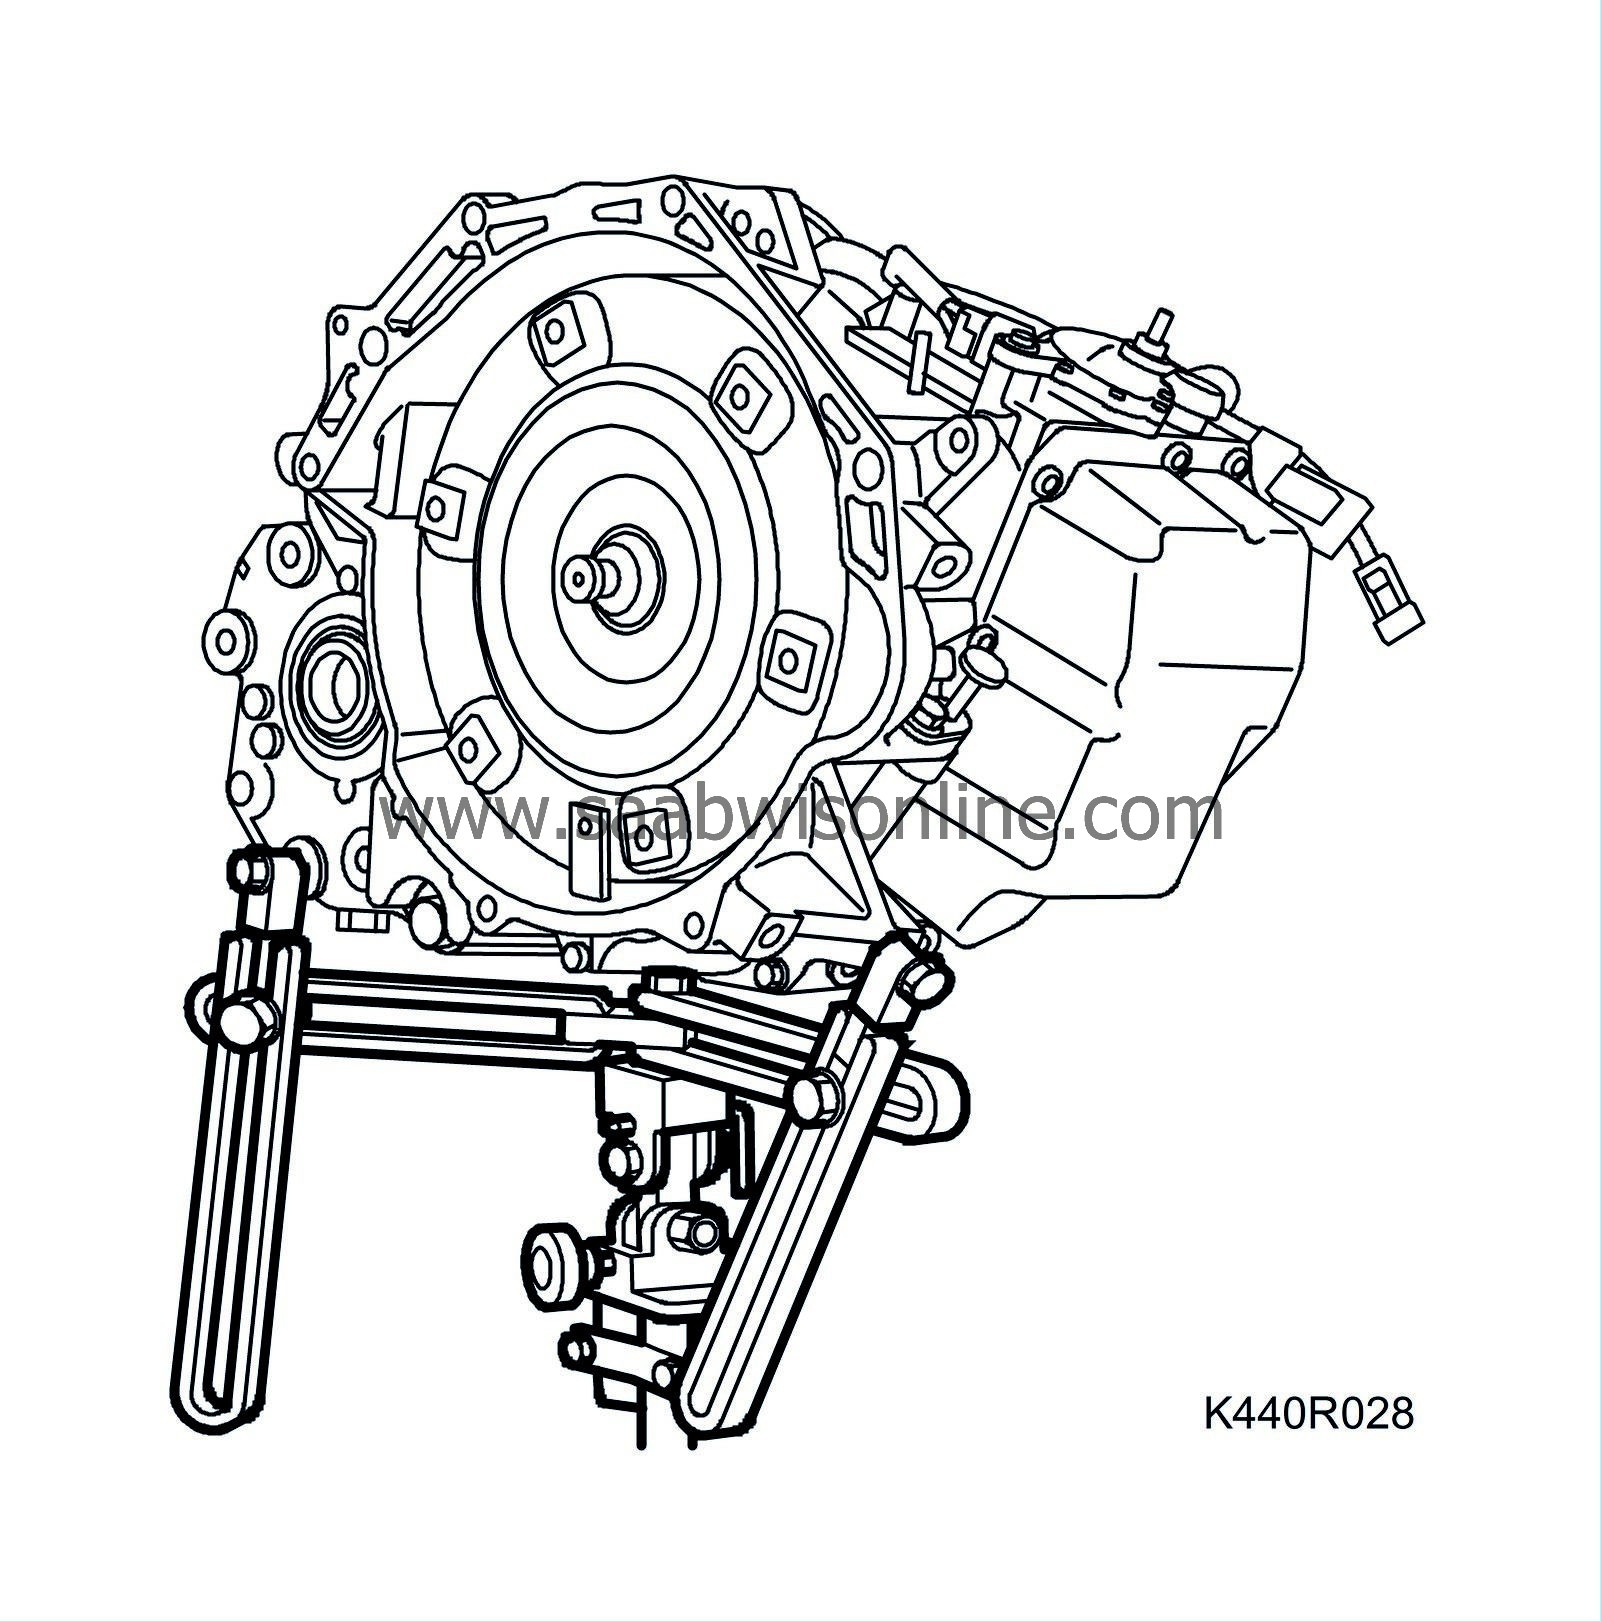
Complete gearbox, B207 4WD
|
|
Complete gearbox, B207 4WD
|
|
1.
|
Place covers over the wings to keep the paintwork clean and protect it from damage.
|
|
2.
|
Remove the upper engine cover.
|
|
3.
|
Remove the battery cover.
|
|
4.
|
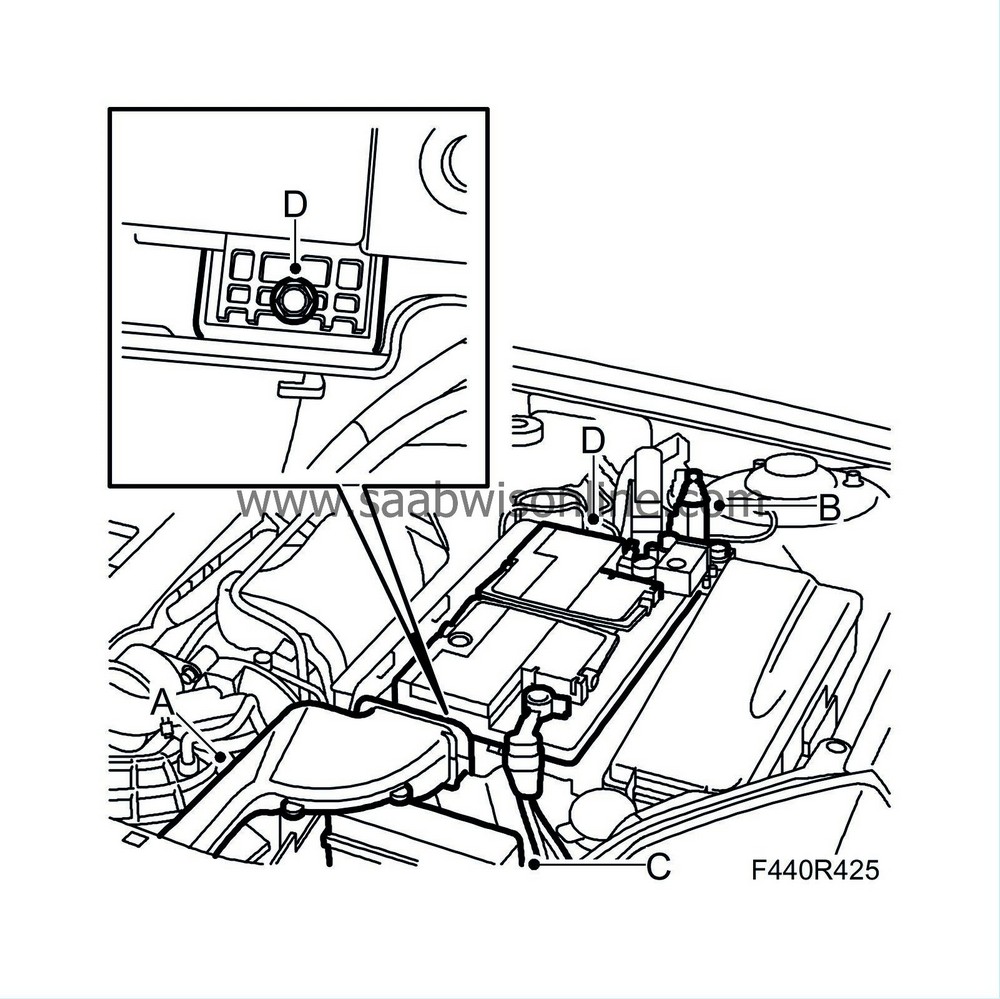
Remove the cooling pipe (A), bonnet switch's connector (B), fuse box (C), and the battery (D).
|
|
5.
|
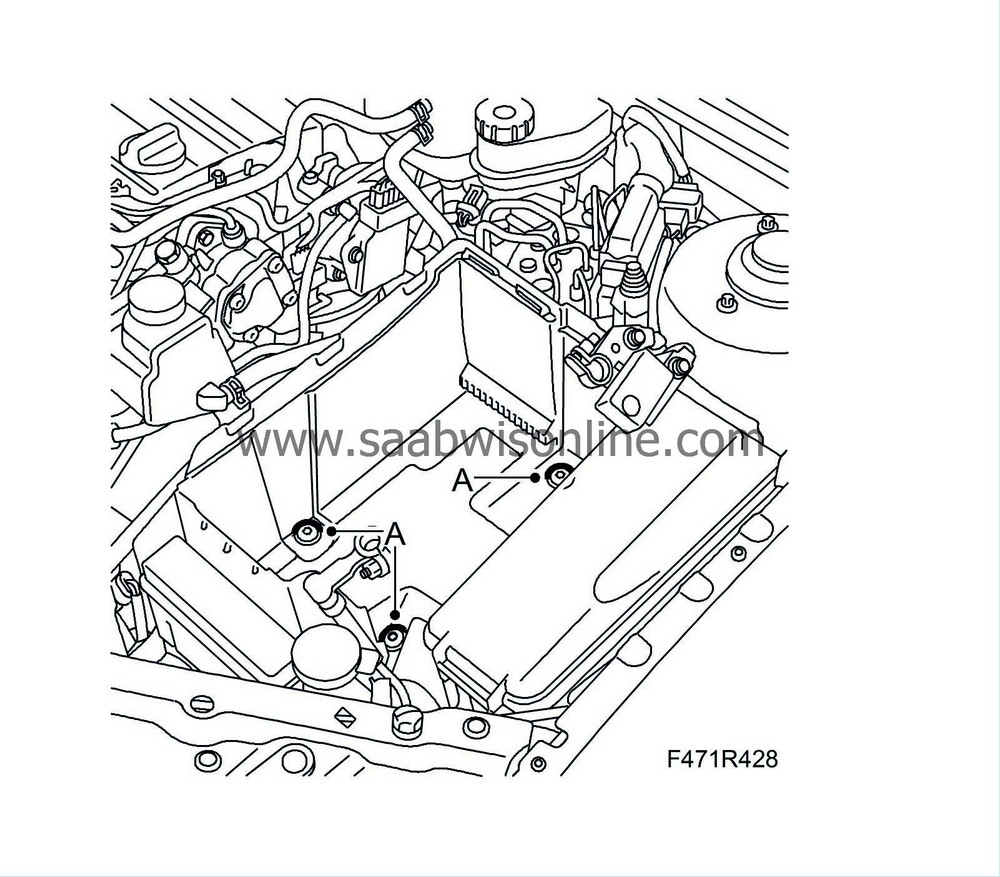
Remove the battery tray (A).
|
|
6.
|
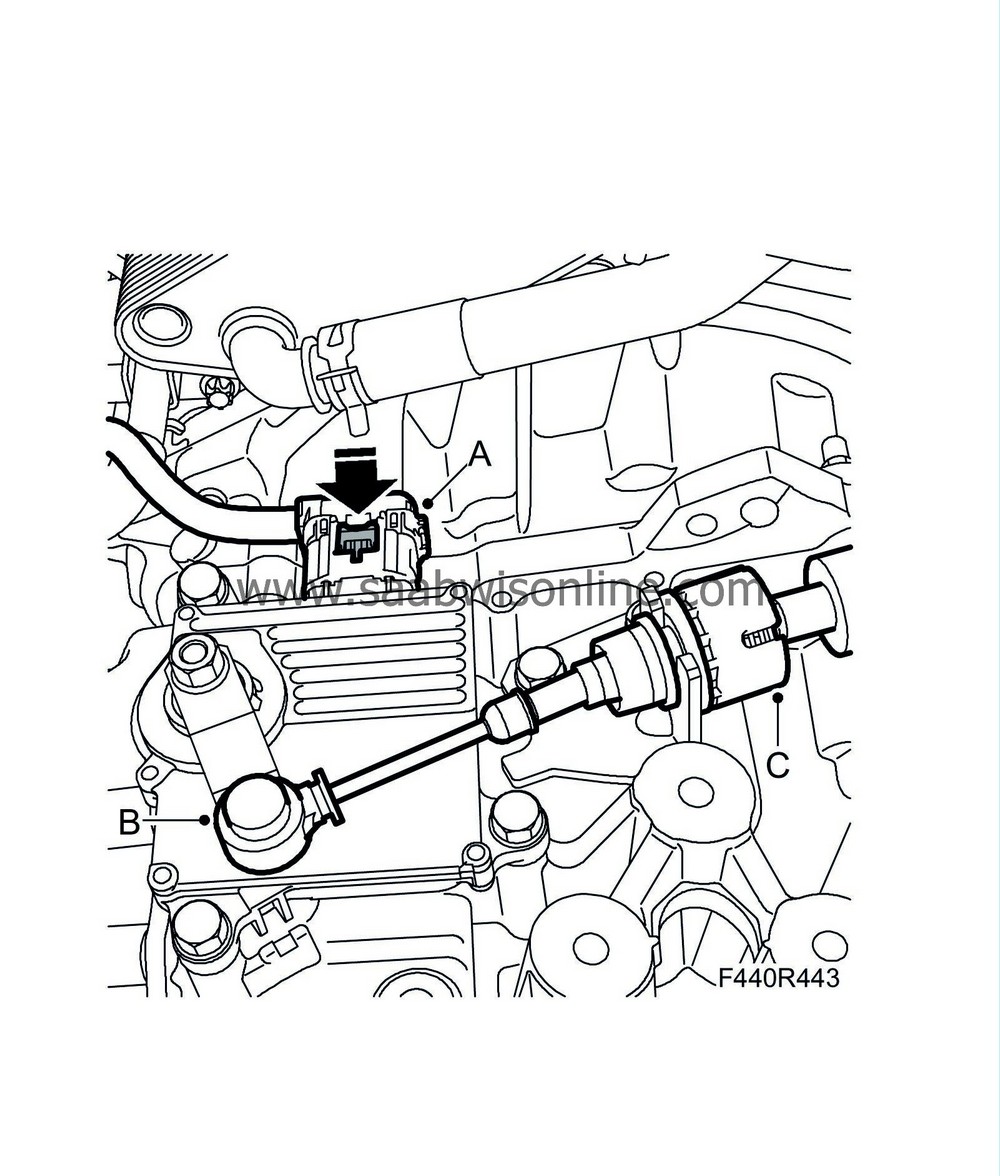
Unplug the control module's connector. (A).

|
|
7.
|
Remove the gear cable (B) from the selector lever arm. The selector lever must be in position N.
|
|
8.
|
Remove the cable from the cable retainer by pulling back the locking sleeve (C).
|
|
11.
|
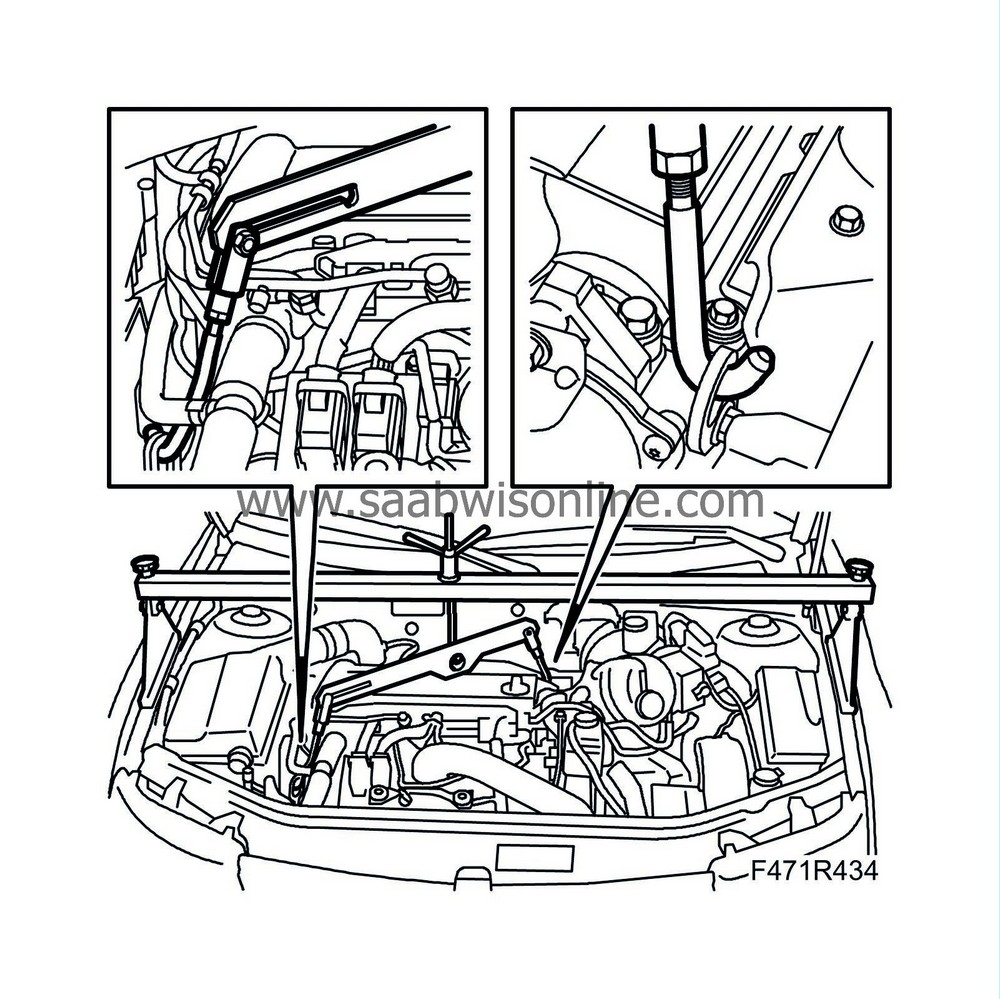
Fit 83 94 850 Lifting beam with 83 95 287 Holder. Change positions on the holder's lifting hooks. Take the weight off the engine and gearbox.
|
|
13.
|
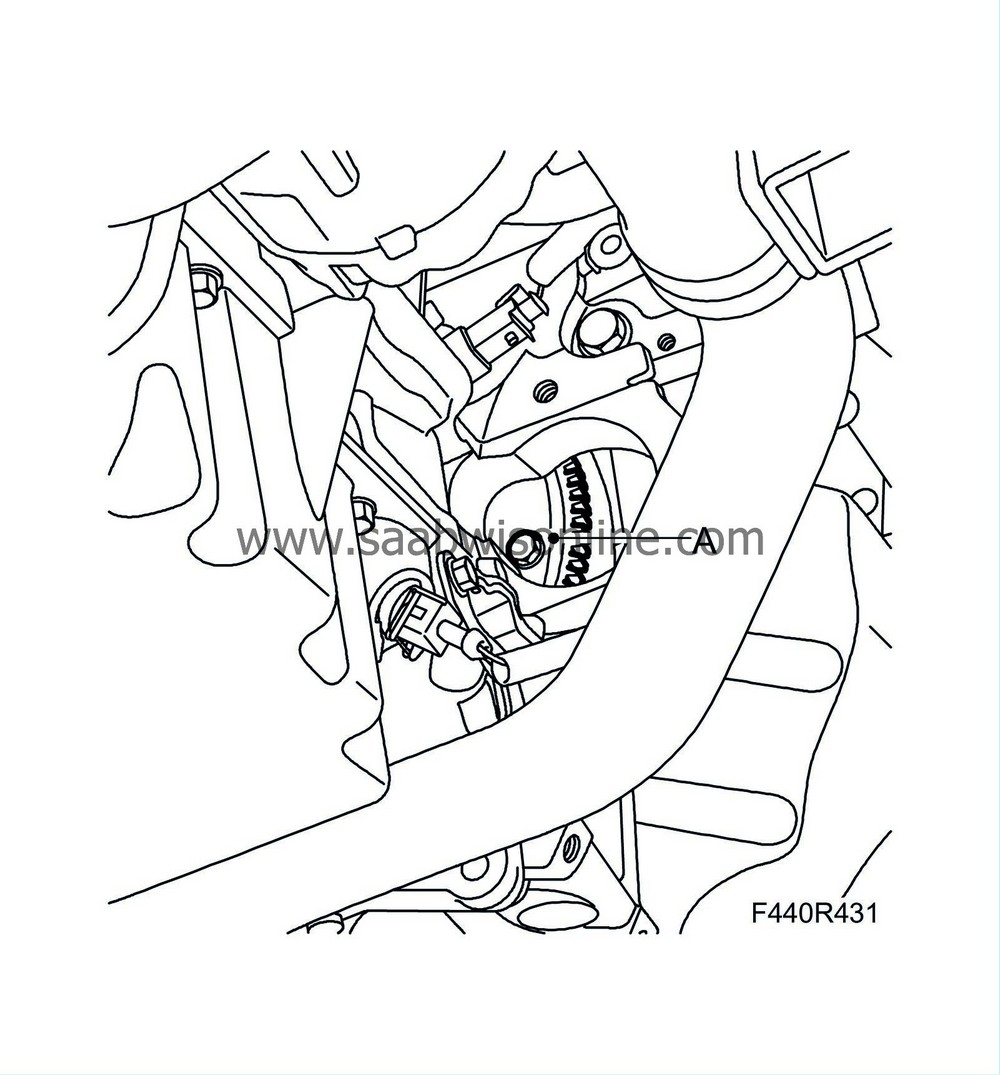
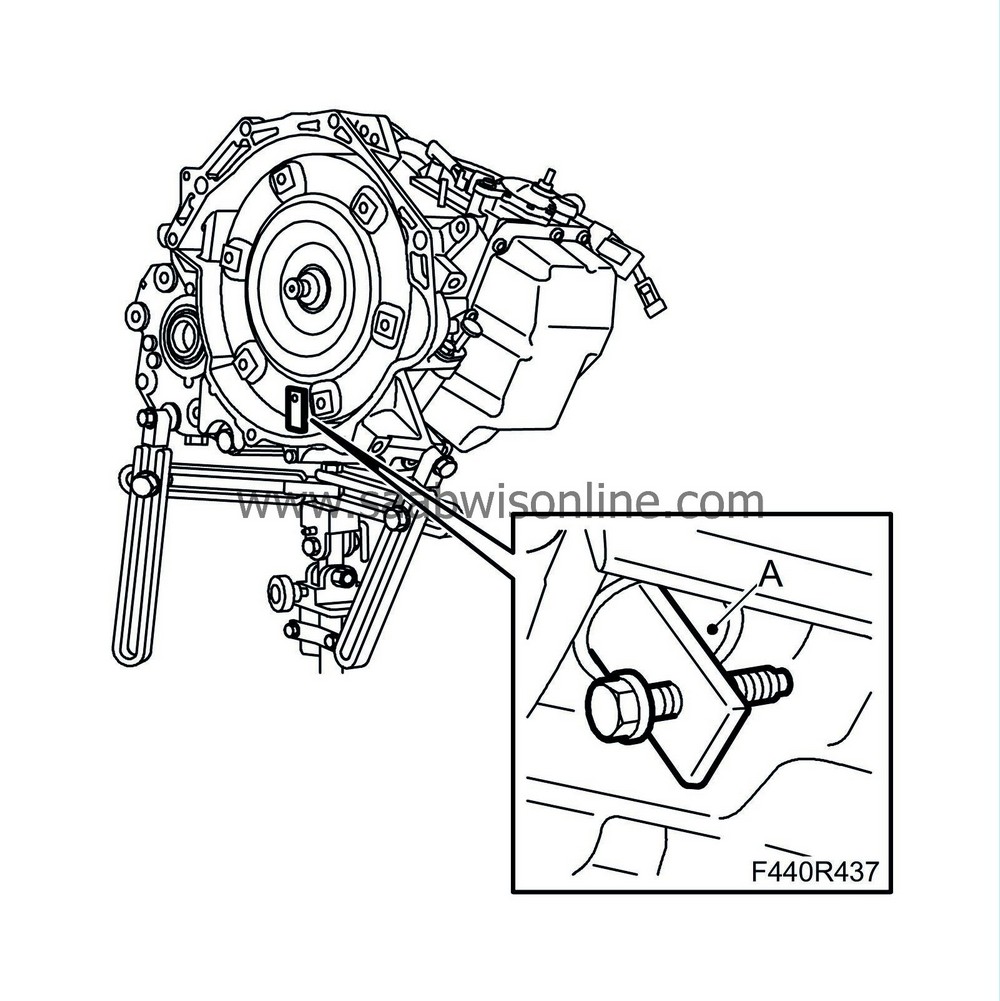
Remove the front torque rod bracket (A).
|
|
14.
|
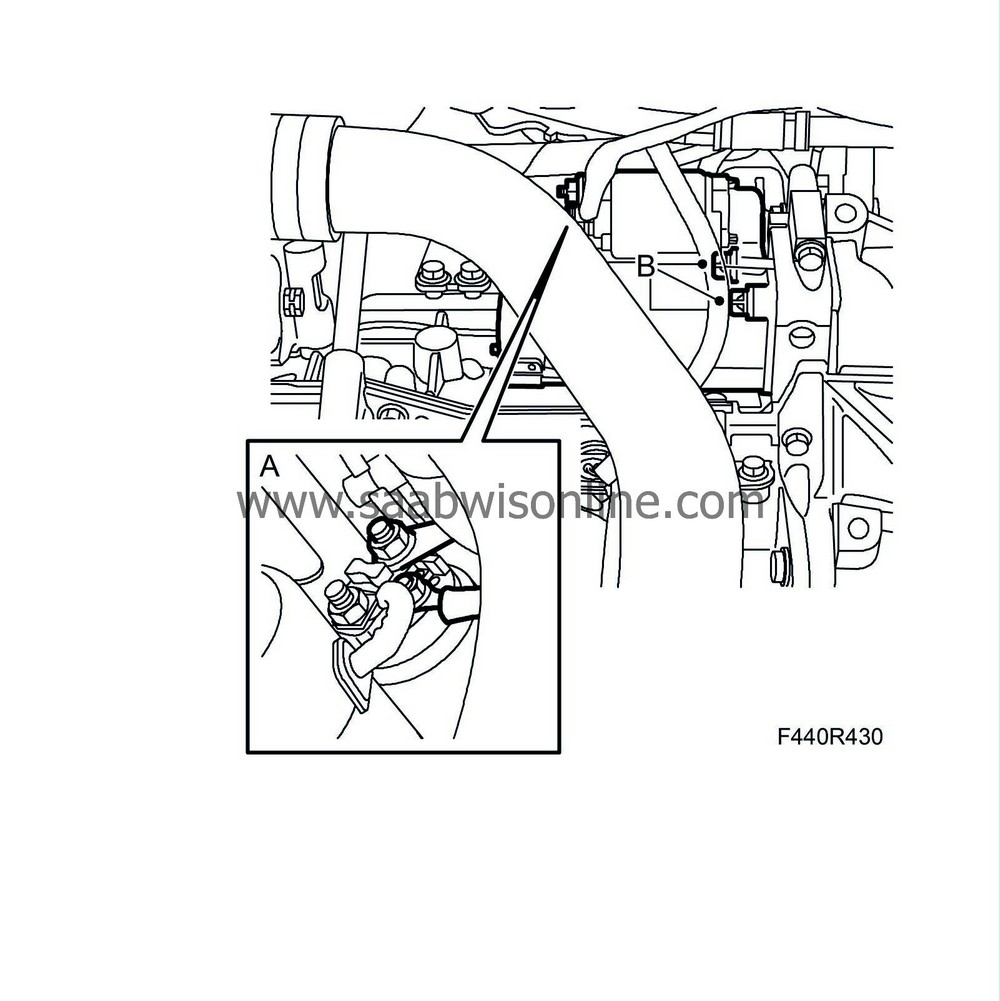
Remove the starter motor's electrical connections (A) and the starter motor (B).
|
|
15.
|
Remove the 6 bolts (A) holding the torque converter to the driver plate. Turn the crankshaft clockwise with the centre bolts on the belt pulley.
|
|
18.
|
Suspend the shaft by means of a cable tie (B).
|
|
19.
|
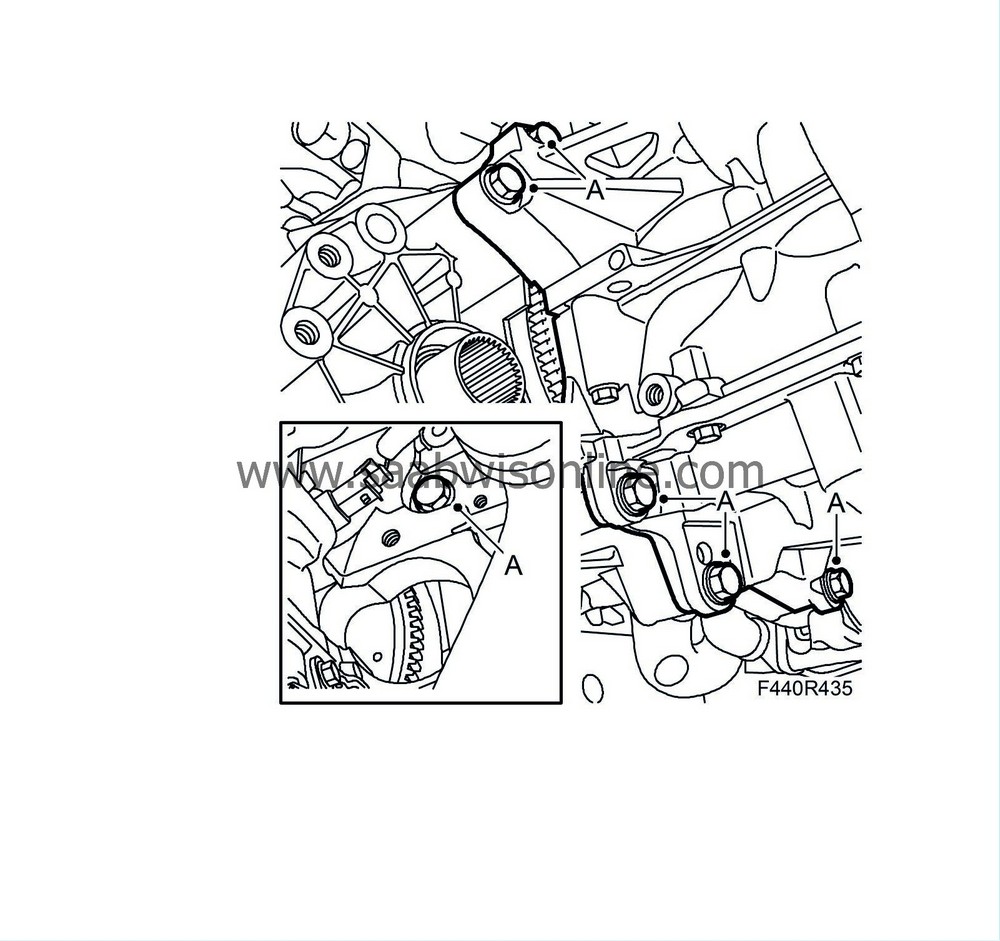
Remove the lower gearbox bolts (A). Leave one bolt in place.
|
|
20.
|
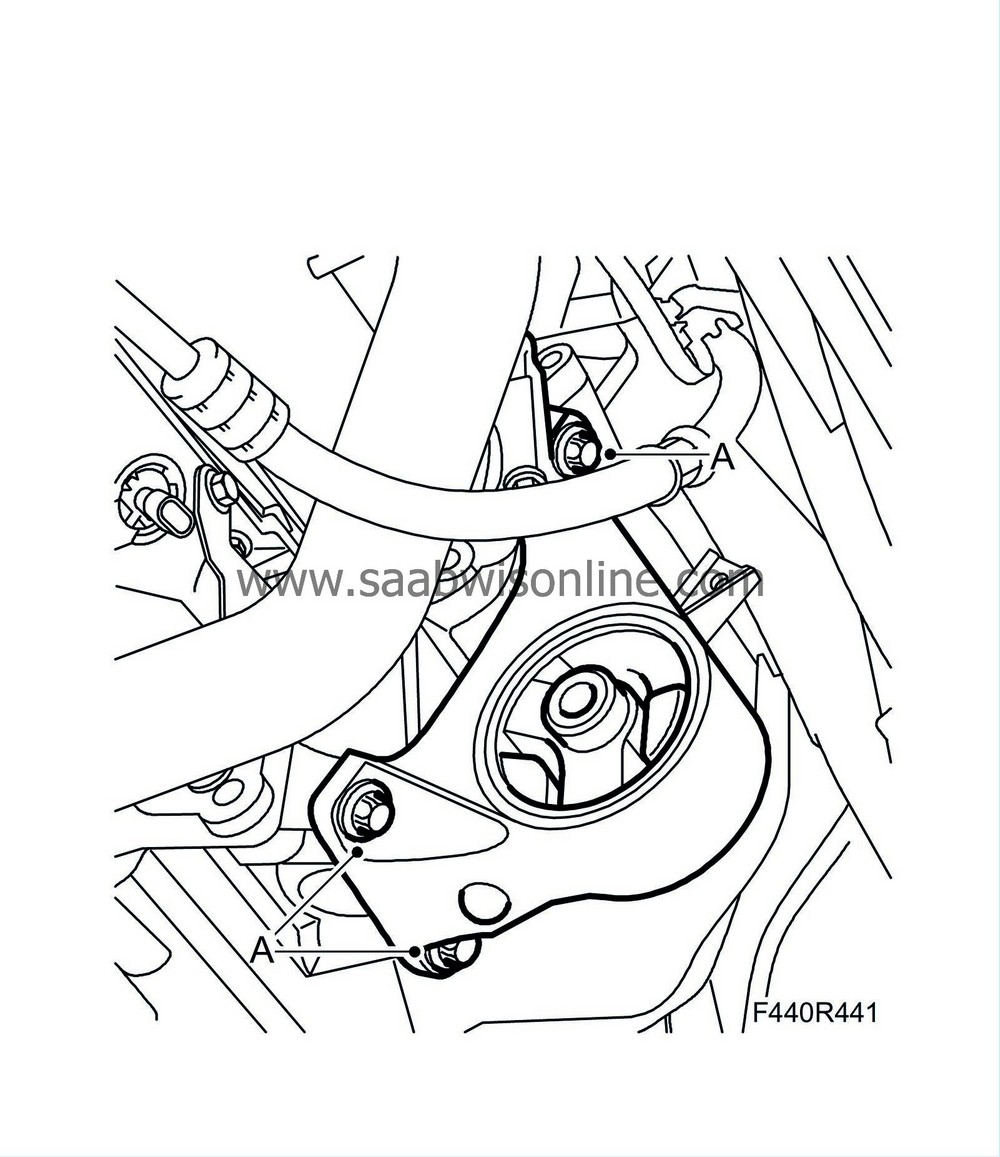
Lower the car, mark the location of the bolts on the left engine mounting with a marker pen to ensure correct refitting and then remove the bracket bolts (A) from the mounting.
|
|
21.
|
Lower the power train with the lifting beam to facilitate removal of the transmission.
|
|
23.
|
Remove the last bolt.
|
Important
|
|
The jack can tip over. Be careful.
|
|
|
|
|
24.
|
Pull out the gearbox about 10 mm.
|
|
25.
|
Remove the plug and press the torque converter toward the transmission and fit
87 92 574 Holder
for holding the torque converter in place while removing the transmission.

|
|
26.
|
Pull out and let down the gearbox.
|
|
27.
|
Lift the transmission down from the column jack with an engine lift and
87 92 442 Lifting cable
while undoing the lifting tool from the transmission.
|
|
28.
|
Plug the holes for the drive shafts if the transmission is to undergo transport.
|
When fitting a new transmission, transfer the holder for the torque converter from the new transmission to the old one.
|
1.
|
Turn the torque converter so that the bolt holes line up with the holes in the driver plate. Fit
87 92 574 Holder
(A) to hold the torque converter in position during assembly.
|
|
2.
|
Make sure the two guide sleeves are on the engine and apply anti-corrosion agent to the sleeves. Fit a new drive shaft seal on the left-hand side, lubricate before assembly. Use
87 92 657 Fitting drift, drive shaft seals
.
|
|
5.
|
Secure the tool to the transmission as for removal.
|
Important
|
|
The jack can tip over. Be careful.
|
|
|
|
|
6.
|
Place the transmission in position. Remove 87 92 574 Holder just before the transmission is in position.
|
|
7.
|
Push in the transmission until it is against the mating face. Fit the bolts (A) between the engine and the transmission.
Tightening torque 70 Nm (52 lbf ft)
|
|
8.
|
Remove the lifting tool from the gearbox and move away the jack.
|
|
9.
|
Lower the car. Lift up the unit and fit the bolts (A) to the engine bracket according to the marks made earlier.
Tightening torque 93 Nm (69 lbf ft)
|
|
10.
|
Remove the lifting beam and undo the lifting eyes. Fit the expansion tank in its holder.
|
|
13.
|
Make sure that the drive shaft is clean and then align it with the tool.
|
Important
|
|
Slide in the gearbox until approx. 20 mm are remaining and remove the tool 83 95 162.
|
|
|
|
|
14.
|
Push in the rest of the shaft until the circlip clicks in.
|
|
15.
|
Attach the ABS cable to the clip (B).
|
|
16.
|
Raise the car. Press the torque converter against the driver plate. Fit the plug.
|
|
17.
|
Apply Thread locking adhesive, Loctite 242 to the bolts (A) holding the torque converter to the driver plate.
|
Note
|
|
Use the original bolts with associated washers. Using bolts that are too long will harm the torque converter.
|
|
|
18.
|
Fit the 6 bolts (A) without tightening them.
|
|
19.
|
Rotate the engine clockwise with the pulley and tighten the bolts (A) once they are all in place.
Tightening torque 60 Nm (44 lbf ft)
|
|
20.
|
Fit the starter motor (B).
Tightening torque 47 Nm (35 lbf ft)
|
|
21.
|
Fit the electrical connections (A).
|
|
24.
|
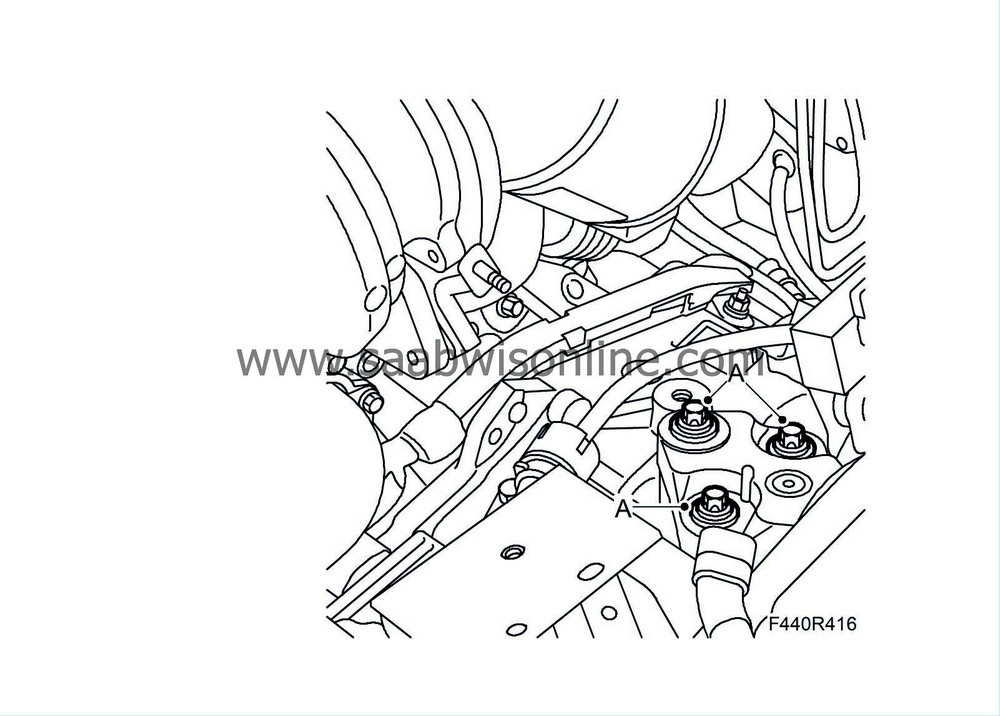
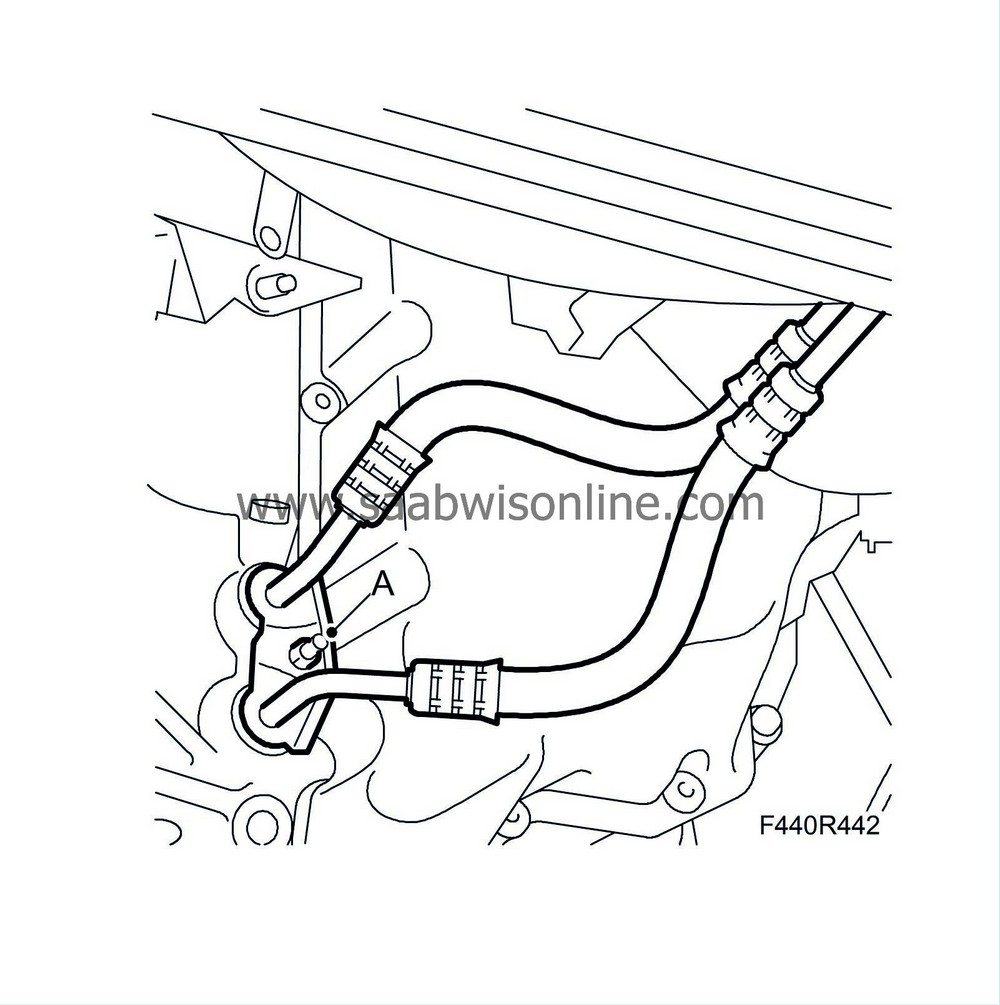
Lubricate the pipes with Vaseline, none-acidic and attach the oil cooler hoses (A). The pipes press holes into the seals during fitting.
|
|
25.
|
Fit the front torque rod bracket.
Tightening torque 93 Nm (69 lbf ft)
|
|
26.
|
Fasten the cable to the cable retainer by pulling back the locking sleeve (C).
|
|
27.
|
Fit the gear cable (B) to the selector lever arm.
|
|
28.
|
Fit the control module's connector. (A).
|
|
30.
|
Fit the battery tray (A).
|
|
31.
|
Fit the battery, bonnet switch, main fuse box and cooling pipe.
|
|
32.
|
Fit and connect the battery cables.
|
|
33.
|
Fit the battery cover.
|
|
34.
|
Fit the upper engine cover. Put back the engine dipstick.
|
|
36.
|
Remove the wing covers.
|
|
38.
|
Test drive the car with varying engine loads and speeds and delete eventual trouble codes. Also check the position of the steering wheel when driving straight ahead on a level road. Adjust if needed.
|


