Automatic transmission assembly, Z19DTR
|
|
Automatic transmission assembly, Z19DTR
|
|
2.
|
Move the selector lever to P and remove the key. The wheels must be pointing straight ahead. Place covers on the wings to protect the paintwork from damage and dirt.
|
|
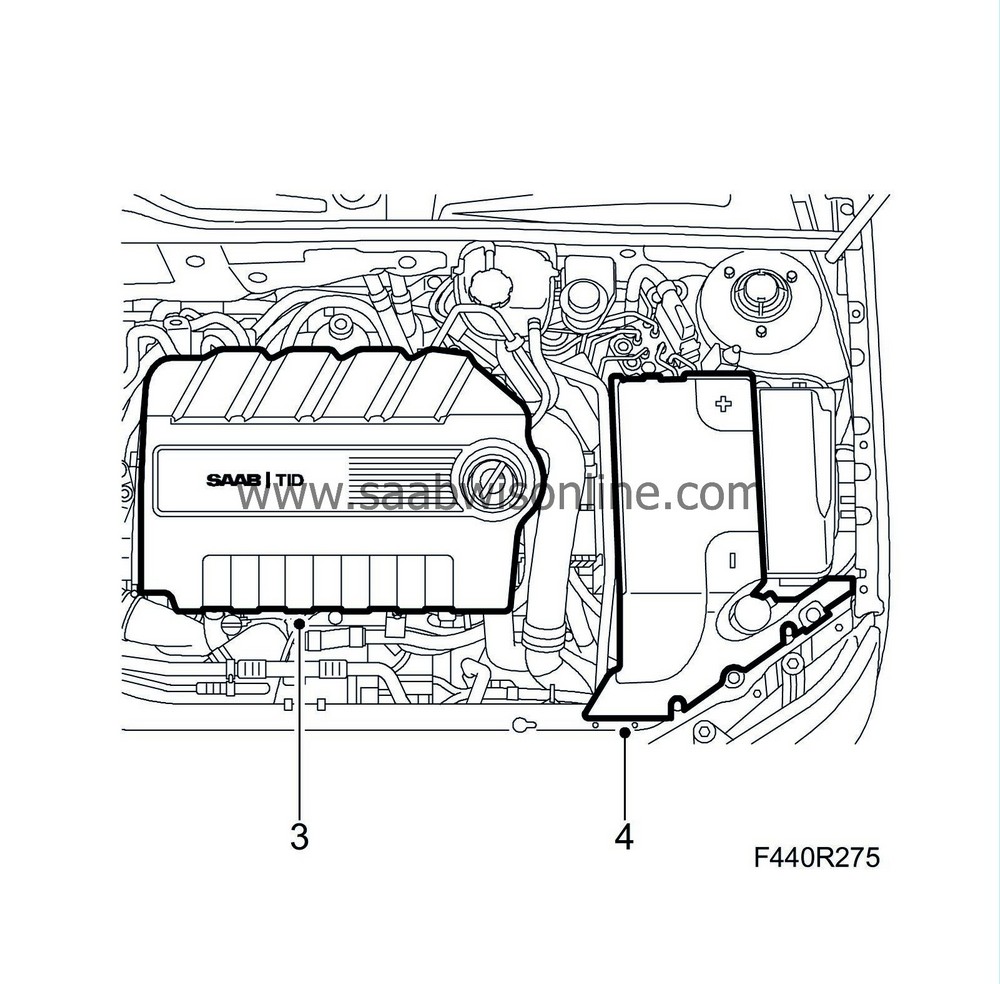
3.
|
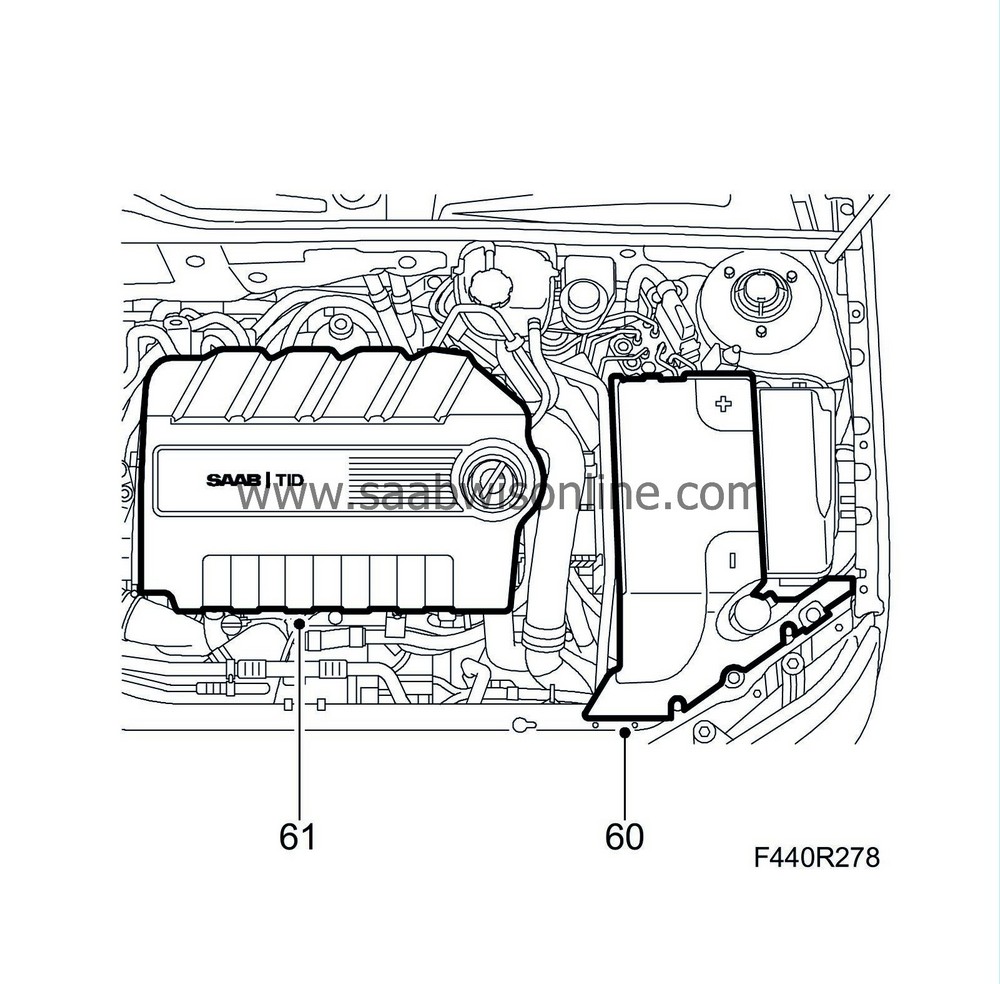
Remove the upper engine cover and insulation.
|
|
4.
|
Remove the battery cover.
|
|
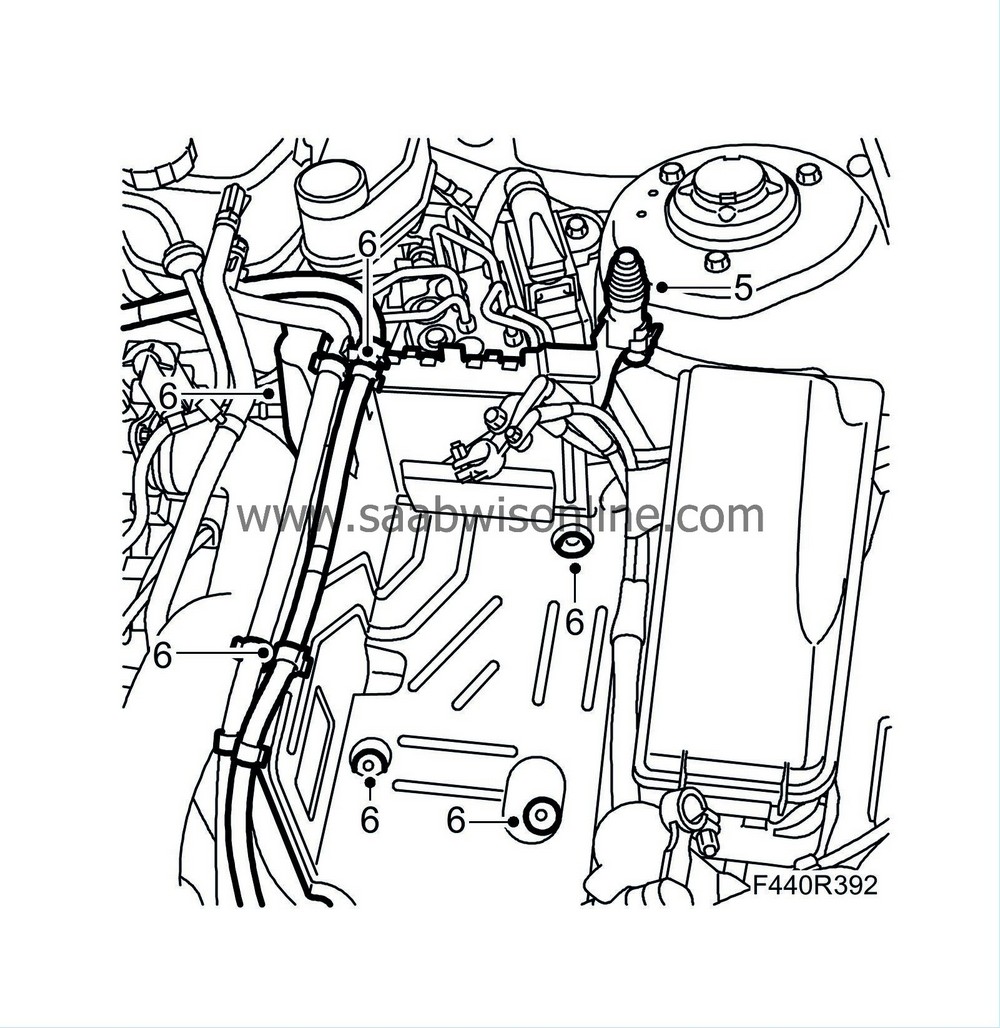
5.
|
Remove the battery and disconnect the bonnet switch.
|
|
6.
|
Remove the fuse holder and wiring harness clips from the battery tray. Remove the battery tray.
|
|
7.
|
Remove the gear cable from the selector lever arm.

|
|
8.
|
Remove the cable from the cable retainer by pulling back the locking sleeve.
|
|
9.
|
Remove the gearbox ventilation hose.
|
|
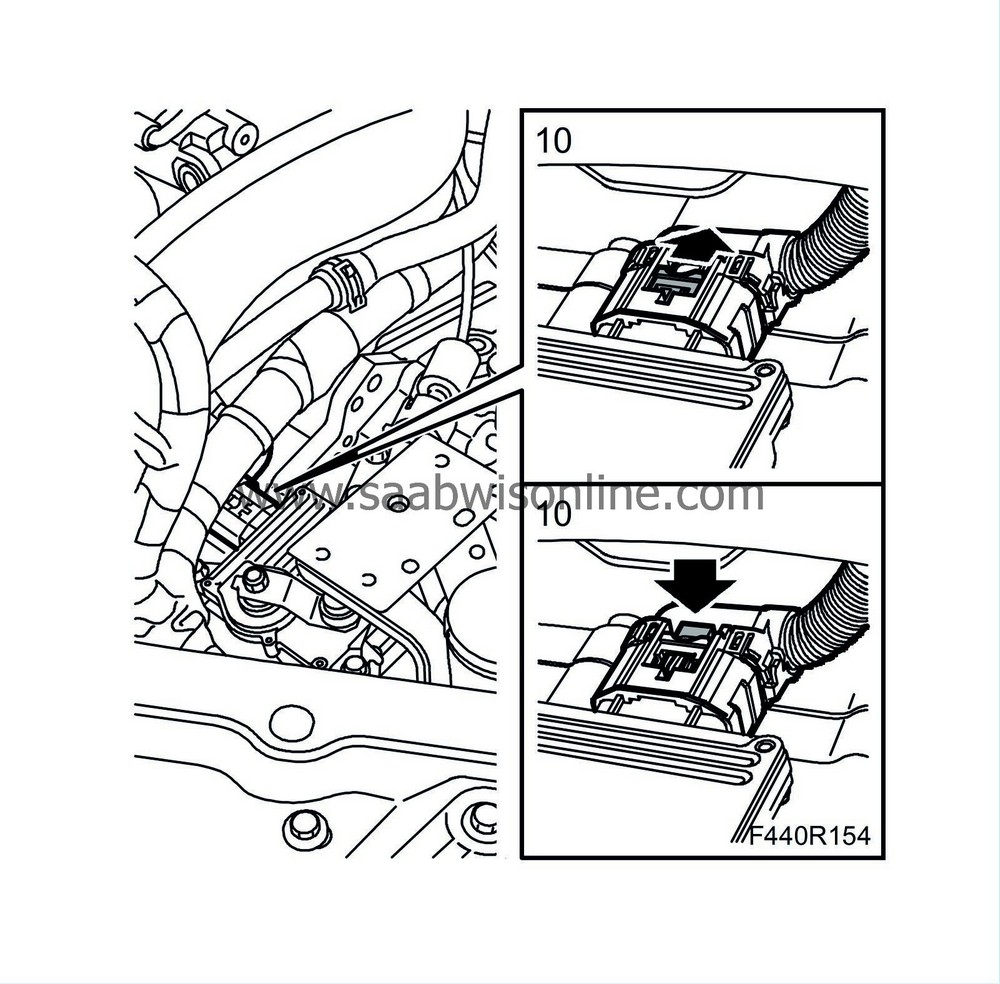
10.
|
Pull out the lock pin, press down the lock and unplug the control module connector.
|
|
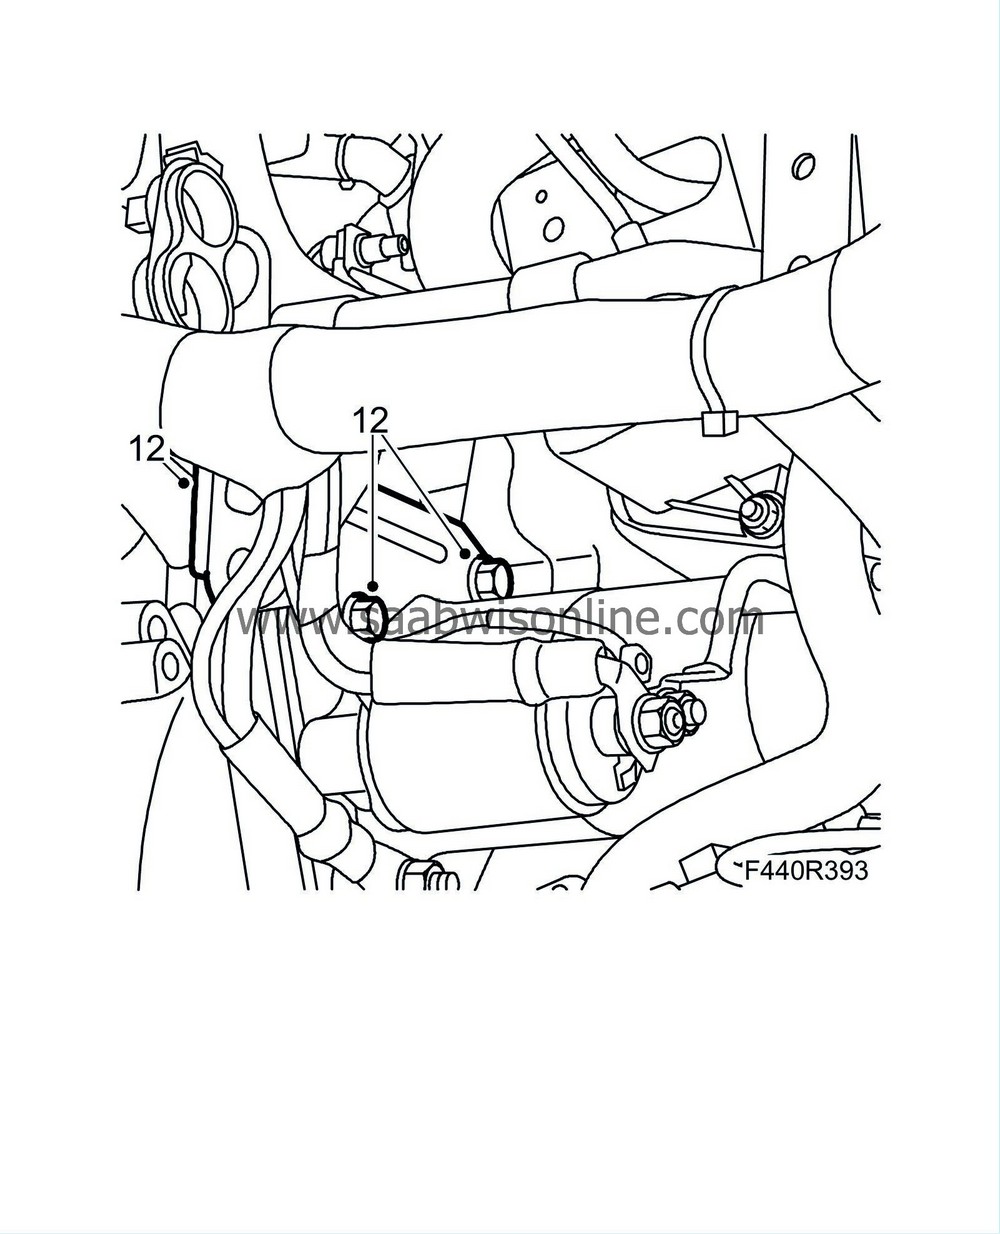
12.
|
Remove the upper starter motor bolts and the bracket from the coolant pipes and wiring harness.
|
|
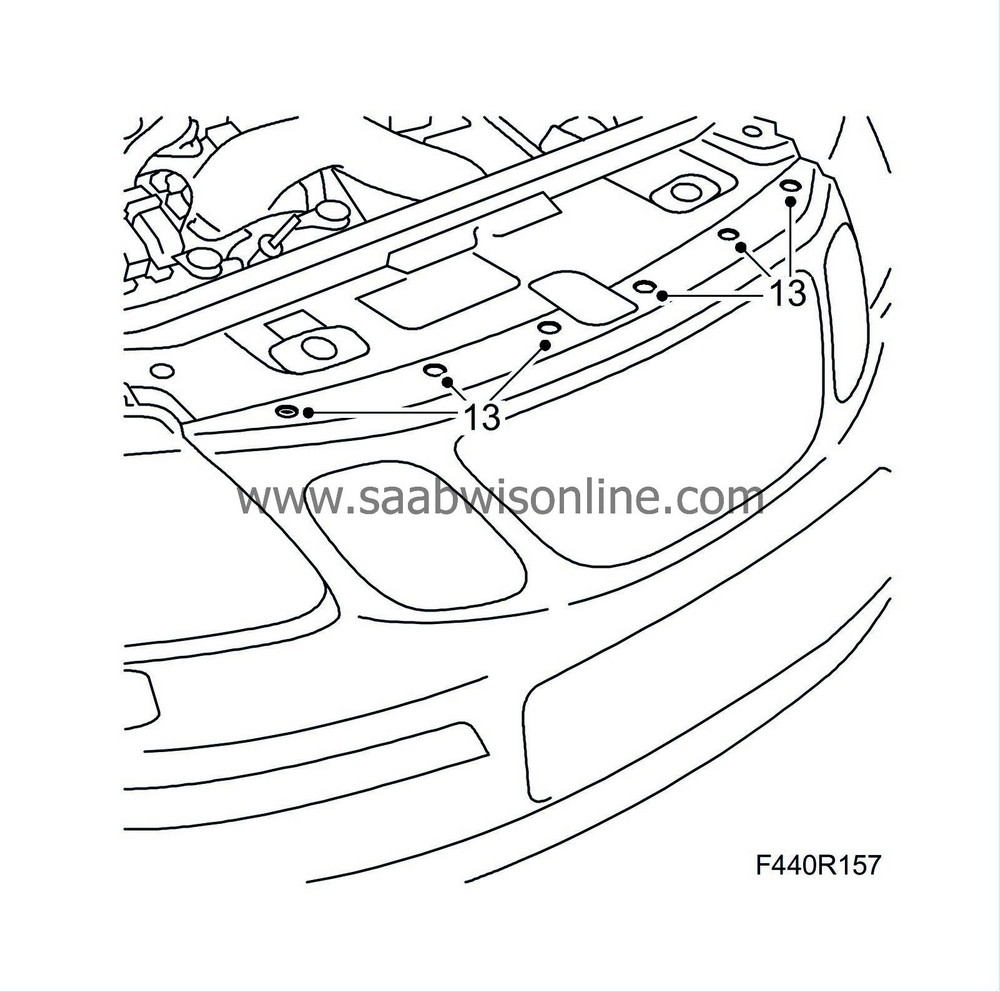
13.
|
Undo the upper bumper shell mountings.
|
|
14.
|
Suspend two
83 95 212 Strap
in place above the radiator core so they are accessible from below.
|
|
16.
|
Remove the front wheels.
|
|
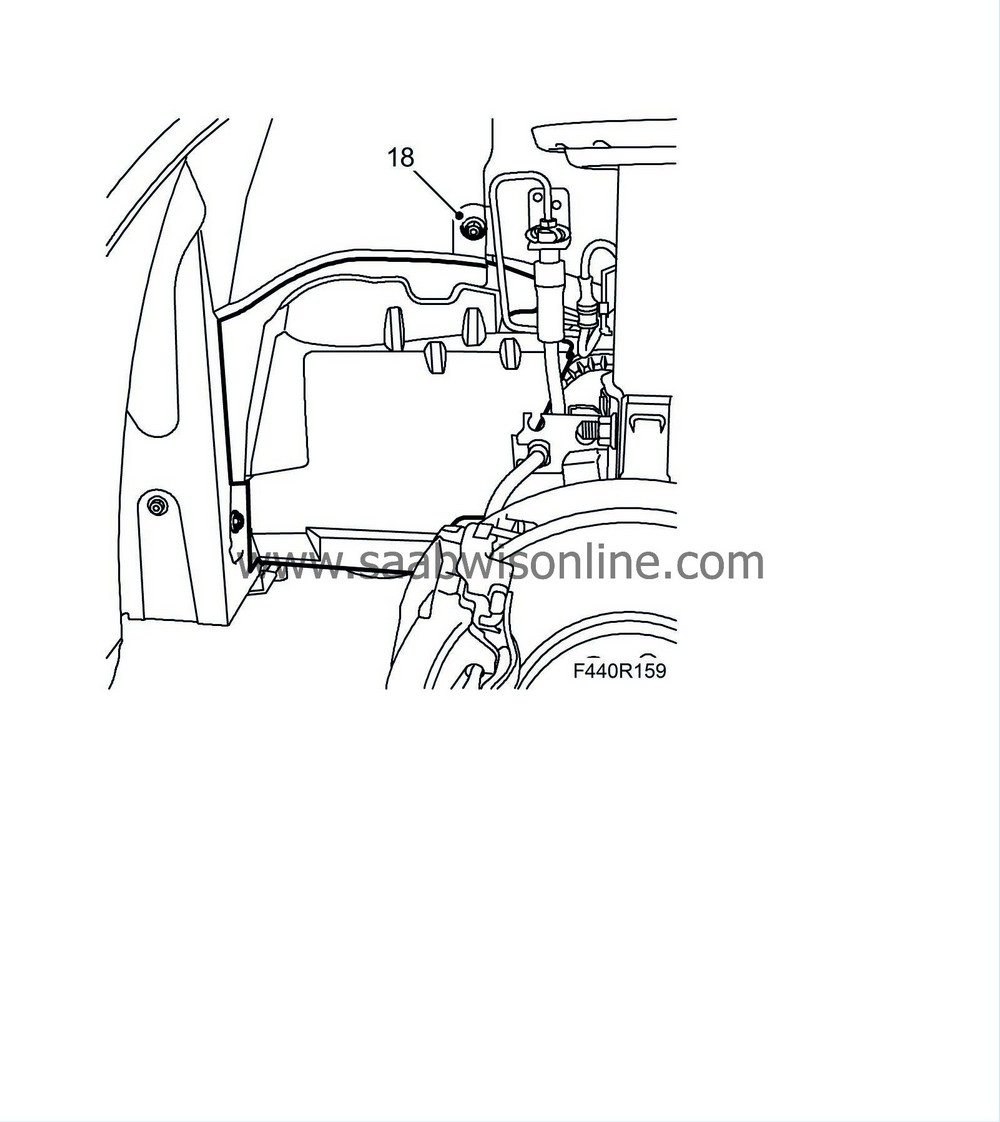
18.
|
Remove the left engine cover.
|
|
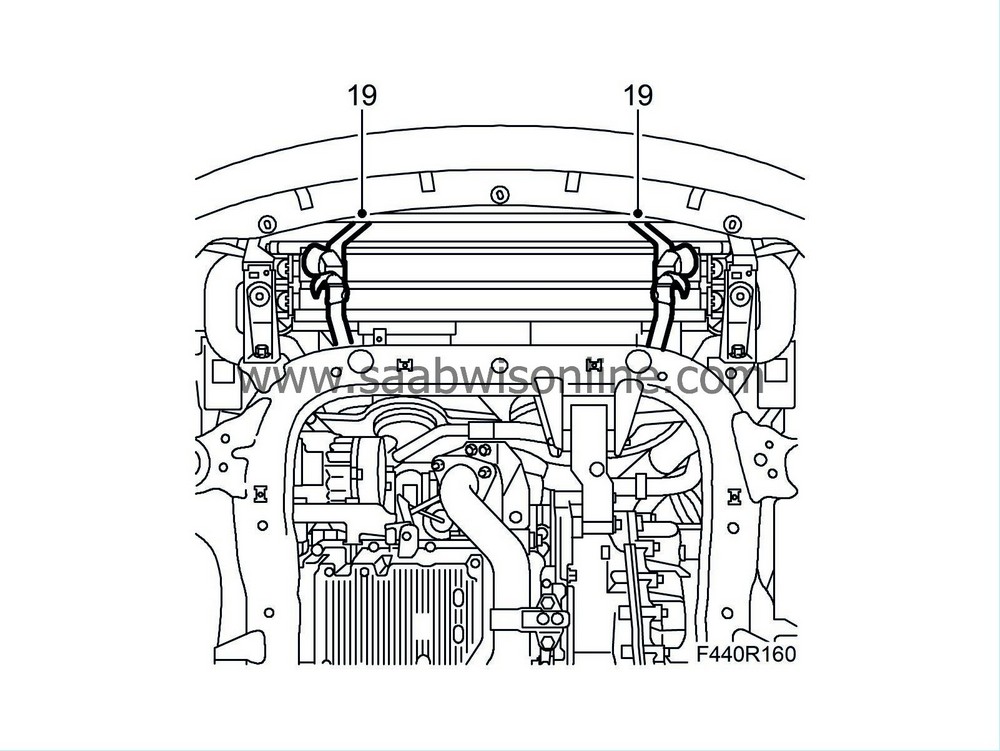
19.
|
Secure the radiator core with the straps.
|
|
20.
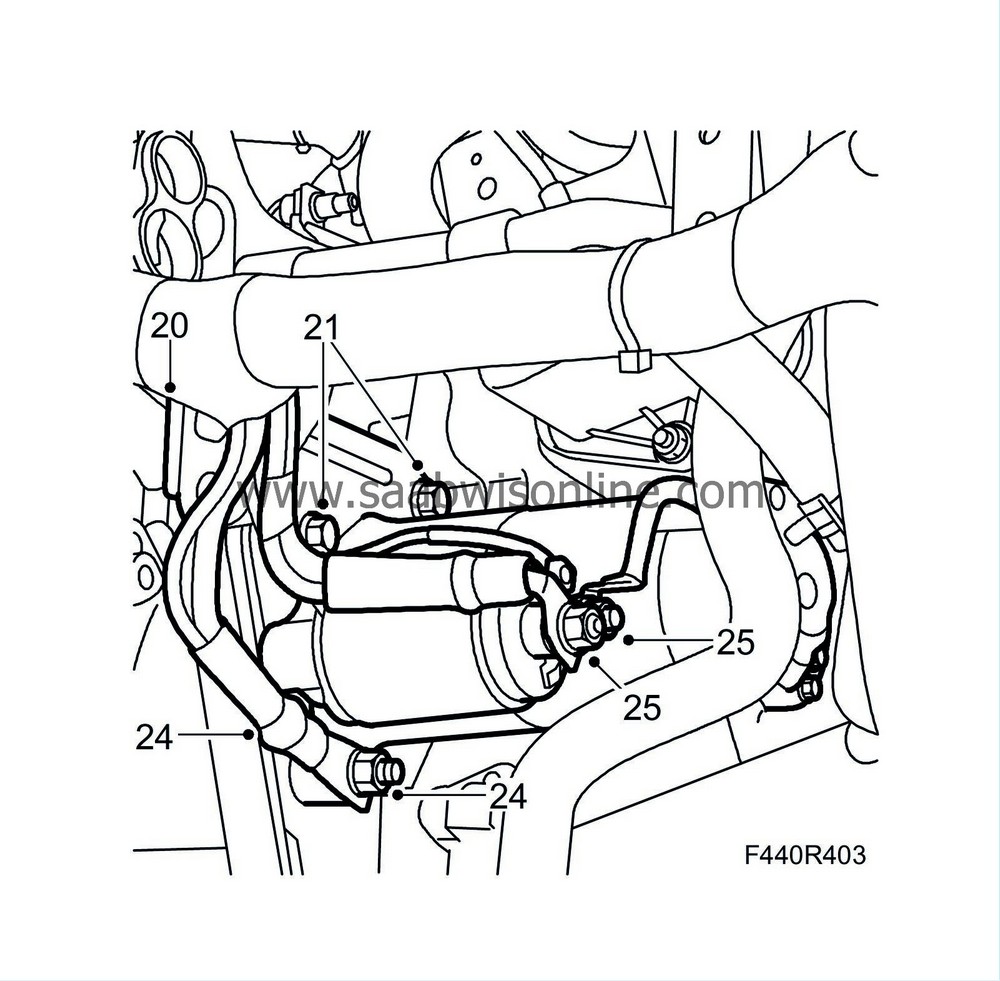
|
Remove the front exhaust pipe.

|
Important
|
|
Take care so as not to crack the flex bellows.
|
|
|
|
|
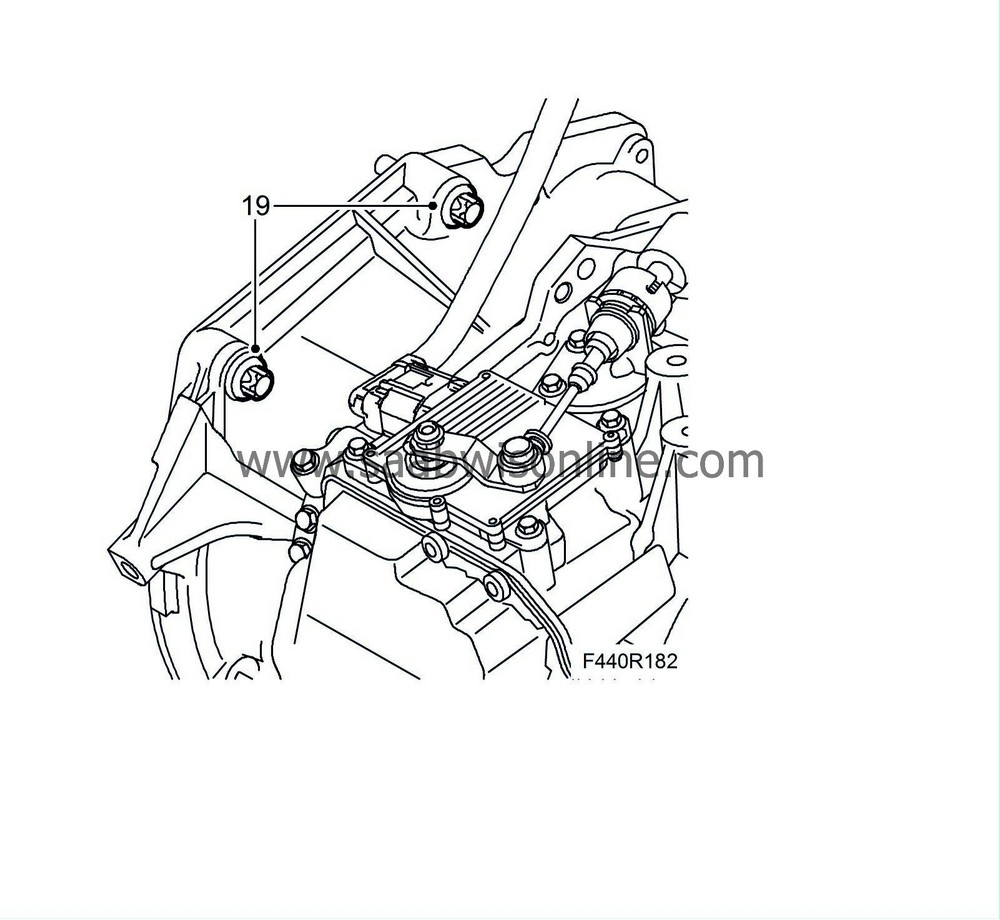
21.
|
Remove the engine torque rod from the subframe.
|
|
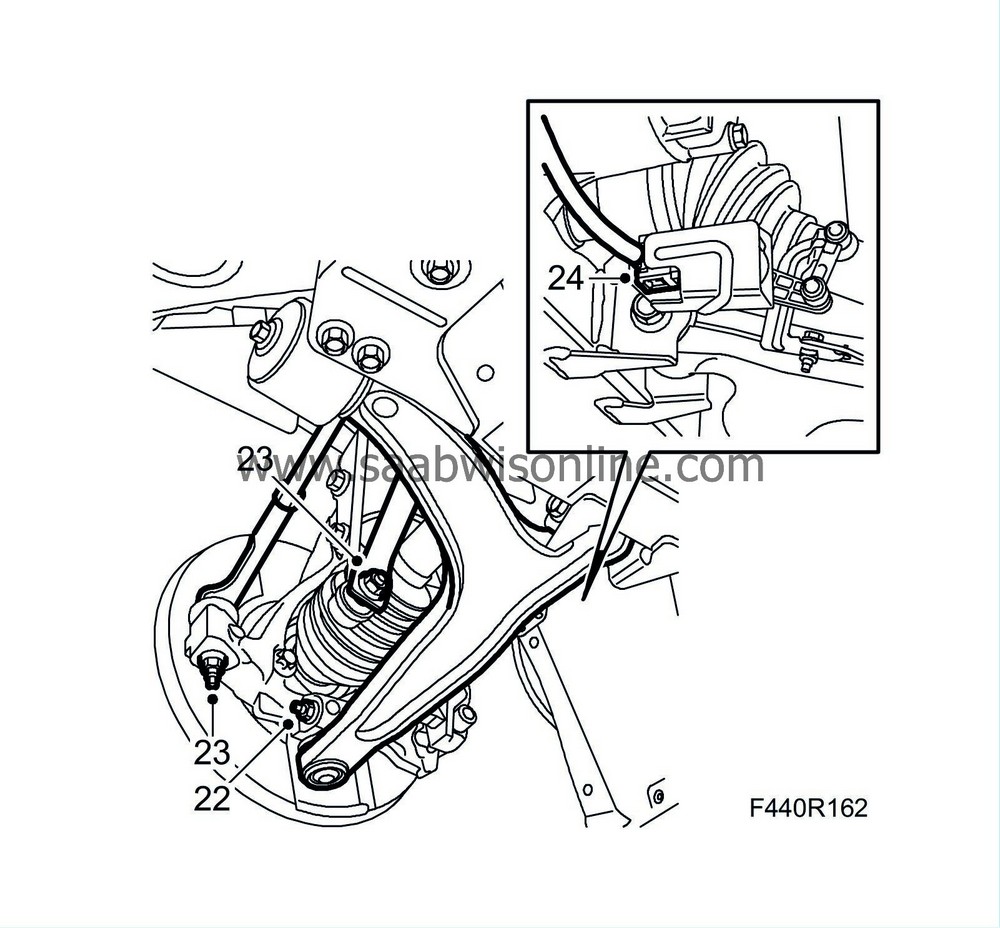
22.
|
Remove the bolt and nut holding the suspension arm to the steering swivel member on both sides.
|
|
23.
|
Remove the anti-roll bar from the link arms and the track rods from the steering swivel member. Use
87 91 287 Puller, 150 mm.
|
|
24.
|
Unplug the connector and detach the cable clip of the headlamp angle sensor (option)
|
|
25.
|
Remove the steering column joint from the steering gear.
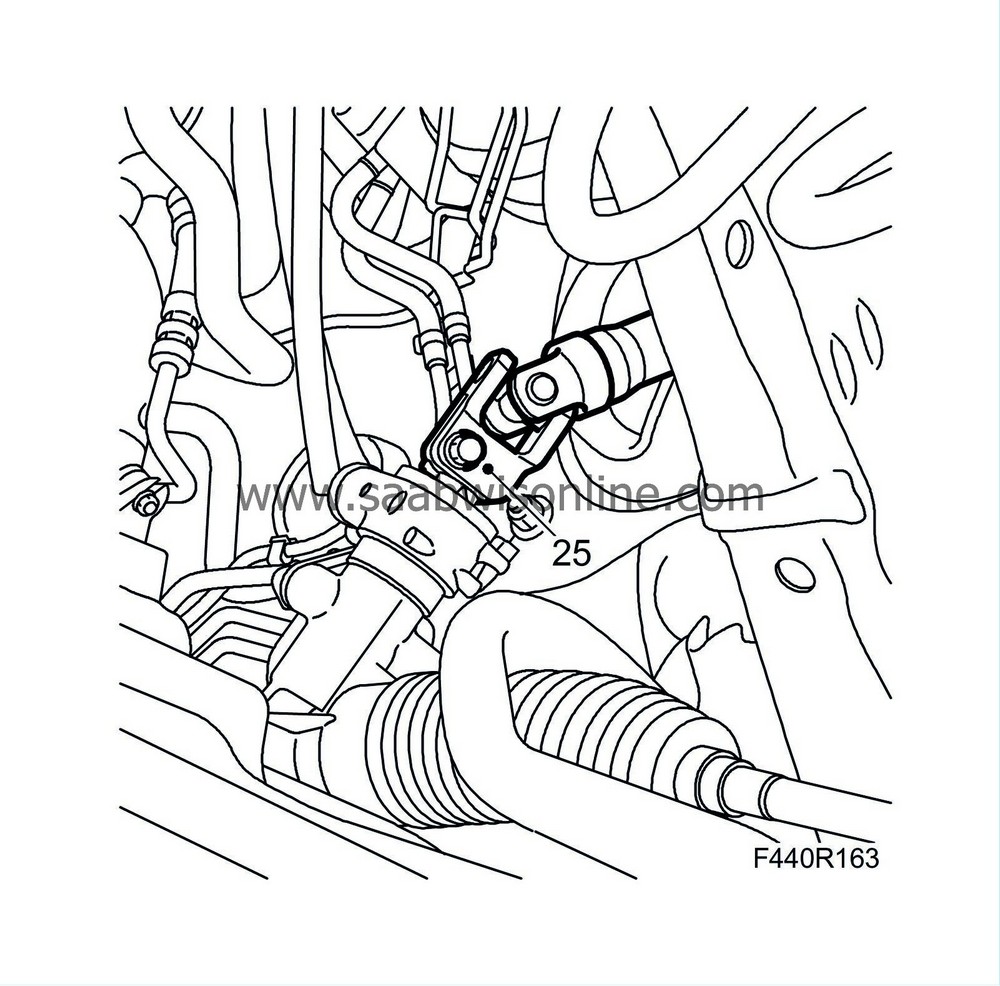
 Warning
|
|
In order to avoid the contact roller for the airbag twisting and breaking the steering wheel must be secured via the steering column lock or by taping it to the panel.
|
|
|
|
|
|
|
|
26.
|
Remove the electrical connections from the EHPS unit and undo the cable tie.

|
|
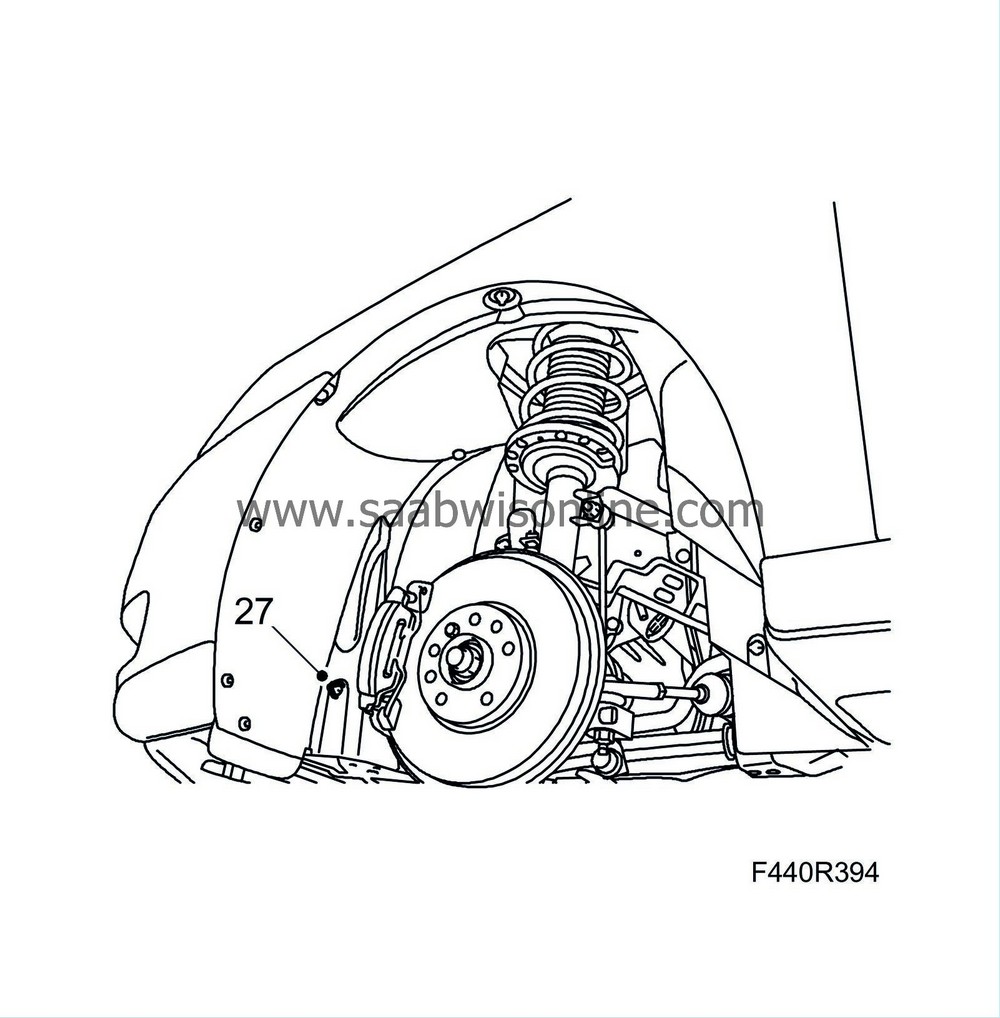
27.
|
Remove the front part of the wing liner and bend it out of the way.
|
|
29.
|
Remove the subframe bolts and the rear brackets.
|
|
30.
|
Lower the subframe slightly.
|
|
31.
|
Pull out the steering arm ball joints from the steering swivel members.
|
|
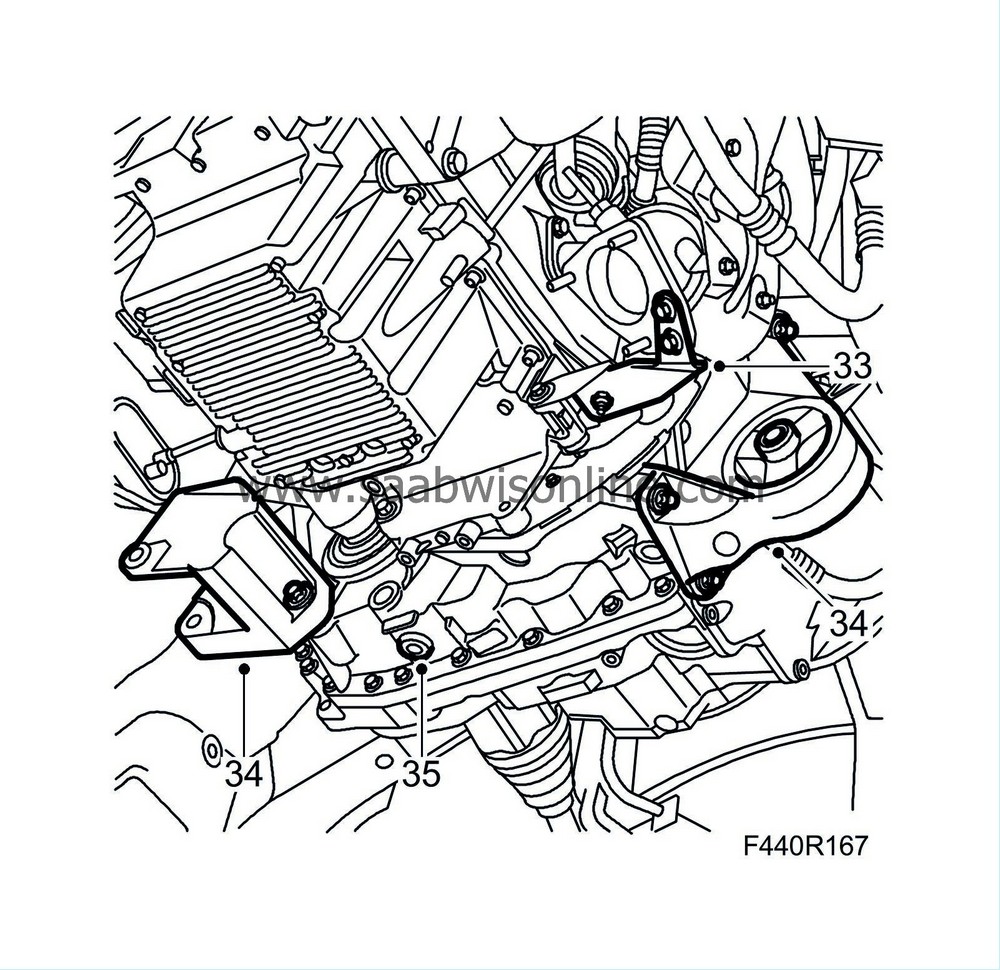
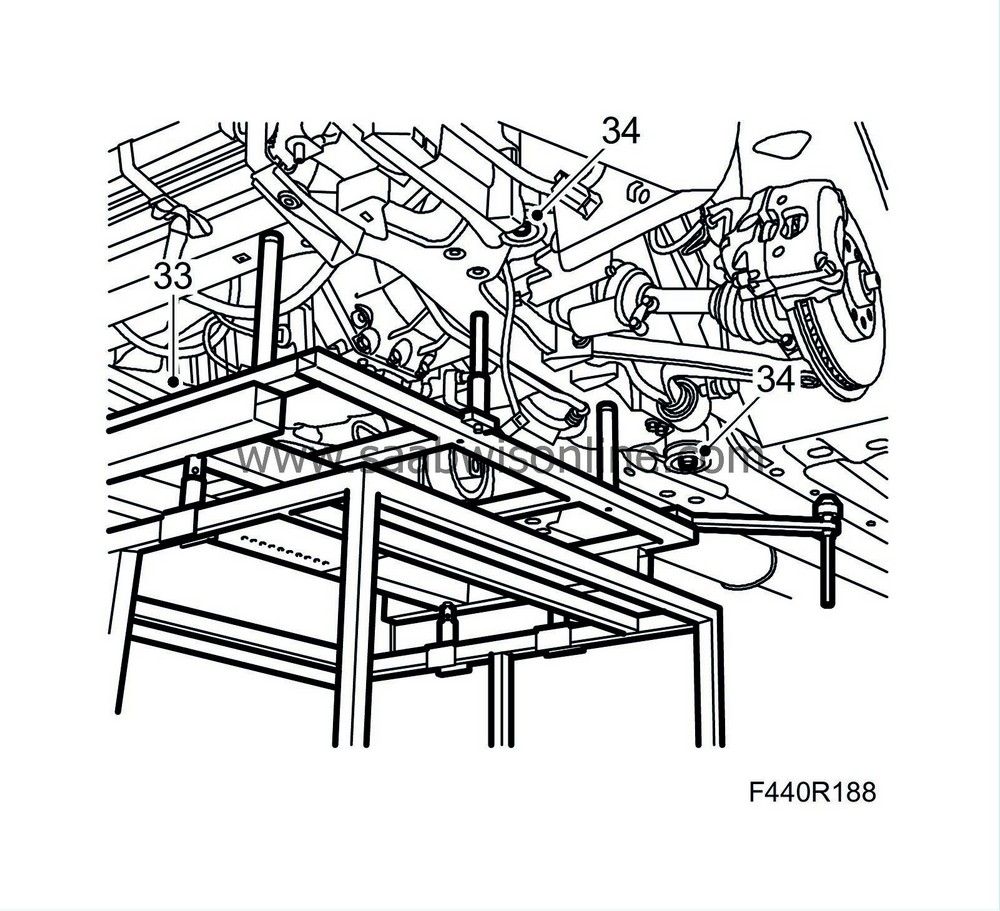
33.
|
Remove the front catalytic converter bracket.
|
|
34.
|
Remove the torque rod brackets from the gearbox.
|
|
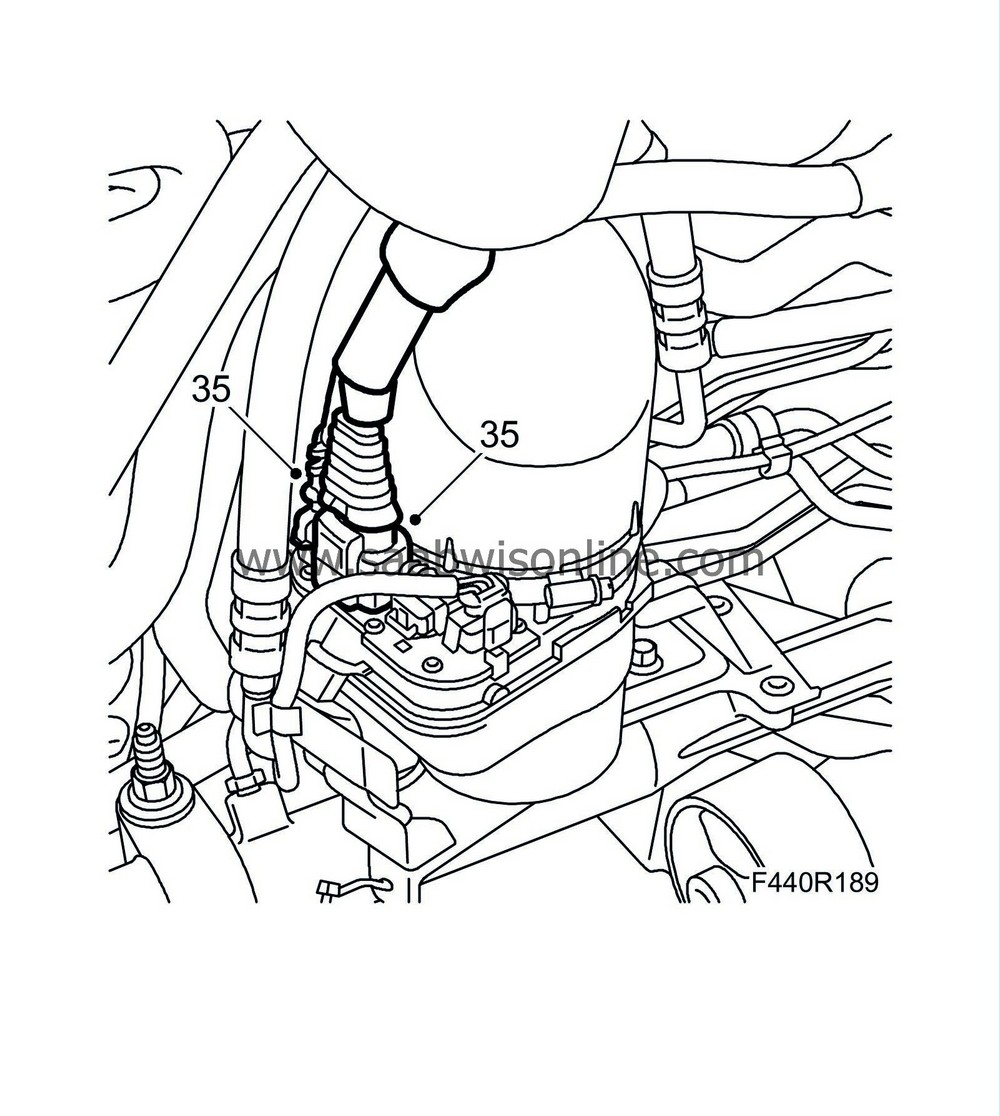
35.
|
Place a receptacle under the car and drain the transmission fluid. Refit the oil plug with a new seal. Fit also the level plug.
Tightening torque, drain plug 45 Nm (33 lbf ft)
|
|
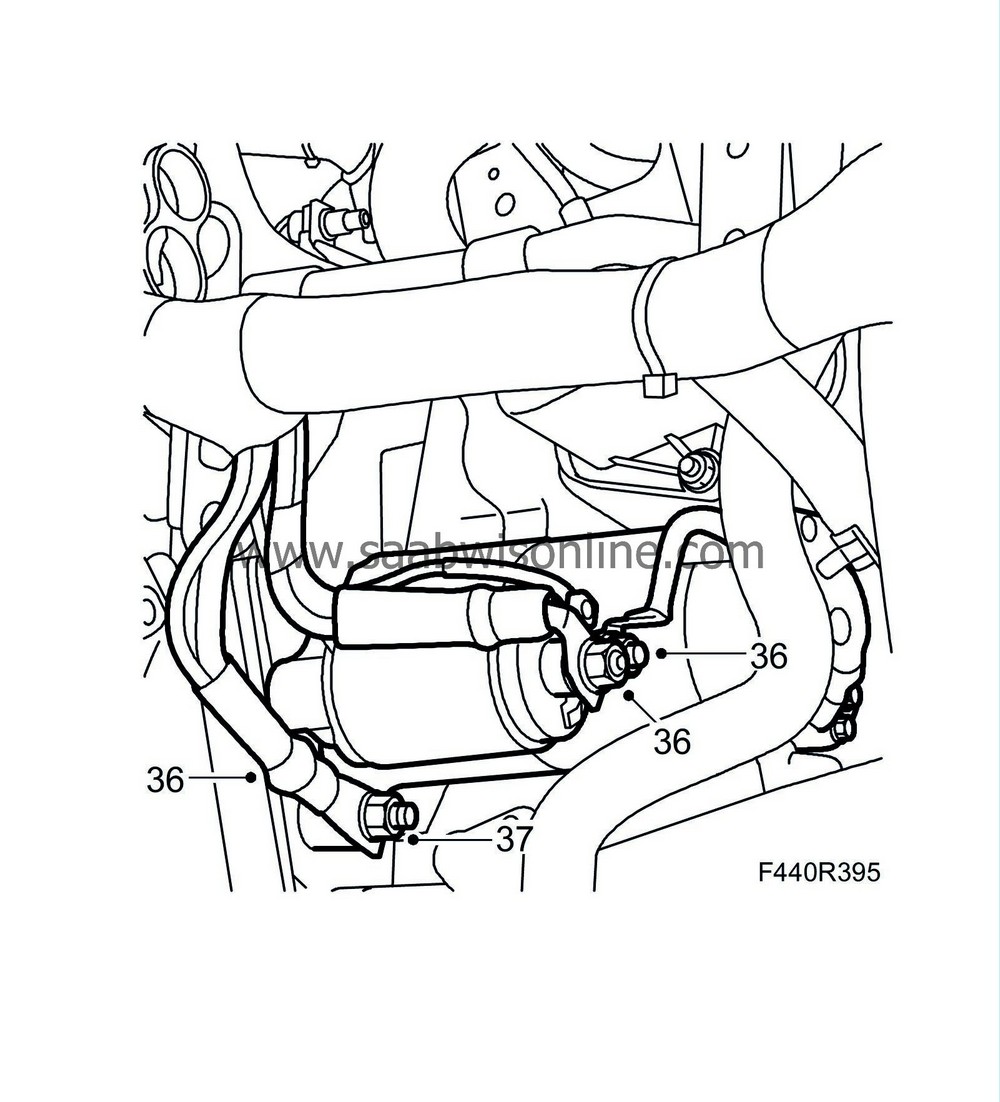
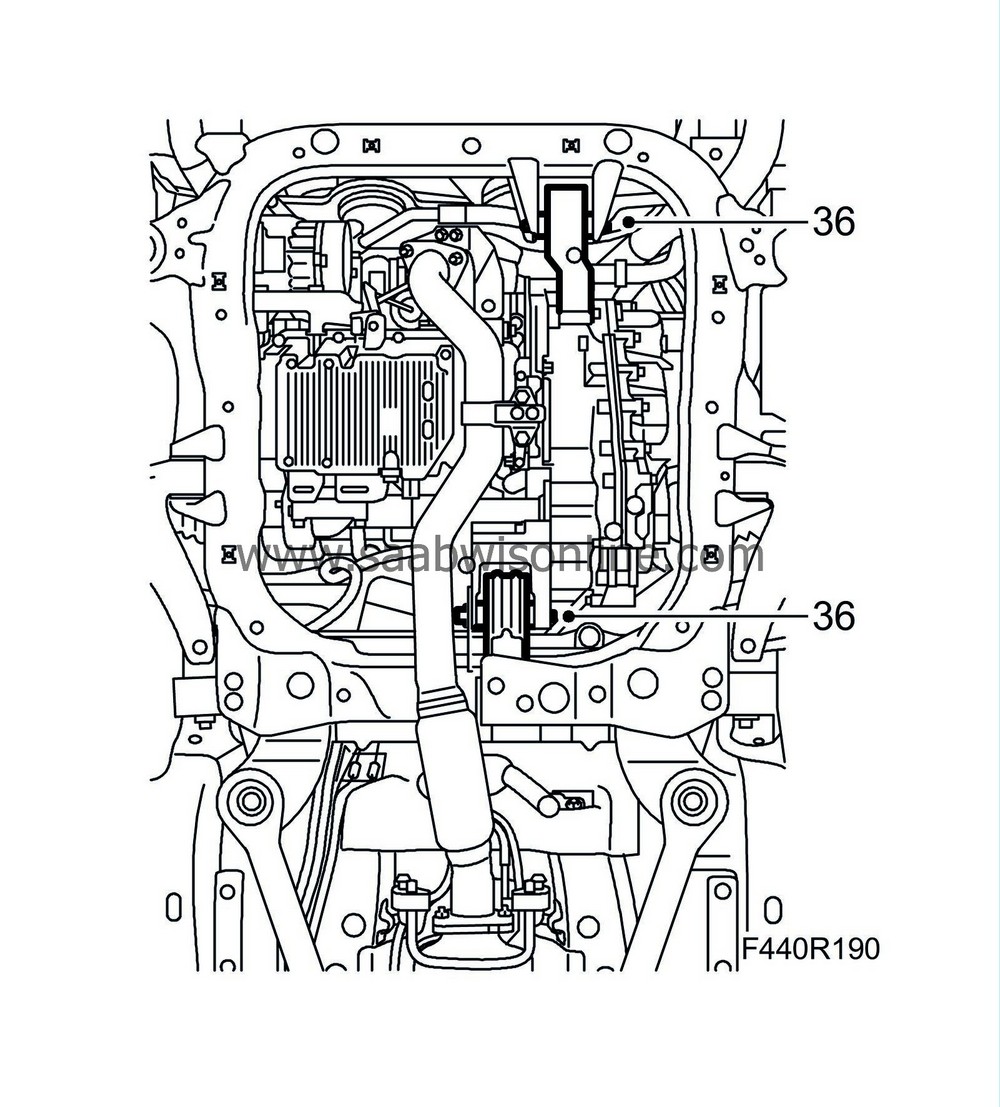
36.
|
Remove the starter motor electrical connections and the ground cable from the stud.
|
|
37.
|
Remove the bottom starter motor bolt and lift down the starter motor.
|
|
38.
|
Undo the six bolts holding the torque converter to the driver plate. Turn the engine clockwise with the centre bolt on the belt pulley.
|
|
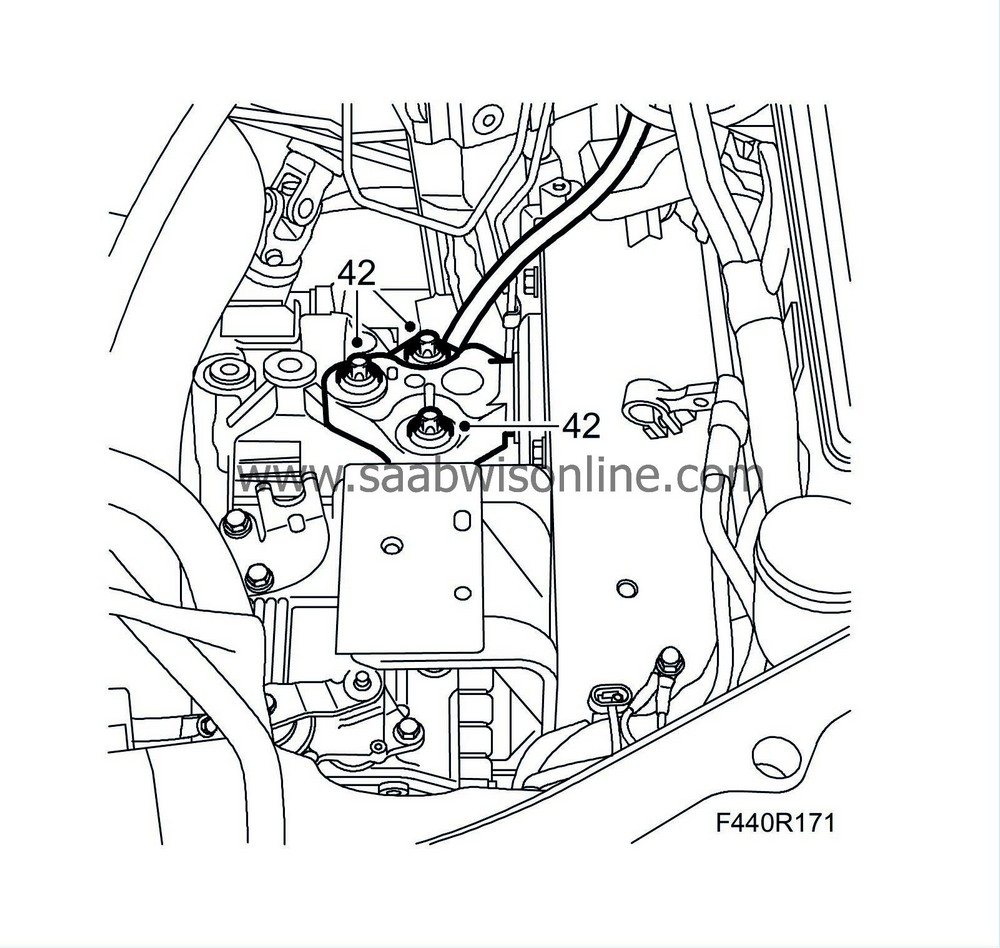
42.
|
Lower the car, mark the location of the bolts on the left engine mounting with a marker pen to ensure correct refitting and then remove the bracket from the mounting.
|
|
43.
|
Remove the screws for the cable duct and the bolt for the intake manifold. Fit
83 94 850 Lifting beam
on the engine. Unload the engine and gearbox.

|
|
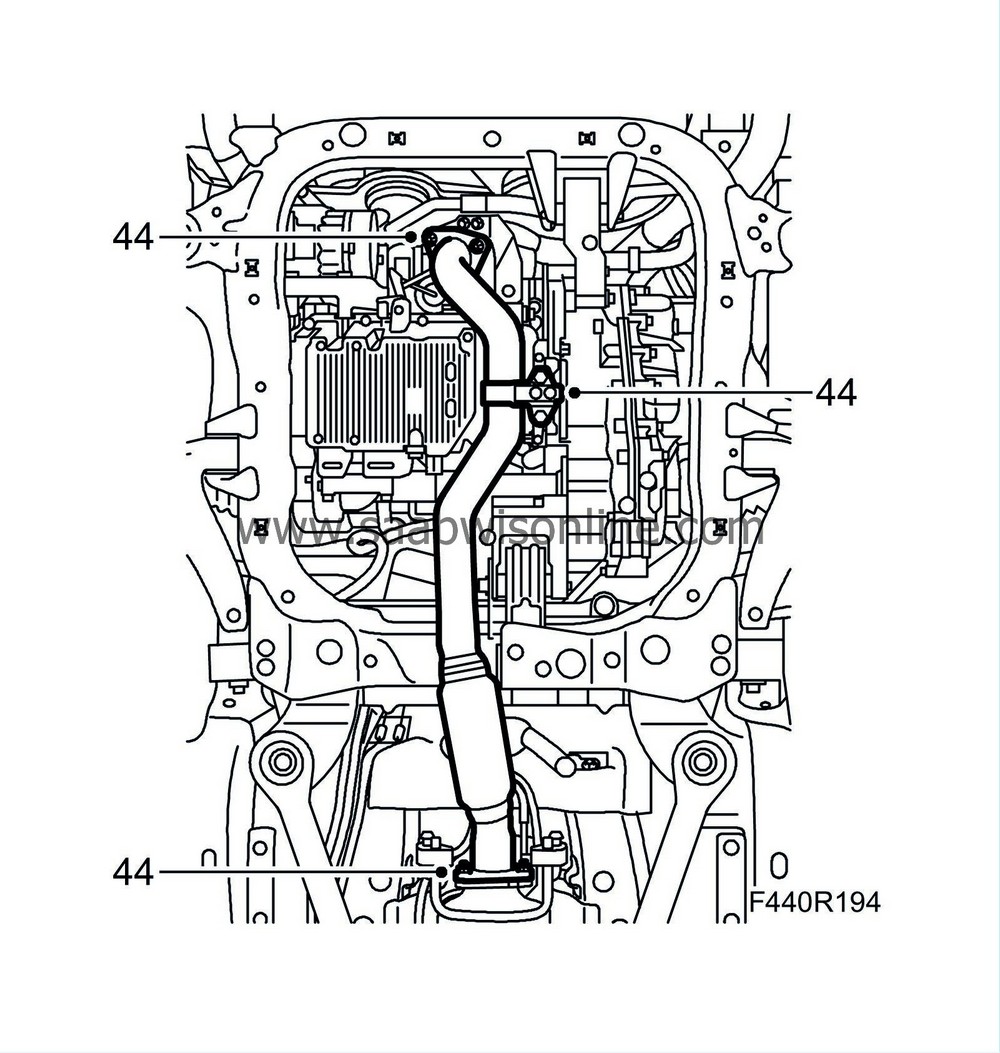
44.
|
Lower the power train with the lifting beam to facilitate removal of the transmission.
|
|
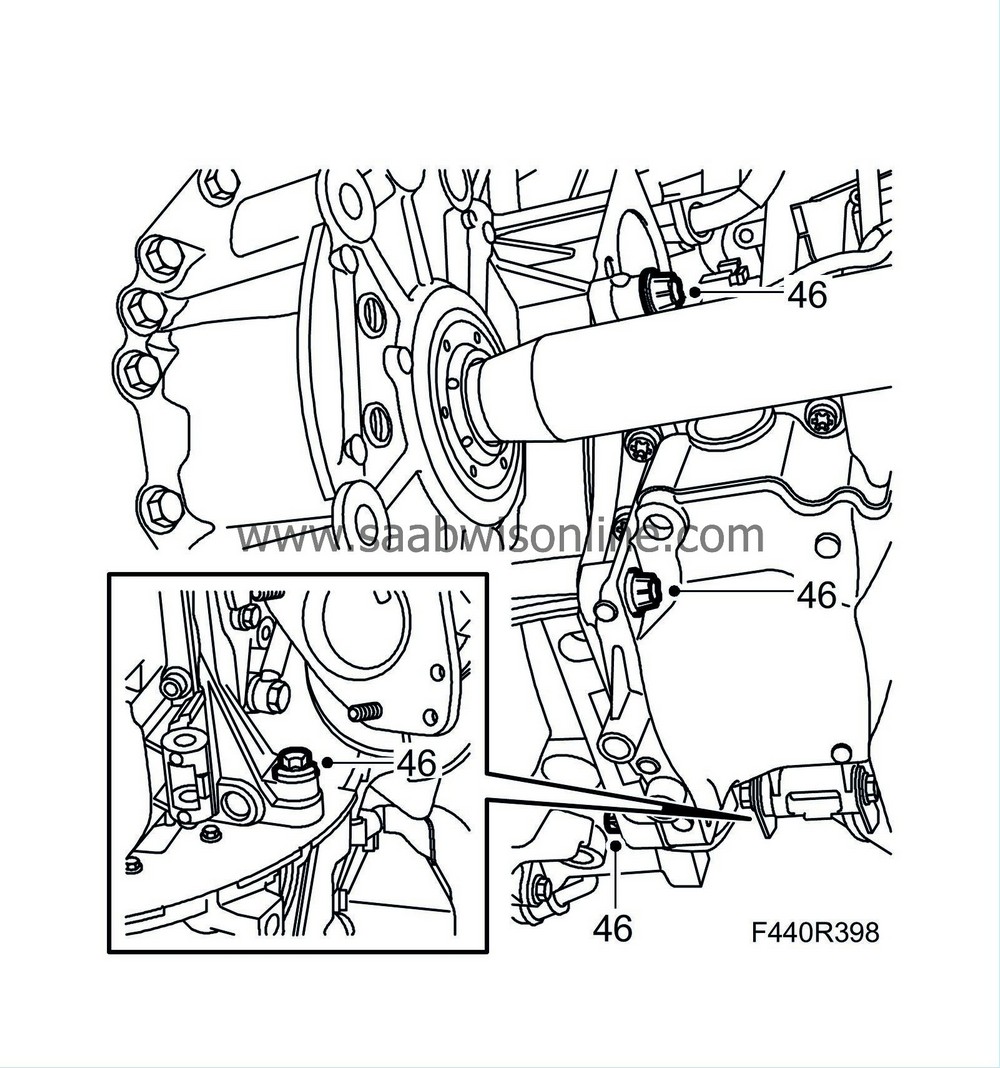
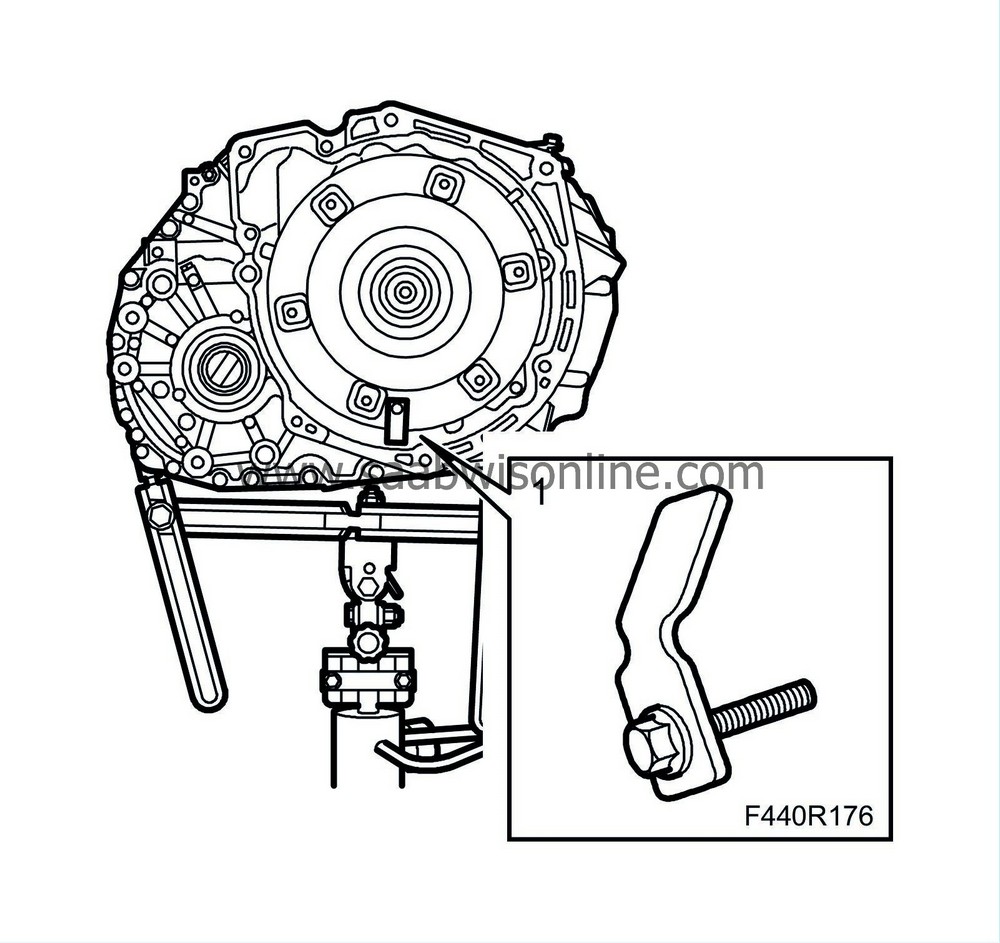
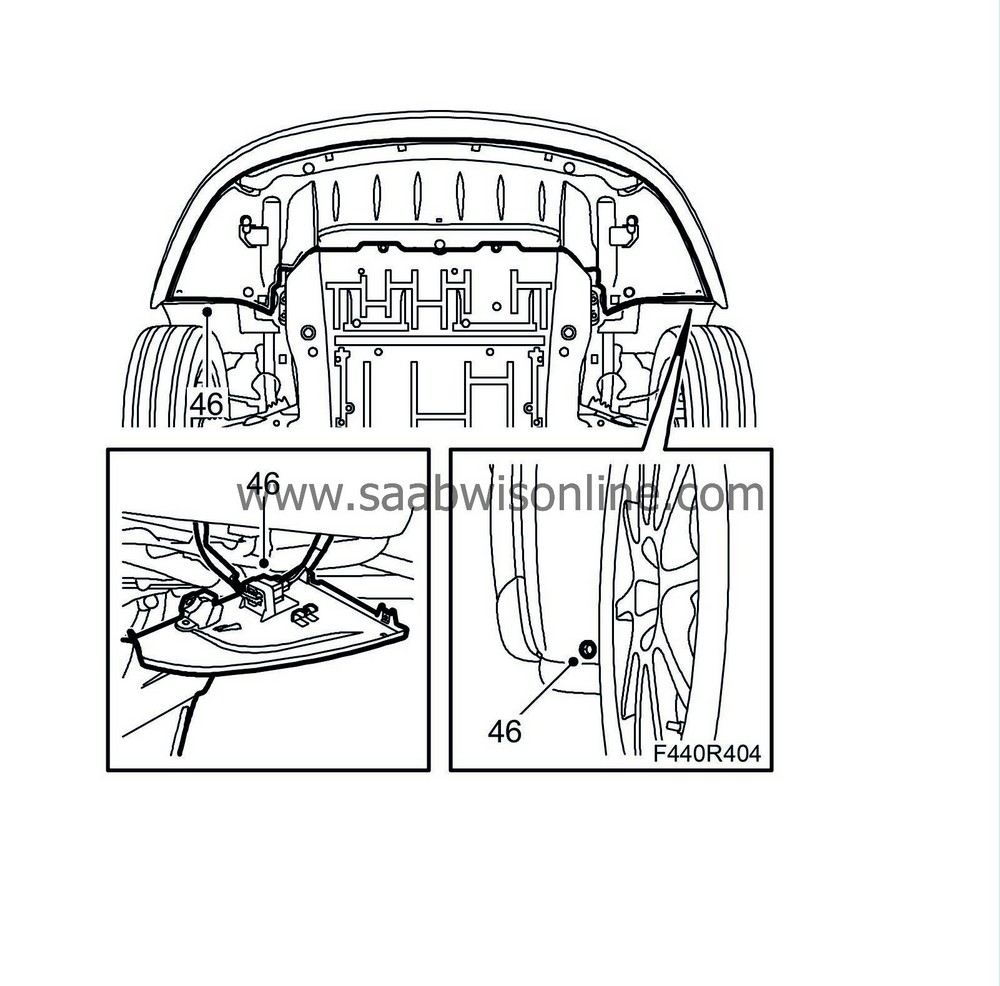
46.
|
Adjust and fasten the tool in the gearbox as illustrated. Use the M12 holes for the torque rods.
|
|
47.
|
Remove the lower bolts holding the gearbox to the engine.
|
|
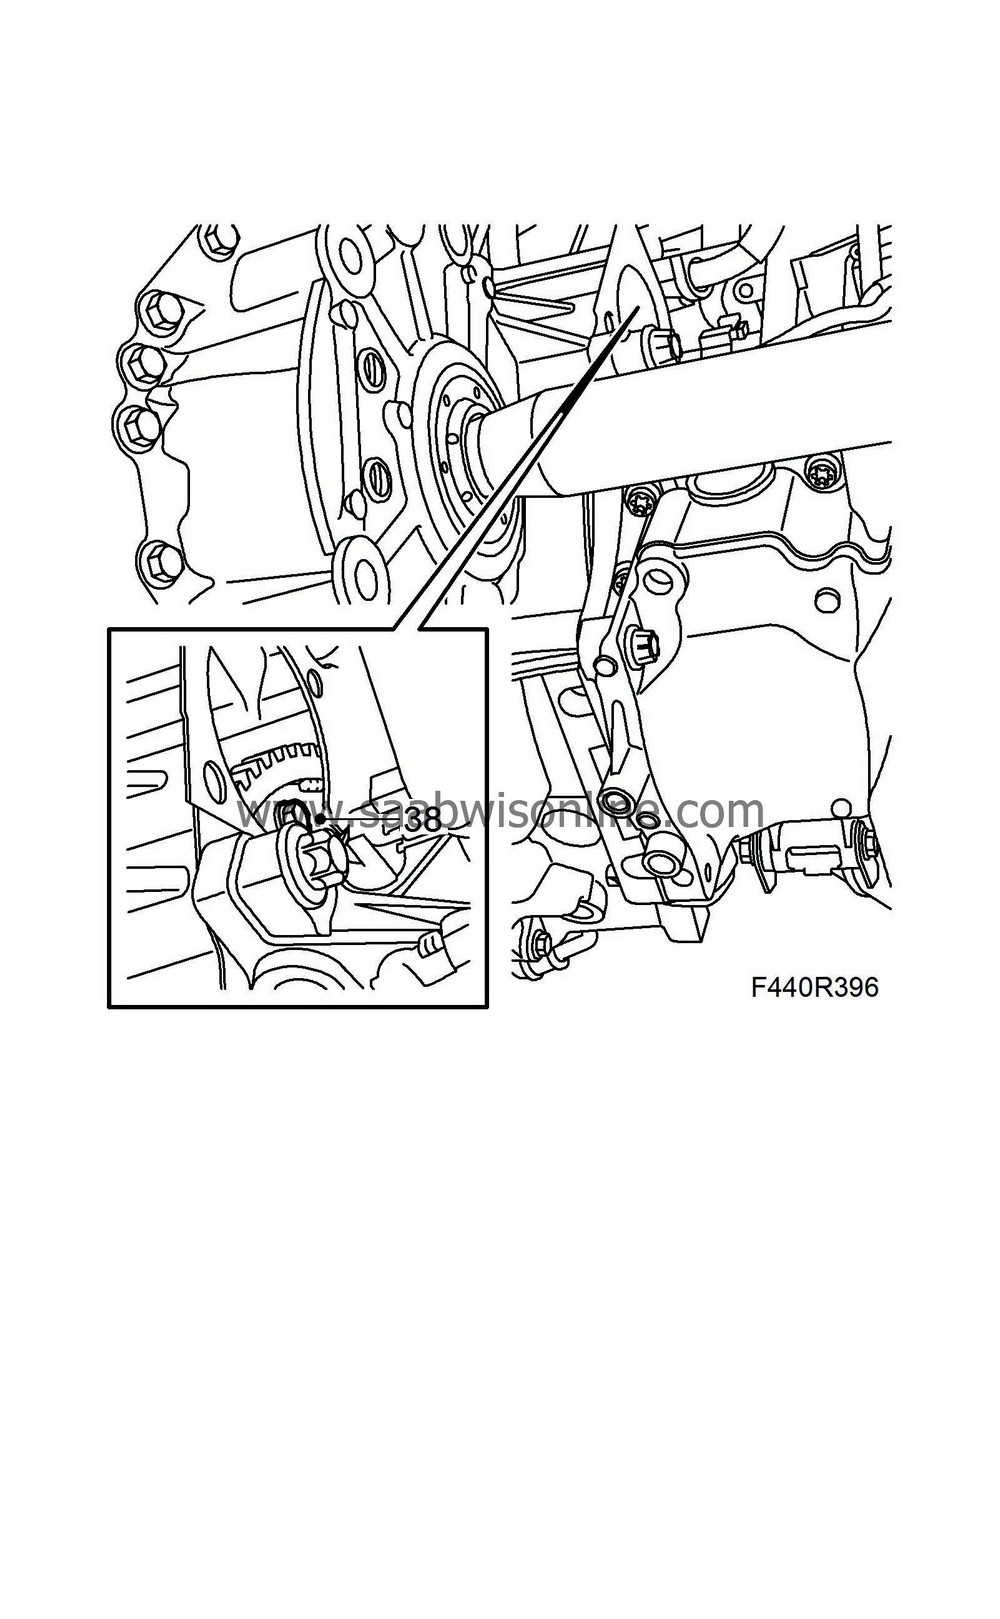
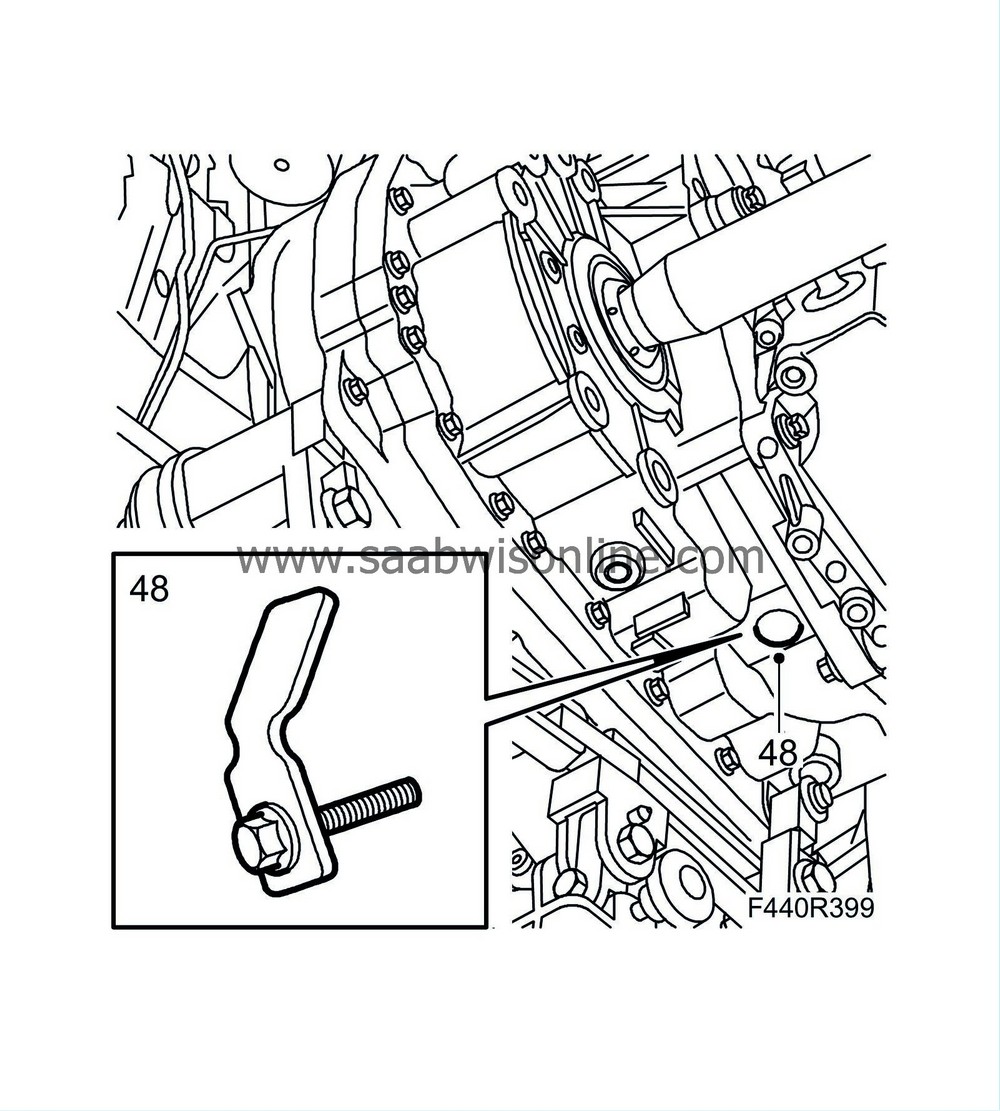
48.
|
Pull out the gearbox about 10 mm. Undo the plug and press the torque converter towards the gearbox and fit
87 92 574 Holder
for holding the torque converter in place while removing the gearbox.
|
|
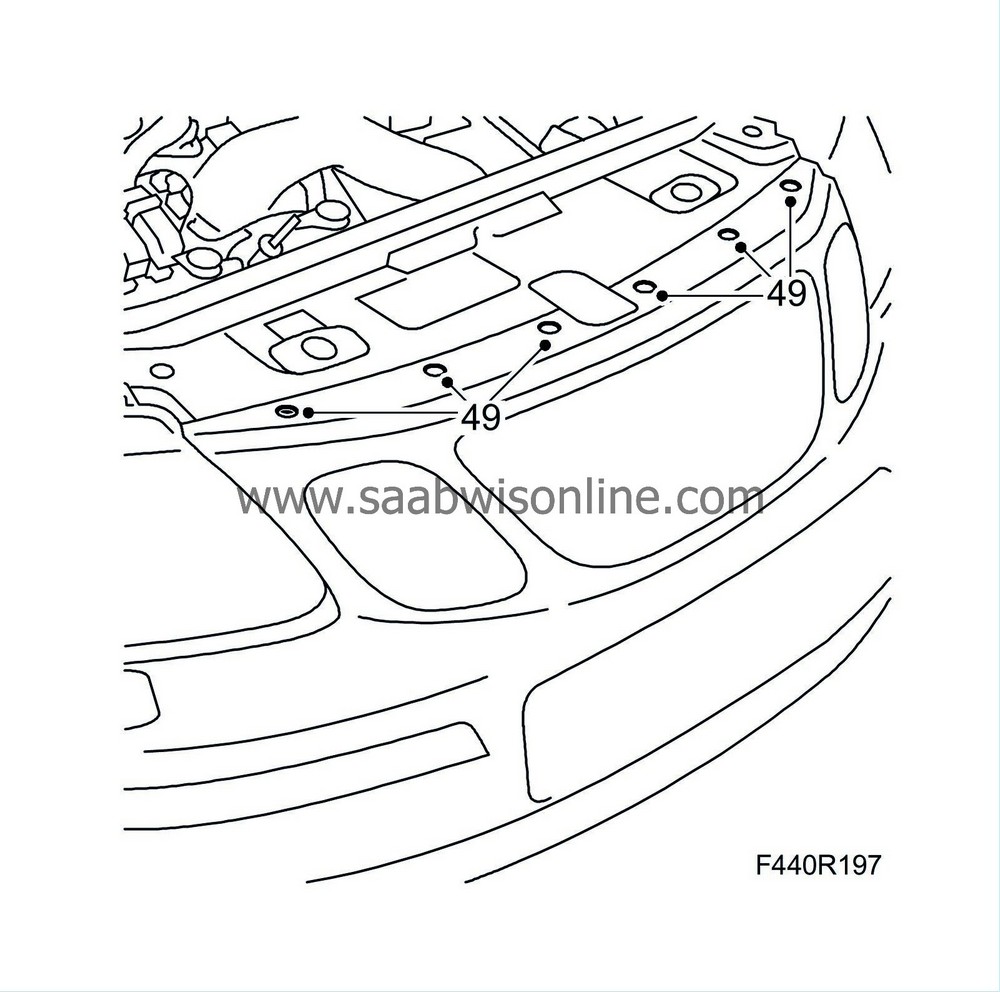
49.
|
Pull out and let down the gearbox.
|
Important
|
|
The jack can tip over. Be careful.
|
|
|
|
|
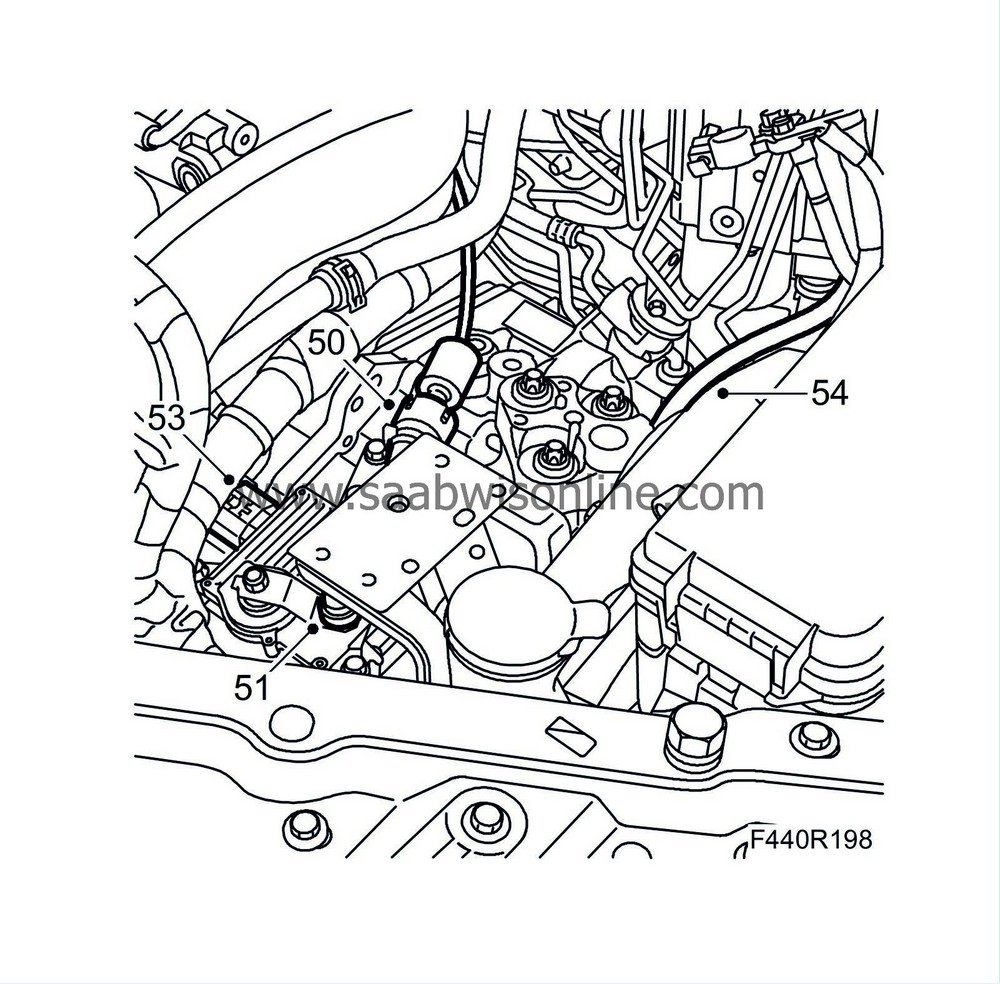
50.
|
Lift the transmission down from the column jack with an engine lift and
87 92 442 Lifting cable
while undoing the lifting tool from the transmission.
|
|
51.
|
Plug the holes for the drive shafts if the transmission is to undergo transport.
|
When fitting a new transmission, transfer the holder for the torque converter and the plugs from the new transmission to the old one.
|
1.
|
Turn the torque converter so the boltholes are in line with the holes on the driver plate and turn the engine so the oval hole in the driver plate is in the centre of the starter motor opening.
Fit
87 92 574 Holder
to hold the torque converter in place while fitting. Grease the torque converter guide pin.
|
|
2.
|
Make sure the two guide sleeves are on the engine and apply grease to the sleeves.
|
|
6.
|
Secure the tool to the transmission as for removal.
|
Important
|
|
The jack can tip over. Be careful.
|
|
|
|
|
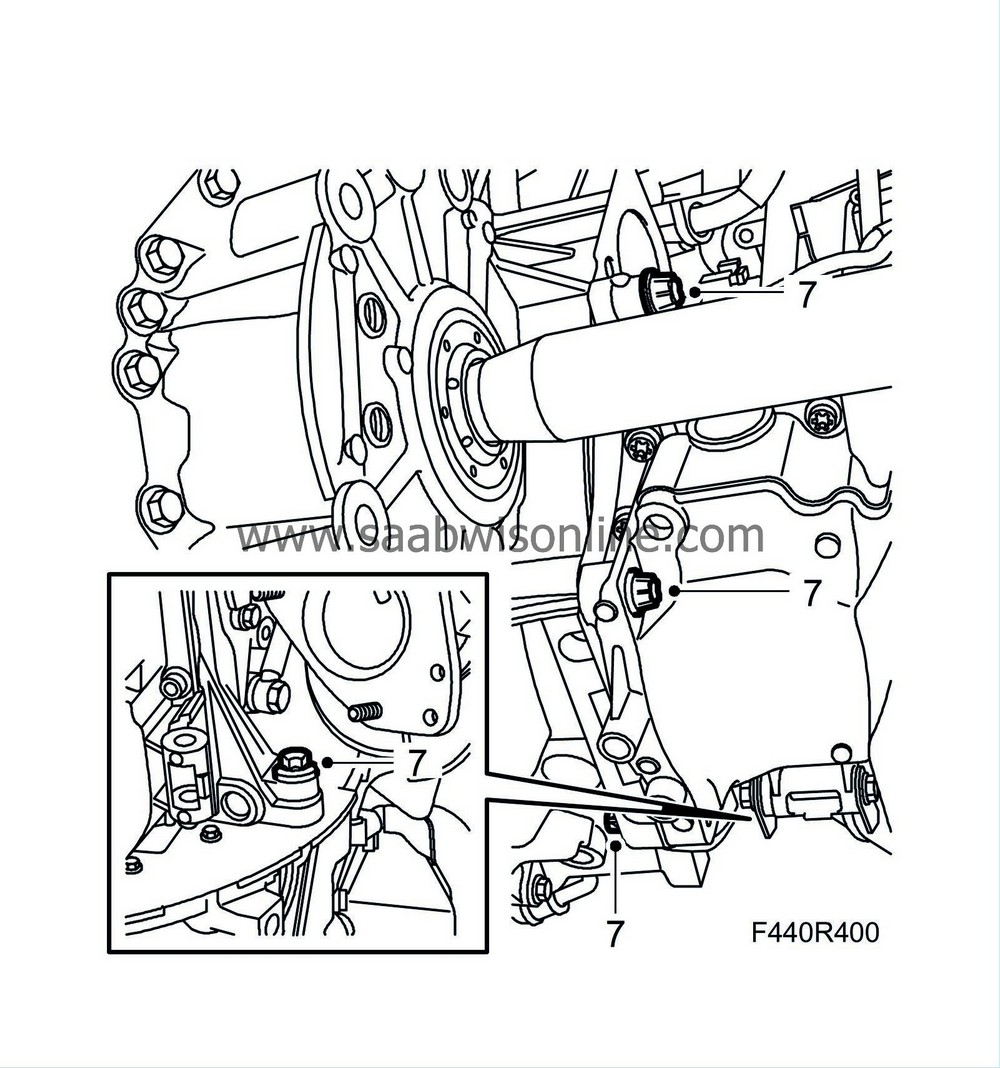
7.
|
Fit the gearbox to the engine. Remove
87 92 574 Holder
just before the gearbox is in place. Tighten the lower bolts between the engine and gearbox.
Tightening torque, M12 60 Nm (44 lbf ft)
Tightening torque, M10 40 Nm (30 lbf ft)
|
|
9.
|
Make sure that the drive shaft is clean and then align it with the tool.
|
Important
|
|
Slide in the gearbox until approx. 20 mm are remaining and remove the tool 83 95 162.
|
|
|
|
|
10.
|
Push in the rest of the shaft until the circlip clicks in.
|
|
11.
|
Press the torque converter against the driver plate. Fit the plug.
|
|
12.
|
Apply
74 96 268 Thread locking adhesive
to the bolts holding the torque converter to the driver plate.
|
Note
|
|
Use the original bolts with associated washers. Using bolts that are too long will harm the torque converter.
|
|
|
13.
|
Turn the engine clockwise with the belt pulley and tighten the bolts one at the time starting at the oval hole in the driver plate.
Tightening torque 60 Nm (44 lbf ft)
|
|
14.
|
Lift the starter motor in place and insert the lower stud.
|
|
15.
|
Remove the lifting tool from the gearbox and move away the jack.
|
|
16.
|
Lower the car to the floor.
|
|
17.
|
Lift up the unit and fit the bolts to the engine bracket according to the marks made earlier.

|
|
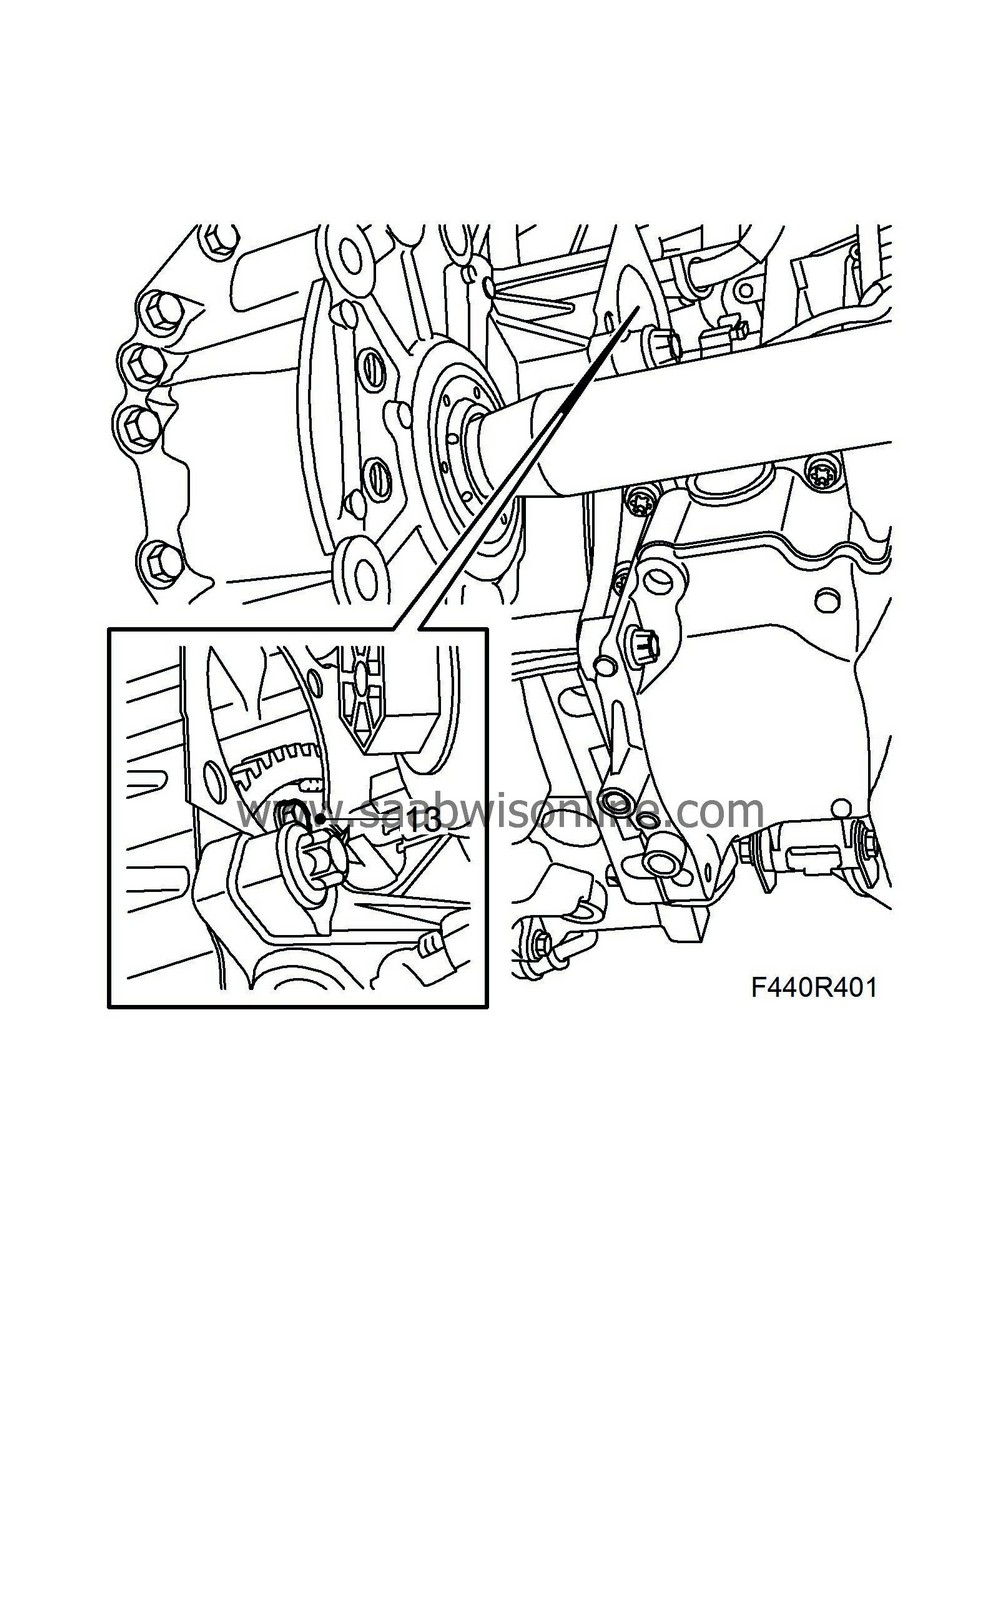
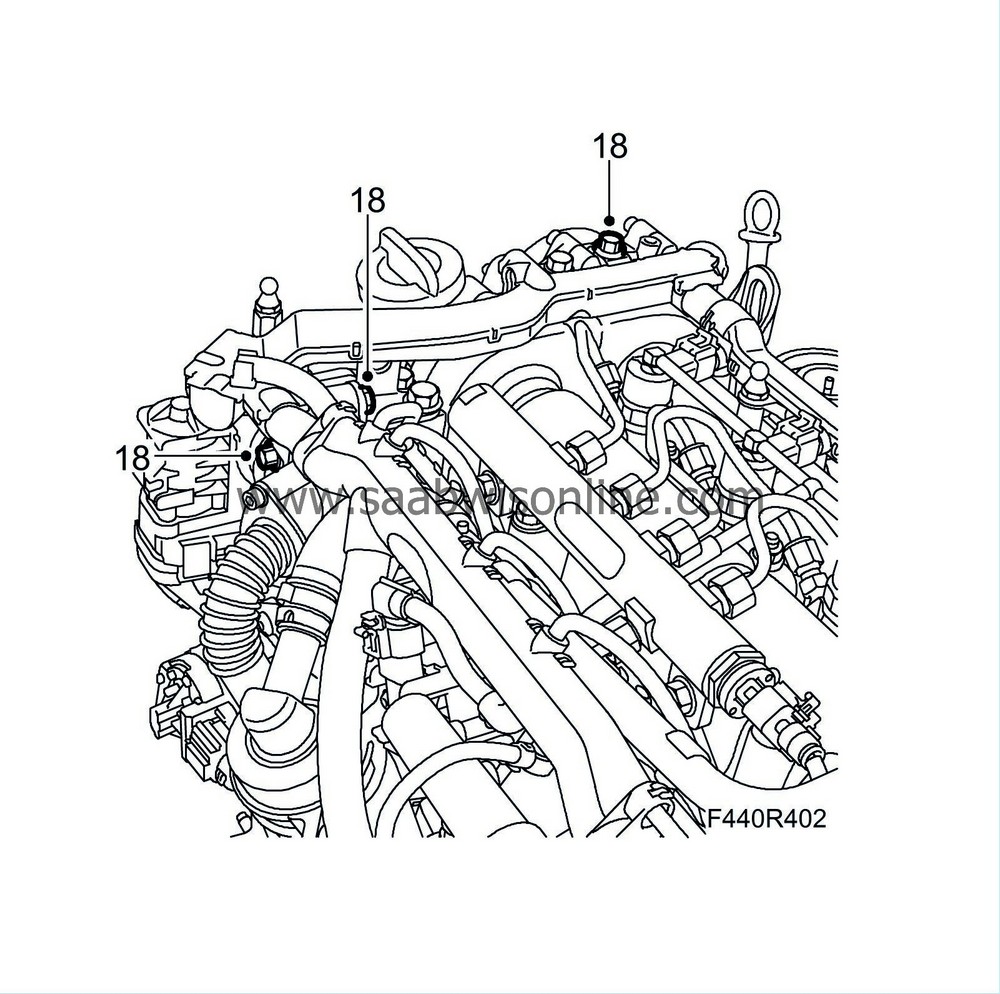
18.
|
Remove the lifting beam. Fit the bolt to the intake manifold and the cable duct's screws.
|
|
19.
|
Fit the wiring harness bracket and the upper bolts between the engine and the gearbox.
Tightening torque, M12 60 Nm (44 lbf ft)
|
|
20.
|
Fit the bracket for the coolant pipes and wiring harness.
|
|
21.
|
Fit the upper starter motor bolts.
Tightening torque 24 Nm (18 lbf ft)
|
|
23.
|
Tighten the lower stud.
Tightening torque 24 Nm (18 lbf ft)
|
|
24.
|
Fit the ground cable to the lower stud.
|
|
25.
|
Fit the electrical connections to the starter motor.
|
|
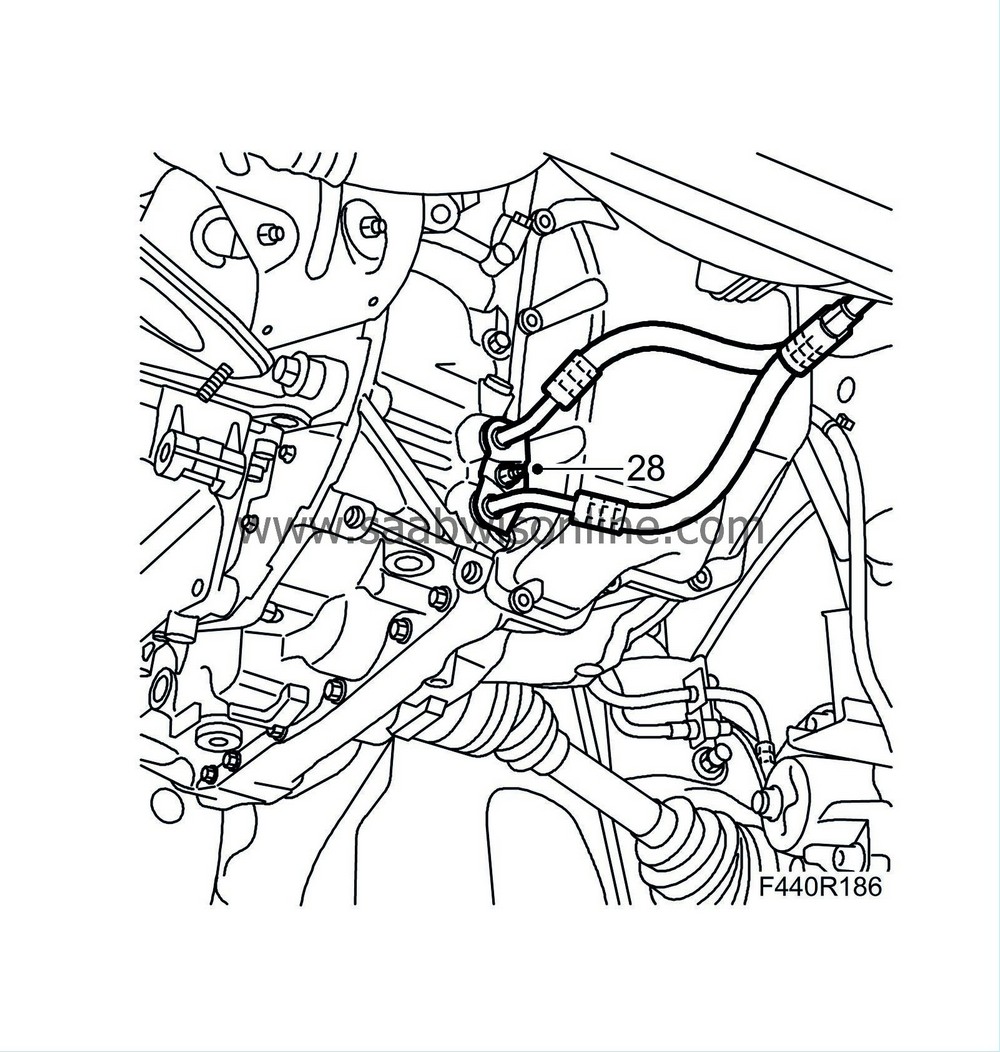
28.
|
Lubricate the pipes with
Vaseline, none-acidic
and attach the oil cooler hoses. The pipes press holes into the seals during fitting.
|
|
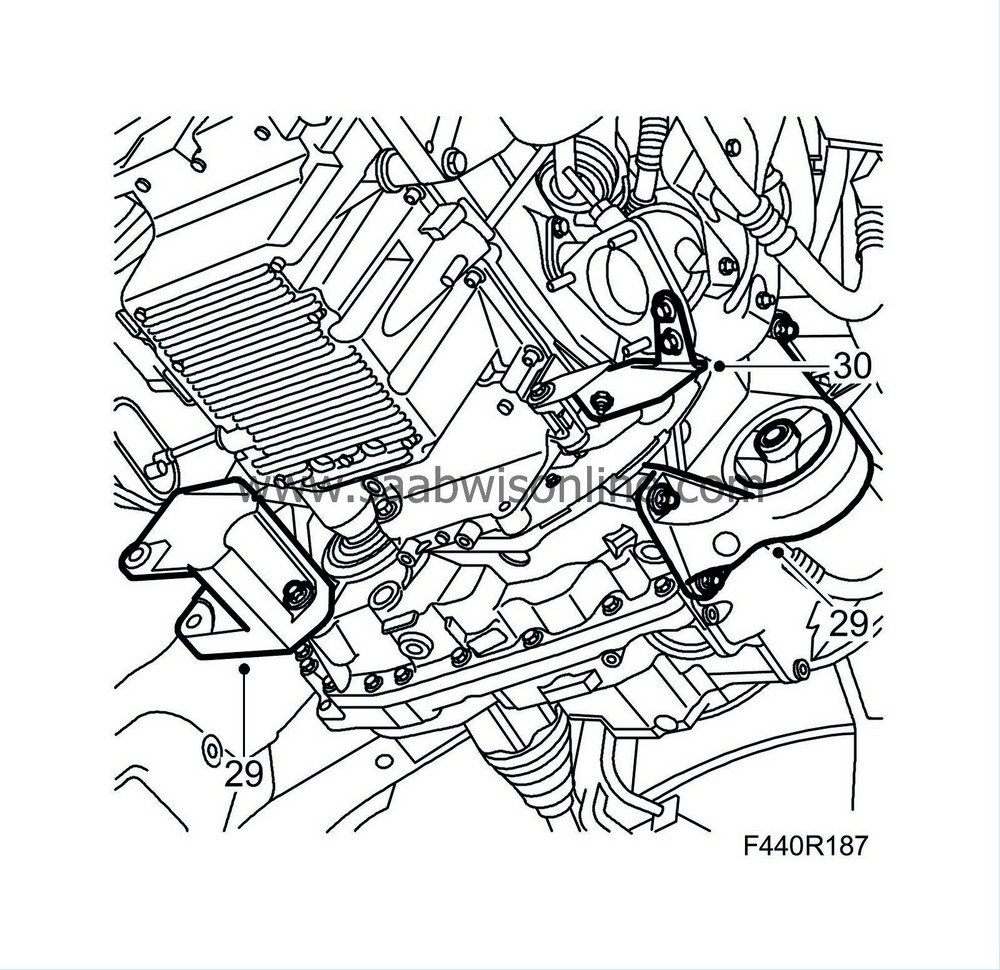
29.
|
Fit the torque rod brackets to the gearbox.
Tightening torque 80 Nm (69 lbf ft)
|
|
30.
|
Fit the front catalytic converter bracket.
|
|
31.
|
Place the frame on the trolley lift with the jig.
|
|
32.
|
Lift the frame. Position the suspension arm ball joints in the steering swivel member and the radiator guide pins. Make sure the upper radiator guides are against their brackets.
|
Important
|
|
Press up the pin carefully.
|
|
The groove in the pin must be visible in the screw hole in the spindle housing.
|
|
If the rubber gaiter is pressed down, it will not seal properly to the swivel pin.
|
|
|
|
|
33.
|
Lift in place the subframe. Steer the guide pins in the fixture to the holes in the body.
|
|
34.
|
Fit the subframe bolts and rear brackets. Lift the subframe against the body so that the bushes do not rotate when the bolts are tightened. Remove the trolley lift.
Tightening torque, subframe 75 Nm +135°(55 lbf ft + 135°)
Tightening torque, rear bracket bolts 90 Nm +45° (60 lbf ft + 45°)
|
|
35.
|
Fit the electrical connections to the EHPS unit and the wiring harness cable tie.
|
|
36.
|
Fit the engine torque rod to the subframe.
Tightening torque, front bolt 60 +90° Nm (44 lbf ft +90°)
Tightening torque, rear bolt 80 Nm (59 lbf ft)
|
|
37.
|
Fit the suspension arms to the steering swing member. Use new nuts.
Tightening torque 50 Nm (38 lbf ft)

|
Important
|
|
Ensure that the steering knuckle stub is visible on the top of the steering knuckle housing before the bolt is fitted.
|
|
|
|
|
38.
|
Fit the track rods to the swivel members. Use new nuts.
Tightening torque 30 Nm (22 lbf ft)
|
|
39.
|
Fit the link arms to the anti-roll bar.
Tightening torque 64 Nm (47 lbf ft)
|
|
40.
|
Fit the connector and cable clip to the headlamp angle sensor. (Option)
|
|
42.
|
Remove the straps.

|
|
44.
|
Fit the front exhaust pipe. Lubricate the threads with
30 20 971 Screw thread paste.
Tightening torque, exhaust flanges are to 22 Nm (16 lbf ft)
Tightening torque, bracket to gearbox 19 Nm (14 lbf ft)
|
|
46.
|
Fit the spoiler shield.
Cars with headlamp washer:
Fit the washer hose.
|
|
48.
|
Lower the car to the floor.
|
|
49.
|
Fit the bumper shell's upper mountings to the upper radiator member.
|
|
50.
|
Fasten the cable to the cable retainer by pulling back the locking sleeve.
|
|
51.
|
Fit the gear cable to the selector lever arm.
|
|
53.
|
Connect and secure the control module connector.
|
|
54.
|
Connect the air exhaust hose
|
|
56.
|
Fit the filler plug.
Tightening torque 45 Nm (33 lbf ft)
|
|
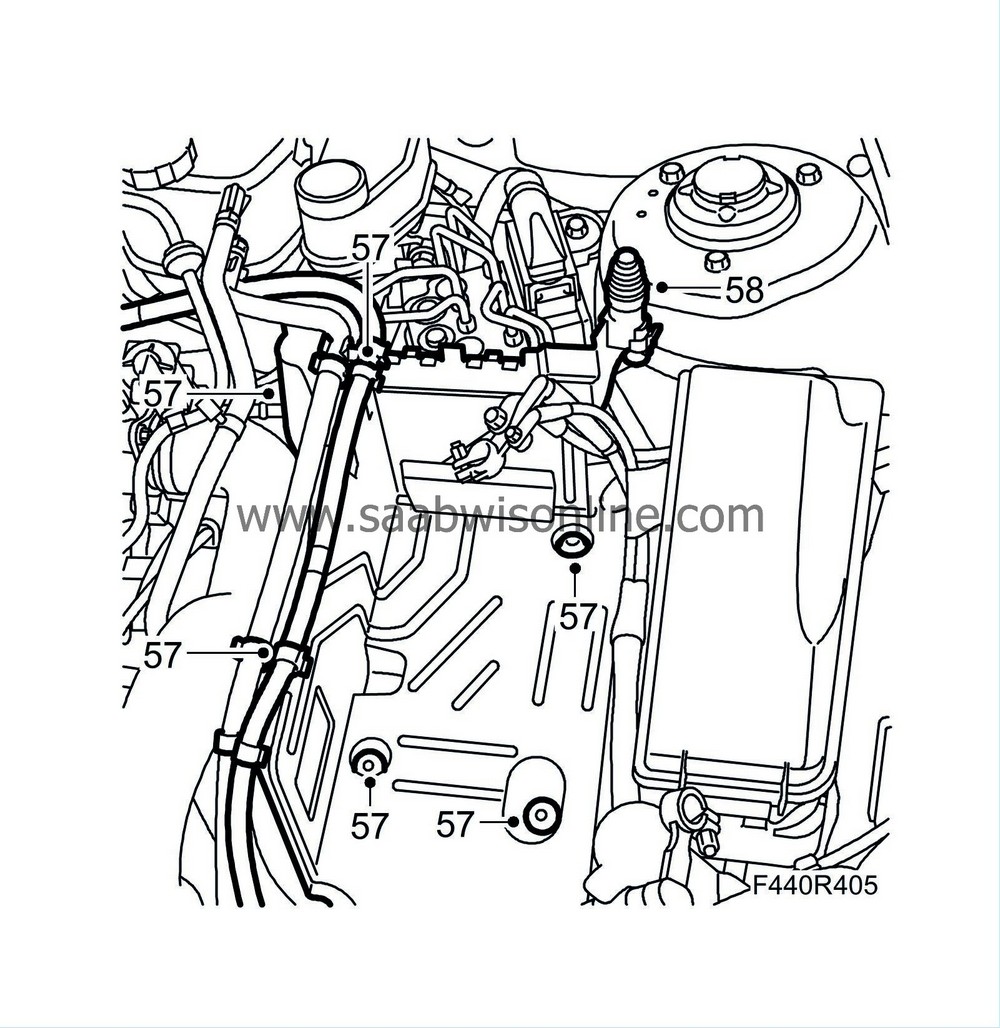
57.
|
Fit the battery tray, fuse holder, cable clips and cover over the fuse holder.
|
|
58.
|
Fit the bonnet switch and battery.
|
|
59.
|
Fit and connect the battery cables.
|
|
60.
|
Fit the battery cover.
|
|
61.
|
Fit the insulation and upper engine cover.
|
|
63.
|
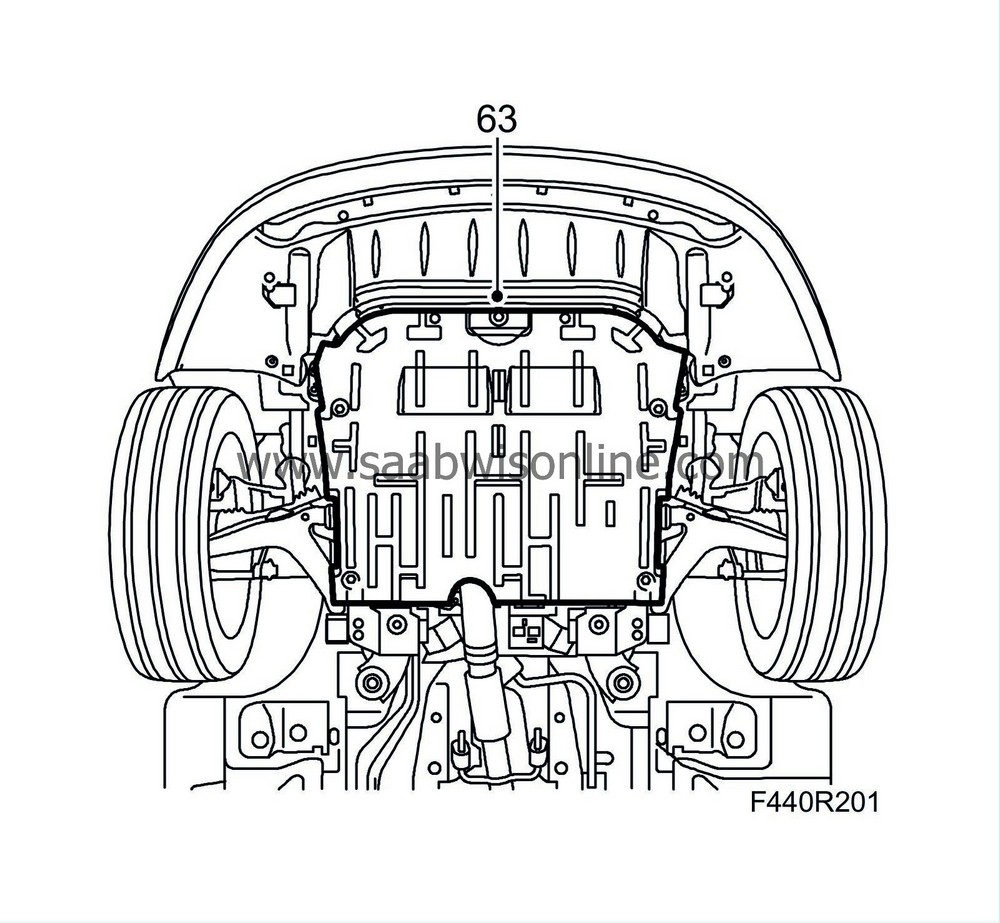
Fit the lower engine cover.
|
|
65.
|
Remove the wing covers.
|
|
68.
|
Test drive the car with varying engine loads and speeds and delete eventual trouble codes. Also check the position of the steering wheel when driving straight ahead on a level road. Adjust if needed.
|


