PRE-RELEASE
Camshaft Position Actuator Installation - Right Side Intake
| Camshaft Position Actuator Installation - Right Side Intake |
| 1. |
Ensure the proper camshaft position actuator is installed. Observe the body of the camshaft position actuator for the "IN" marking (3). The marking is for an intake camshaft position actuator.

|
|
| 2. |
Ensure the proper camshaft position actuator is being installed. The reluctor wheel on the right intake camshaft position actuator (1) is indexed in a different position compared to the left intake camshaft position actuator (2). 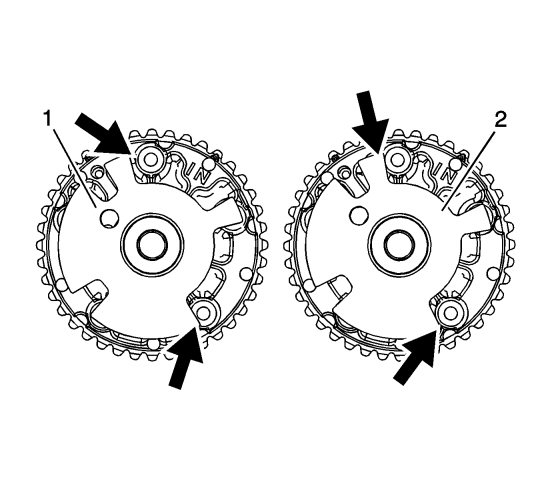
|
|||||||||
 Warning
| 3. |
On the right intake camshaft actuator the edge of the reluctor wheel (1) lines up with the valley (2) of the sprocket tooth.

|
|
| 4. |
Ensure the proper timing mark is used. Observe the outer ring of the camshaft position actuator for the triangle marking (2). The triangle marking is for alignment to the highlighted timing chain link on the right side of the engine.
|
|
| 5. |
Refer to
Torque Reaction Against Timing Drive Chain Caution
.
Use an open wrench on the hex cast into the camshaft in order to prevent camshaft rotation when tightening the camshaft position actuator bolt. |
|
| 6. |
Ensure the proper camshaft thrust washer is used, if applicable. Use a 1.6 mm (0.063 in) thrust washer on applications that have 5 attaching screws on the back side of the camshaft position actuator without an identification dot (1). Use a 1.1 mm (0.043 in) thick thrust washer with yellow speckles on applications that have 4 attaching screws on the back side of the camshaft position actuator (2) and on applications that have 5 attaching screws on the back side of the camshaft position actuator with an identification dot (3). 
|
||||||||||
| 7. |
There are first design (1) and second design (2) camshaft front bearing caps. Applications that have a second design camshaft bearing cap (2) do not use thrust washers.

|
|
| 8. |
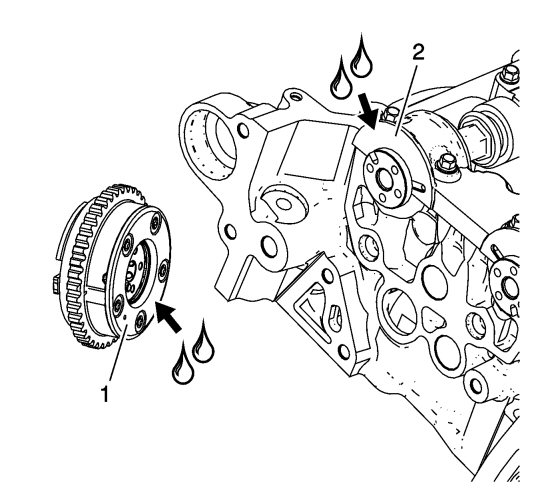
For applications without a camshaft thrust washer, apply a liberal amount of lubricant to the back of the camshaft position actuator (1) and front of the camshaft bearing cap (2). Refer to
Adhesives, Fluids, Lubricants, and Sealers
for recommended lubricant.
|
|
| 9. |
Install the thrust washer (3), if applicable.

|
|
| 10. |
Install the right intake camshaft position actuator (2).
|
|
| 11. |
Refer to
Fastener Caution
.
Install the camshaft's position actuator bolt (1) and tighten to 58 Nm (43 lb ft) . |
|
