Differential Clutch Oil Replacement
|
|
Differential Clutch Oil Replacement
|
|
1.
|
 Warning
|
|
The hydraulic pressure in the differential clutch is very high. To prevent personal injury, wait for at least 10 minutes before removing any parts from the differential clutch.
|
|
|
|
|
|
|
Note
|
|
The vehicle should be as level as possible when performing this procedure.
|
|
Note
|
|
To adjust the differential clutch fluid to the proper level without draining, go to step 12 of installation.
|
Raise the vehicle and support the vehicle. Refer to
Lifting and Jacking the Vehicle
|
|
2.
|
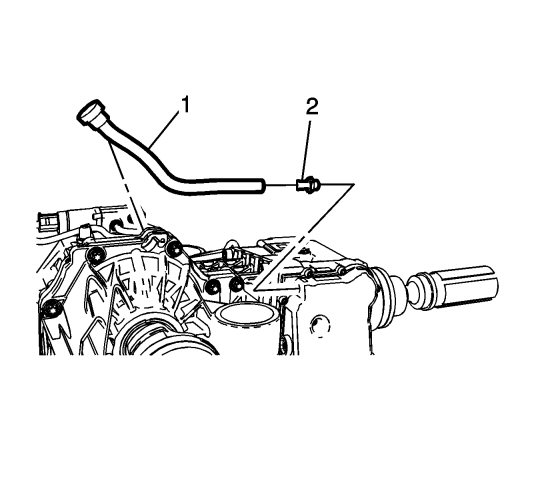
Remove the vent hose (1).
|
|
3.
|
|
Warning
|
|
It is very important to observe maximum cleanliness when working on the differential clutch. Dirt particles can seriously damage the function and service life of the differential clutch.
|
|
|
|
|
|
Remove the differential clutch cover to drain the differential clutch.
|
|
4.
|
Remove the vent hose fitting from the differential clutch cover.
|
|
Note
|
|
Both the fluid level and clutch motor current parameter requirements must be met to ensure the differential is filled to specifications.
|
|
1.
|
Install the differential clutch cover.
|
|
2.
|
Refer to
Fastener Caution
.
|
Note
|
|
The following tighten procedure MUST BE PERFORMED TWICE to ensure the proper sealing around the accumulator and the filter.
|
Install the differential cover bolts and tighten to
6 Nm (53 lb in)
in a star pattern and repeat this torque sequence twice to ensure proper sealing around the accumulator and the filter.
|
|
3.
|
|
Warning
|
|
Fluids for the differential clutch and the rear axle are different. The fluids must never be mixed or interchanged or vehicle damage will result.
|
|
|
|
|
|
Fill the differential clutch with 350 ml (12 ounces) of the proper differential fluid through the vent hose fitting hole. Refer to
Adhesives, Fluids, Lubricants, and Sealers
.
|
|
4.
|
Remove the supports and lower the vehicle.
|
|
5.
|
To stabilize the oil level, let the vehicle rest for 10 minutes with the ignition off.
|
|
6.
|
Start the engine and allow to run for 5 minutes at idle.
|
|
7.
|
In park, cycle the throttle to wide open briefly 5 times to cycle solenoids to purge air.
|
|
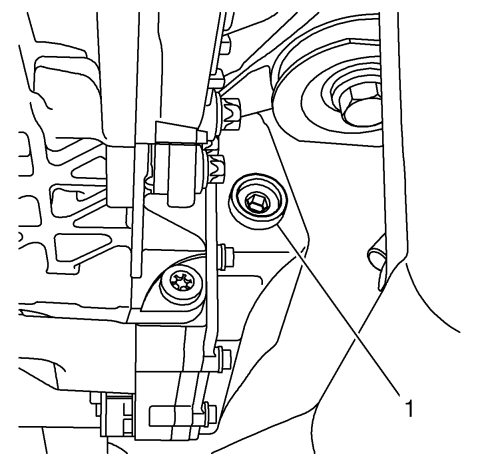
10.
|
Remove the differential clutch level inspection plug (1).
|
|
11.
|
The differential clutch fluid should be level with the bottom of the differential clutch fluid level inspection plug hole.
|
|
12.
|
If needed, install the differential clutch level inspection plug and add 50 ml (1.7 ounce) through the vent fitting hole. Repeat step 4 through 11.
|
|
13.
|
Install the breather hose connection (2) and tighten to
14 Nm (10 lb ft)
.
|
|
14.
|
Install then vent hose (1).
|
|
16.
|
Install the scan tool.
|
|
17.
|
|
Note
|
|
When the clutch pump motor cycles from OFF to ON the current will also cycle from 0 mA to 2500-3500 mA. DTC C0407 64 is set when the pump current is CONSTANTLY BELOW 2500 mA.
|
With engine running, observe the scan tool Rear Differential Clutch Pump Motor Current parameter. The parameter display should be between
2500-3500 mA
when the pump is on. If the parameter is below
2500 mA
, repeat step 12.
|
|
18.
|
If the parameter is between 2500-3500 mA, check the differential clutch is not overfilled. If the differential clutch fluid level is too high, remove the fluid level inspection plug and allow the excess fluid to drain.
|
