3-5-Reverse and 4-5-6 Clutch Housing Disassemble
|
|
3-5-Reverse and 4-5-6 Clutch Housing Disassemble
|
|
Reluctor Wheel and Piston Removal
|
Reluctor Wheel and Piston Removal
|
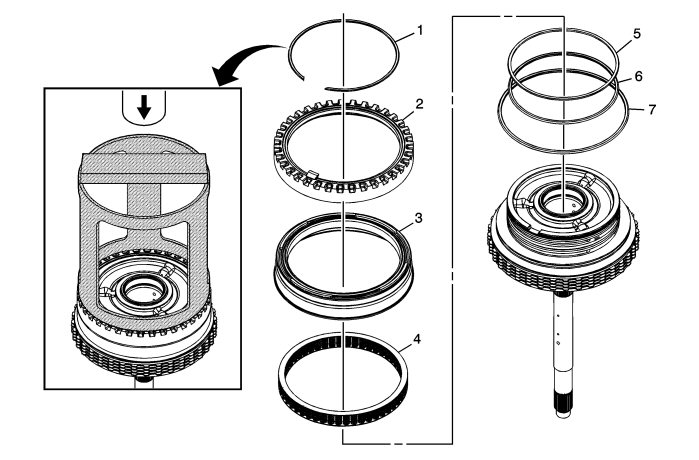
Callout
|
Component Name
|
|
1
|
A/Trans Input Shaft Speed Sensor Reluctor Ring Retaining Ring
 Warning
|
|
Compress the reluctor wheel just enough to clear the retainer. Over compressing the reluctor wheel will break the alignment tab and the clutch housing.
|
|
|
|
|
|
Special Tools
DT-47694
Piston Spring Compressor
For equivalent regional tools, refer to
Special Tools
.
|
|
2
|
A/Trans Input Shaft Speed Sensor Reluctor Wheel
|
|
3
|
3-5 Reverse Clutch Piston
|
Note
|
|
Inspect the piston seals for damage and/or wear. The piston is reusable.
|
|
|
4
|
3-5 Reverse Clutch Spring Assembly
|
|
5
|
3-5 Reverse Clutch Piston Inner Seal (Orange)
|
|
6
|
3-5 Reverse Clutch Piston Inner Seal (Black)
|
|
7
|
3-5 Reverse Clutch Piston Dam Seal
|
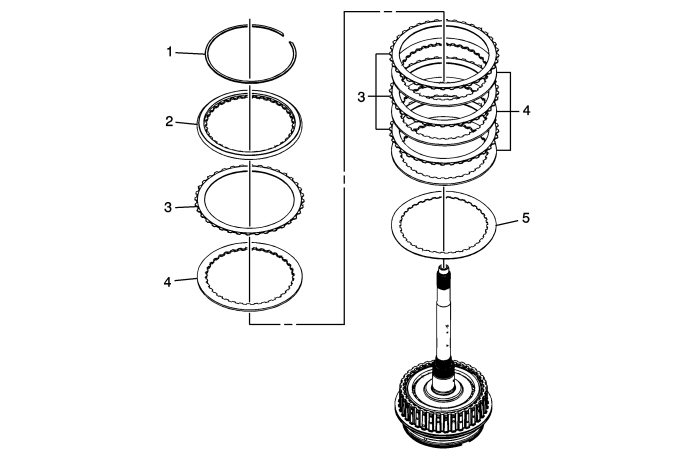
Clutch Plate Removal
|
Callout
|
Component Name
|
|
1
|
3-5 Reverse Clutch Backing Plate Retaining Ring
|
|
2
|
3-5 Reverse Clutch Backing Plate
|
|
3
|
3-5 Reverse Clutch (w/Friction Material) Plate Assembly (Qty: 4)
|
|
4
|
3-5 Reverse Clutch Plate (Qty: 4)
|
|
5
|
3-5 Reverse Clutch (Waved) Plate
|

4-5-6 Clutch Hub Removal
|
Callout
|
Component Name
|
|
1
|
4-5-6 Backing Plate Retaining Ring
|
Note
|
|
Gently push down on the backing plate to get enough clearance between the backing plate and retainer.
|
|
|
2
|
Reaction Carrier Hub Assembly
|
Note
|
|
The clutch plates will come out of the housing with the hub assembly.
|
|
|
3
|
4-5-6 Clutch Backing Plate
|
|
4
|
4-5-6 Clutch Plate (Qty: 6)
|
|
5
|
4-5-6 Clutch (w/Friction Material) Plate Assembly (Qty: 6)
|
|
6
|
4-5-6 Clutch Hub Thrust Bearing Assembly
|
Note
|
|
The bearing may stick to the reaction carrier hub.
|
|
|
4-5-6 Clutch Piston Removal
|
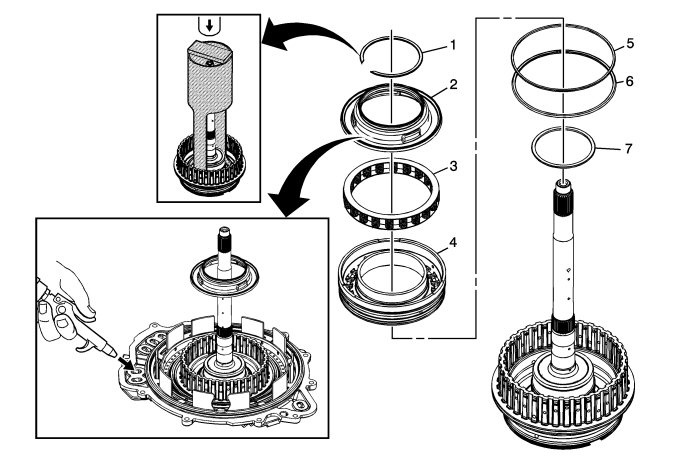
4-5-6 Clutch Piston Removal
|
Callout
|
Component Name
|
|
1
|
4-5-6 Clutch Dam Retaining Ring
Special Tools
|
•
|
GE 8059
Snap Ring Pliers-Parallel Jaw or equivalent
|
For equivalent regional tools, refer to
Special Tools
.
|
|
2
|
4-5-6 Clutch Piston Fluid Dam
Procedure:
|
1.
|
Place the 3-5-R and 4-5-6 clutch housing onto the case cover assembly.
|
|
2.
|
Apply shop air to the 4-5-6 clutch feed hole using a rubber tipped air gun to dislodge the dam piston and the 4-5-6 clutch piston from the clutch housing.
|
|
|
3
|
4-5-6 Clutch Spring Assembly
|
|
4
|
4-5-6 Clutch Piston
|
|
5
|
4-5-6 Clutch Piston Outer Seal (Stepped)
|
|
6
|
4-5-6 Clutch Piston Outer Seal (Rounded)
|
|
7
|
4-5-6 Clutch Piston Inner Seal
|
