Control Valve Body Assembly Assemble
|
|
Control Valve Body Assembly Assemble
|
|
Lower and Upper Body Assemble
|
Lower and Upper Body Assemble
|
Callout
|
Component Name
|
|
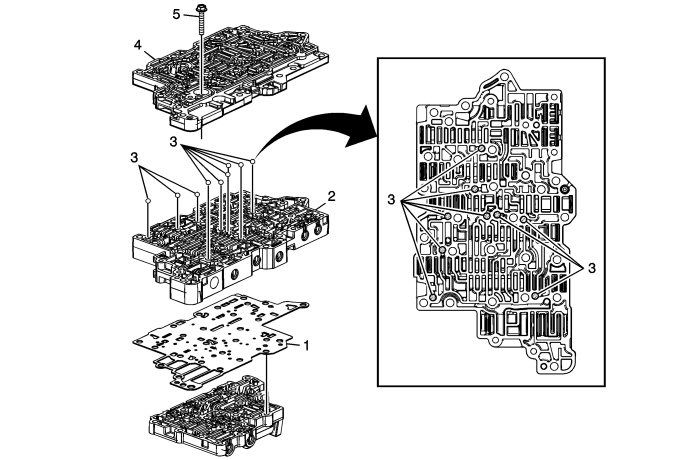
1
|
Control Valve Lower Body Spacer Plate Assembly
 Warning
|
|
Do not use the old spacer plate. Install a NEW spacer plate. Reusing an old spacer plate may cause internal transmission leaks and transmission damage.
|
|
|
|
|
|
|
Note
|
|
Inspect the upper channel plate bolt pass through holes for damage or brinelling. Any damage around the PCS switch feed holes could cause leakage around the PCS switch seals. Replace as necessary.
|
|
|
2
|
Control Valve Upper Body Assembly
|
|
3
|
Control Valve Body Ball Check Valve (Qty: 9)
|
Warning
|
|
Do not use any type of grease or other material to hold the check ball valves in place during assembly. Grease will cause the valves to not operate properly, resulting in damage to the transmission.
|
|
|
|
|
|
|
|
4
|
Control Valve Channel Plate Assembly
|
|
5
|
Control Valve Body Bolt 6 x 55 (Qty: 1)
Refer to
Fastener Caution
.
Tighten
12 Nm (9 lb ft)
|
|
Channel Plate and Upper Channel Plate Assemble
|
Channel Plate and Upper Channel Plate Assemble
|
Callout
|
Component Name
|
|
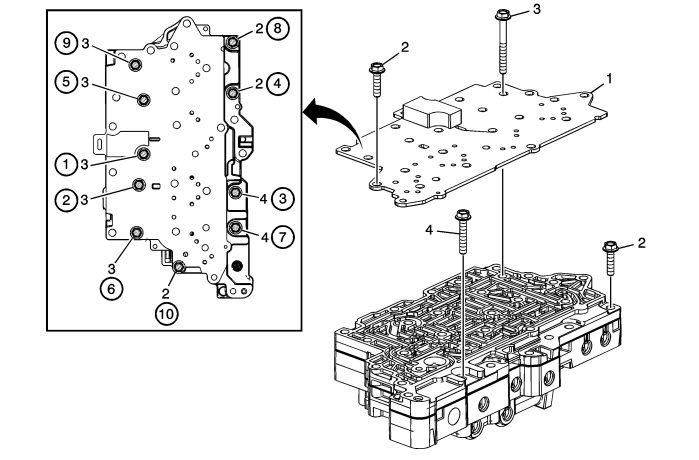
1
|
Control Valve Channel Upper Plate Assembly
|
Note
|
|
Inspect the upper channel plate bolt pass through holes for damage or brinelling. Any damage near the PCS feed holes could cause leakage around the PCS switch seal. Replace as necessary.
|
|
|
2
|
Control Valve Body Bolt M6 x 35 (Qty: 3)
Refer to
Fastener Caution
.
Procedure
Hand tighten for alignment, then tighten in sequence, after all bolts are installed.
Tighten
12 Nm (9 lb ft)
|
|
3
|
Control Valve Body Bolt M6 x 65 (Qty: 5)
Procedure
Tighten in sequence.
Tighten
12 Nm (9 lb ft)
|
|
4
|
Control Valve Body Bolt M6 x 55 (Qty: 2)
Procedure
Tighten in sequence.
Tighten
12 Nm (9 lb ft)
|
