PRE-RELEASE
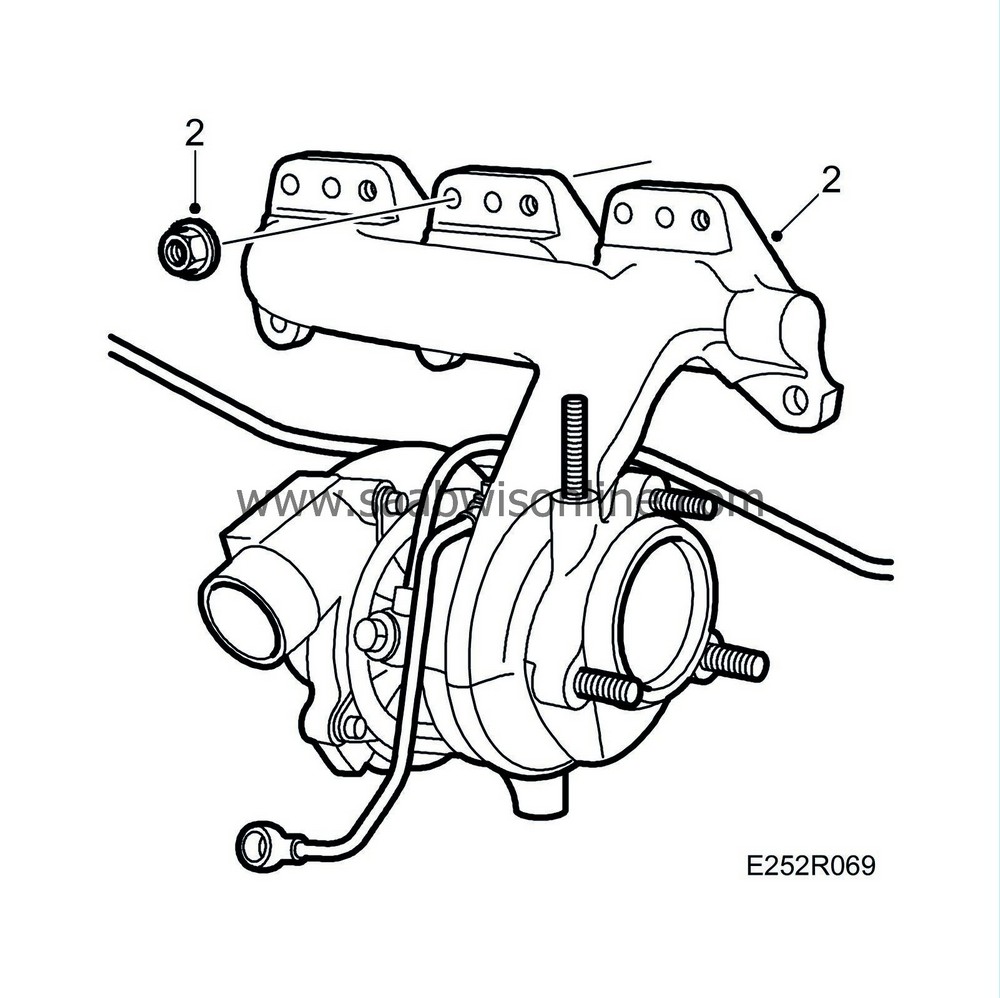
Front exhaust manifold, V6
| Front exhaust manifold, V6 |
| To remove |
| Important | ||
|
The oxygen sensor cable must not be of twisted type. Twisted cables exposed to vibration can break. |
||
|
The oxygen sensor is sensitive to impacts and jolting and must be handled with care. |
||
| 1. |
Position the car on a lift.
|
|
| 2. |
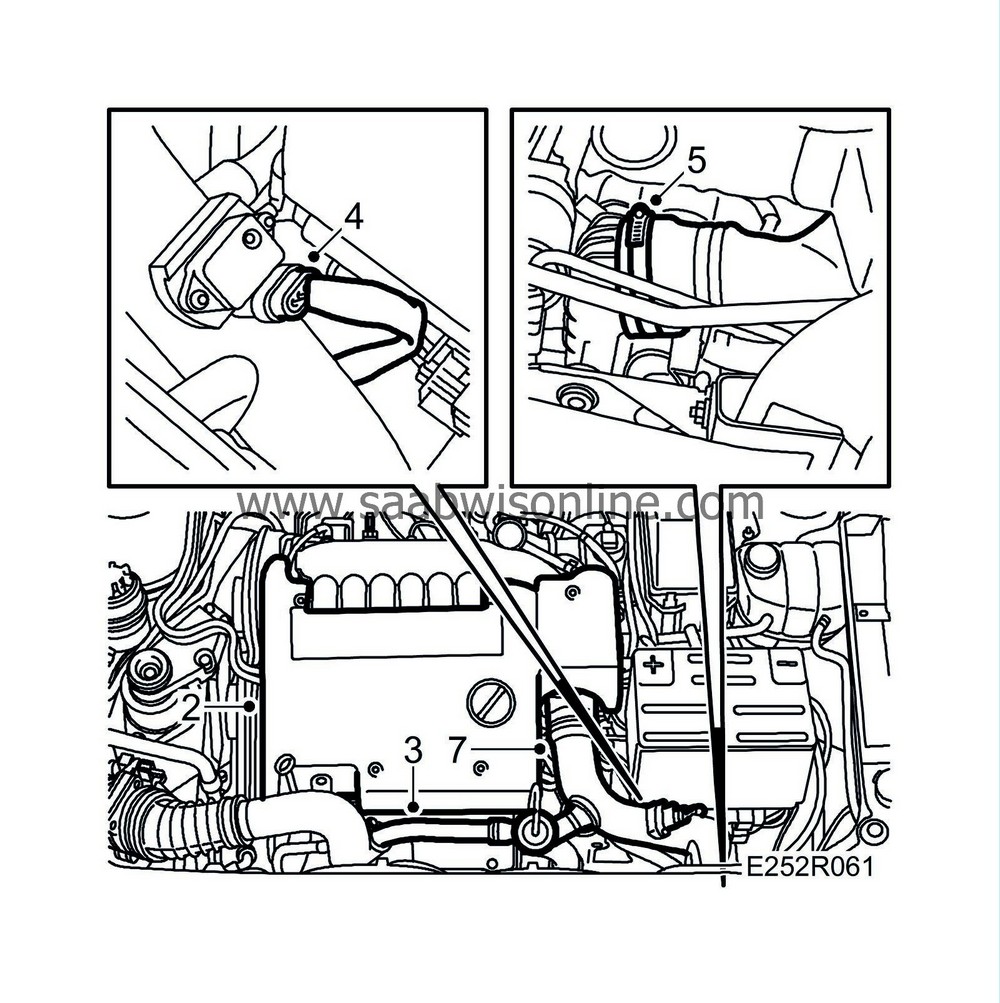
Remove the upper engine cover.
|
|
| 3. |
Remove the turbo bypass pipe and valve.
|
|
| 4. |
Unplug the connector for the temp/pressure sensor and detach the turbocharger delivery pipe from the throttle body. Leave the hose clip hanging.
|
|
| 5. |
Raise the car and undo the turbocharger delivery pipe connection to the charge air cooler.
|
|
| 6. |
Plug the charge air cooler outlet. Lower the car.
|
|
| 7. |
Remove the turbo delivery pipe.
|
|
| 8. |
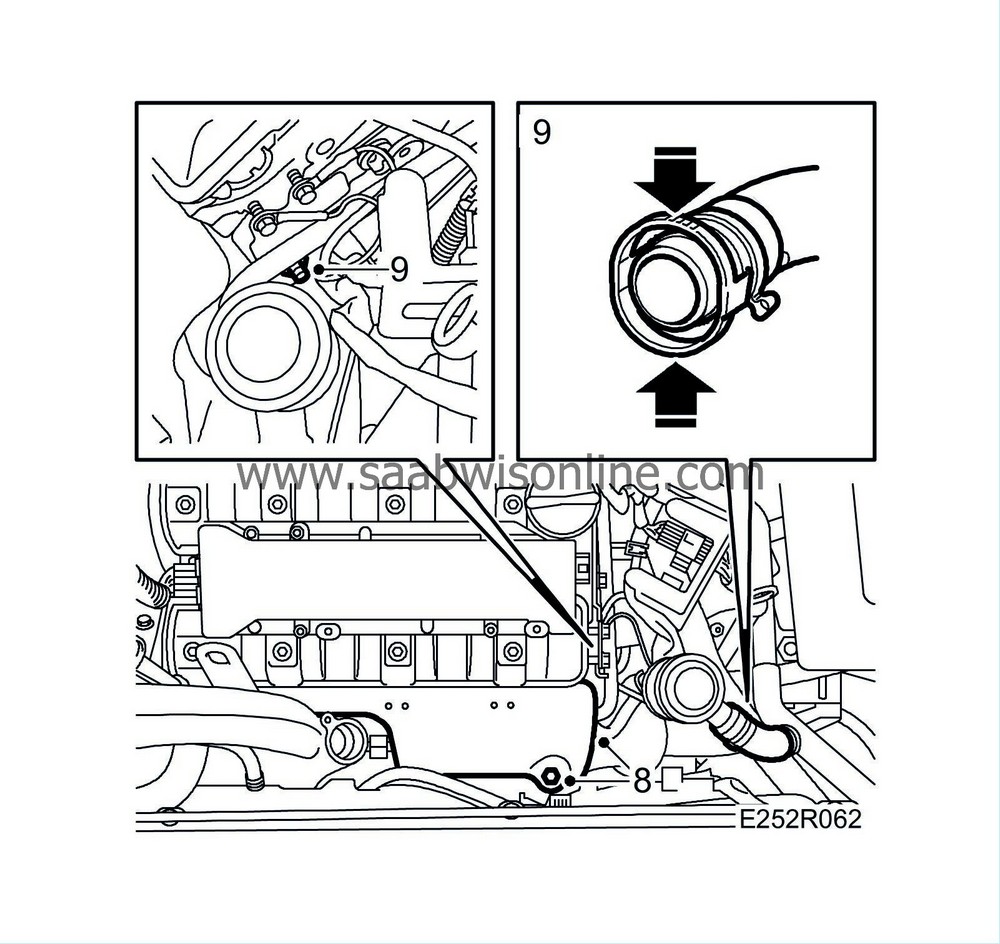
Remove the exhaust manifold's heat shield.
|
|
| 9. |
Detach the hose connection from the front SAI valve by pressing together the clip and pulling it back. Undo the nut on the valve bracket.
|
|
| 10. |
Note the radio code if applicable. Remove the battery and vent hose.
|
|
| 11. |
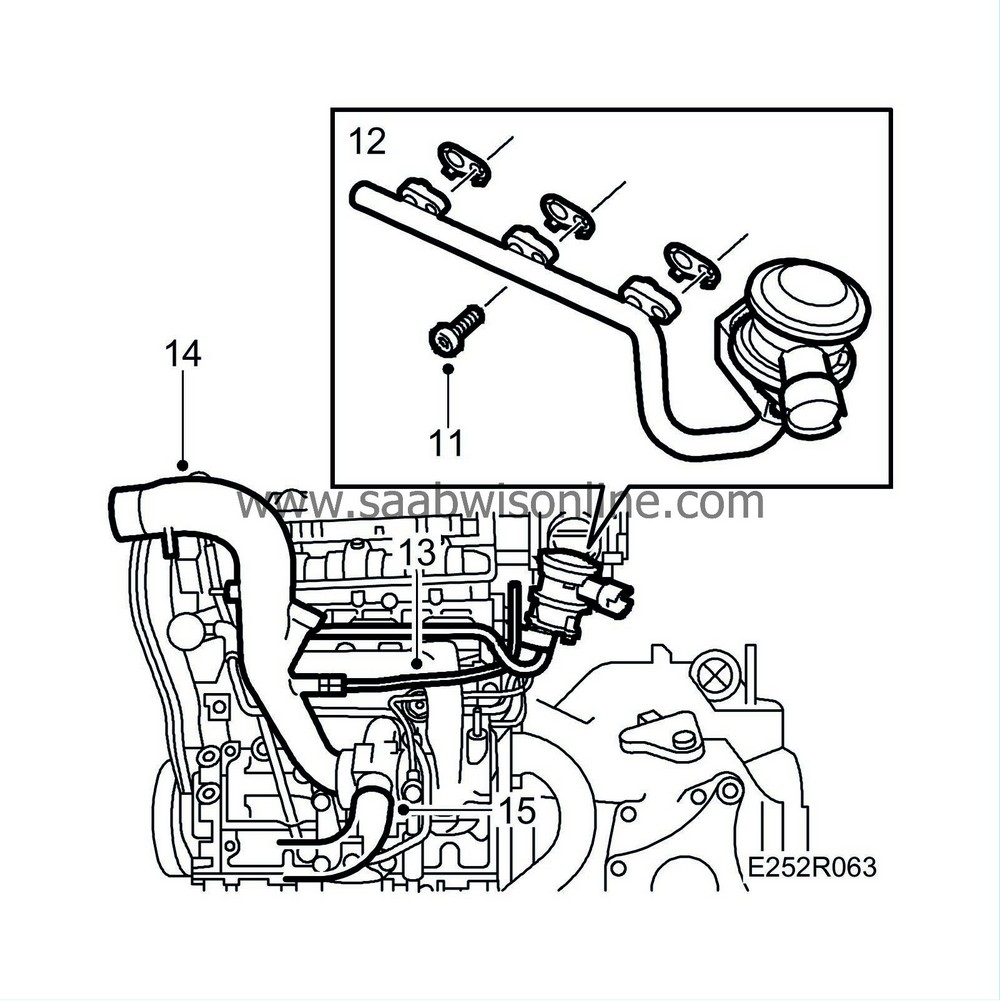
Undo the bolt securing the front SAI pipe.
|
|
| 12. |
Remove the SAI pipe with valve from the exhaust manifold.
|
|
| 13. |
Detach the crankcase ventilation pipe between the turbo inlet pipe and the cylinder head and the hose from the oil trap.
|
|
| 14. |
Detach the turbo intake pipe. Bend the pipe aside.
|
|
| 15. |
Detach the turbo's outlet hose to the charge air cooler.
|
|
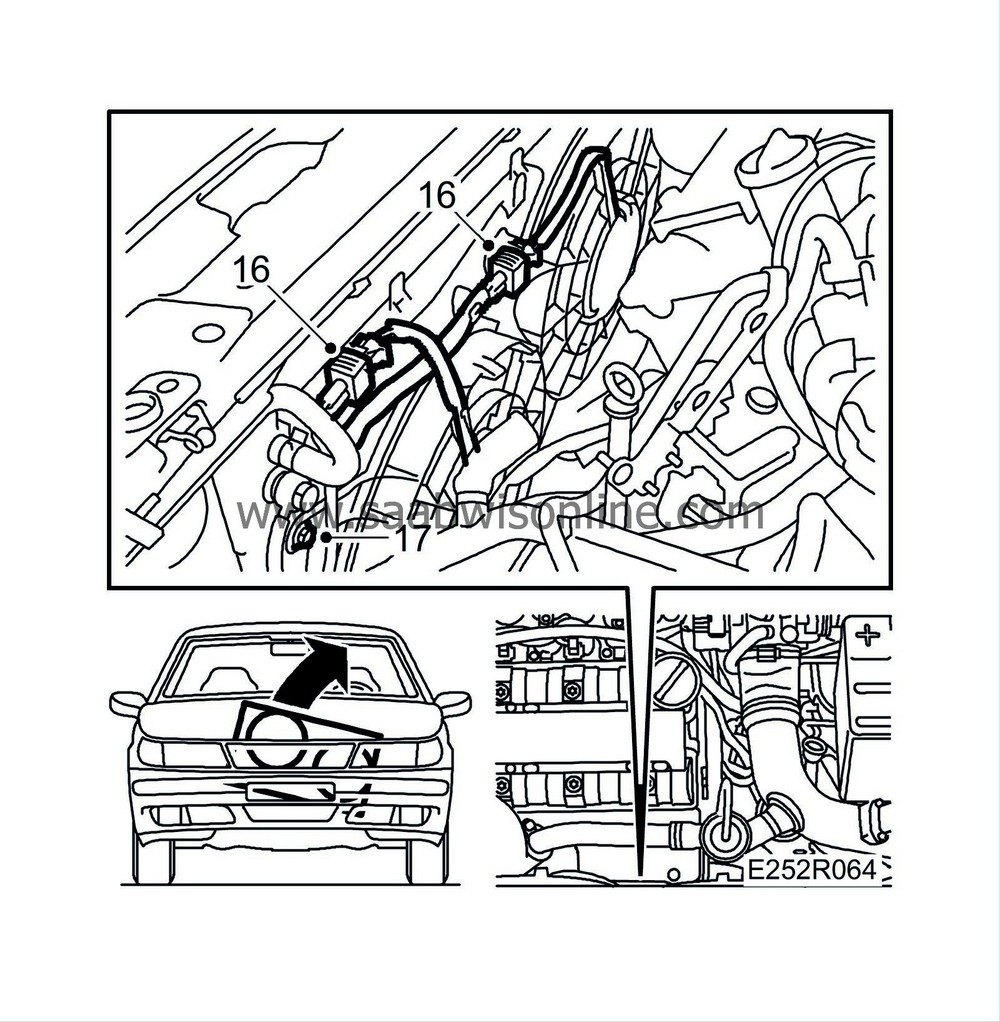
| 16. |
Unplug the fan motor connectors.
|
|
| 17. |
Remove the radiator fan.
|
|
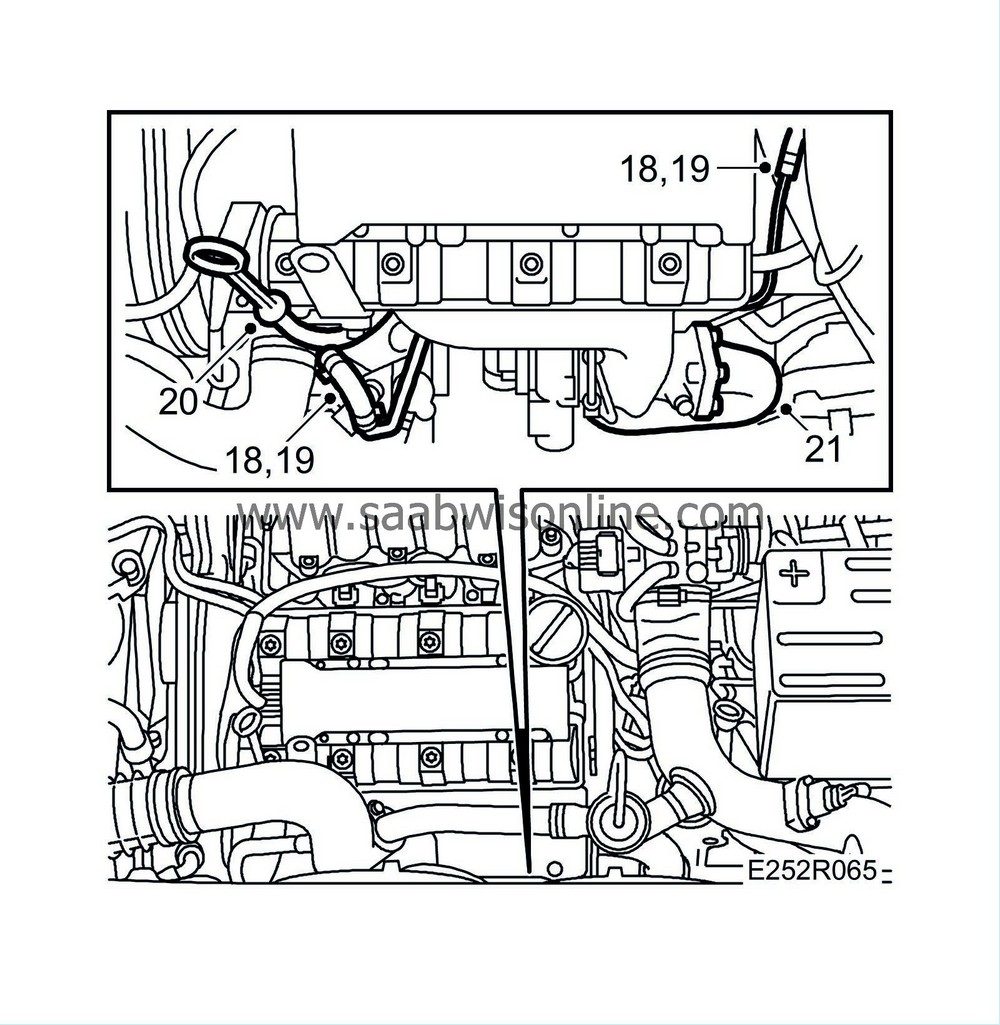
| 18. |
Close off the inlet and return water hoses to the turbo. Use
30 07 739 Pinch-off pliers
.
|
|
| 19. |
Remove the water pipes to the turbo.
|
|
| 20. |
Undo and remove the dipstick tube.
|
|
| 21. |
Remove the front pipe from the turbo.
|
|
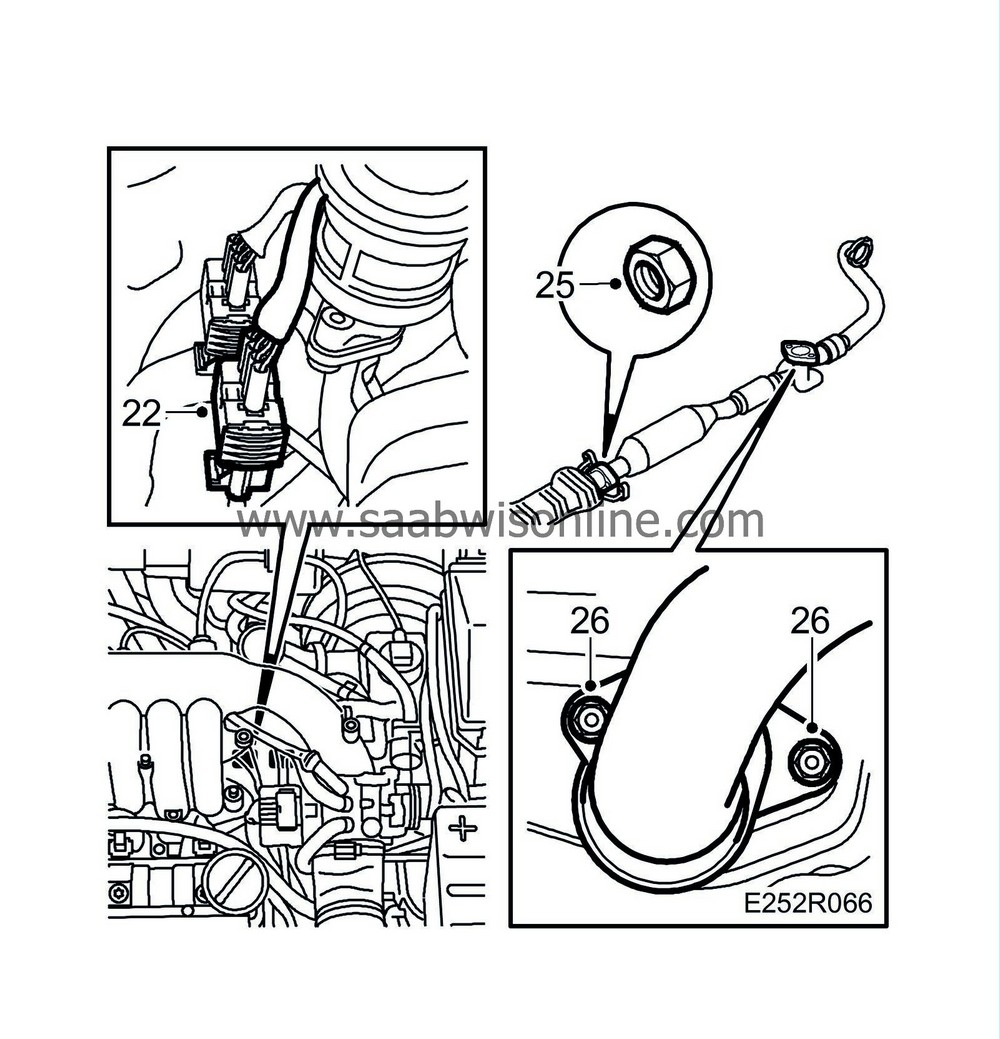
| 22. |
Unplug the oxygen sensor connectors.
|
|
| 23. |
Raise the car.
|
|
| 24. |
Cut off the cable tie securing the oxygen sensor cables. Note how the cables are run and lower the cable.
|
|
| 25. |
Separate the pipe joint between the front and rear exhaust systems.
|
|||||||
| 26. |
Detach the front pipe from the rear exhaust manifold. Lower away the front exhaust system.
|
|
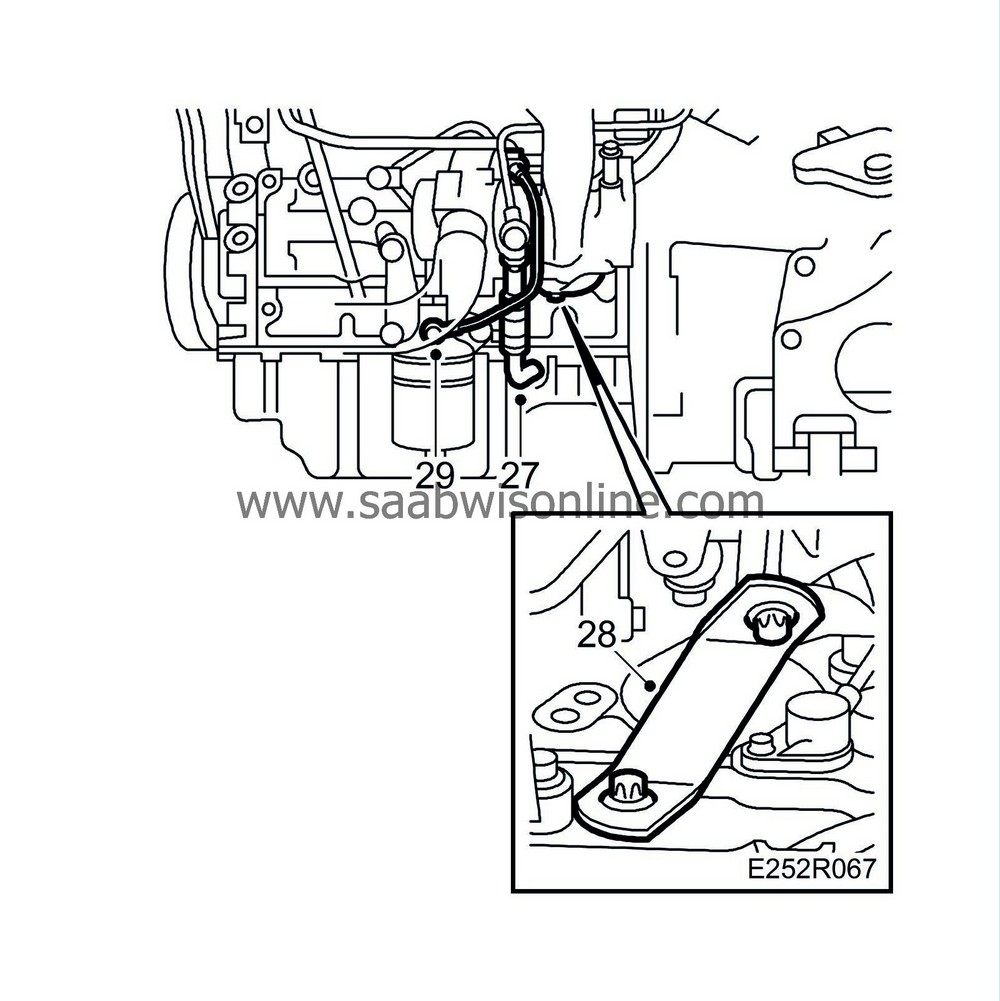
| 27. |
Remove the turbo's oil return pipe.
|
|
| 28. |
Remove the turbo mounting bracket.
|
|
| 29. |
Detach the oil pipe from the oil filter adapter.
|
|
| 30. |
Lower the car to the floor.
|
|
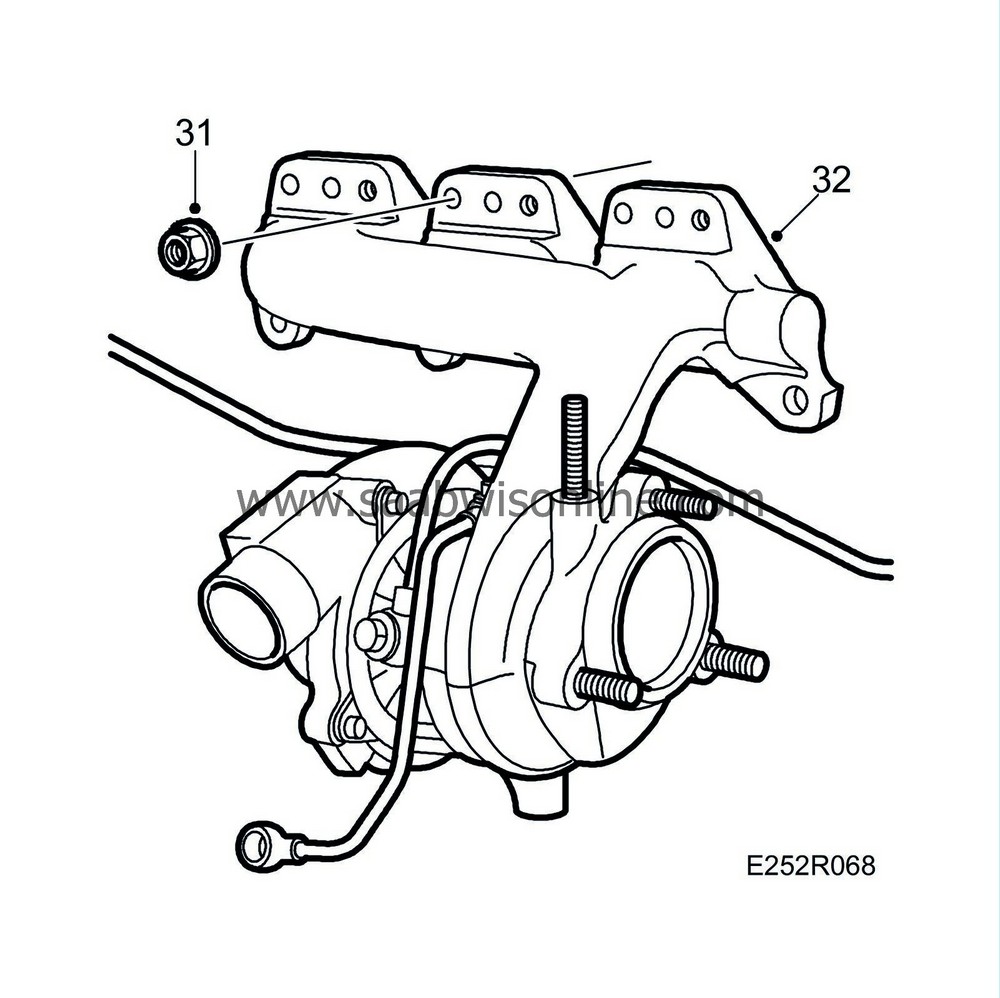
| 31. |
Undo the nuts securing the front exhaust manifold.
|
|
| 32. |
Remove the front exhaust manifold with turbo.
|
|
| To fit |
| Important | ||
|
The oxygen sensor cable must not be of twisted type. Twisted cables exposed to vibration can break. |
||
|
The oxygen sensor is sensitive to impacts and jolting and must be handled with care. |
||
| Note | ||
|
Smear the studs and gaskets sparingly with Molycote 1000, part. no. 30 20 971 or similar, to prevent them baking on. |
| Note | ||
|
Spray the connector with Kontakt 61, part no. 30 04 520, before plugging it in. |
| 1. |
Clean the sealing surfaces and fit a new gasket to the front exhaust manifold.
|
|
| 3. |
Raise the car.
|
|
| 4. |
Fit a new gasket on the front pipe against the rear exhaust manifold.
|
|||||||
| 5. |
Fit the front exhaust pipe to the rear exhaust manifold.
Tightening torque: 40 Nm (29.5 lbf ft). 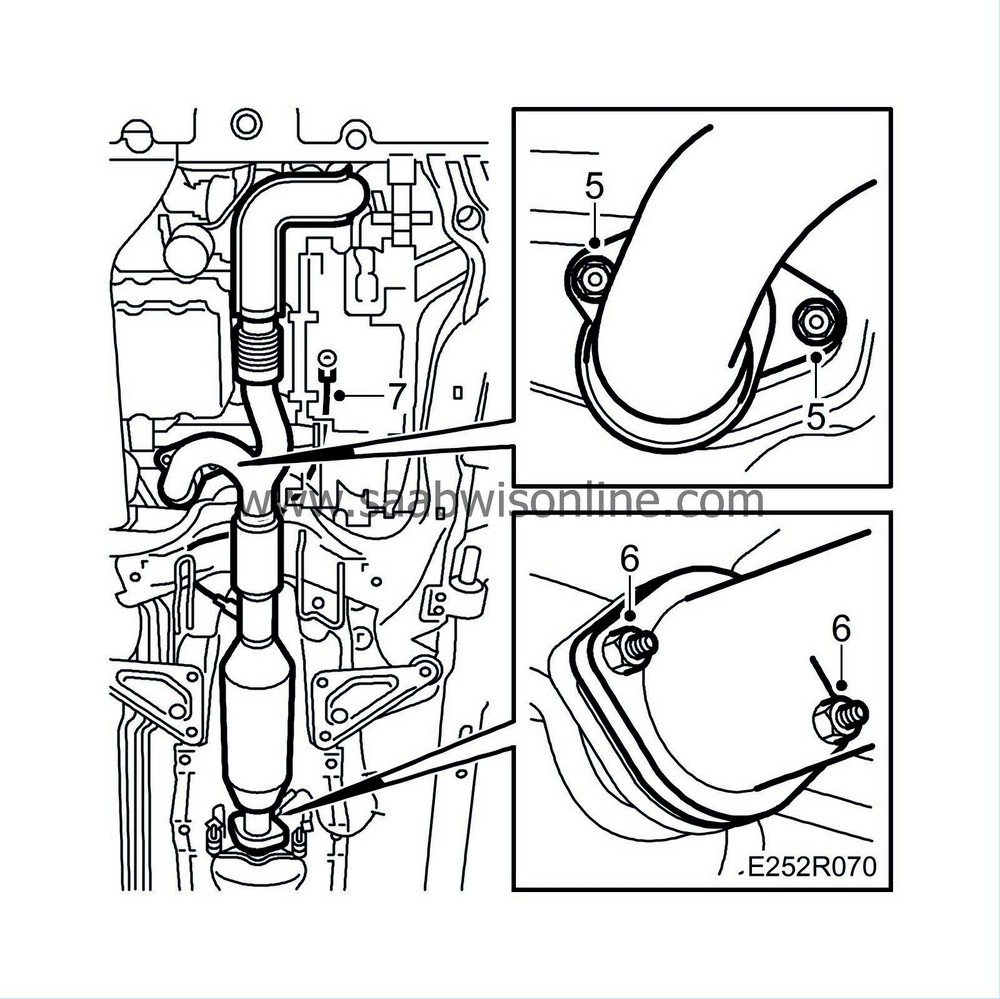
|
|
| 6. |
Fit the pipe joint between the front and rear exhaust systems.
Tightening torque: 22 Nm (16.2 lbf ft). |
|
| 7. |
Secure the oxygen sensor cables with cable ties. Carefully run the cables back to the oxygen sensor connectors.
|
|
| 8. |
Fit the oil pipe to the oil filter adapter. Fit new gaskets and sealing washers.
Tightening torque: 20 Nm (14.7 lbf ft). 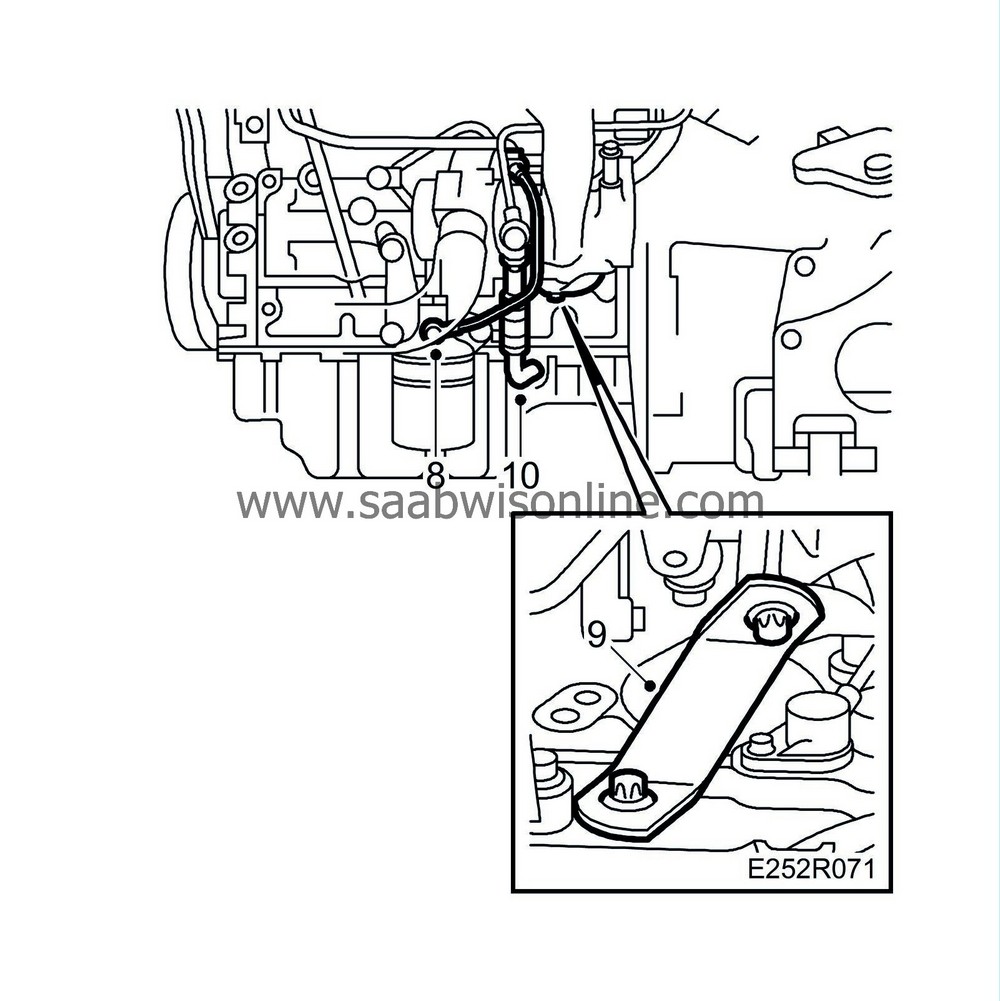
|
|
| 9. |
Fit the turbo mounting bracket.
Tightening torque: 24 Nm (17.7 lbf ft). |
|
| 10. |
Fit the turbo's oil return pipe.
Tightening torque: M6 bolt: 14 Nm (10.3 lbf ft) |
|
| 11. |
Lower the car to the floor.
|
|
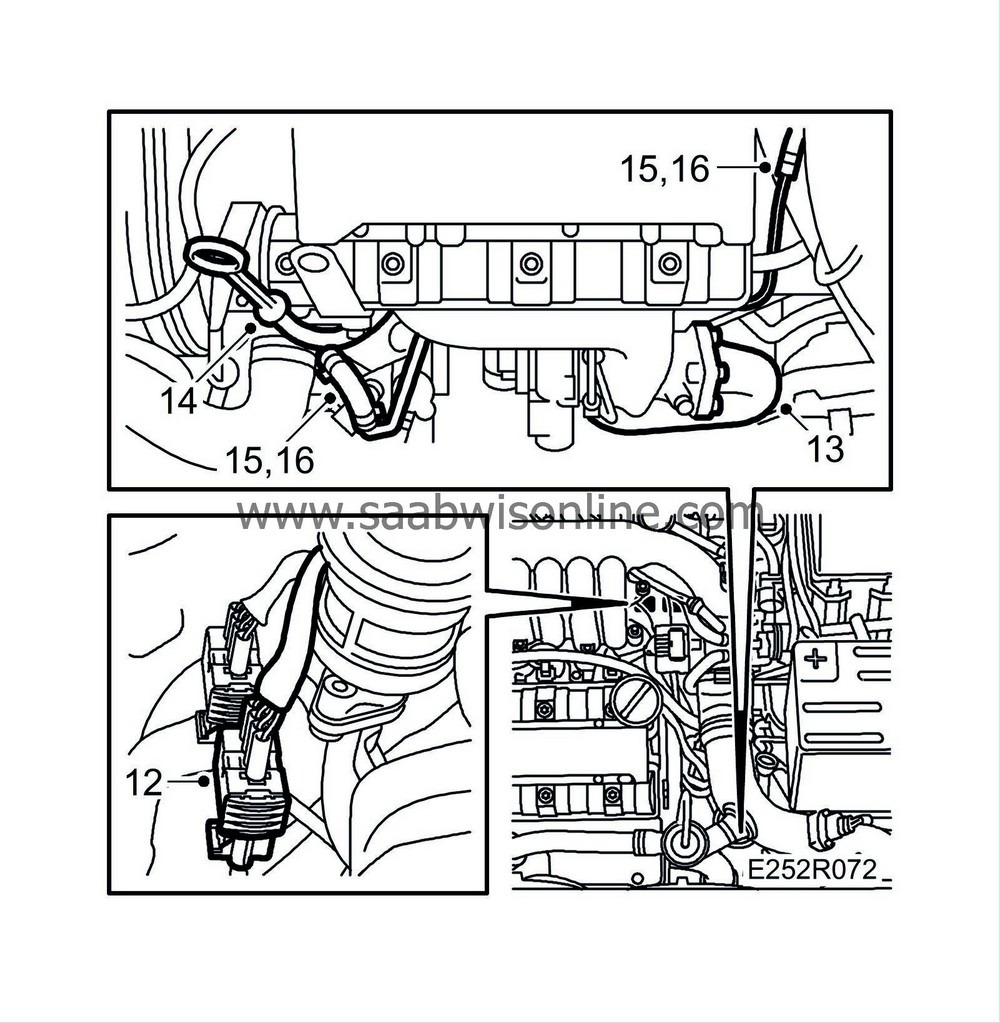
| 12. |
Plug in the oxygen sensor connector.
|
|
| 13. |
Bolt the front exhaust pipe to the turbo.
Tightening torque: 24 Nm (17.7 lbf ft). |
|
| 14. |
Fit the dipstick tube.
|
|
| 15. |
Fit the turbo water return pipe. Use new seal washers.
Tightening torque: Banjo bolt, turbo 25 Nm (18.4 lbf ft) Retaining screw cylinder head 14 Nm (10.3 lbf ft) |
|
| 16. |
Remove the pinch-off pliers from the inlet and return water hoses to the turbo.
|
|
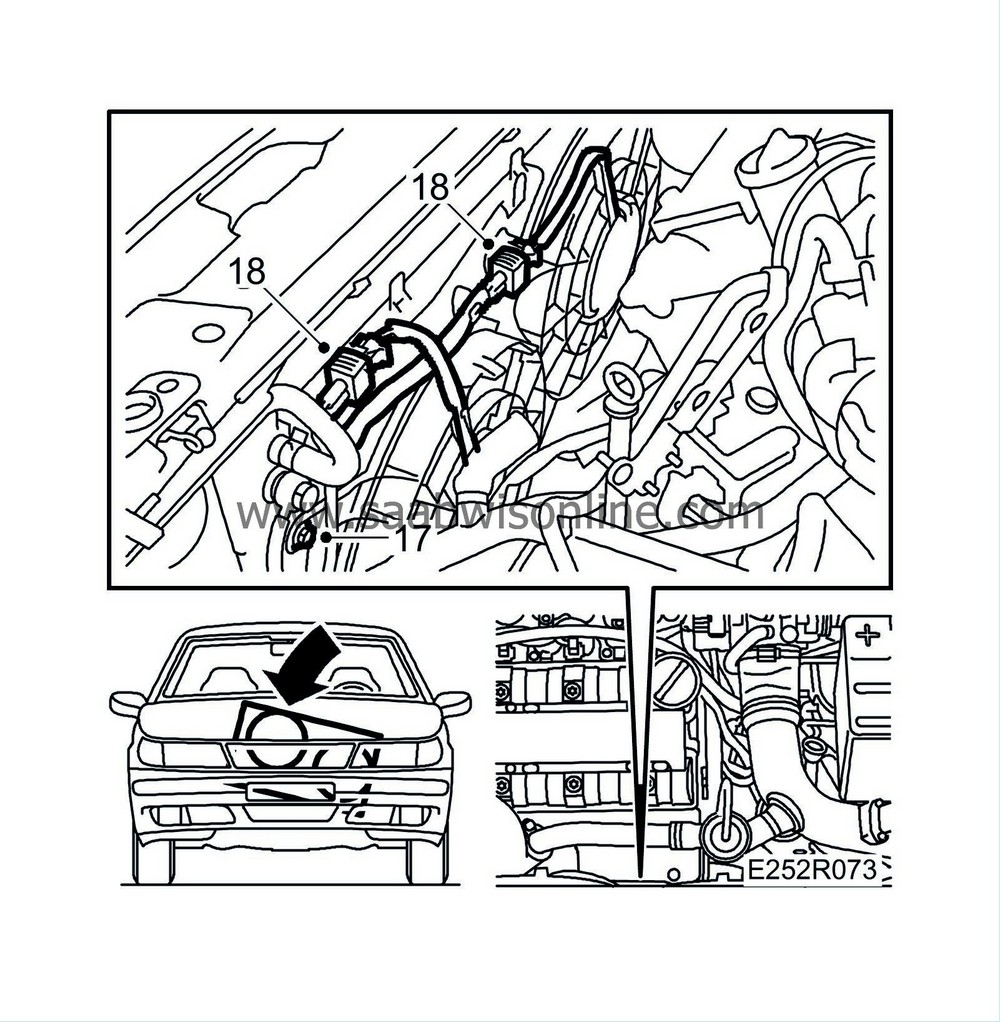
| 17. |
Fit the radiator fan.
Tightening torque: 8 Nm (5.9 lbf ft) |
|
| 18. |
Plug in the connectors to the radiator fan motors.
|
|
| 19. |
Fit the hose between the turbo and the charge air cooler.
Tightening torque: 8 Nm (5.9 lbf ft) 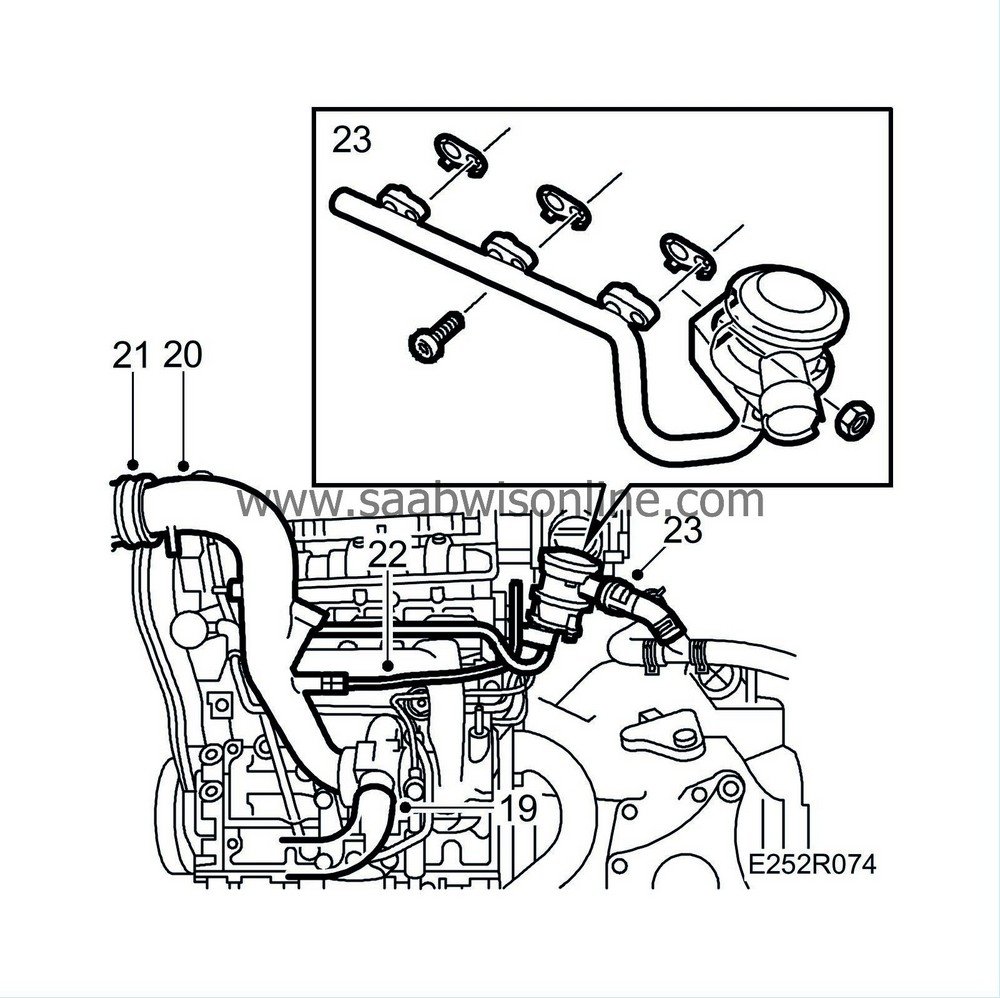
|
|
| 20. |
Fit the turbo's intake pipe.
Tightening torque: V-clamp 3 Nm (2.2 lbf ft) U-clamp cylinder head 14 Nm (10.3 lbf ft) |
|
| 21. |
Fit the hose to the mass air flow sensor
|
|
| 22. |
Fit the crankcase ventilation pipe between the cylinder head and the turbo inlet pipe. Connect the hose from the oil trap.
|
|
| 23. |
Fit the SAI pipe with valve and new gaskets to the bracket and the hose connection to the front SAI valve. Check the connection.
|
|
| 24. |
Lower the turbo delivery pipe and connect it to the throttle body.
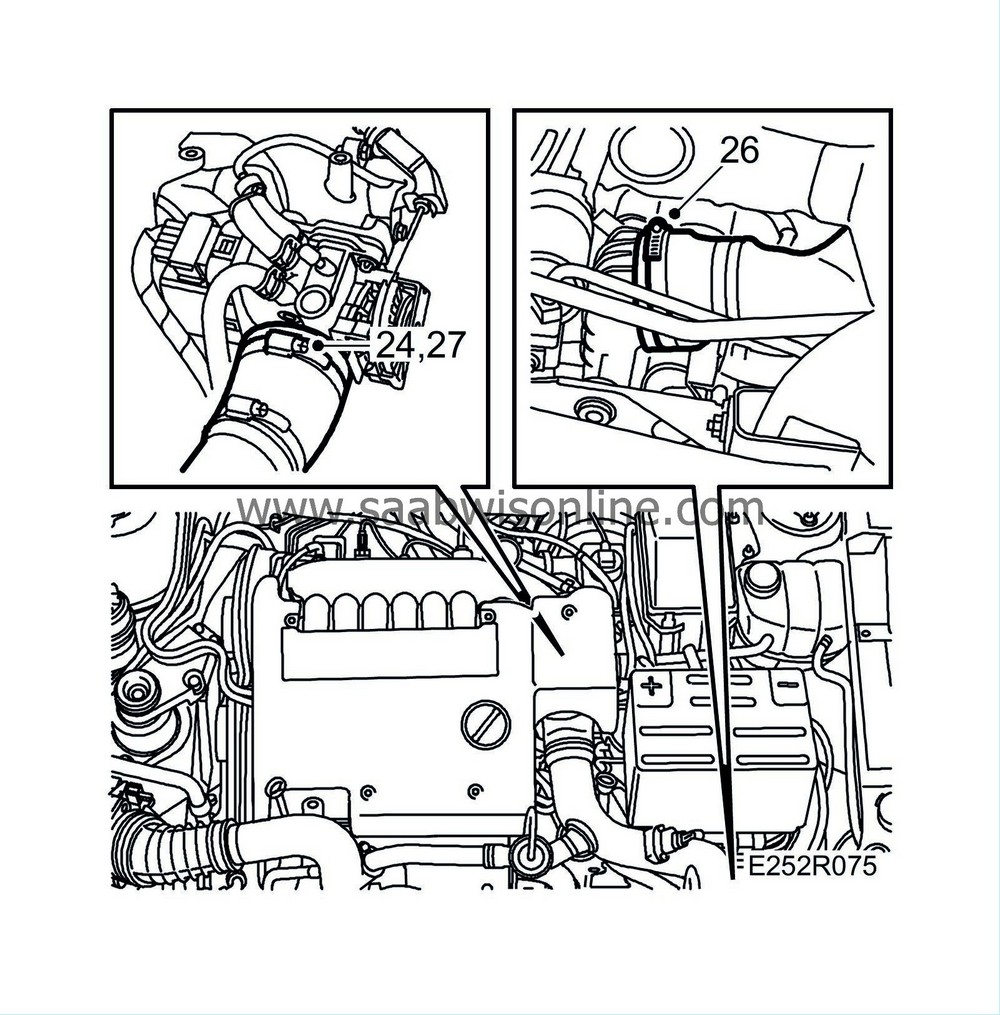
|
|
| 25. |
Raise the car and remove the plug in the charge air cooler outlet.
|
|
| 26. |
Connect and tighten the turbocharger delivery pipe hose clip to the charge air cooler.
|
|
| 27. |
Lower the car and tighten the turbocharger delivery pipe hose clip to the throttle body.
|
|
| 28. |
Plug in the connector for the temp/pressure sensor.
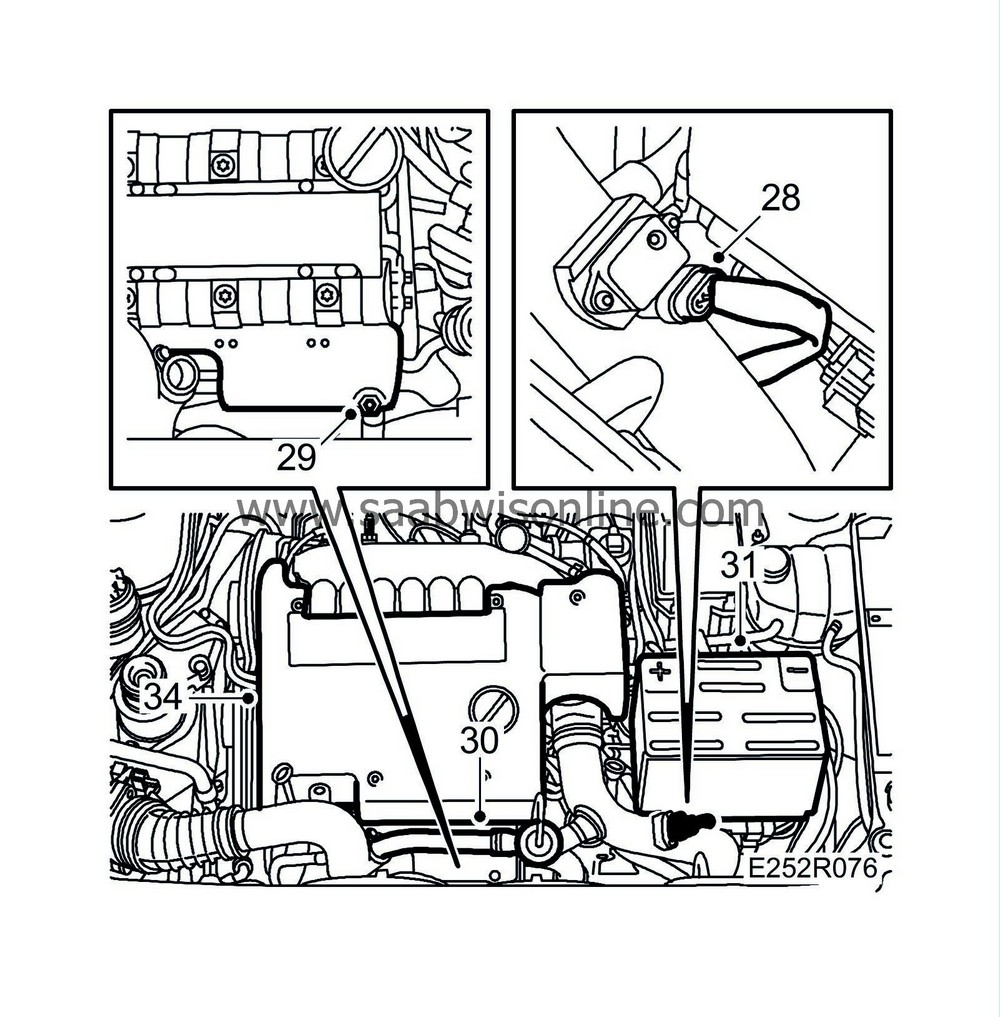
|
|
| 29. |
Fit the front exhaust manifold's heat shield.
Tightening torque: 24 Nm (17.7 lbf ft). |
|
| 30. |
Fit the turbo bypass pipe with valve.
Tightening torque: 8 Nm (5.9 lbf ft) |
|
| 31. |
Fit the battery and vent hose. Fit the battery cover.
|
|
| 32. |
Check the oil and water levels. Top up as necessary.
|
|
| 33. |
Start the engine and check for any oil and water leakage.
|
|
| 34. |
Fit the upper engine cover.
|
|
| 35. |
Reset the clock and program the radio code if applicable.
|
|

