Removing gearbox, V6 diesel
|
|
Removing gearbox, V6 diesel
|
|
Important
|
|
Wiring, hoses, lines etc. are attached with hard plastic ties. After tightening, the ends are cut which leads to sharp edges remaining at the fixing point. Beware of the risk of cutting injuries from sharp ends of cable ties.
|
|
|
|
1.
|
Place the car on a lift.
|
|
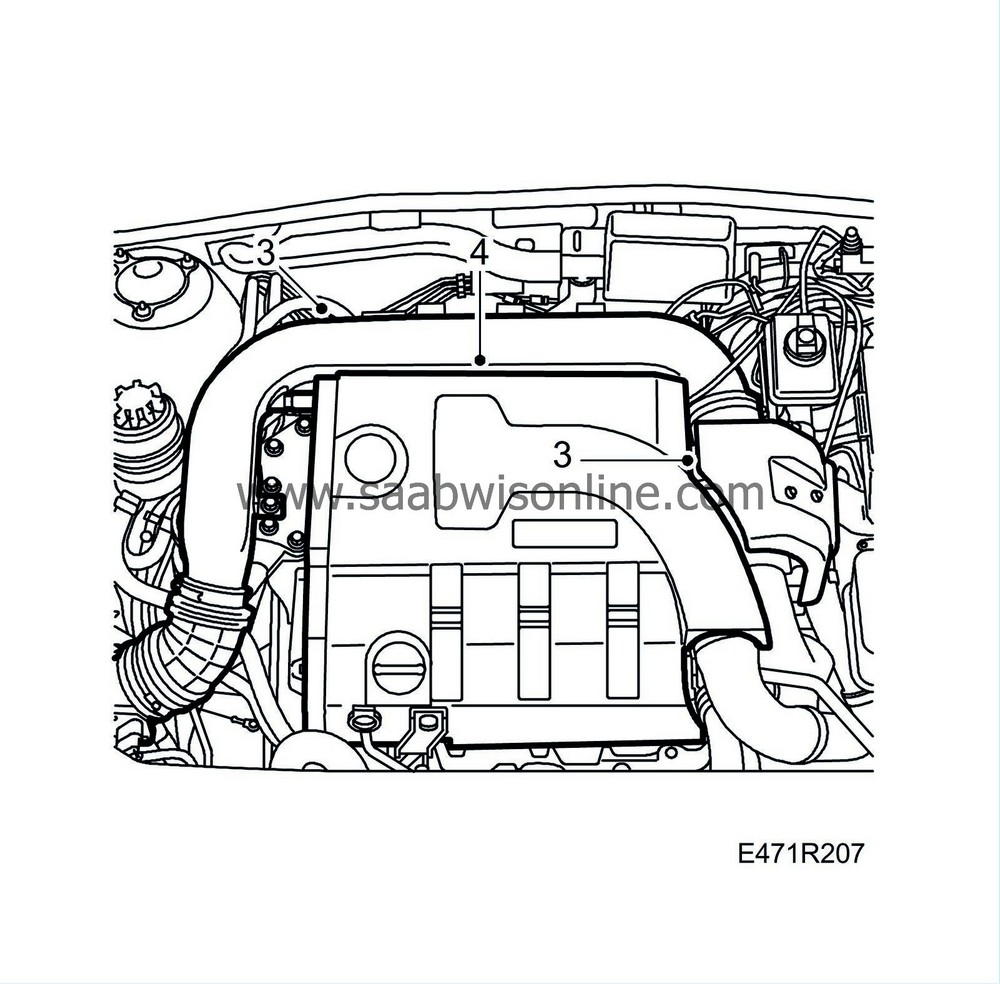
3.
|
Remove the turbo heat shield and intake manifold.
|
|
4.
|
Remove the upper engine cover.
|
|
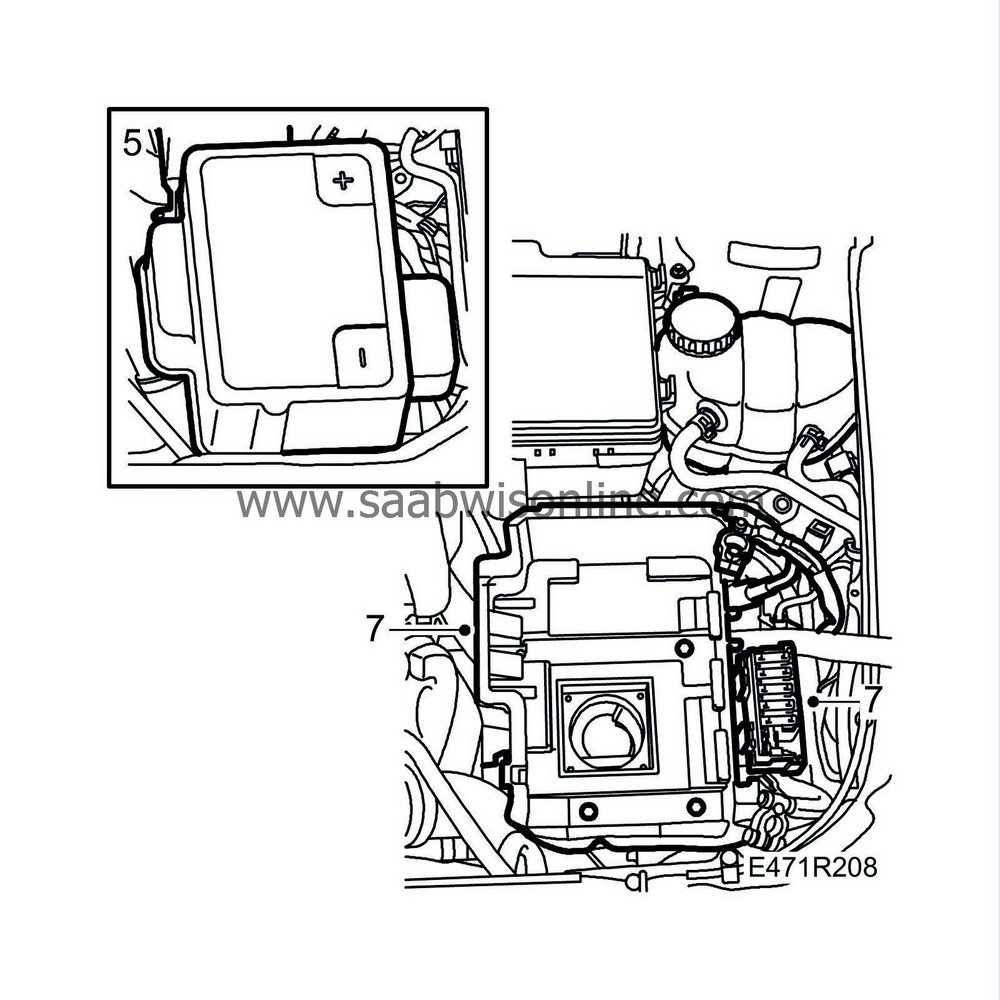
5.
|
Remove the battery plastic cover.
|
|
6.
|
Undo the battery connections and remove the battery.
|
|
7.
|
Remove the battery tray.
|
|
8.
|
Raise the car and remove the wheels.
|
|
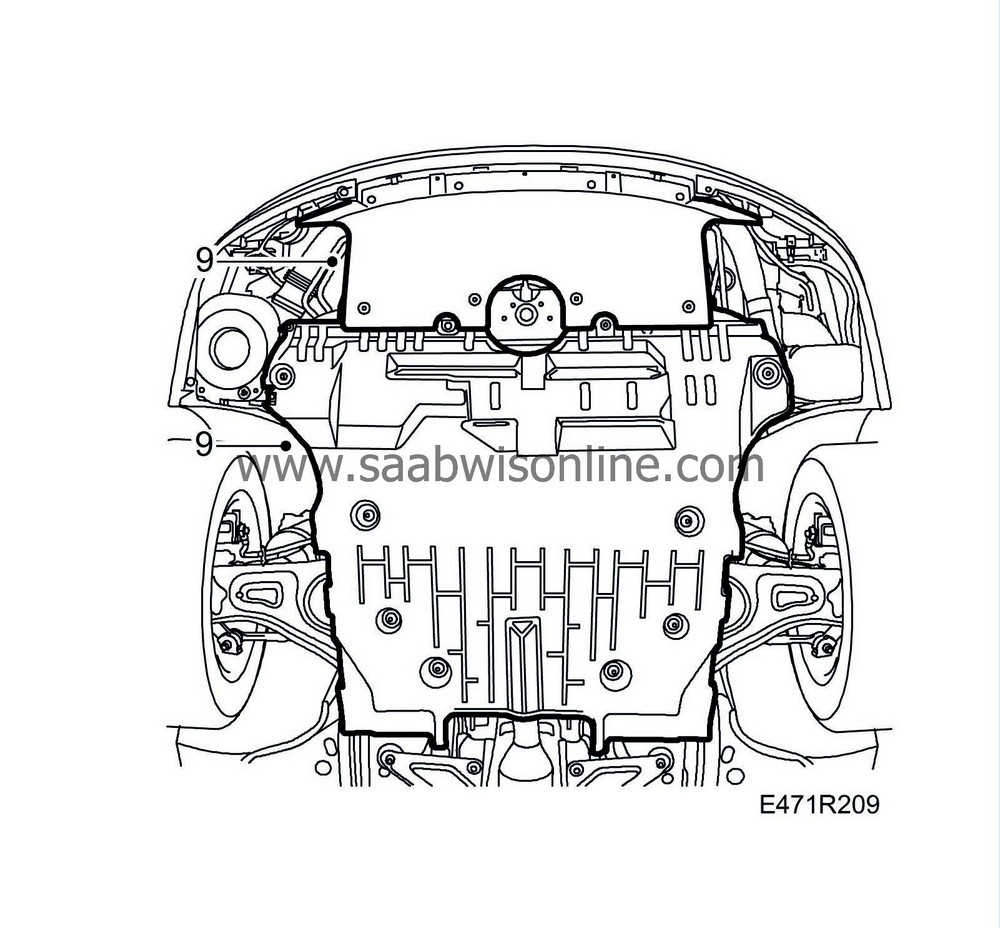
9.
|
Remove the two lower engine covers.
|
|
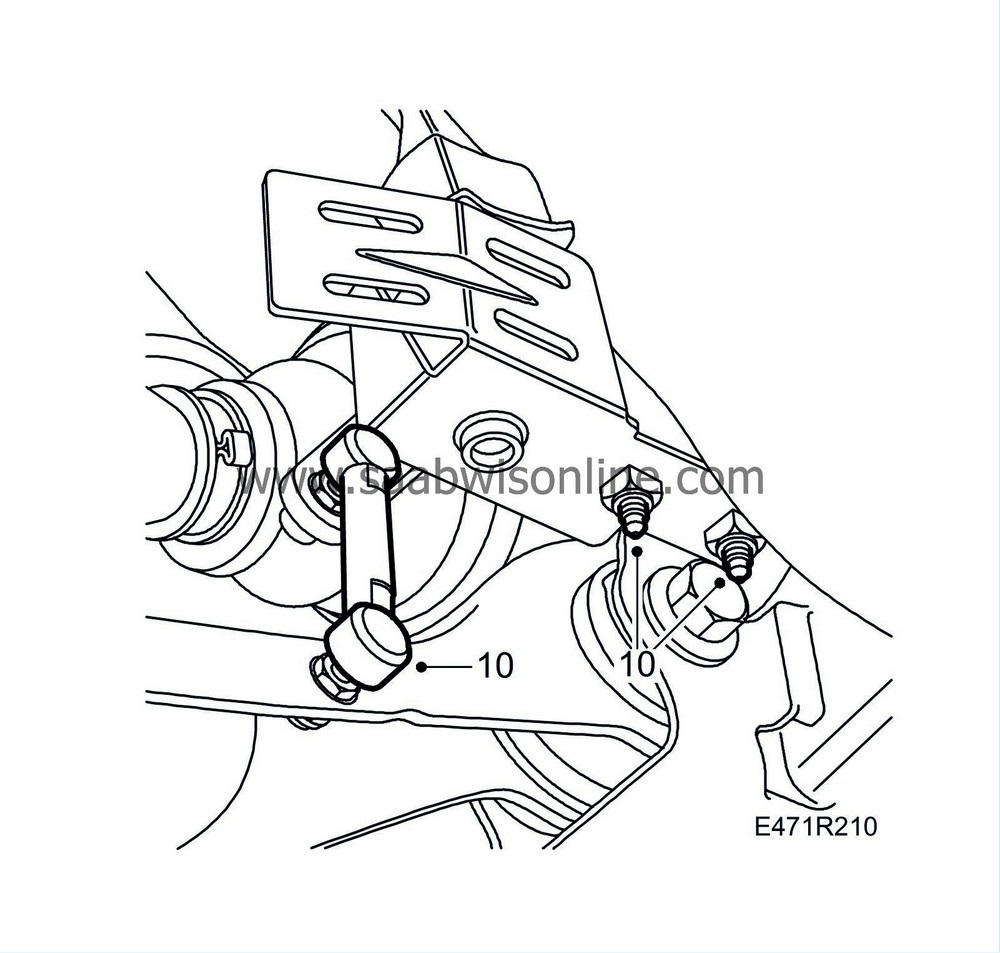
10.
|
Remove the xenon headlamp level sensor from the fixing and bend aside (option).
|
|
11.
|
Remove the side covers on both wheelarches.

|
|
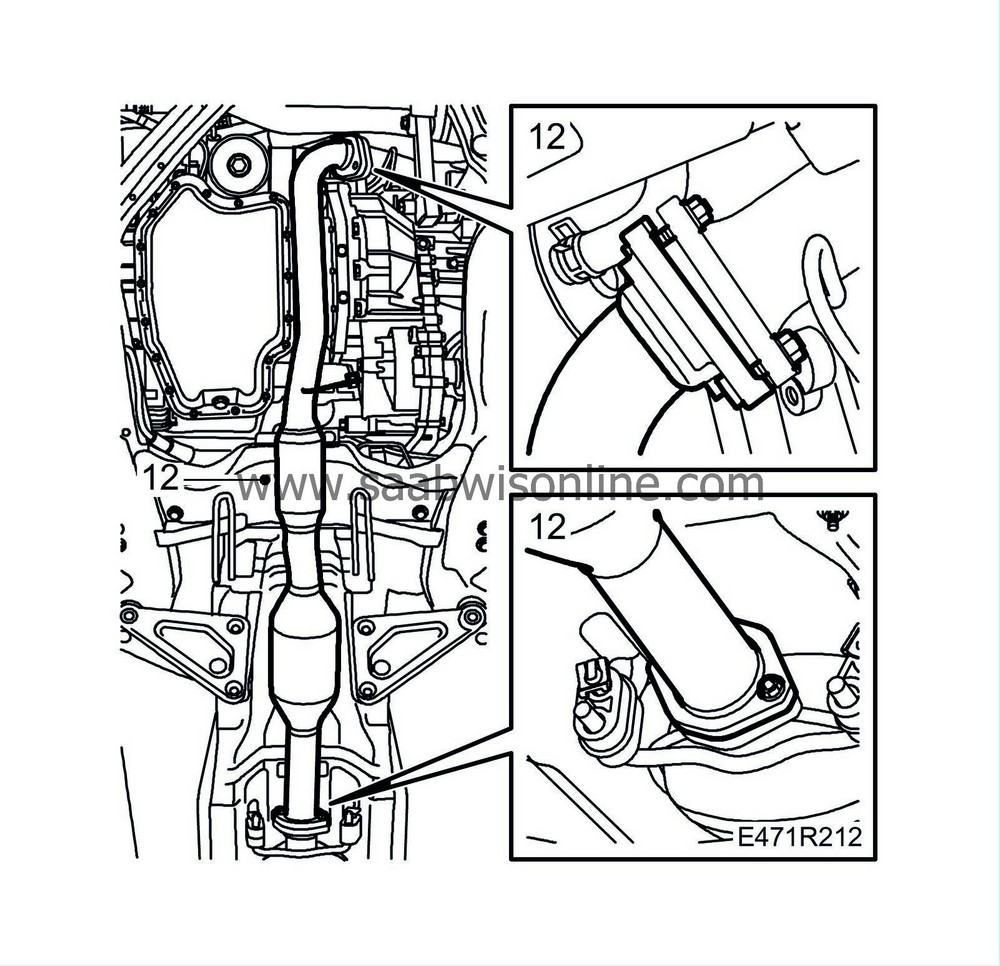
12.
|
Remove the centre exhaust pipe.
|
|
13.
|
Remove the front exhaust pipe fixing bolts to the gearbox mounting.
|
|
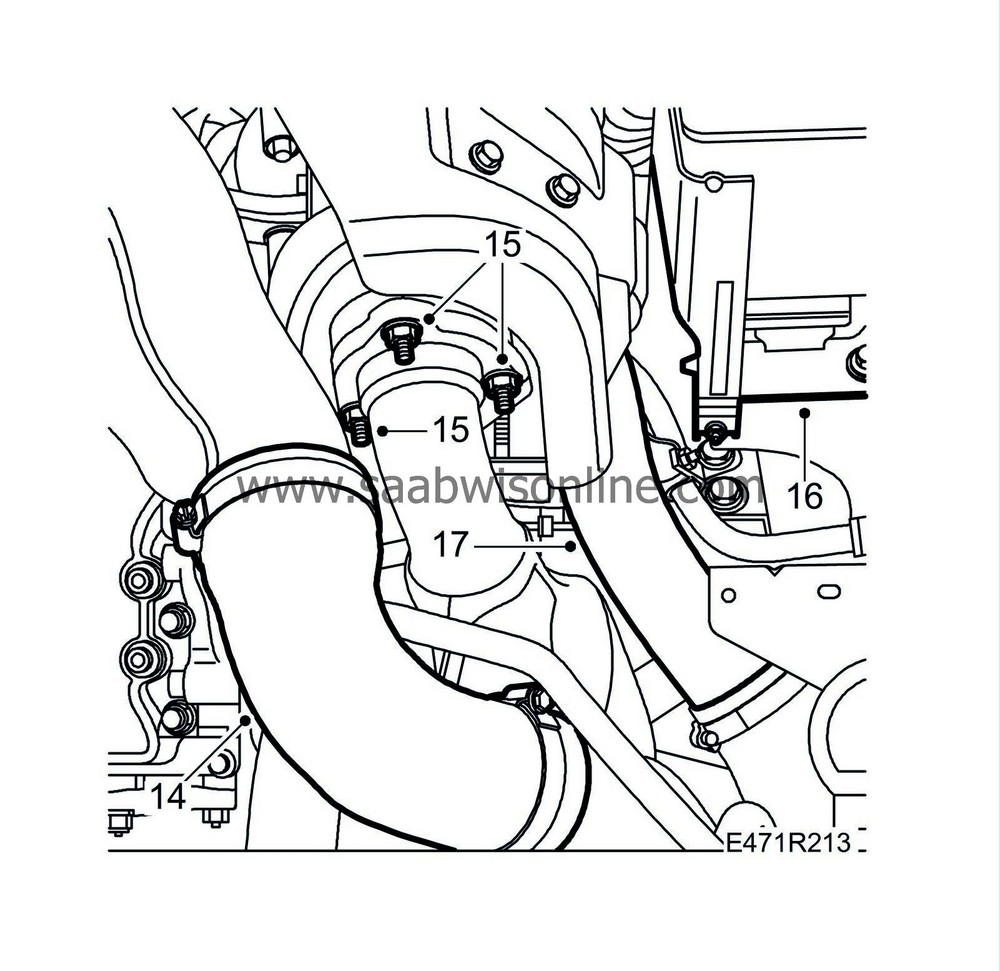
14.
|
Lower the car and release the hose to the intake manifold.
|
|
15.
|
Remove the front exhaust pipe connection from the turbo and raise the front exhaust pipe with catalytic converter.
|
|
16.
|
Release the relay box and bend aside.
|
|
17.
|
Remove the pipe between the turbo and the charge air cooler.
|
|
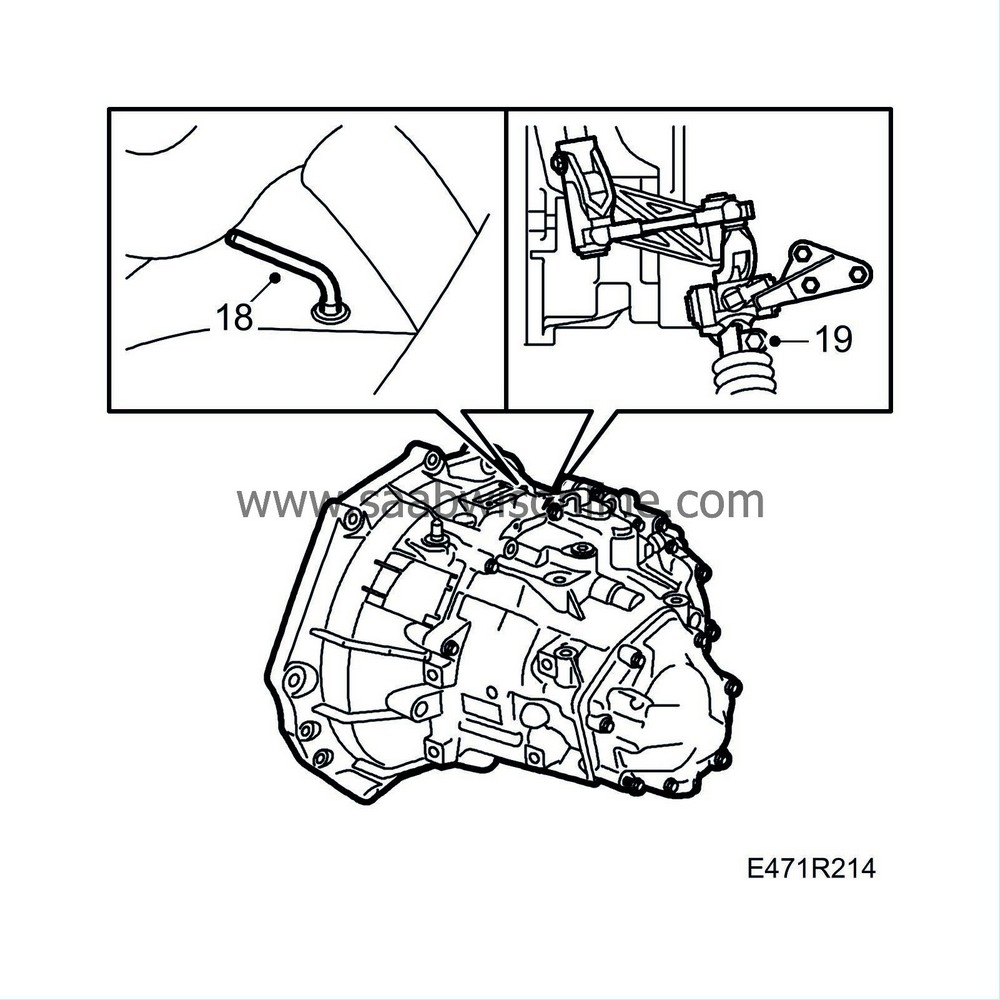
18.
|
Select 4th gear and remove the plastic plug from the gearbox. Lock in 4th at the gearbox by inserting
87 92 335 Lock pin
.
|
|
19.
|
Release the clamp above which holds the selector rod in the gearbox linkage.
|
|
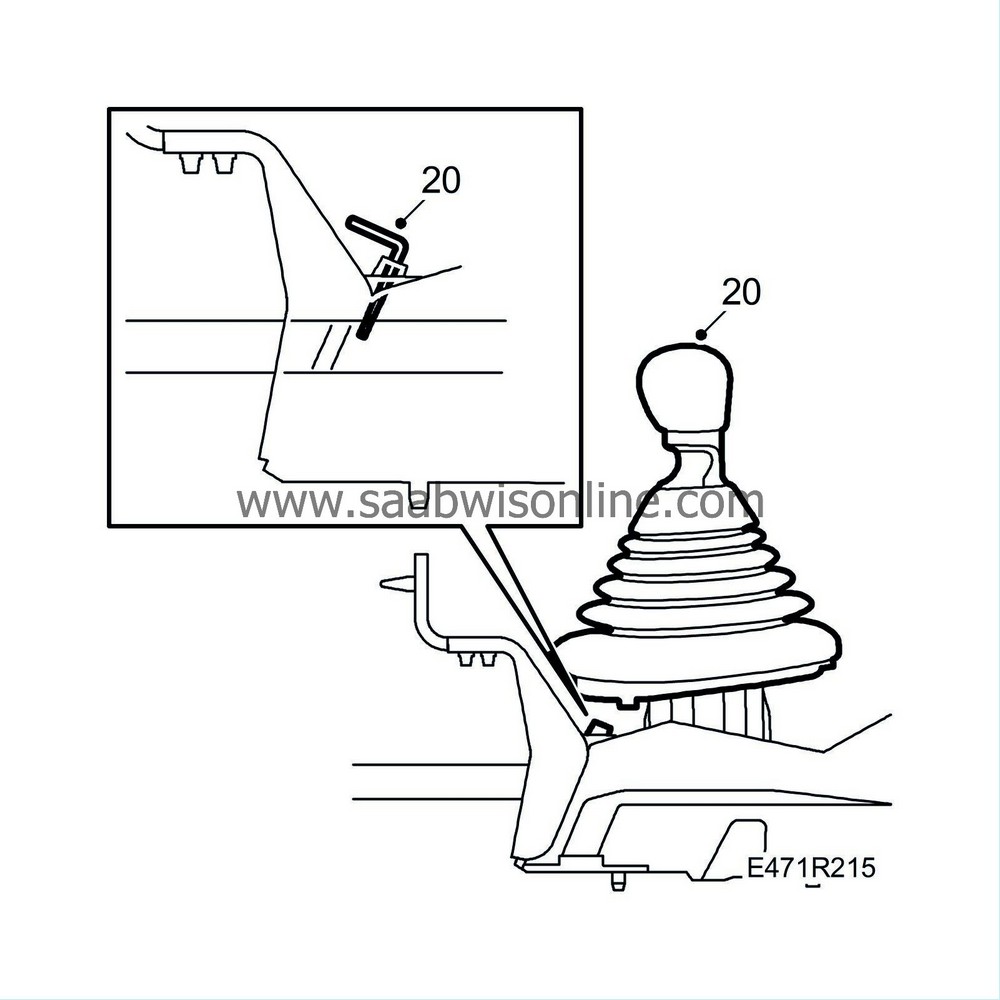
20.
|
Lift the gaiter. Select 3rd gear so that the selector rod comes out of the linkage, and insert 87 92 335 Lock pin in the selector rod housing.
|
|
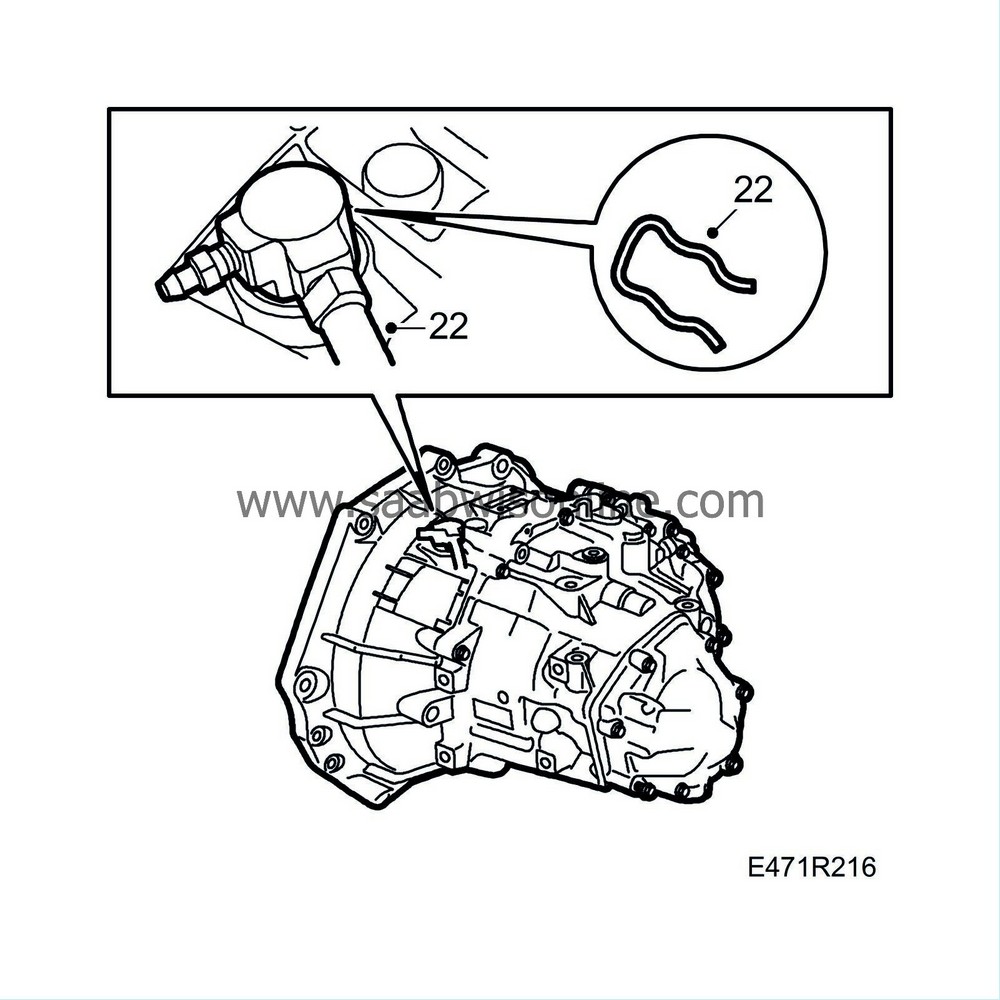
22.
|
Remove the locking clip at the slave cylinder and release the connection to the pressure pipe. Refit the locking clip.
|
|
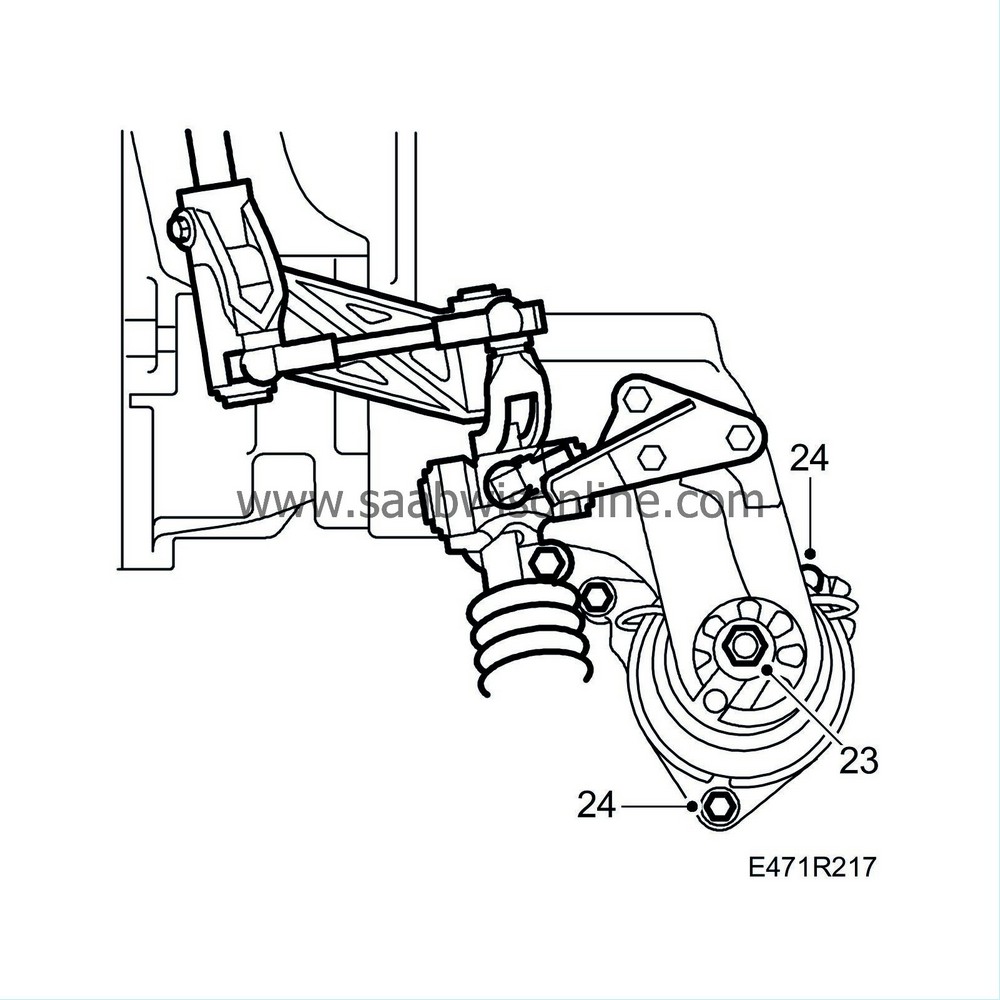
23.
|
Remove the nuts on the rear engine mounting.
|
|
24.
|
Loosen the bolts holding the rear engine mount using a long 10 mm socket, an extension with ball (e.g. 30 17 613) and
Extension, 500 mm, 3/8 square
82 93 102. Leave the bolts in place.
|
|
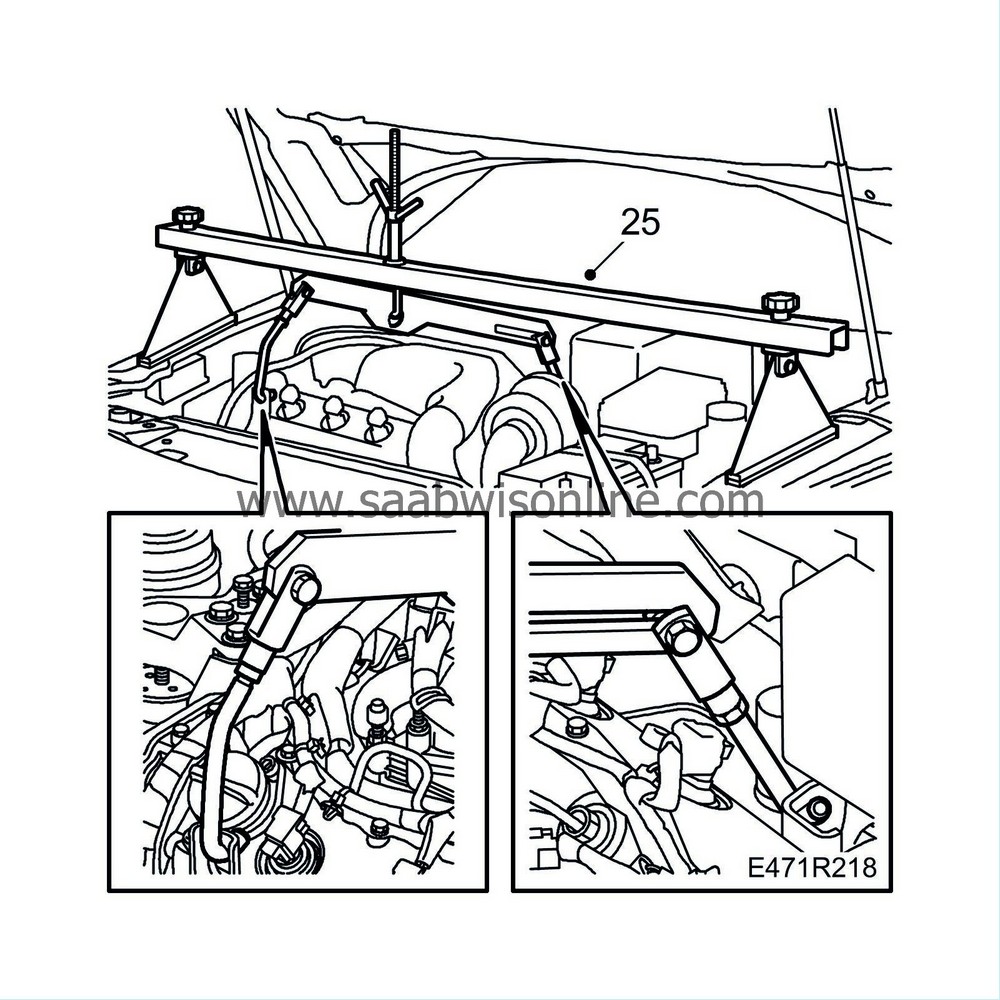
25.
|
Relieve the load on the engine and gearbox with
83 94 850 Lifting beam
and
83 95 287 Holder
. Place the yoke on the wheelarch so it lies against the wing edges and near the wing fixing bolts.
|
|
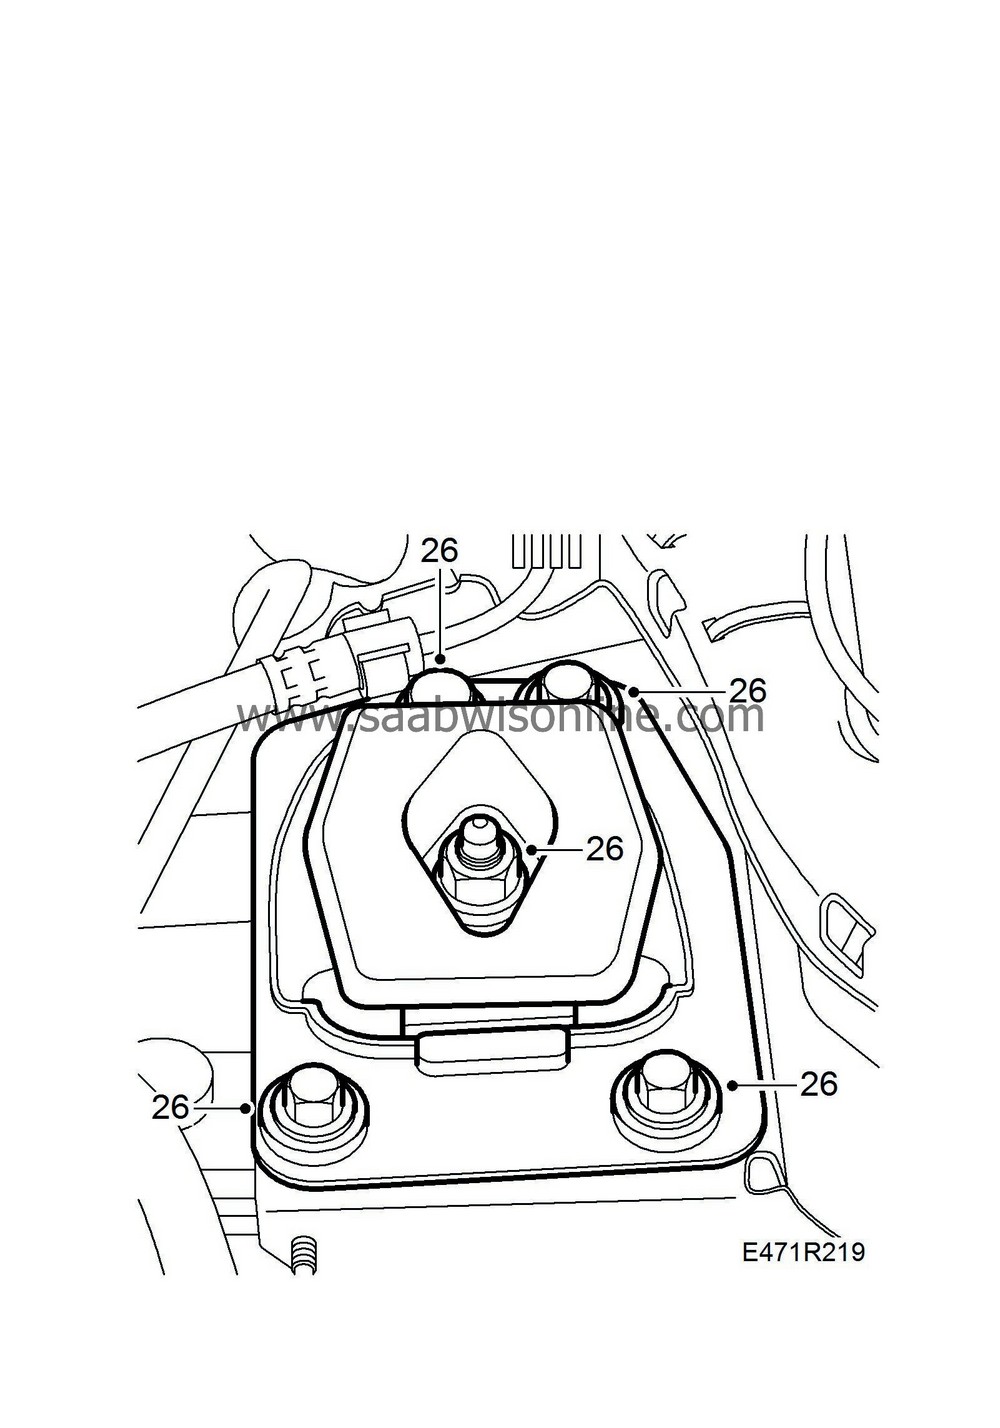
26.
|
Remove the bolts and nuts from the left engine cushion and remove the cushion.
|
|
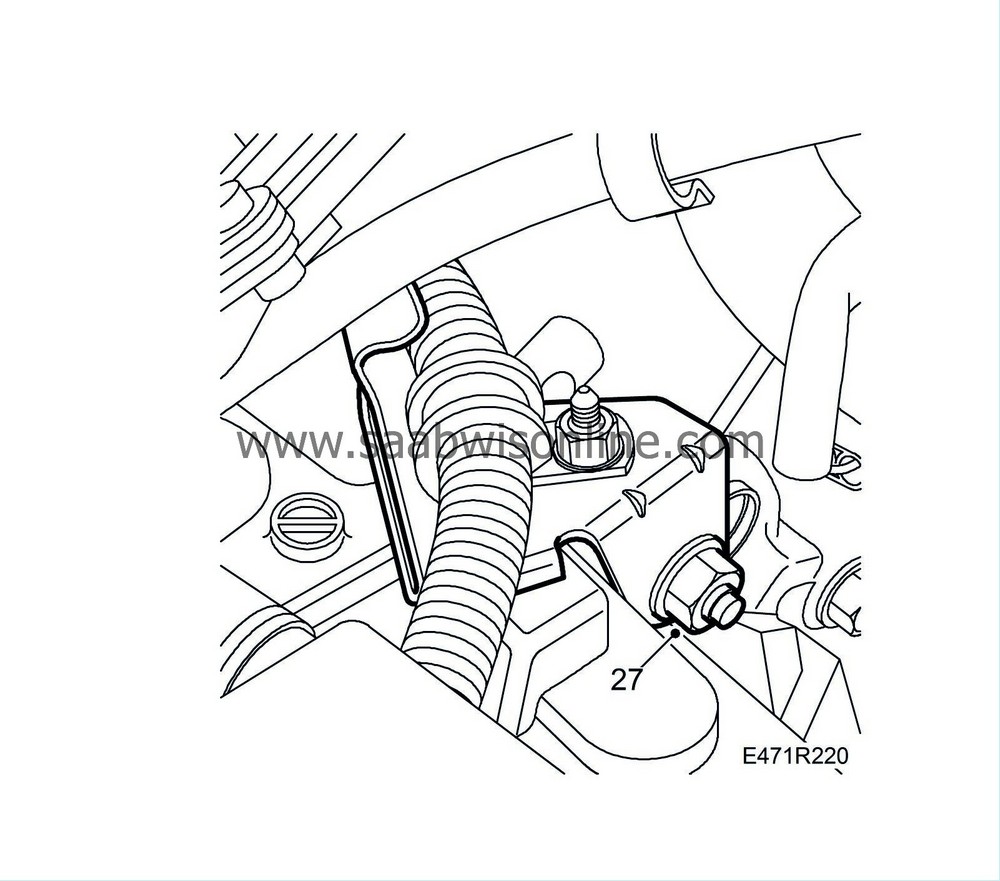
27.
|
Remove the nuts holding the cable duct to the gearbox.
|
|
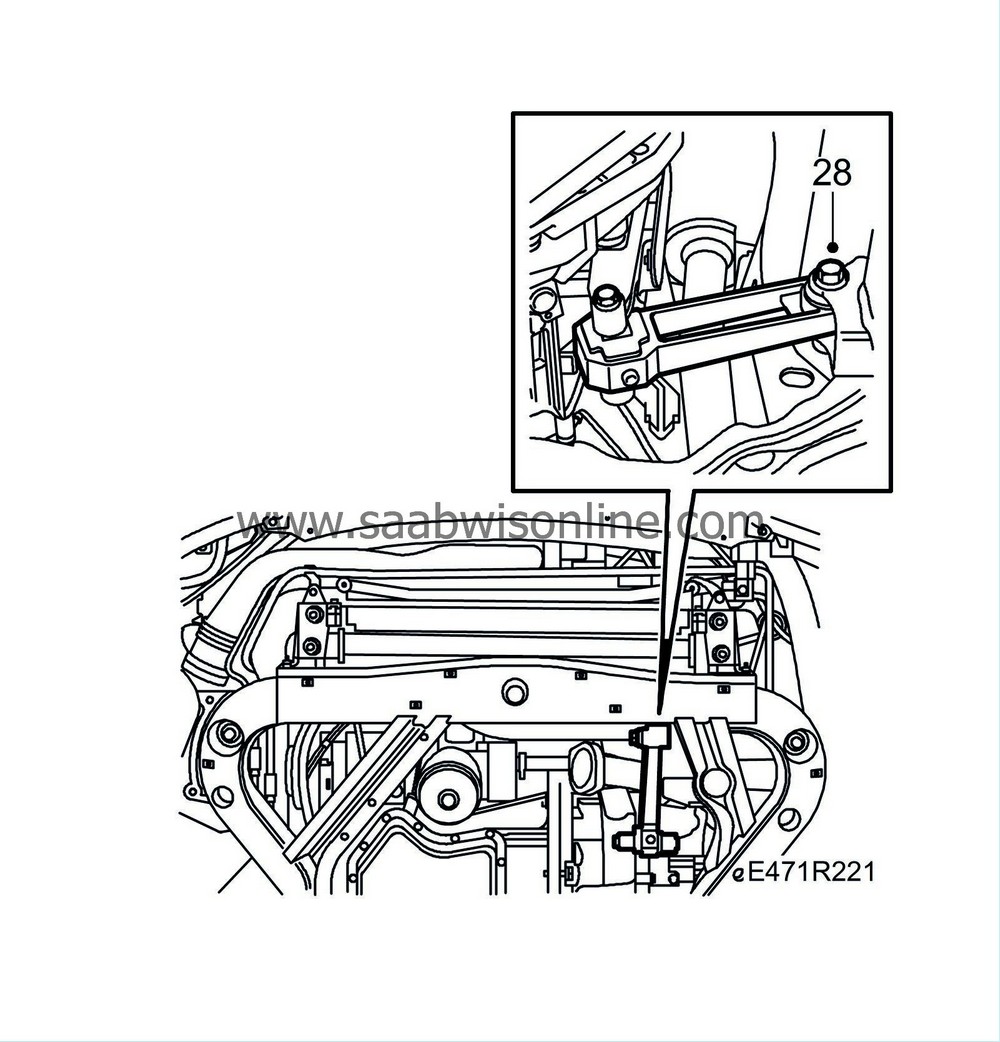
28.
|
Raise the car and remove the nuts for the charge air pipe and the screws holding the front torque rod to the subframe.
|
|
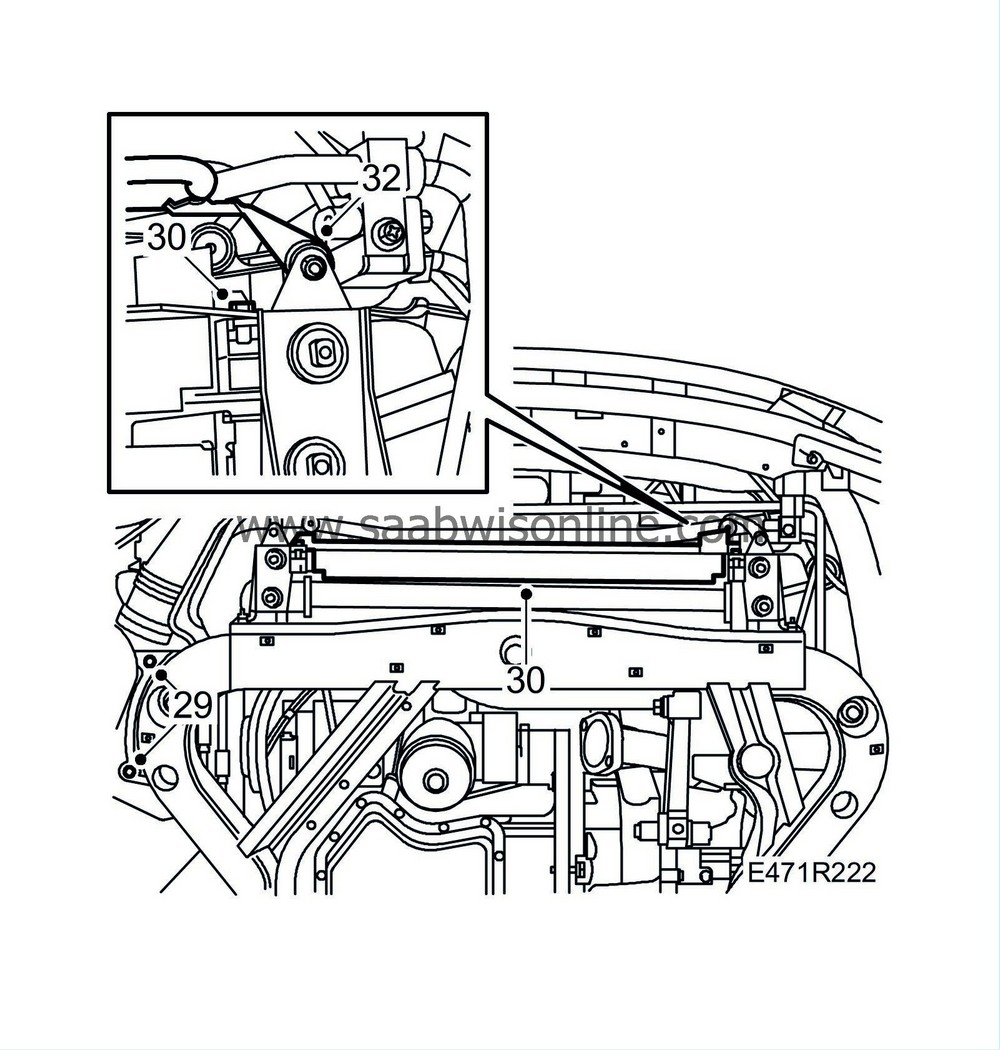
29.
|
Release the air filter housing from the subframe.
|
|
30.
|
Remove the lower air deflector from the radiator.
|
|
31.
|
Pull a
83 95 212 Strap
around the radiator core and radiator bar to keep the core supported.
|
|
32.
|
Release the rubber mountings for the power steering cooling pipe.
|
|
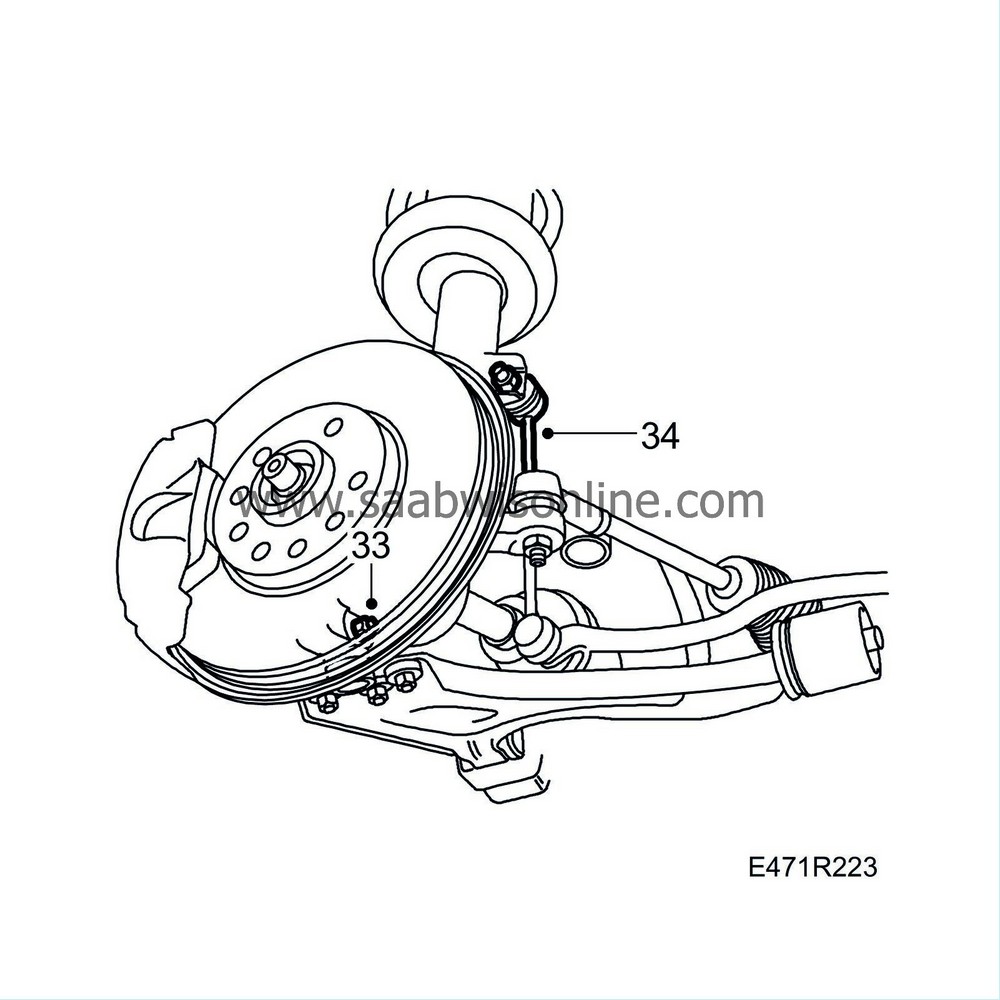
33.
|
Remove the bolts holding the outer ball couplings to the steering swivel member on both sides.
|
|
34.
|
On both sides release the upper ball coupling to the anti-roll bar. Hold in place with an open 17 mm wrench so that the boot does not twist. If the wrench is too wide to fit between the boot and the spring strut, grind it down.
|
|
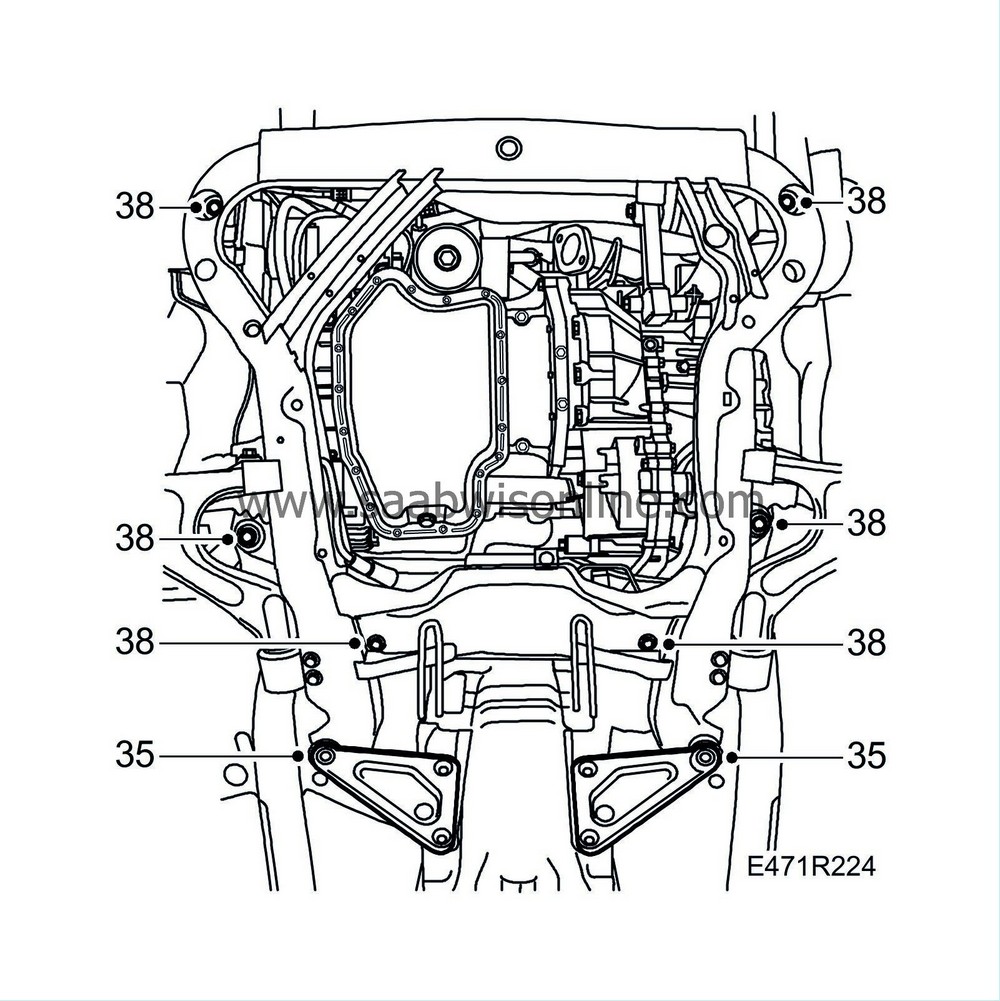
35.
|
Remove the screws holding the rear supporting plate and rear screws to subframe.
|
|
36.
|
Split the battery cooling pipe.
|
|
37.
|
Place a trolley lift below the subframe. Trolley 83 95 311,
83 94 801 Parent fixture
, adjustment feet 83 95 170, base fixture 83 95 188 and mounting fixture 83 95 196.
|
|
38.
|
Remove the remaining bolts holding the subframe.
|
Note
|
|
The centre bolts on the subframe should not be confused with the others during refit (different size and design).
|
|
|
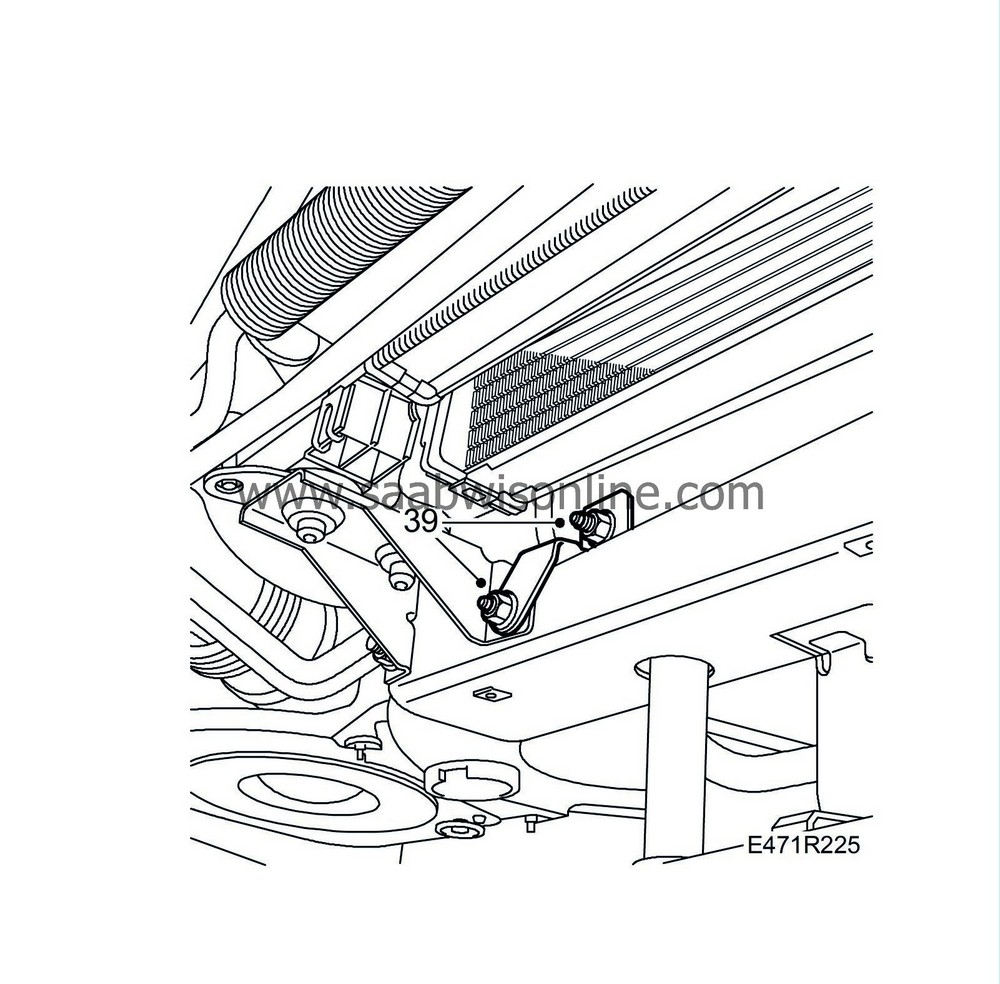
39.
|
Remove the fixing for the charge air cooler pipe.
|
|
40.
|
Lower the subframe until the steering gear bolts are acccessible. Remove the bolts.
|
|
41.
|
At the same time, open the clips holding the power steering pipe and secure the cooling pipe for the power steering with a cable tie. Release the A/C pipe from its clips.
|
|
42.
|
Lower the car with the subframe.
|
|
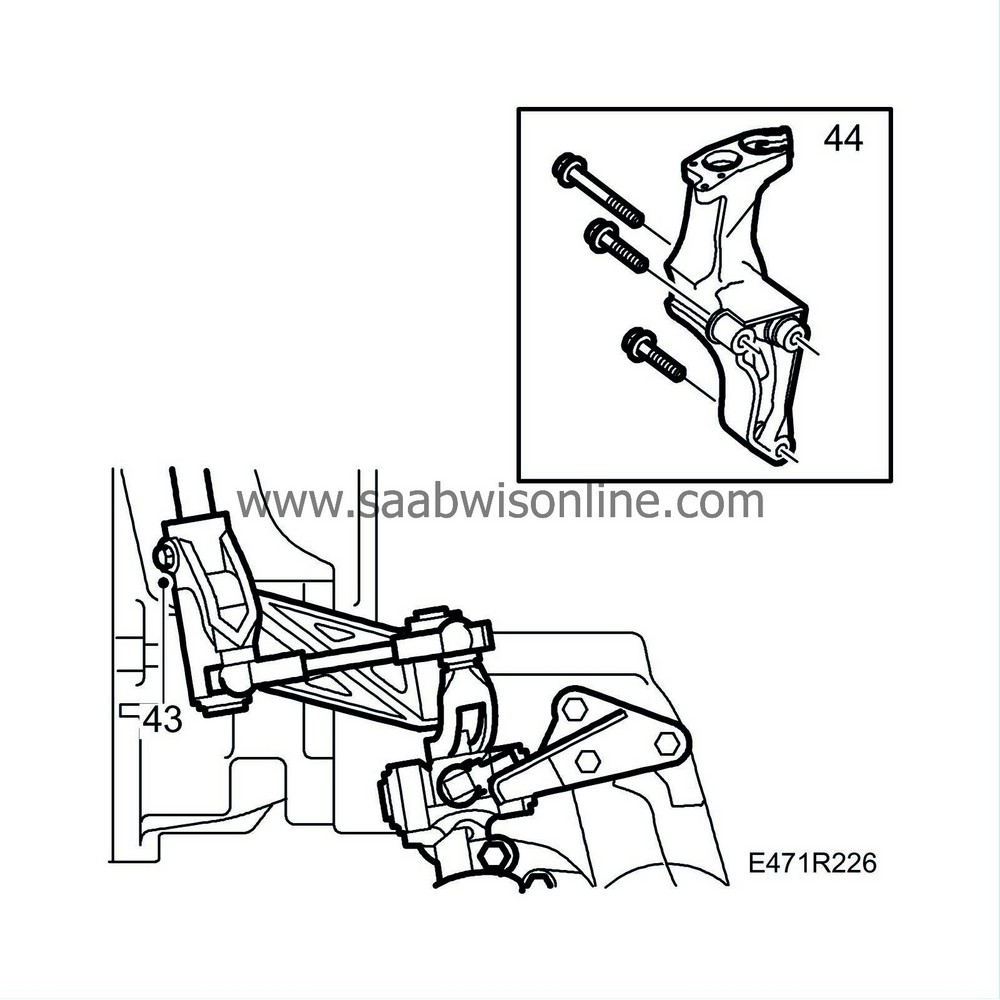
43.
|
Remove the bolts holding the selector linkage to the selector rod.
|
|
44.
|
Remove the rear engine mount and cushion. The gearbox linkage should follow. Retain the shim.
|
|
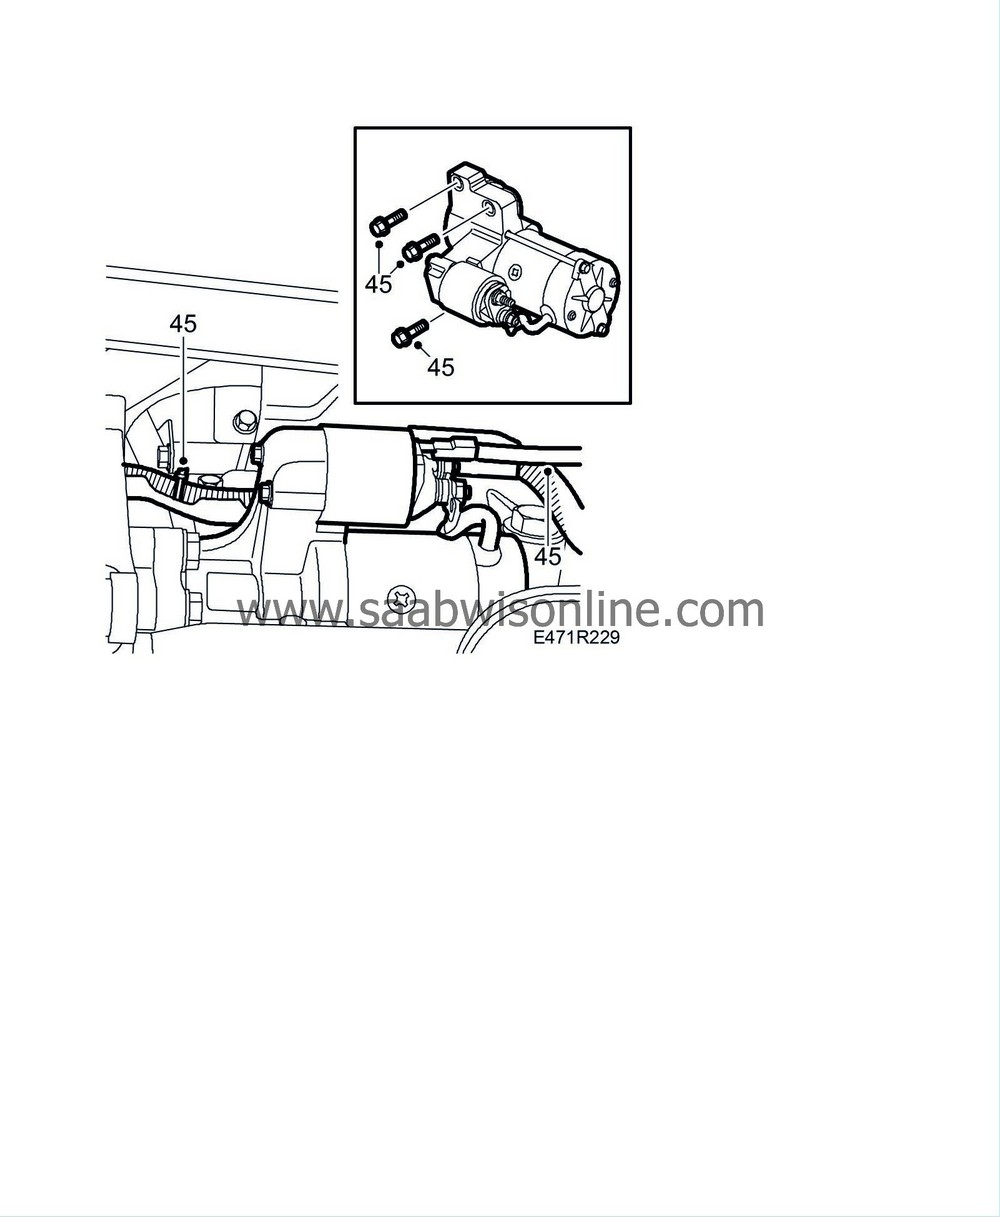
45.
|
Undo the electrical connections and remove the starter motor.
|
|
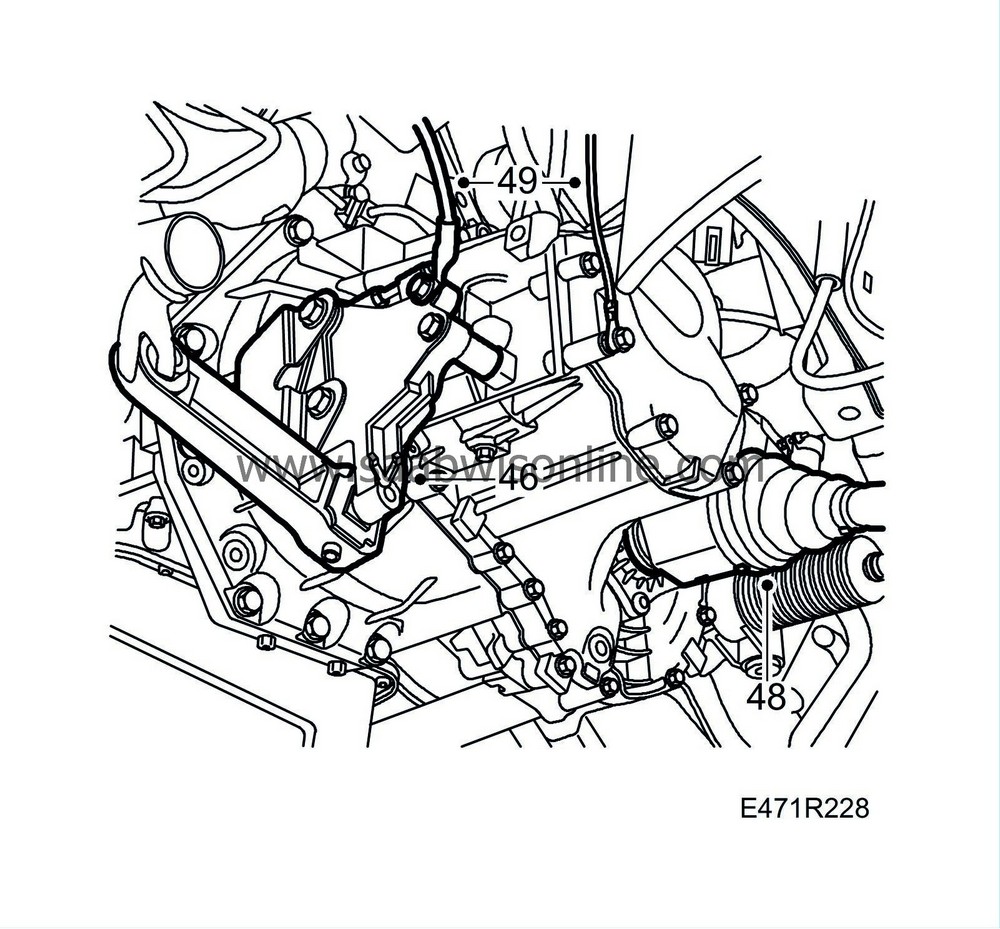
46.
|
Remove the mounting for the torque rod from the gearbox (only if the gearbox is to be replaced or dismantled).
|
|
47.
|
Drain the gearbox oil.
|
|
49.
|
Release the ground leads from the gearbox and lower the car.
|
|
50.
|
Lower the assembly so that the gearbox is clear of the structural member.
|
|
51.
|
Remove the upper gearbox fixing from the gearbox.
|
|
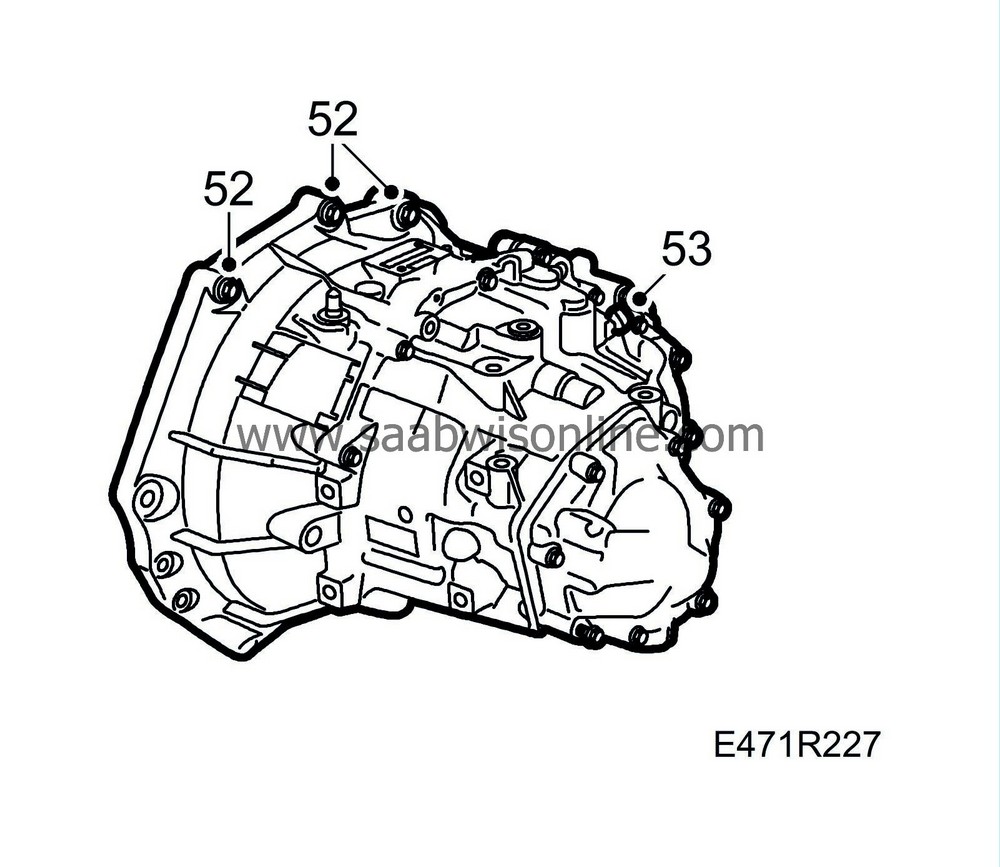
52.
|
Remove the upper bolts holding the gearbox to the engine.
|
|
53.
|
Release the electrical connection to the reversing light switch.
|
|
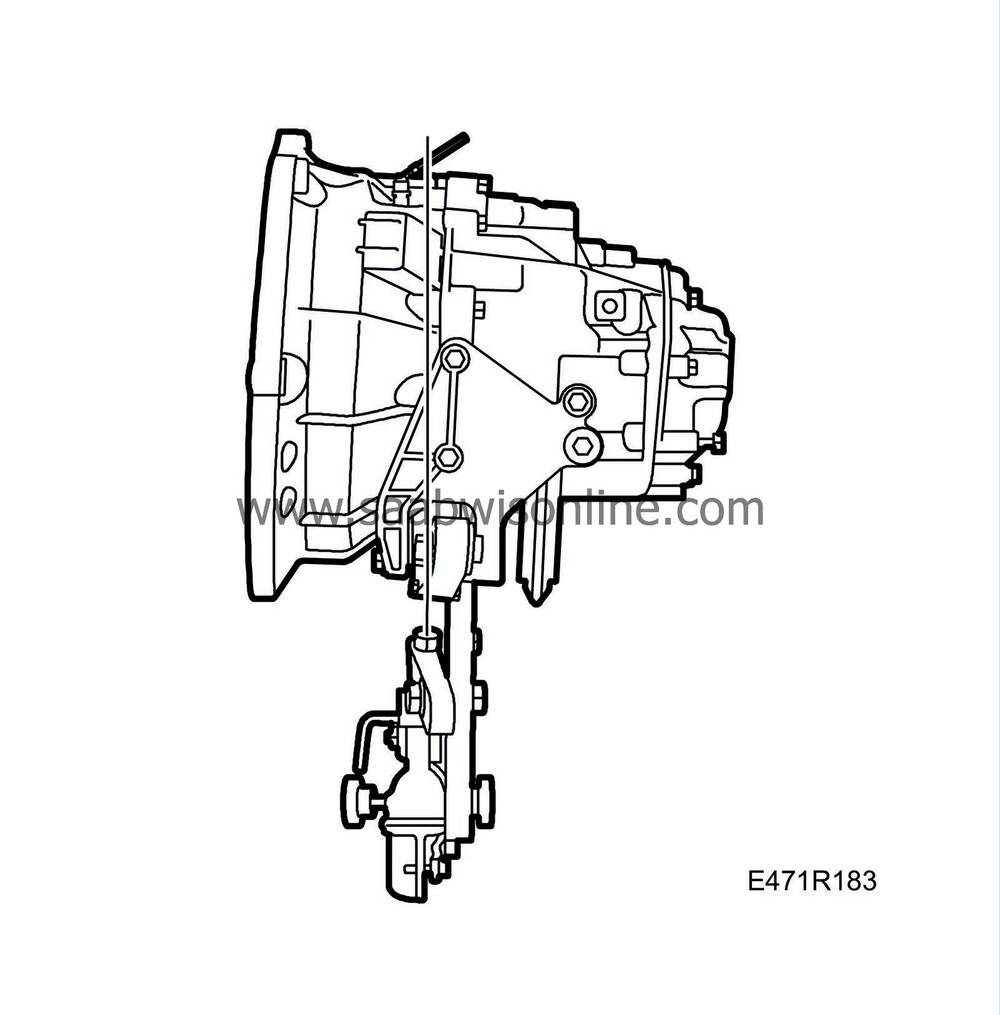
55.
|
Connect the lifting tool to the gearbox, using bolts which are around 20 mm longer than the gearbox bolts. Adjust the lifting tool so that its centre is in line with the gearbox centre and splitting plane.
|
|
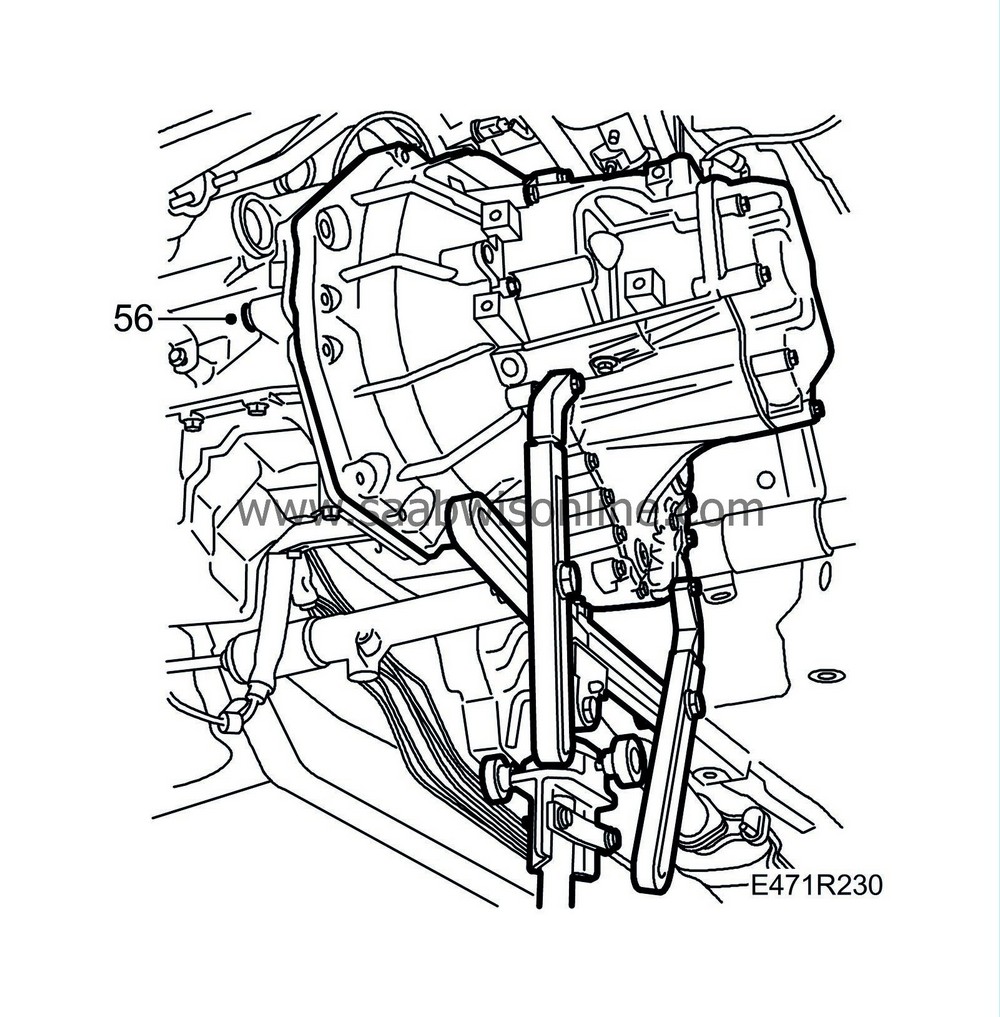
56.
|
Remove the lower bolts between the engine and gearbox.
|
|
57.
|
Twist and lower the gearbox.
 Warning
|
|
Ensure that the jack does not fall over.
|
|
|
|
|
|
|
|
58.
|
Lift the gearbox off the jack and remove the lifting tool from the gearbox.
|


