Dismantling the powertrain
|
|
Dismantling the powertrain
|
 Warning
|
|
There are a large number of cables, hoses, wires, etc., that are secured with hard plastic cable ties. These cable ties are cut off after tightening, leaving more or less sharp ends.
|
|
Beware of the risk for cuts caused by the sharp ends of the cable ties!
|
|
|
|
|
|
|
1.
|
Position the car on a lift and put protection on the wings.
|
|
2.
|
Raise the car somewhat so that the wheels are free from the floor.
|
Warning
|
|
In order to avoid the contact roller for the airbag twisting and breaking the steering wheel must be secured via the steering column lock or by taping it to the panel.
|
|
|
|
|
|
|
|
3.
|
Man:
Position the wheels straight ahead, secure the steering wheel and undo the steering column joint with the steering gear inside the cabin.

|
|
4.
|
Man:
Engage 4th gear and remove the plastic plug from the gearbox. Lock 4th gear in the gearbox by inserting
87 92 335 Lock pin.

|
|
5.
|
Man:
Undo the clamp holding the selector rod to the linkage on the gearbox.
|
|
6.
|
Man:
Lift the gaiter. Engage 3rd gear so that the selector rod leaves the linkage and insert
87 92 335 Lock pin
into the gear lever housing.
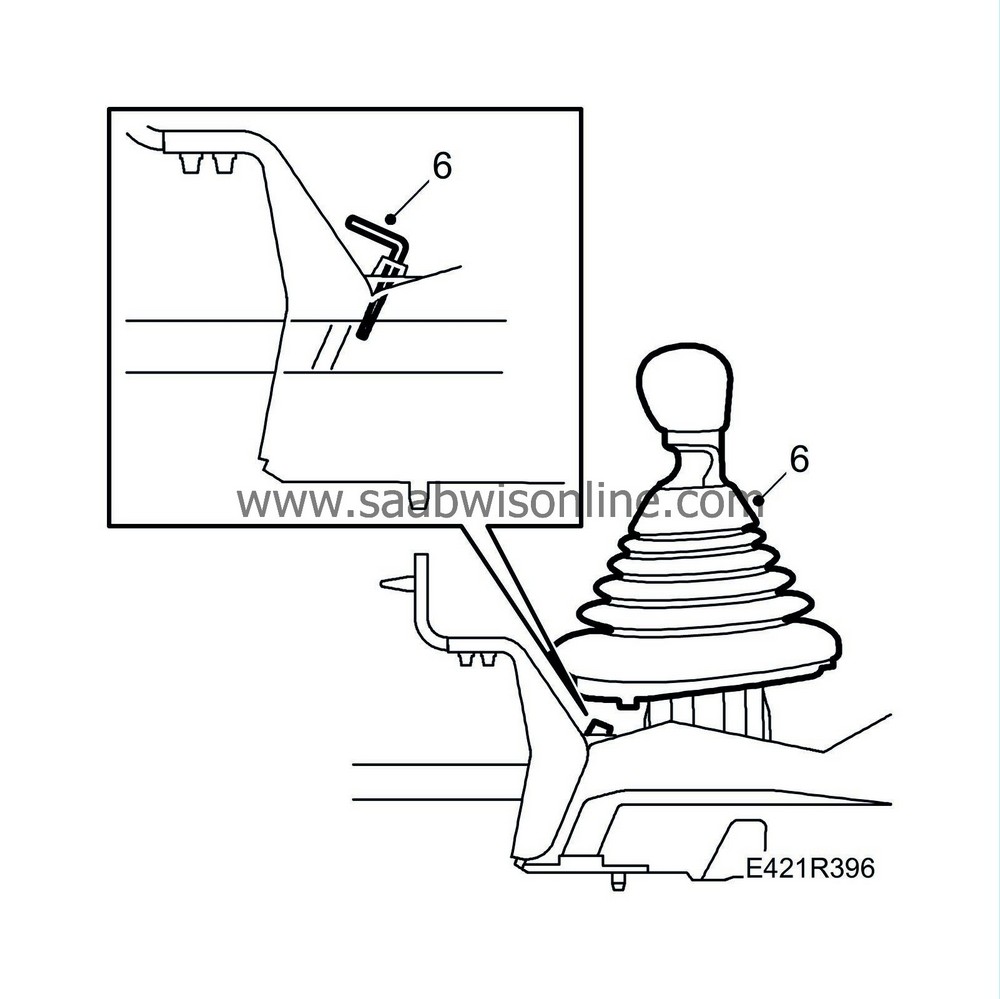
|
|
7.
|
Open the cap on the expansion tank.

|
|
8.
|
Remove the upper engine cover and the battery cover. Undo the battery cables and remove the battery.
|
|
9.
|
Undo the maxi fuse holder and remove the battery tray. Undo the electrical distribution box and move it to one side.
|
|
10.
|
Remove the intake manifold from the mass air flow sensor to the turbocharger and camshaft cover.
|
|
11.
|
Remove the charge air hose with charge air pipe from the turbocharger and the charge air pipe on the fan cowling. Plug the connections.

|
|
12.
|
Unplug the pressure/temperature sensor and disconnect the ground cable. Undo the cable rail and move it to one side.

|
|
13.
|
Undo the rear cable harness mounting on the camshaft cover, unplug the glow plug connections and move them to one side.

|
|
14.
|
Remove the heat shields over the exhaust manifold and turbocharger.

|
|
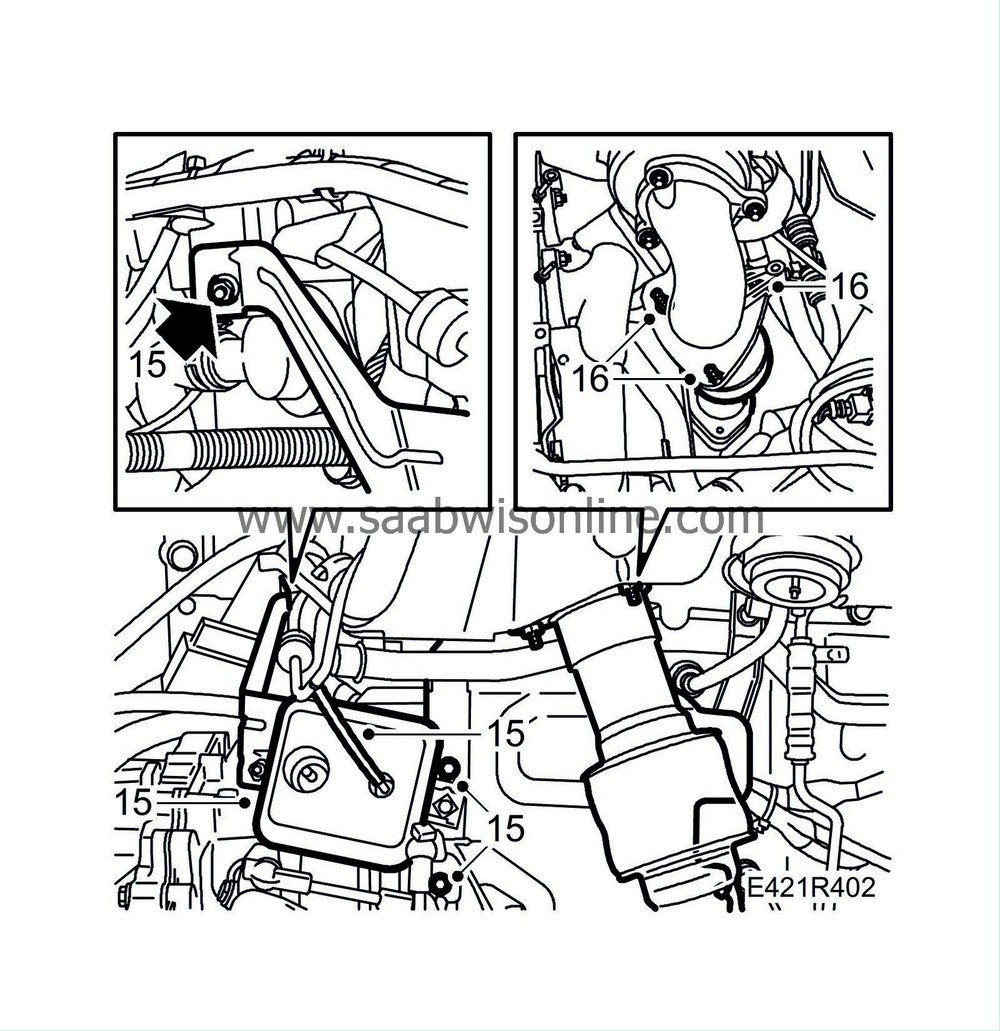
15.
|
Remove the vacuum tank stay to the cable rail, undo the hose and remove the vacuum tank.
|
|
16.
|
Remove the three exhaust pipe bolts from the turbo. Retain the gasket.
|
|
18.
|
Remove the front wheels.
|
|
19.
|
Raise the car and remove the spoiler shields, lower engine cover, drive belt cover and the cover in the left-hand wheel housing.

|
|
20.
|
Place a receptacle under the car and drain the coolant.
|
|
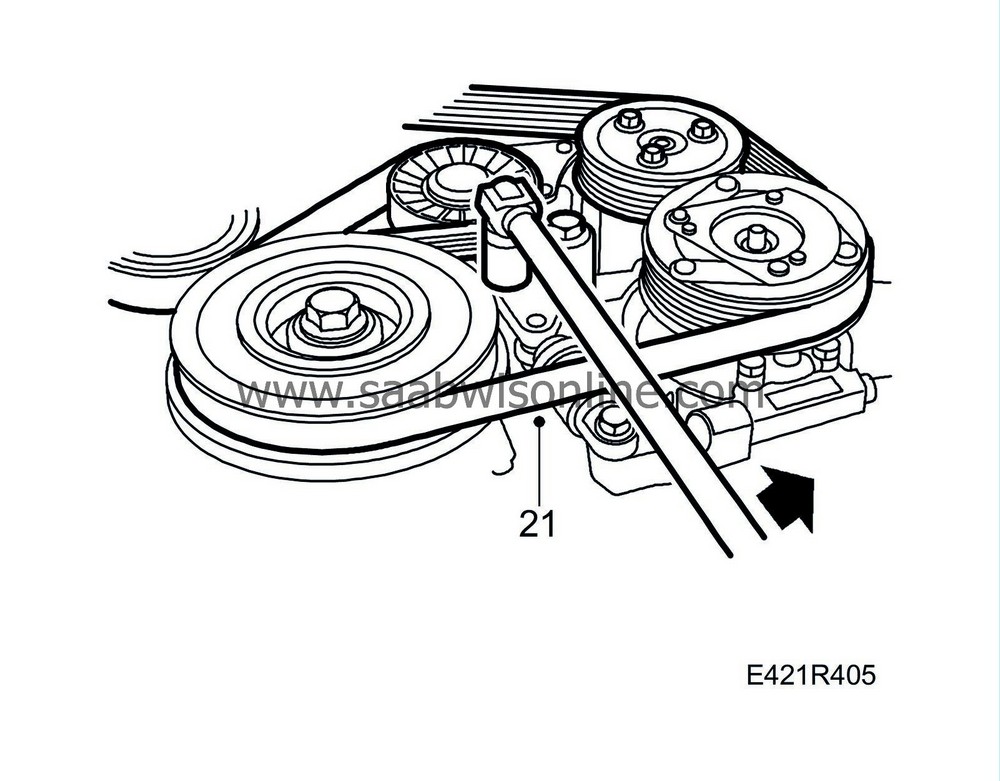
21.
|
Mark the direction of rotation, take the tension off the multigroove belt and remove the belt.
|
|
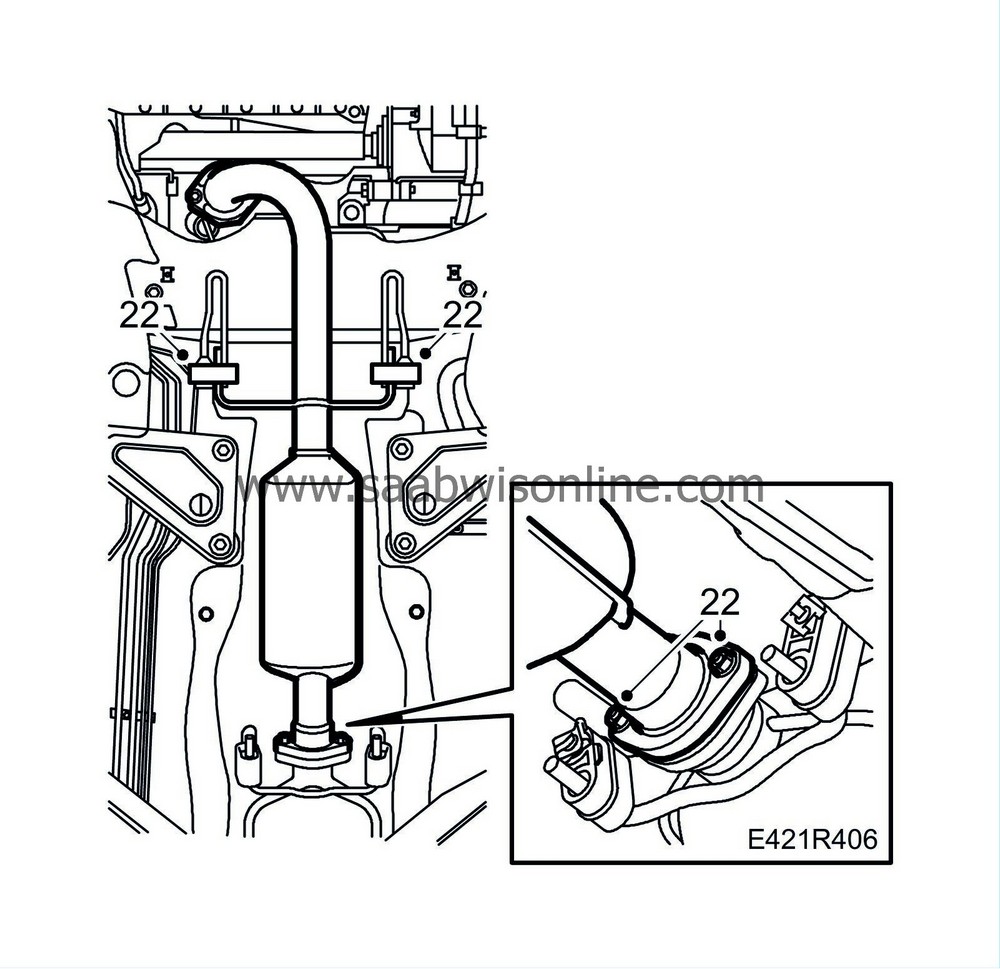
22.
|
Remove the catalytic converter with rubber mountings. Remove the heat shield over the starter motor by undoing the starter motor nut.
|
|
23.
|
Unplug the oil temperature sensor and oil level sensor.

|
|
24.
|
Unplug the electric connectors for the generator and the oil pressure sensor.

|
|
25.
|
Unplug the electric connections for the starter motor.

|
|
26.
|
Detach the turbo delivery hose from the charge air pipe on the left-hand side.
|
|
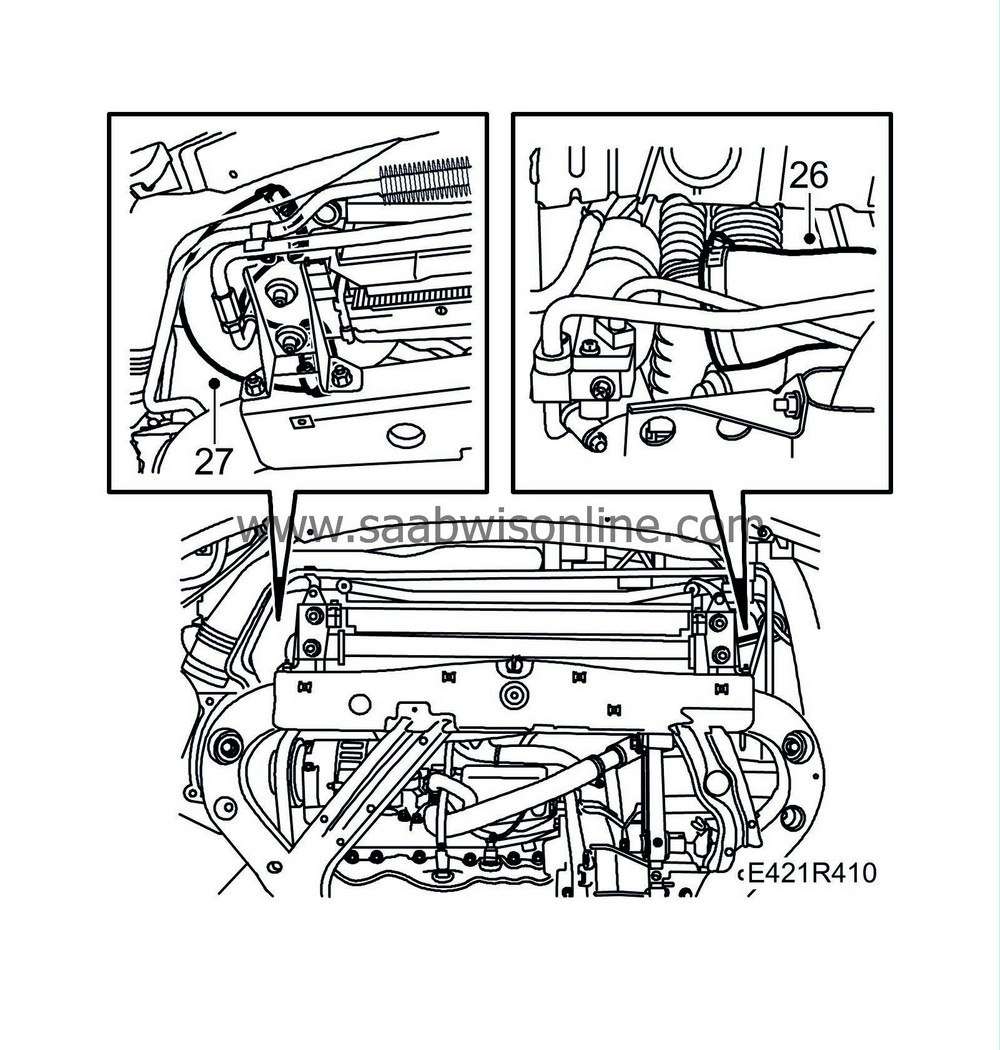
27.
|
Detach the turbo delivery hose from the charge air pipe on the right-hand side and from the charge air cooler.
|
|
28.
|
Lower the car and remove the turbocharger delivery hose with pipe from the throttle body.

|
|
29.
|
Detach the radiator hose from the thermostat housing and the radiator.

|
|
30.
|
Undo the charge air pipe from the fan cowling.
|
|
31.
|
Detach the ventilation hose between the radiator and the expansion tank.
|
|
32.
|
Remove the lower radiator hose.
|
|
33.
|
Aut:
Remove the oil cooler pipe from the gearbox.

|
|
34.
|
Unplug the radiator fans and remove the fan cowling and radiator.
|
|
35.
|
Lift out the charge air pipe.
|
|
36.
|
Remove the coolant hose between the coolant expansion tank and the engine.

|
|
37.
|
Disconnect the lower hose from the thermostat housing and bend it to one side.
|
|
38.
|
Detach the connector on the right-hand engine mounting, the coolant temperature sensor and the engine control module connectors. See
Before changing a control module
. Cut off the cable tie.
|
|
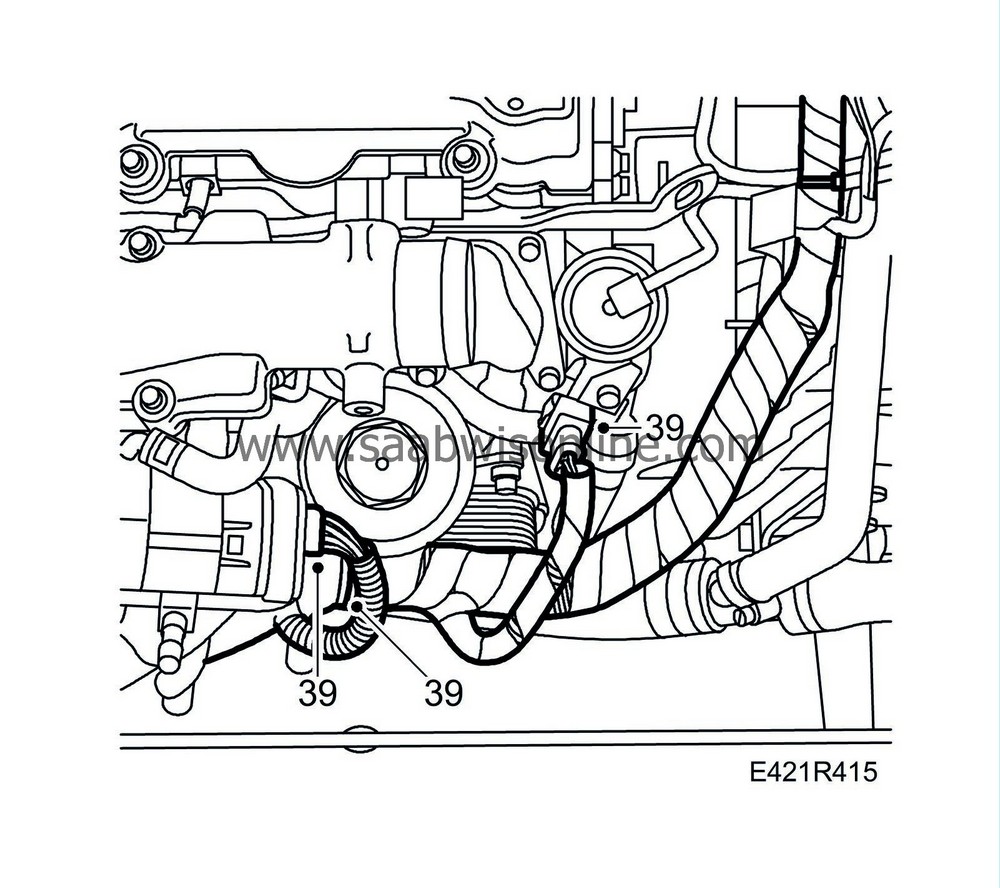
39.
|
Detach the connector to the EGR valve and unplug the connector to the crankshaft position sensor. Cut the cable tie on the oil filter housing. Detach the ground cable from the throttle body.
|
|
40.
|
Detach the vacuum hose to the swirl throttle and the hoses to the vacuum pump.

|
|
41.
|
Detach the vacuum hose from the turbo control valve.

|
|
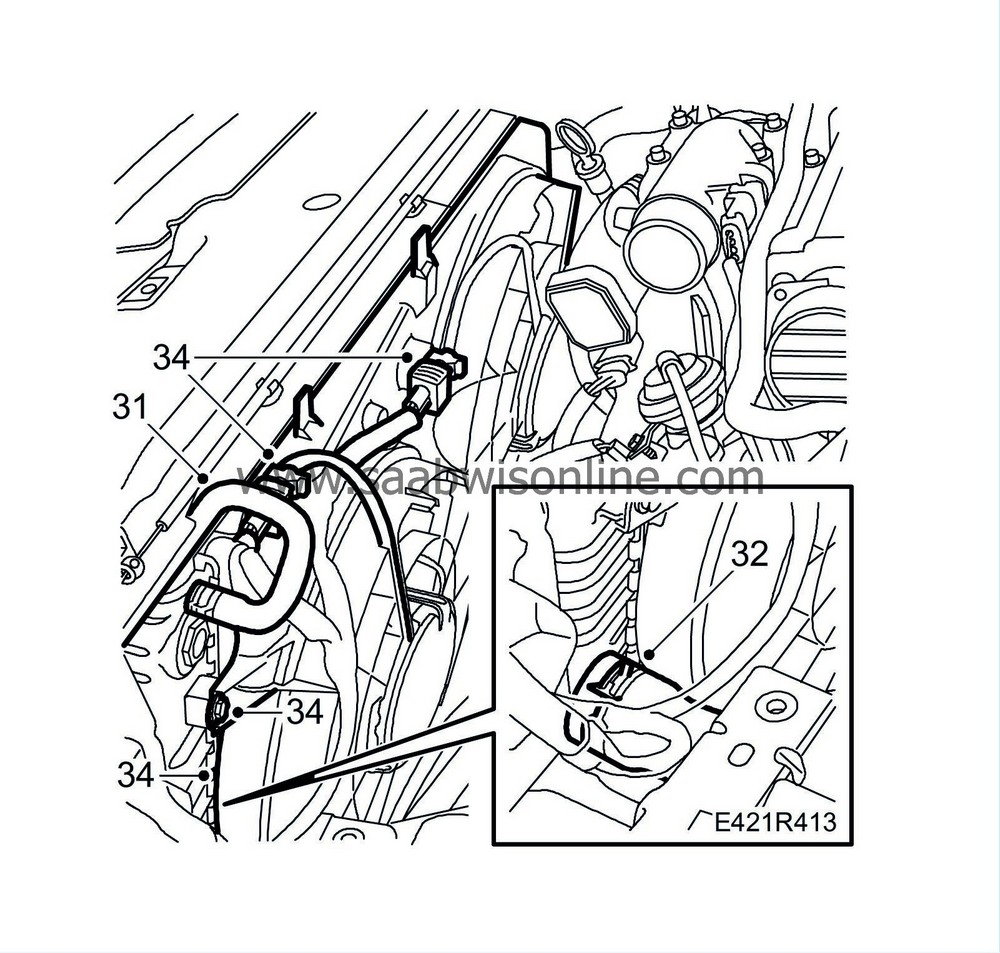
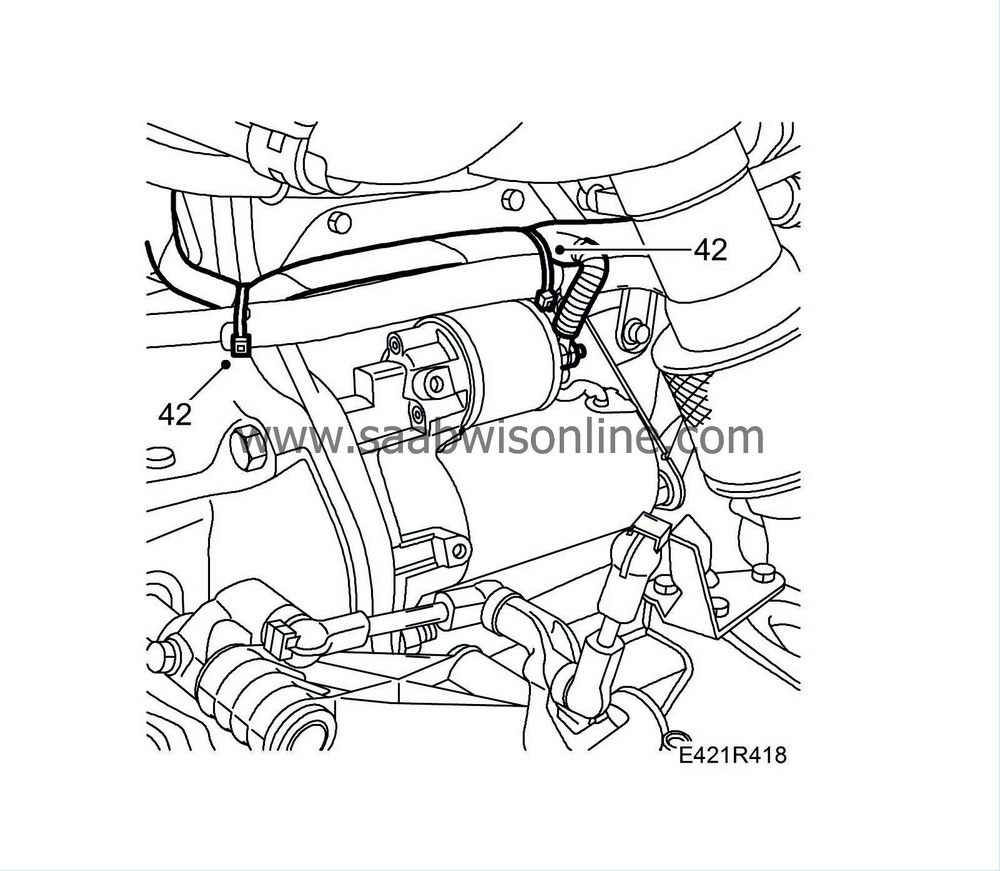
42.
|
Cut off the cable ties and remove the wiring harness to the starter motor.
|
|
43.
|
Remove the coolant hose from the T-piece on the gearbox.

|
|
44.
|
Detach the coolant hose from the rear coolant pipe quick-release coupling and the coolant hose from the generator bracket.
|
|
45.
|
Unplug the A/C compressor connector.
|
Warning
|
|
The work involved in removing the fuel pipe requires working with the vehicle's fuel system. The following points should therefore be heeded in conjunction with these measures:
|
|
• Have a class BE fire extinguisher on hand! Be aware of the risk of sparks, i.e. in connection with electric circuits, short-circuiting, etc.
|
|
• Absolutely No Smoking!
|
|
• Ensure good ventilation! If there is approved ventilation for evacuating fuel fumes then this must be used.
|
|
• Wear protective gloves! Prolonged exposure of the hands to fuel can cause irritation to the skin.
|
|
• Wear protective goggles.
|
|
|
|
|
|

|
Important
|
|
Be particulary observant regardning cleanliness when working on the fuel system. Loss of function may occur due to very small particles. Prevent dirt and grime from entering the fuel system by cleaning the connections and plugging pipes and lines during disassembly. Use 82 92 948 Plugs, A/C system assembly. Keep components free from contaminants during storage.
|
|
|
|
|
47.
|
Undo the upper clip from the power steering return line. Attach a
30 07 739 Hose pinch-off pliers
on the power steering hose as close to the pump as possible. Remove the power steering reservoir and place it on top of the engine. Make sure none of the fluid leaks out of the reservoir.
|
|
48.
|
Remove the banjo screw on the power steering pump.
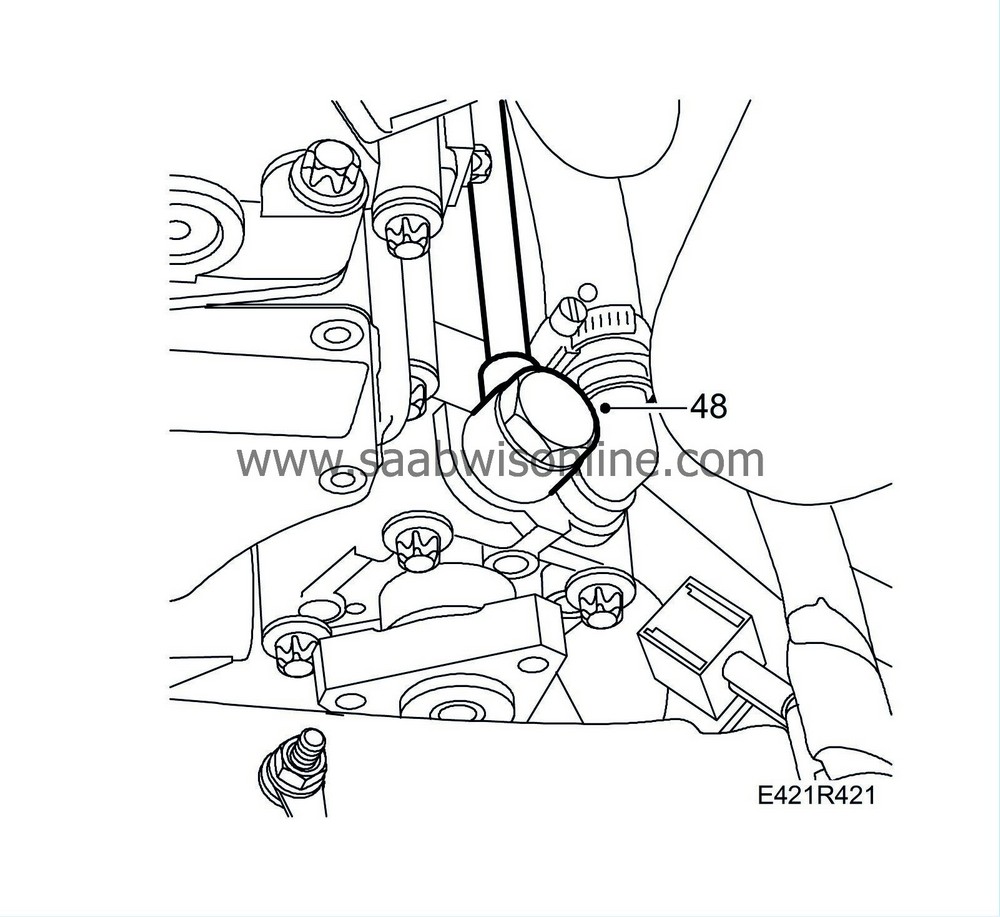
|
|
49.
|
Man:
Remove the clip on the slave cylinder and detach the connection to the delivery pipe. Refit the clip. Bend upwards and place the connection higher than the brake fluid reservoir so that fluid does not run out.

|
|
50.
|
Man:
Detach the connector from the reversing light switch on the gearbox.
|
|
51.
|
Disconnect the ground cable from the gearbox.
|
|
52.
|
Aut:
Remove the clamp holding the battery cable on the gearbox.
|
|
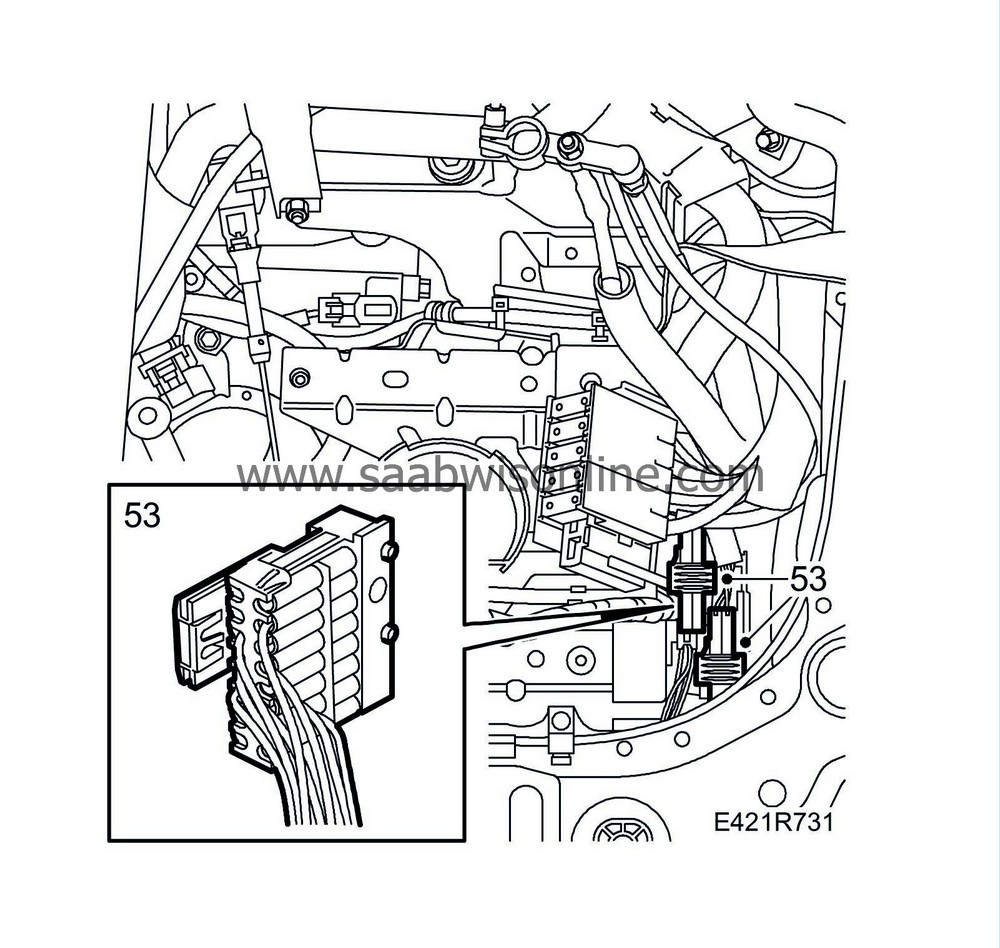
53.
|
Aut:
Detach the gearbox connector from the structural member. Detach the connector pointing forwards from the bracket.
|
|
54.
|
Aut:
Lay the cable over the gearbox to facilitate dismantling the engine.
|
|
55.
|
Lay the engine cable harness over the electric centre to facilitate dismantling the engine.
|
|
56.
|
Aut:
Remove the gear selector and move to one side.
|
|
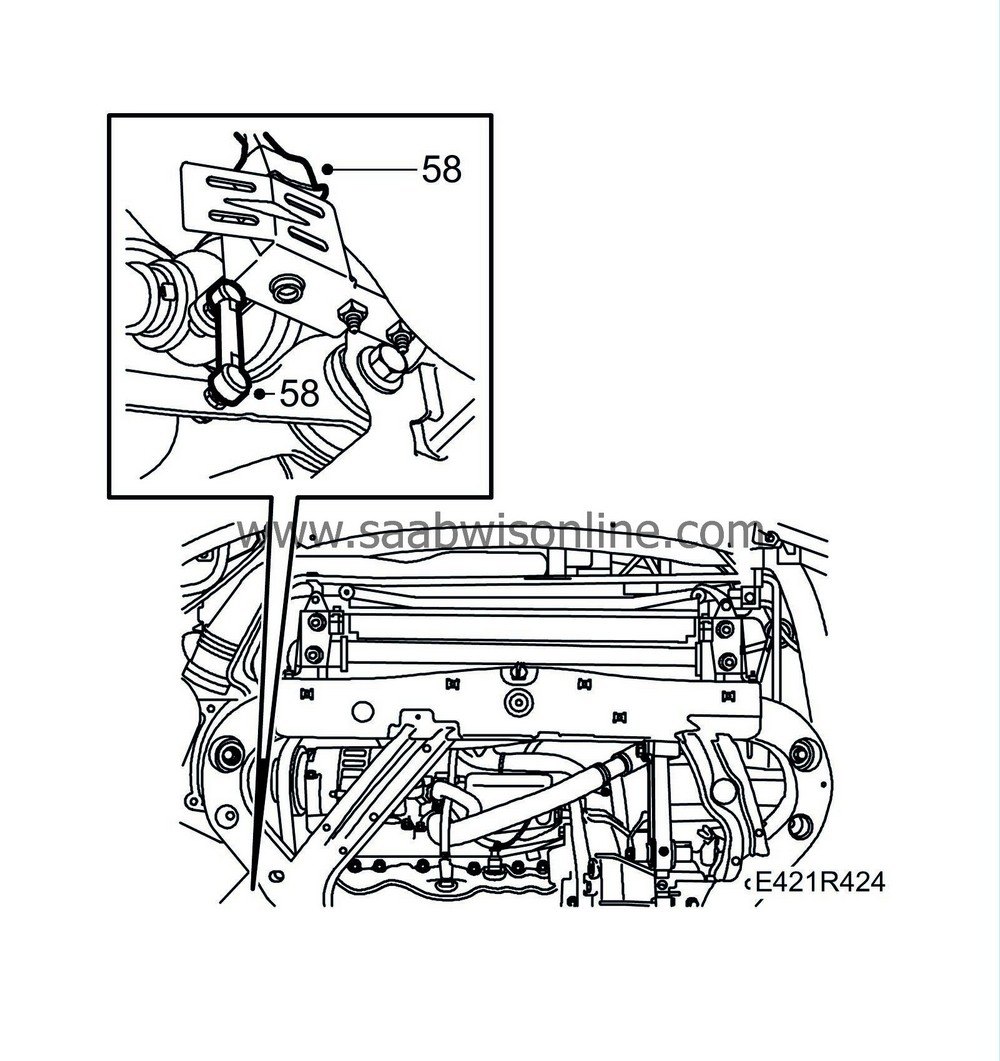
58.
|
Raise the car and unplug the connector to the headlamp control module on the link arm (xenon headlamps only).
|
|
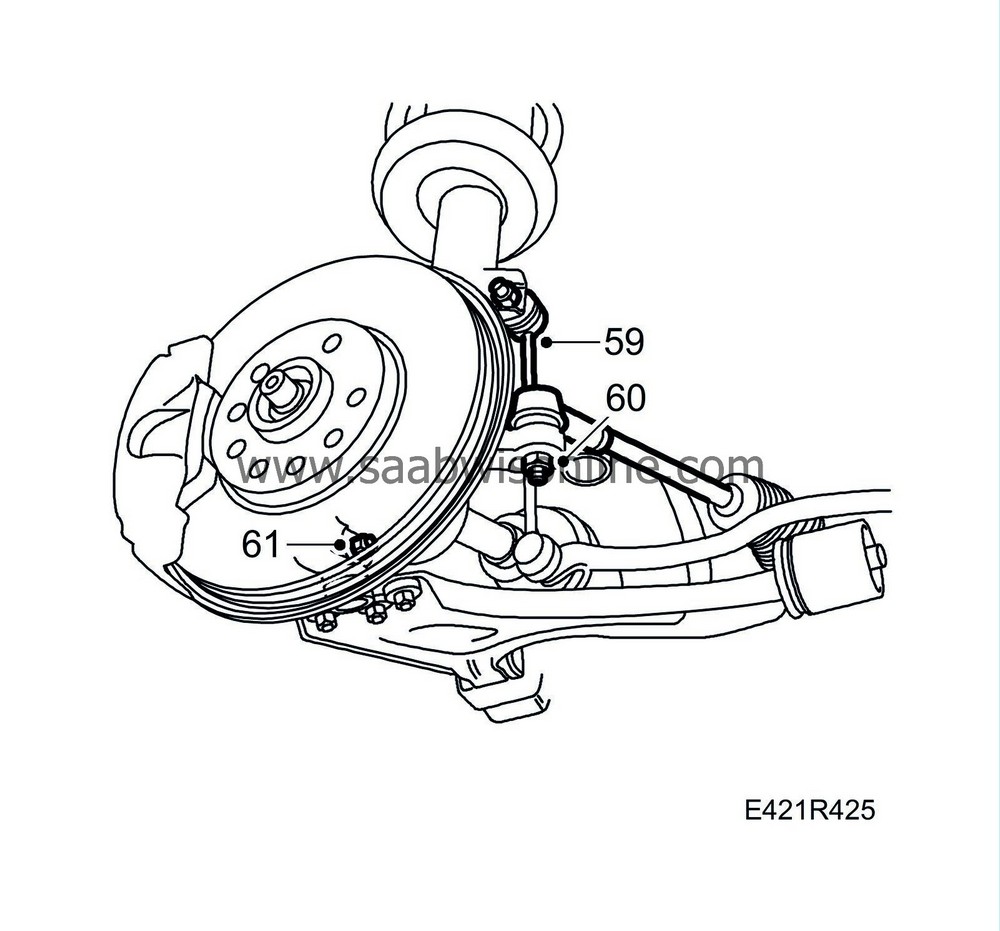
59.
|
Undo the top nut on the anti-roll bar. Use a flat wrench for support.
|
|
61.
|
Undo the bolts for the lower steering links on the steering swivel member. Use a fixed wrench so that the bolts do not rotate and get damaged.
|
|
62.
|
Detach the drive shafts from the hub. Use a mallet and a brass drift.
|
Warning
|
|
Use protective goggles to protect against flying splinters of metal.
|
|
|
|
|
|
|
|
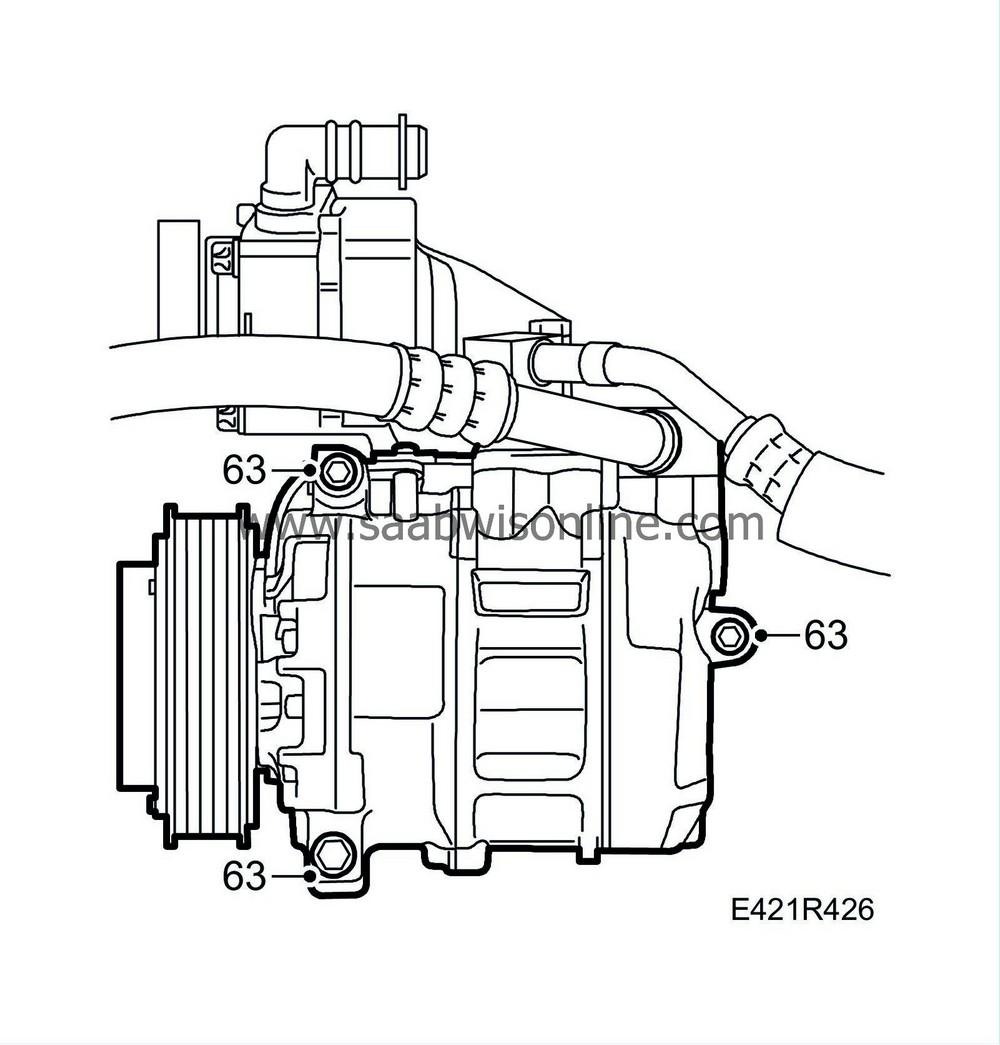
63.
|
Remove the A/C compressor bolts. Move the A/C compressor and the steering servo high pressure hose to one side.
|
|
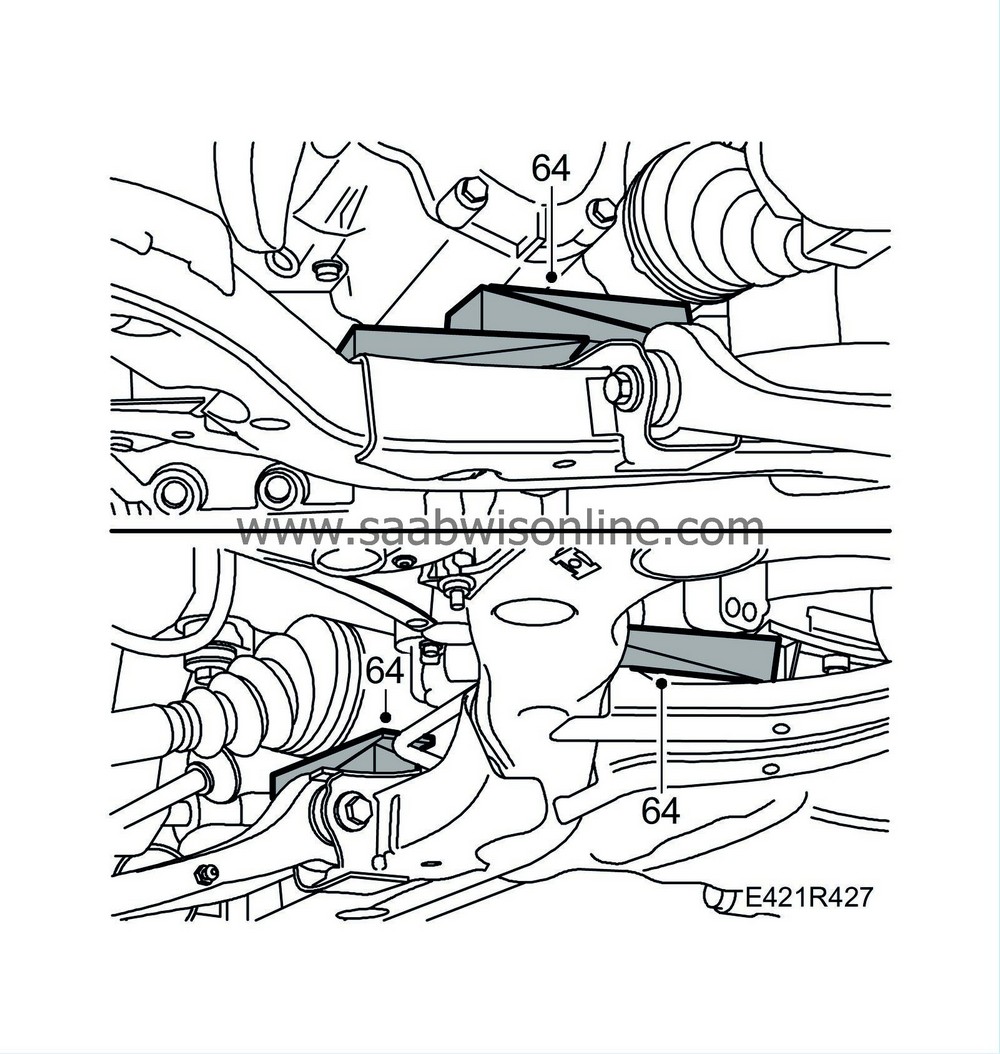
64.
|
Place
83 95 238 Wedges
between the subframe, gearbox and engine as illustrated.
|
|
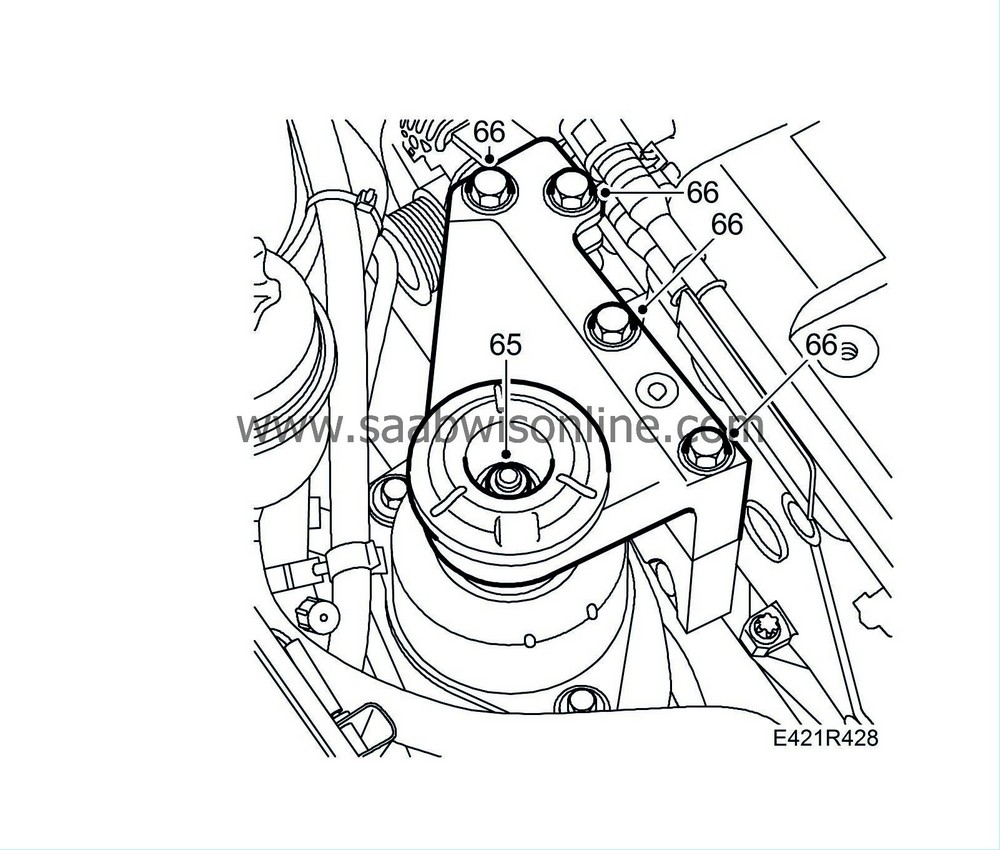
65.
|
Lower the car and take the weight off the engine with a jack. Remove the nut and the vibration damper on the right-hand engine mounting.
|
|
66.
|
Remove the right-hand engine mounting. Make sure the wedges are in place and carefully lower the engine.
|
|
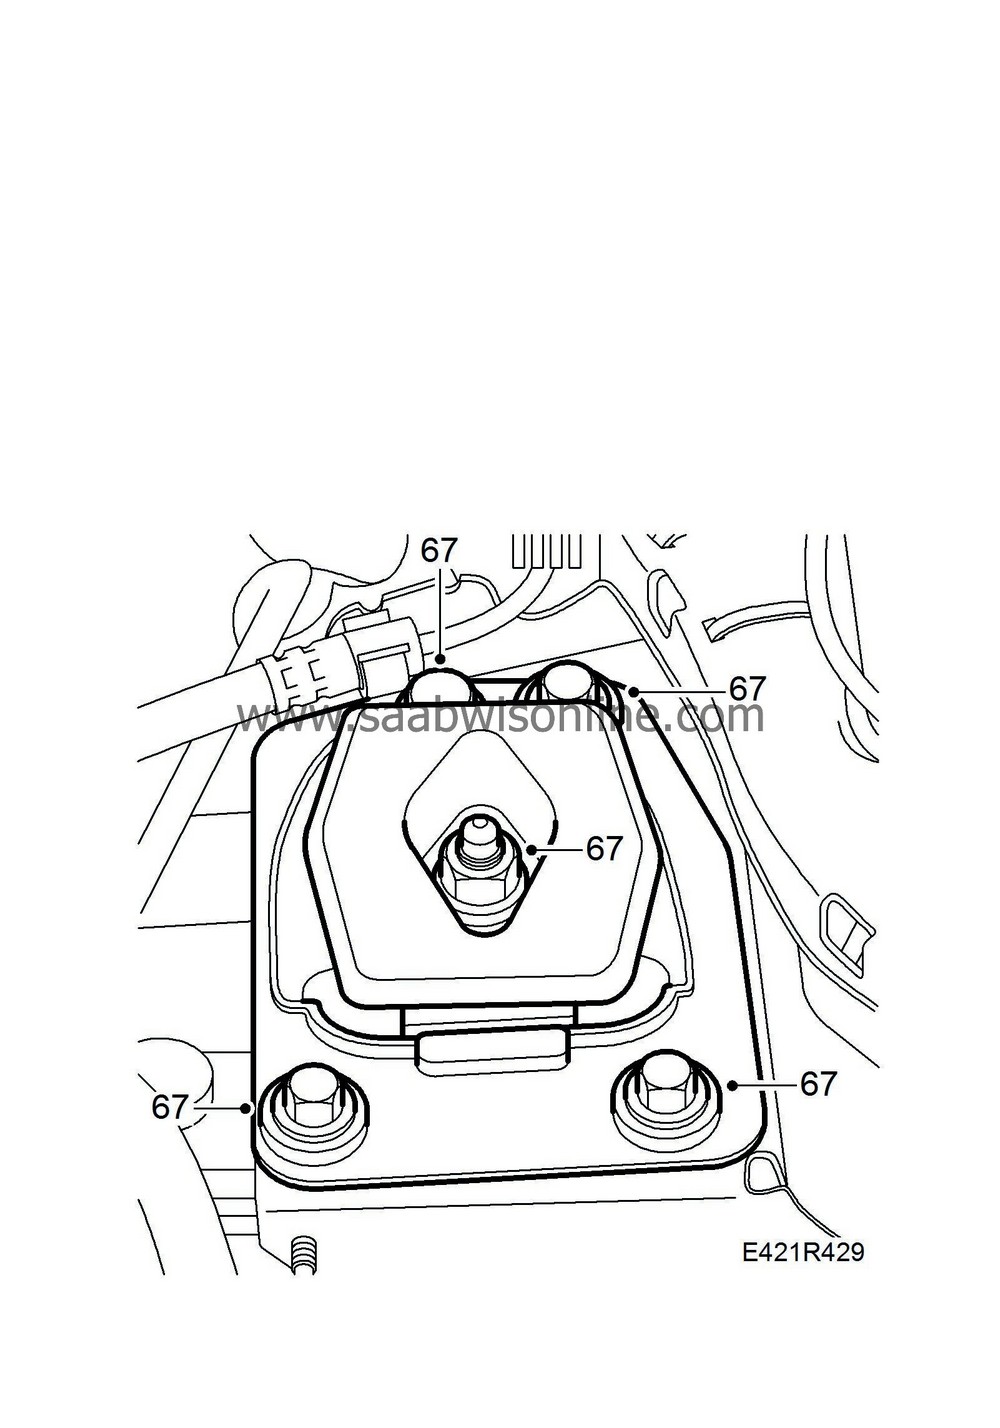
67.
|
Take the weight off the left-hand side of the engine and remove the left-hand engine mounting. Carefully lower the car.
|
|
68.
|
Raise the car and remove the coolant pipe for the battery box.
|
|
70.
|
Raise the lifting table and adjust it according to the locating points on the car body and fixture. Continue raising the lifting table until it touches the subframe. Raise it a little more and then adjust its height until it abuts evenly against the subframe.
|
|
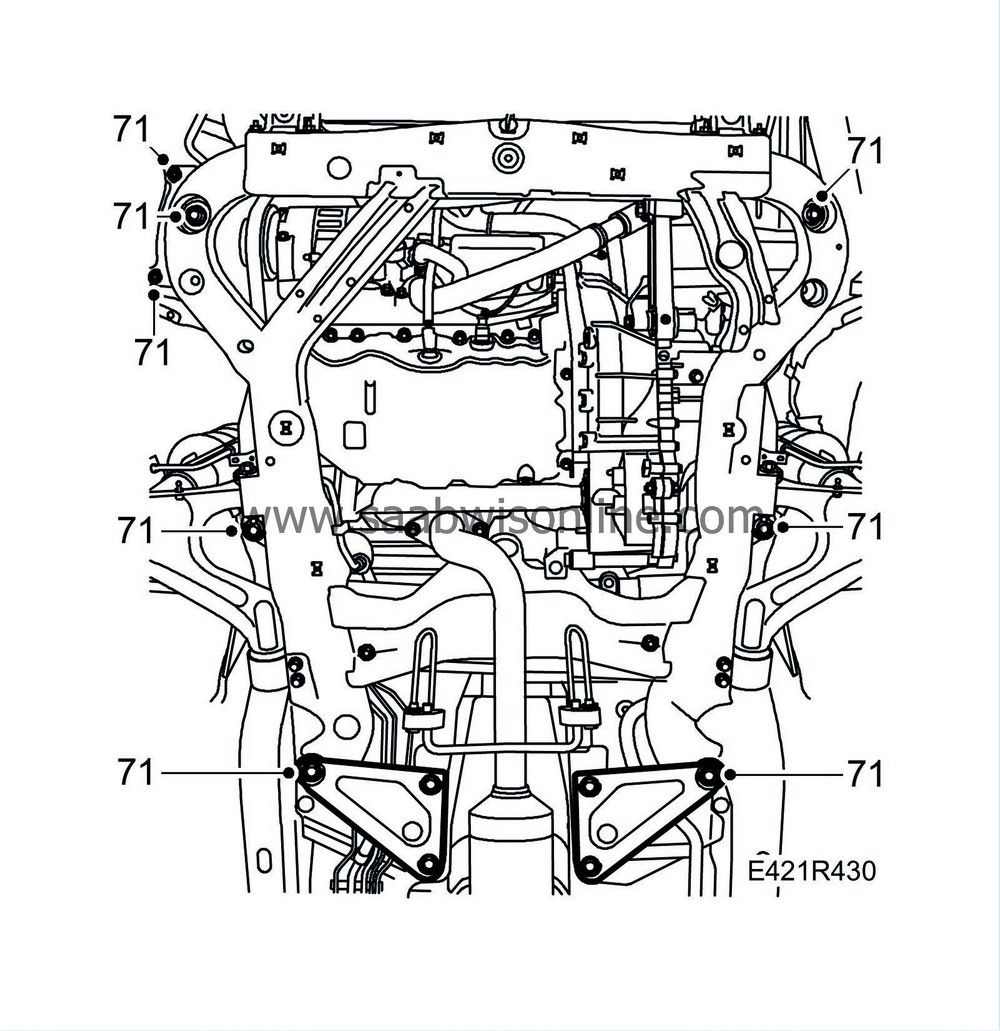
71.
|
Remove the triangular stiffeners. Undo the subframe retaining bolts and the two nuts on the air cleaner.
|
|
72.
|
Hold the A/C compressor on the charge air cooler with two cable ties and make sure everything has been detached and moved out of the way to avoid damage when removing the power train.
|
|
73.
|
Carefully lower the powertrain slightly and loosen the drive shafts from the hub.
|
|
74.
|
Lower the power unit more. Be careful to ensure that nothing gets jammed or overlooked during removal and gets damaged.
|


