Engine block
| Engine block |
| 1. |
Remove the starter motor.
|
|
| 2. |
Remove the belt tensioner and generator. Remove the support bearing bracket with intermediate shaft and inboard drive-shaft joint. Plug the gearbox with
protective plugs
87 92 244.
|
|
| 3. |
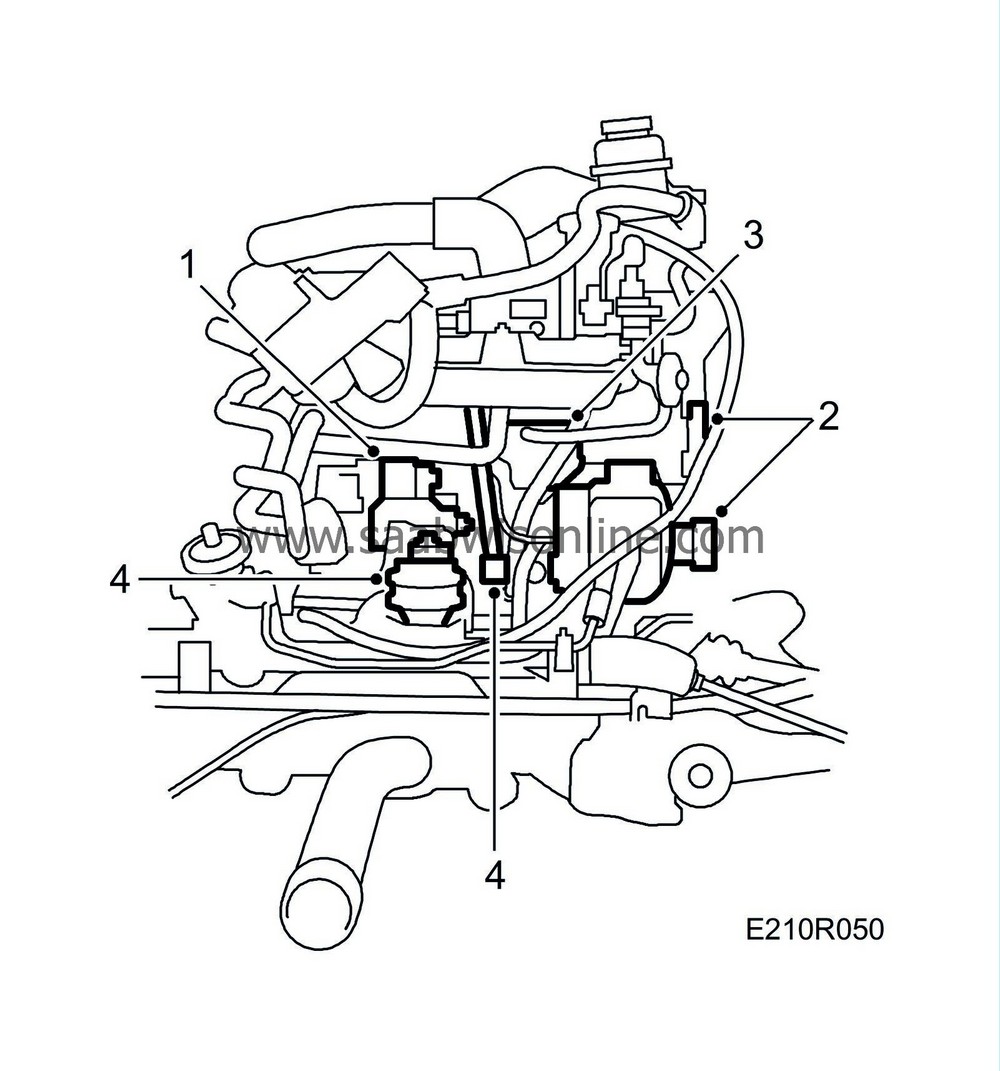
Remove the generator bracket and crankcase breather's oil trap complete with hoses.
|
|
| 4. |
Remove the intake manifold's steady bar and remove the rear engine mounting.
|
|
| 5. |
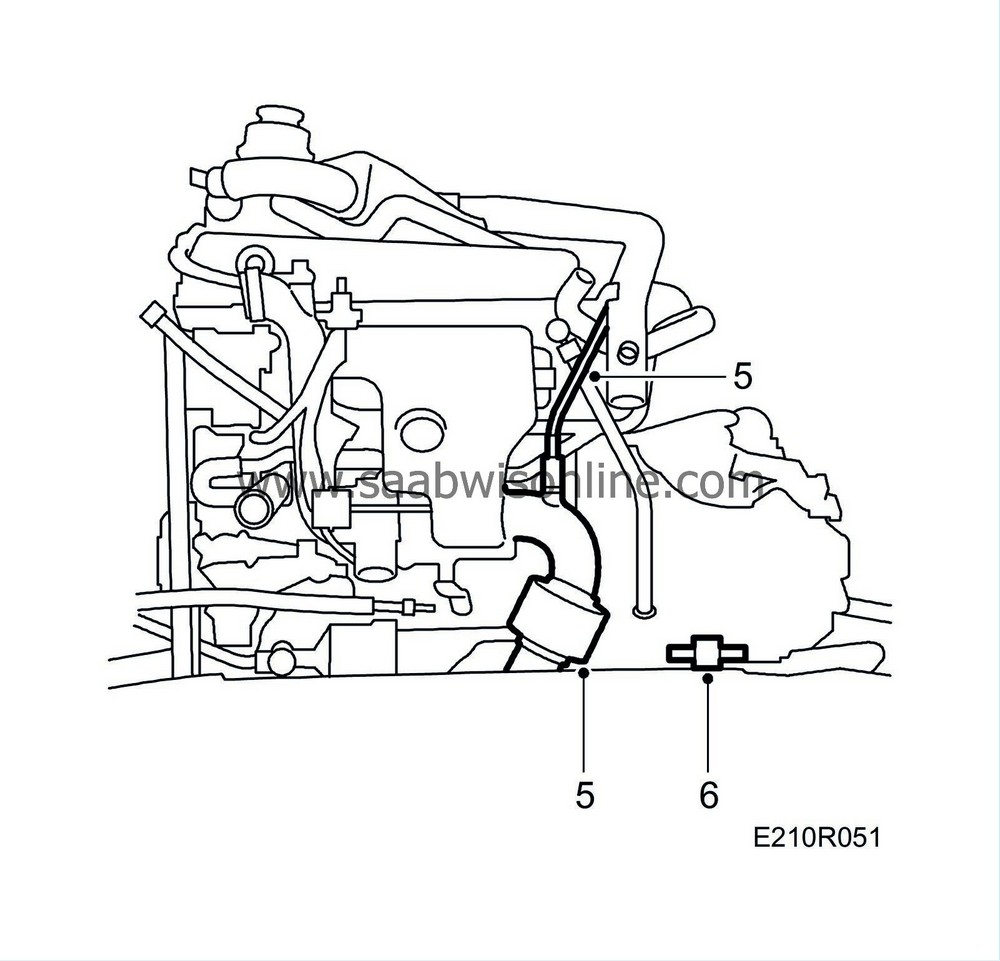
Remove the gearbox retaining bolts. Disconnect the exhaust pipe from the turbocharger and unplug the oxygen sensor connectors.
|
|
| 6. |
Remove the gearbox stay. Remove the servo pump and put it on the subframe.
|
|
| 7. |
Lift the power train and roll away the table with the subframe. Remove the bracket, engine mounting and bolts lower, rear on the engine to the gearbox.
|
|
| 8. |
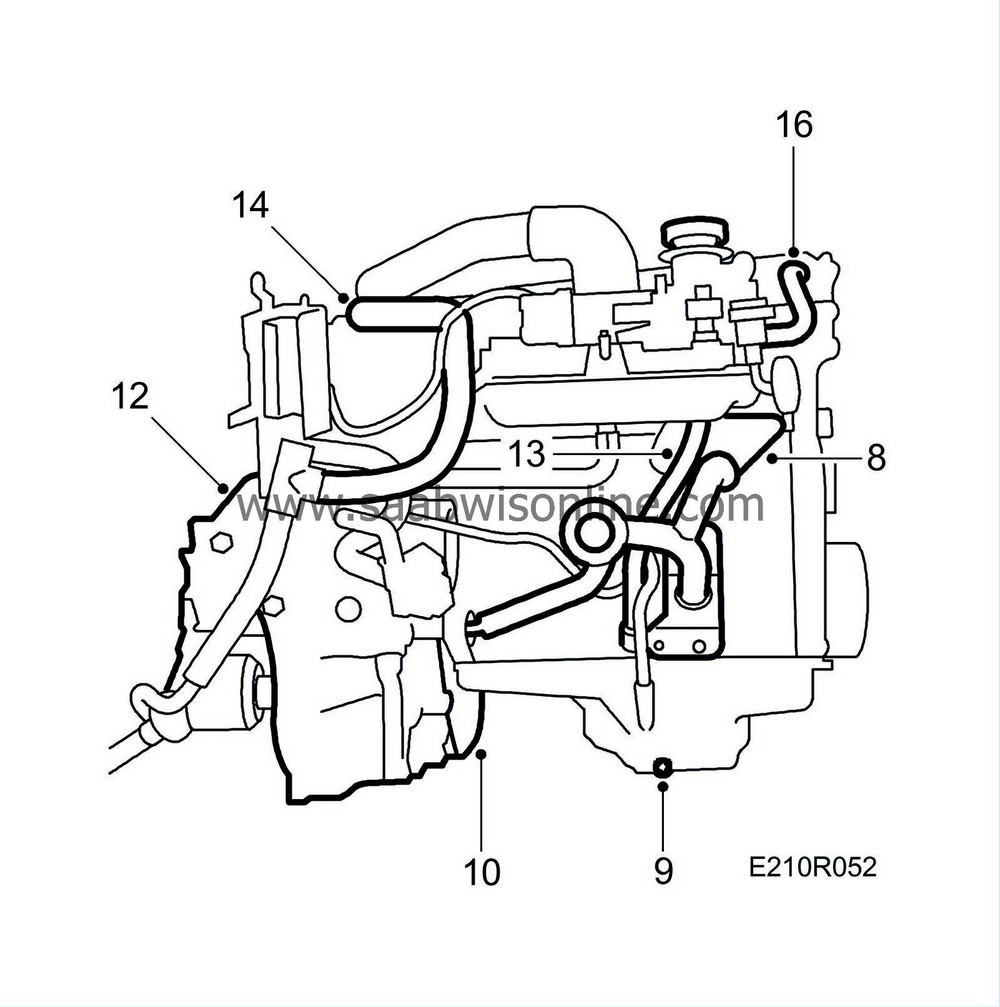
Fit
Engine holder
83 95 220 to the engine and lift over the power train to
78 74 878 Floor stand.
|
|
| 9. |
Drain off the oil.
|
|
| 10. |
Remove the protective plate and undo the torque converter retaining bolts (aut.). Gradually withdraw the torque converter while rotating the crankshaft pulley.
|
|
| 11. |
Prevent the torque converter from moving by means of
Converter holder
87 92 574.
|
|
| 12. |
Lift away the gearbox. Use
lifting cable
87 92 442.
|
|
| 13. |
Remove the oil filler pipe from its bracket and disconnect the preheating hoses from the throttle body.
|
|
| 14. |
Remove the bracket for the electric leads from the cylinder head.
|
|
| 15. |
Unplug all electric connectors between the intake manifold and engine.
|
|
| 16. |
Remove the crankcase breather nipple.
|
|
| 17. |
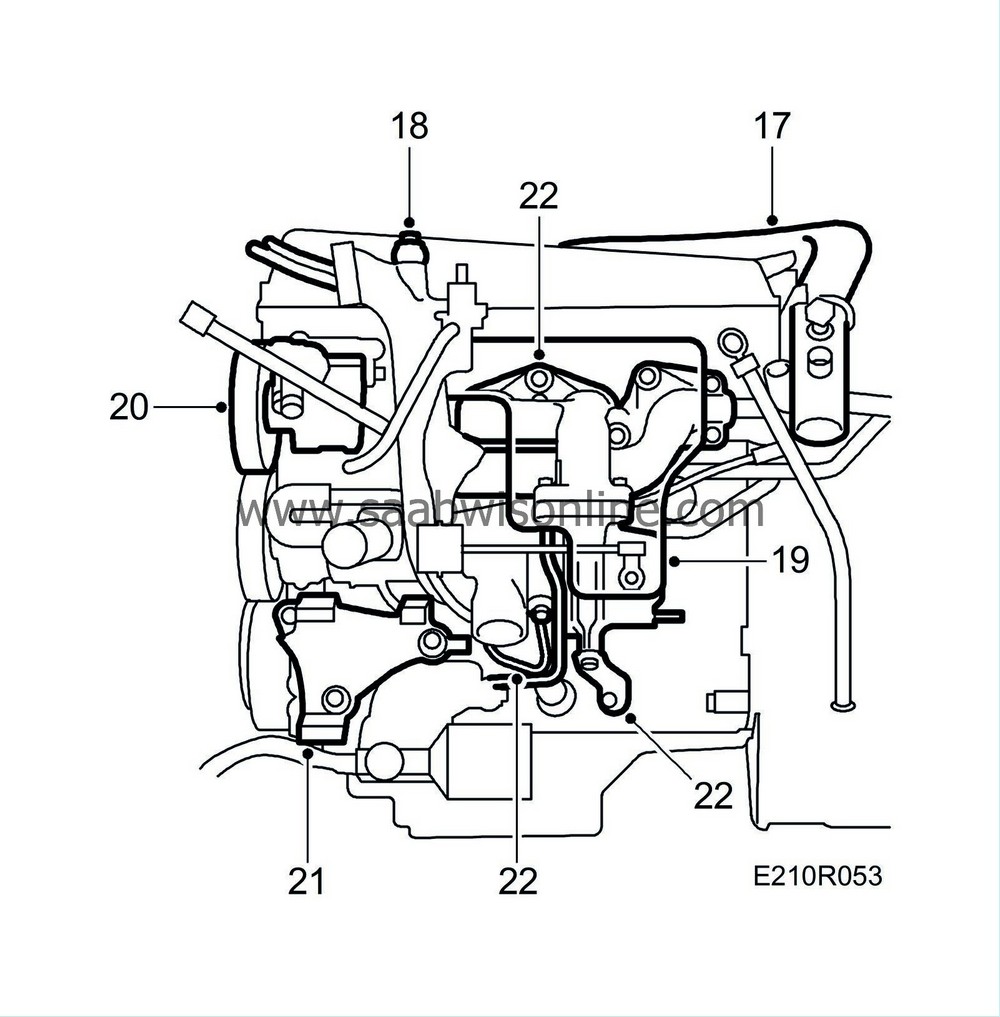
Remove the delivery pipe between the charge air cooler and throttle body.
|
|
| 18. |
Disconnect the crankcase breather pipe from the turbocharger's inlet pipe.
|
|
| 19. |
Remove the heat shield from above the turbocharger.
|
|
| 20. |
Remove the power steering pump and power steering bracket by means of the lifting eyebolt.
|
|
| 21. |
Remove the A/C compressor bracket.
|
|
| 22. |
Remove the turbocharger steady bar, disconnect the coolant and oil hoses, and remove the turbocharger complete with exhaust manifold. Heat it carefully if it sticks.
|
|
| 23. |
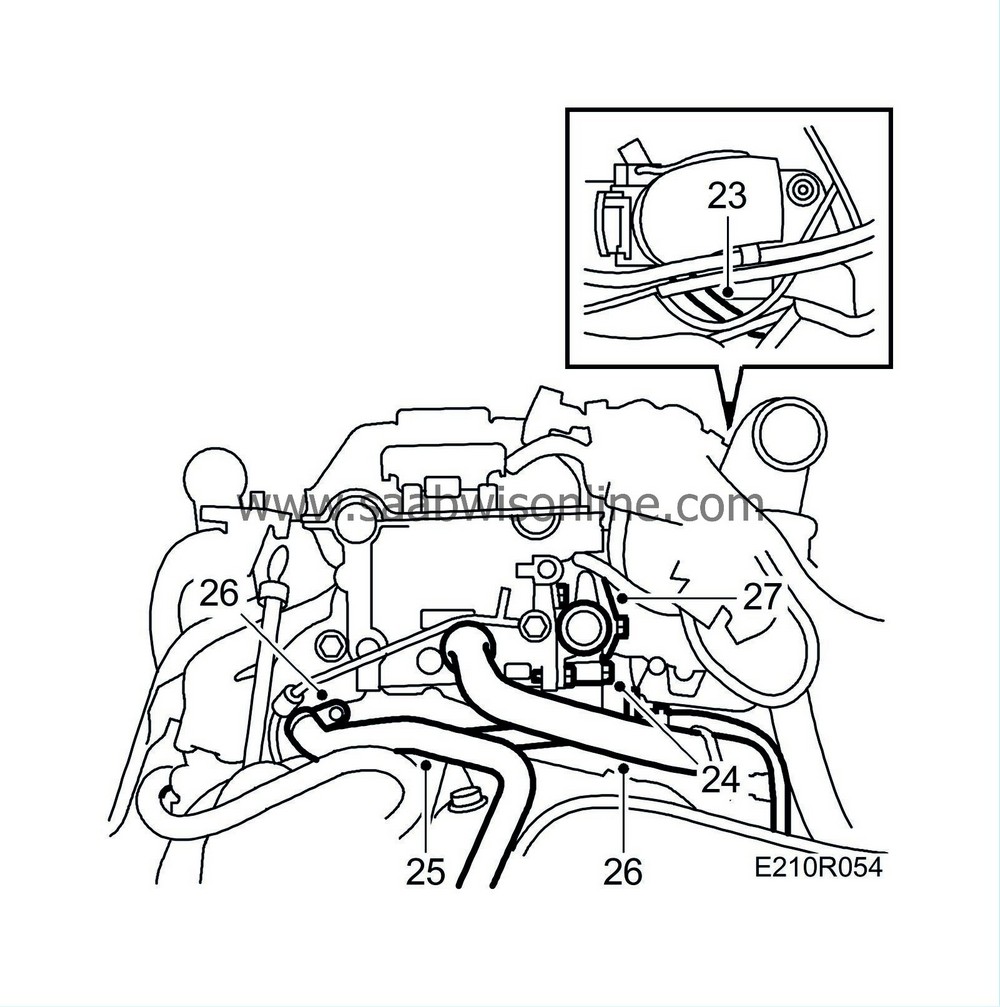
Remove the throttle body preheating hose.
|
|
| 24. |
Remove the bolts retaining the intake manifold.
Lift it away from the power train. |
|
| 25. |
Disconnect the filler hose from the expansion tank.
|
|
| 26. |
Remove the pipe from the heat exchanger and the hose from the cylinder head.
|
|
| 27. |
Remove the thermostat housing's cover complete with thermostat.
|
|
| 28. |
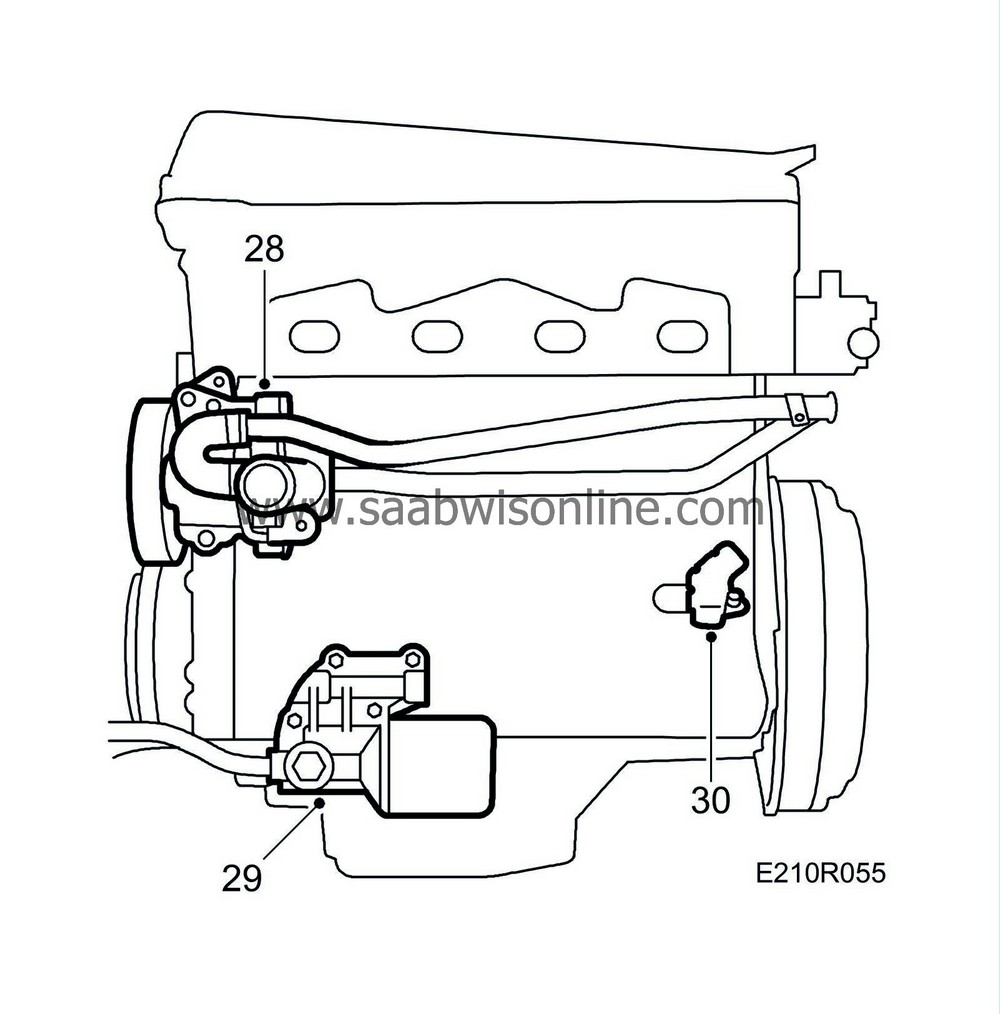
Remove the coolant pump with filler pipe, and the sleeve with the O-rings.
|
|
| 29. |
Remove the oil filter and the adapter housing.
|
|
| 30. |
Remove the crankshaft position sensor.
|
|
| 31. |
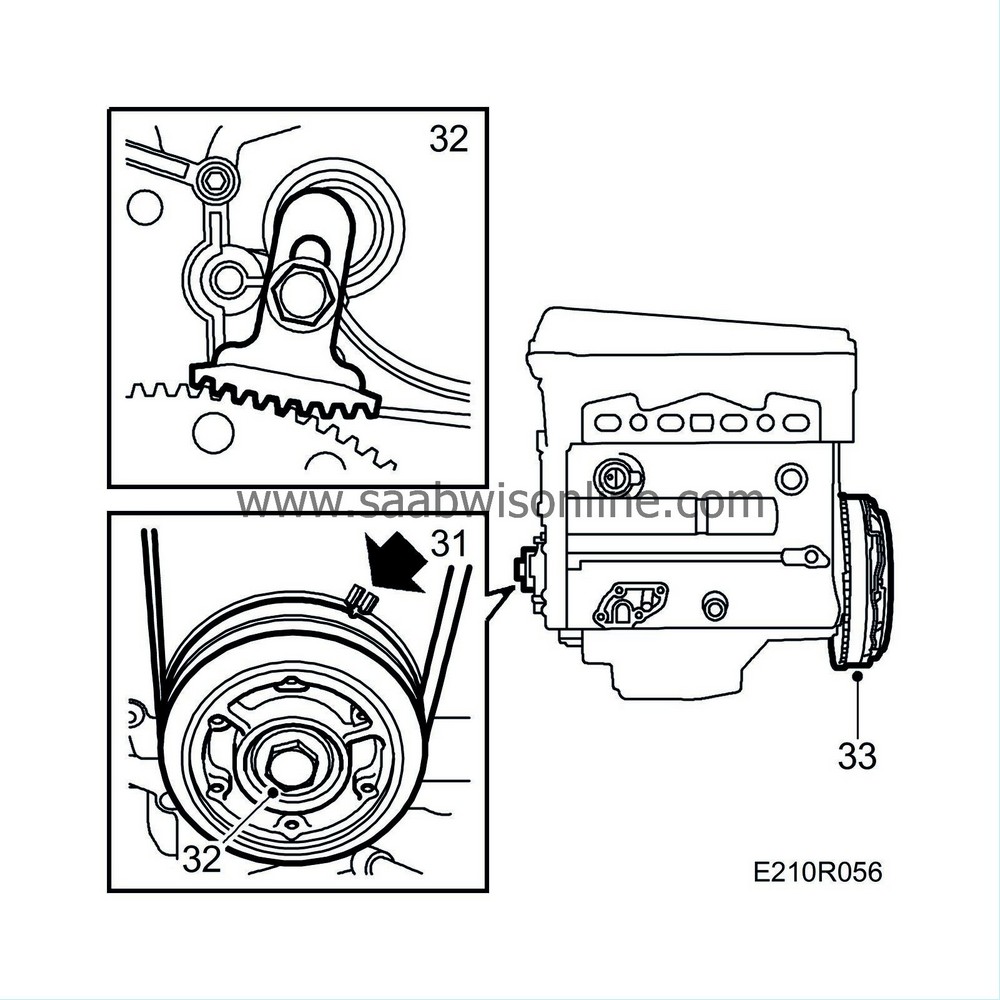
Align the 0 mark on the crankshaft pulley with the mark on the transmission casing.
|
|
| 32. |
Fit
flywheel locking attachment
83 94 868 and remove the crankshaft pulley.
|
|
| 33. |
Remove the flywheel, pressure plate and linings or driven plate and remove the flywheel locking segment.
|
|
| 34. |
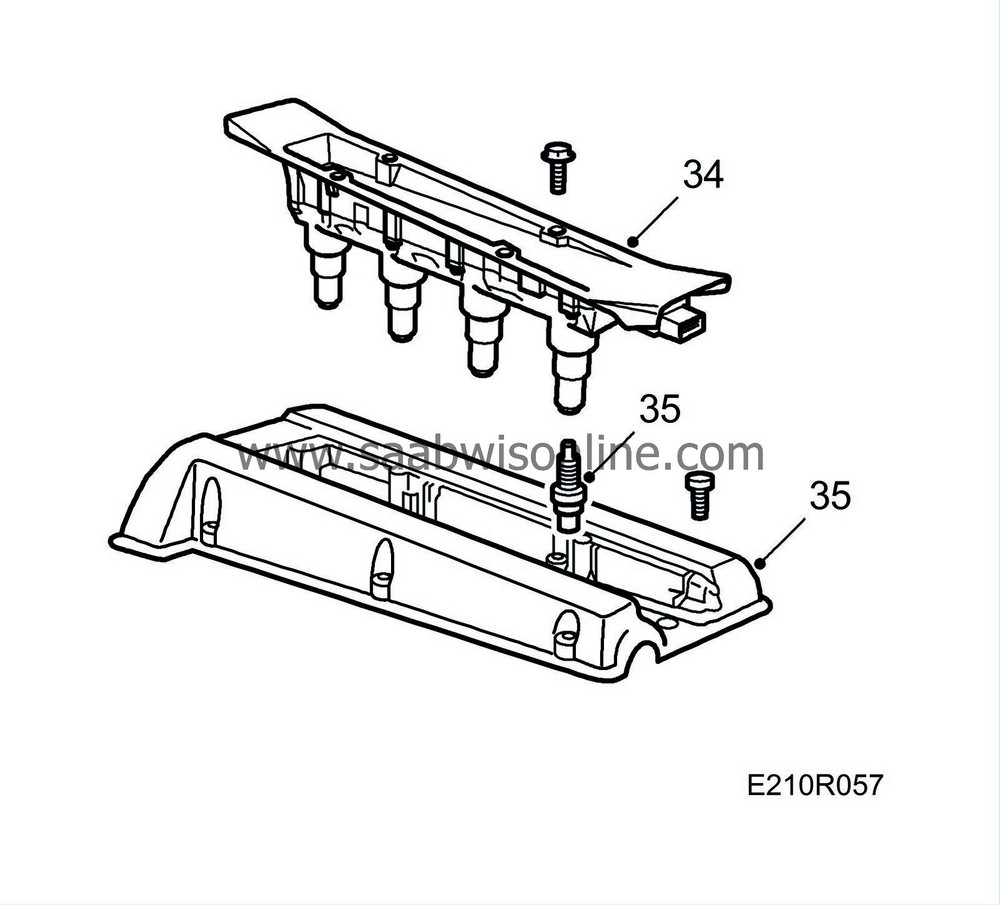
Remove the ignition discharge module.
|
|
| 35. |
Remove the spark plugs and remove the camshaft cover.
|
|
| 36. |
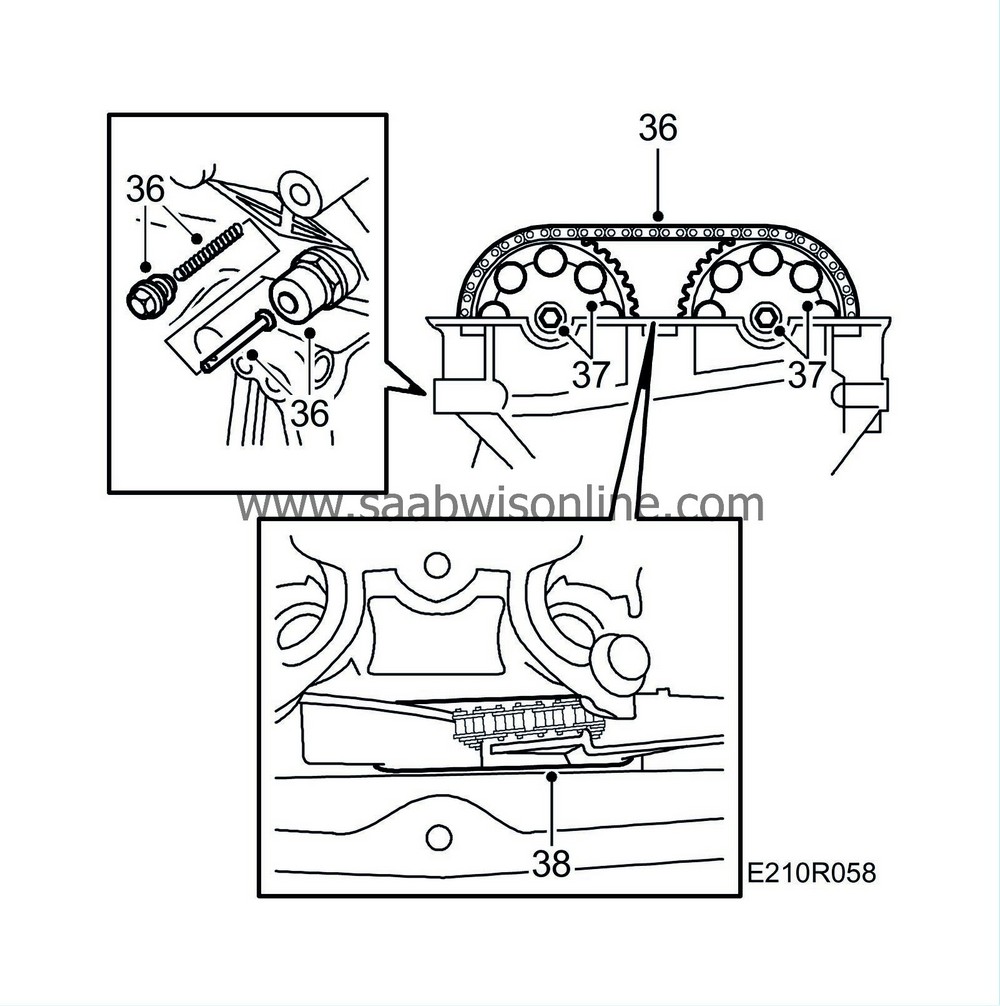
Remove the chain tensioner. First remove the plug, then use a 27 mm socket.
|
|
| 37. |
Remove the camshaft sprockets, holding each camshaft steady with a spanner applied to the end of it.
|
|
| 38. |
Fit a rubber band round the chain guides and remove the cylinder head. Start with the bolts in the timing cover and then continue in reverse order to assembly. Collect the bolts with a magnet.
|
|
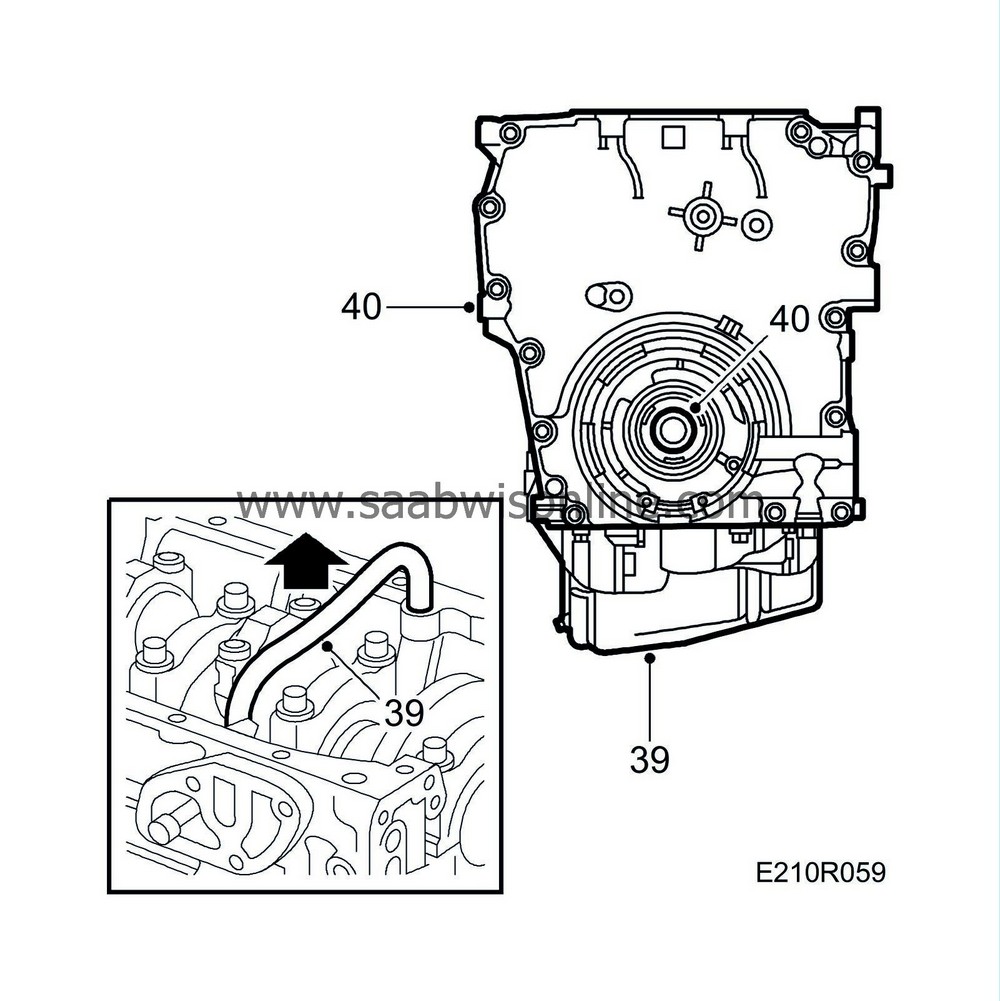
| 39. |
Turn the engine into a suitable working position and remove the oil sump and the pipe running to the oil filter. Leave the guide sleeve in the cylinder block.
|
|
| 40. |
Remove the oil pump and timing cover.
|
|
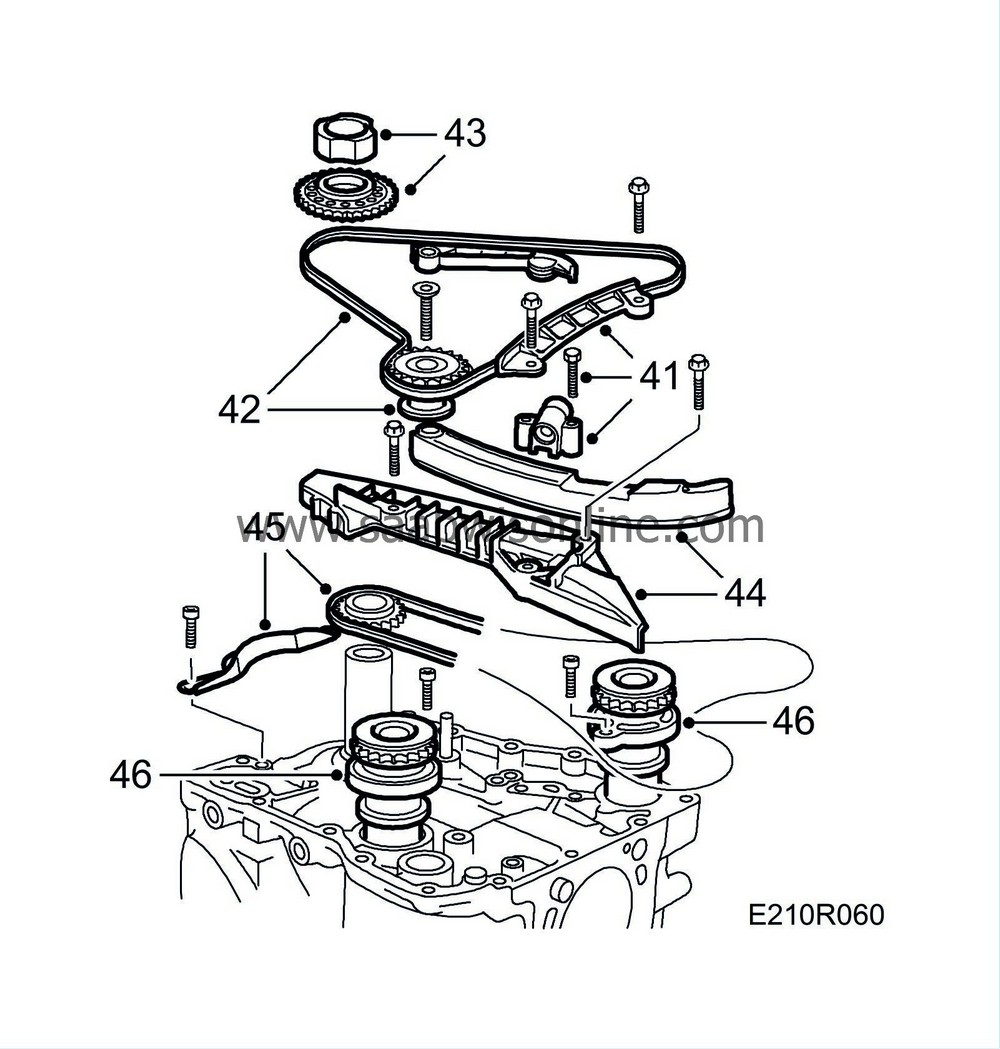
| 41. |
Remove the top chain guide and chain tensioner for the balancer-shaft chain.
|
|
| 42. |
Remove the idler sprocket and balancer-shaft chain.
|
|
| 43. |
Remove the oil pump driver and sprocket from the crankshaft.
|
|
| 44. |
Remove the balancer-shaft and camshaft chain guides.
|
|
| 45. |
Remove the timing chain guard and remove the chain complete with sprocket.
|
||||||||||
| 46. |
Remove the balancer shafts complete with sprockets and bearing housings.
|
|
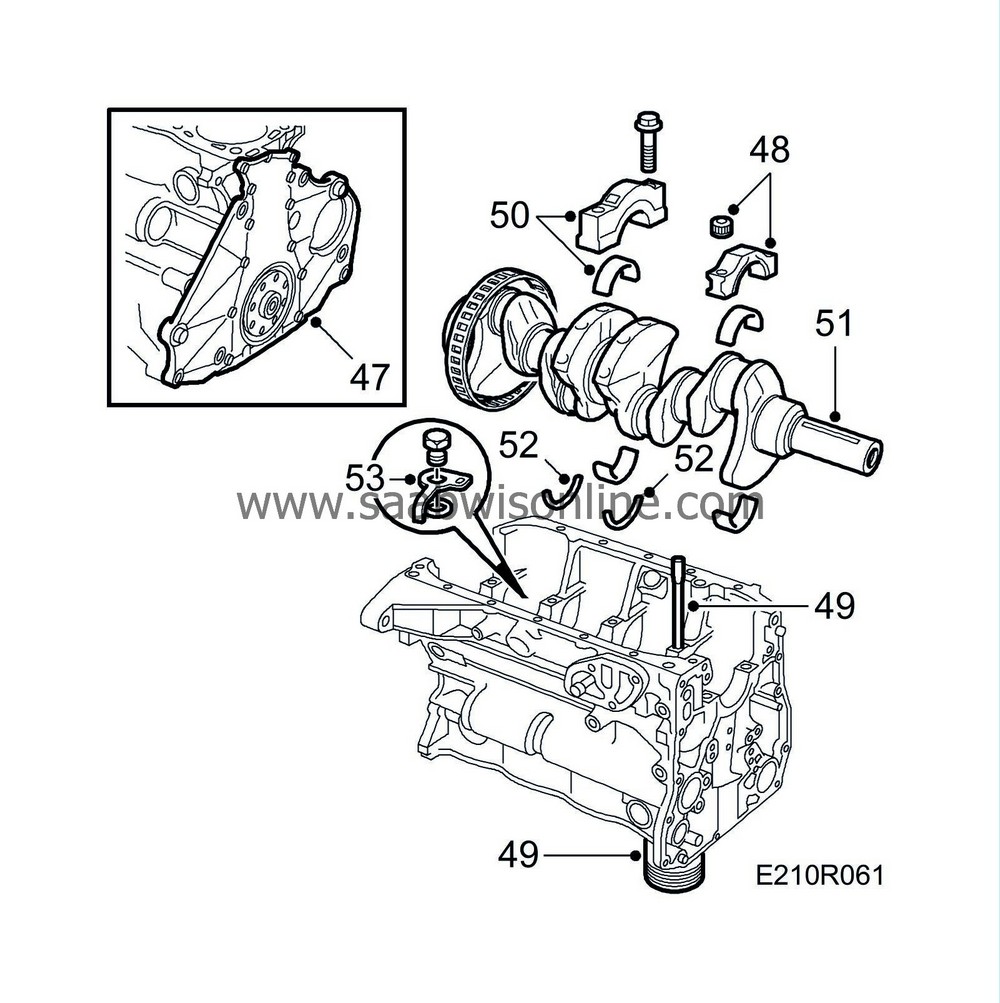
| 47. |
Remove the end plate.
|
||||||||||
| 48. |
Remove any carbon deposits from the edges, turn the engine into a convenient position and remove all big-end bearing caps.
|
|||||||
| 49. |
Fit
protective sleeve
75 19 531 on the studs and press or carefully tap the pistons out of the cylinders.
|
|
| 50. |
Remove all main bearing caps and lift out the crankshaft.
|
||||||||||
| 51. |
Remove the slotted ring.
|
|
| 52. |
Remove all the bearing shells for both the main bearings and big-end bearings. Also remove the two thrust washers from main bearing no. 3.
|
|
| 53. |
Remove the piston cooling nozzles.
|
|
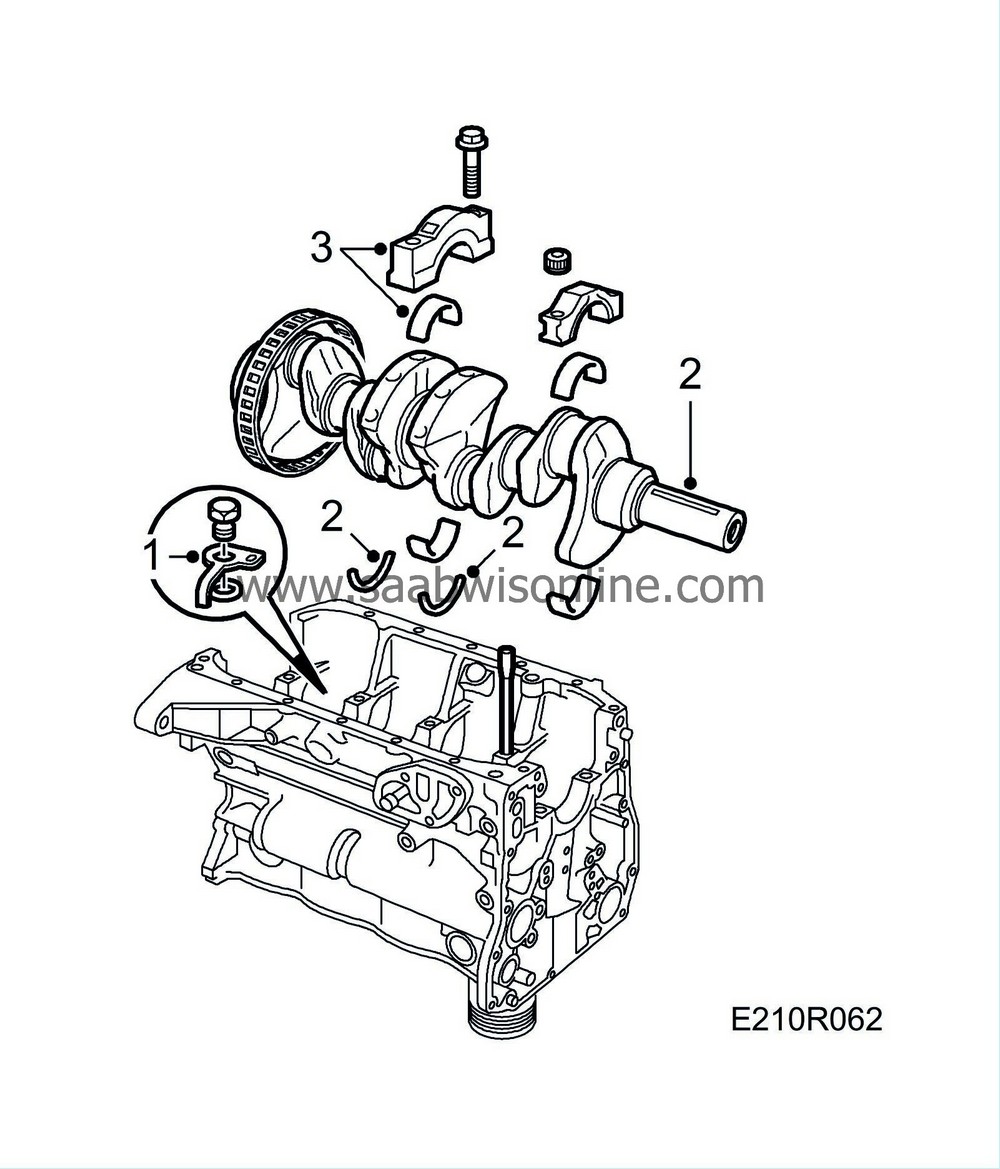
| To assemble the engine |
Wash all sealing surfaces with benzine, making sure that they are perfectly clean.
| 1. |
Fit the piston cooling nozzles. Place all main bearings in their correct positions and coat them with oil.
Tightening torque: 18 Nm (13 lbf ft).
|
||||||||||
| 2. |
Fit the slotted ring, place the crankshaft in position and fit the two thrust washers at the main bearing between the No. 2 and No. 3 cylinders. Fit the washers with the embossed side facing towards the main bearing so that the bearing surface is the right way round.
|
|
| 3. |
Lubricate and fit all main bearing caps in their correct places, making sure that they are the right way round.
Tightening torque 20 Nm + 70 (15 lbf ft + 70). |
|
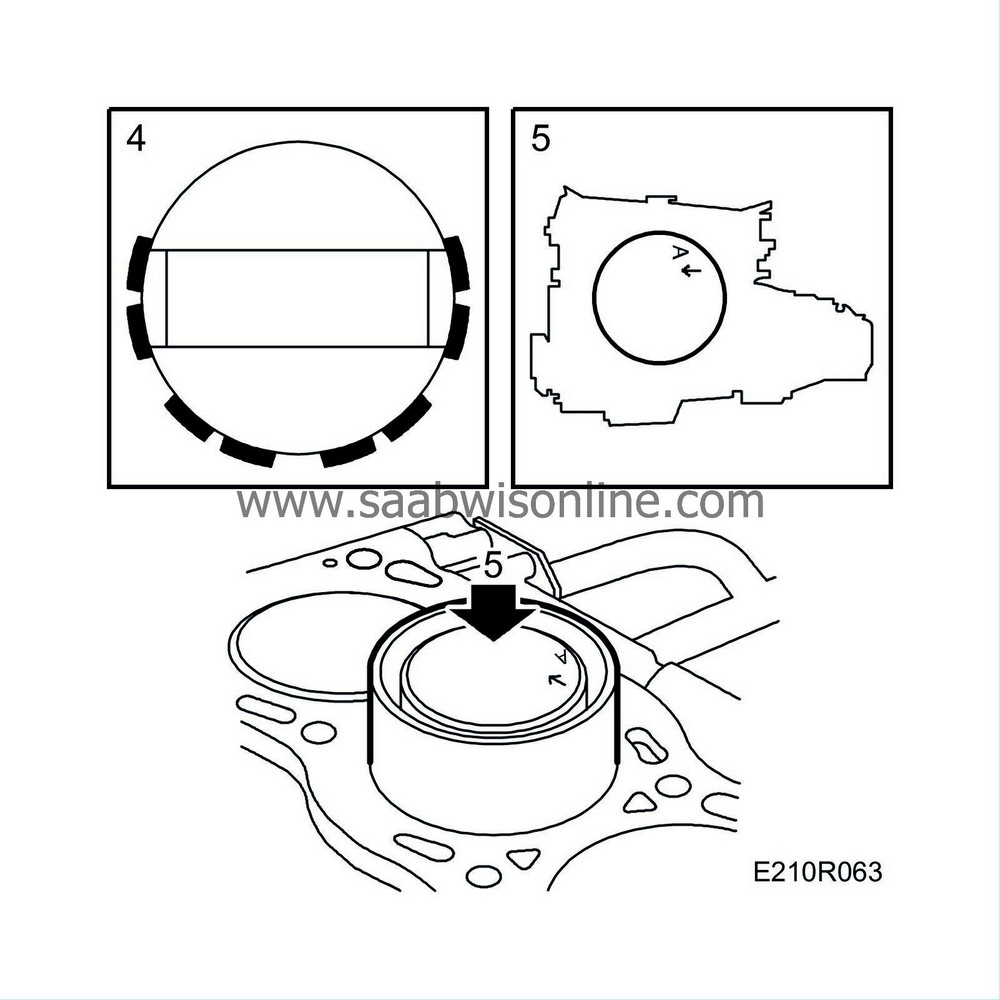
| 5. |
Fit
Protective collars
75 19 531 to the crankshaft studs, oil the pistons and rings, then fit the pistons in their respective cylinders. The arrow markings on the piston crowns should be turned towards the engine's timing chain end. Use
Piston fitting tool
78 62 287 and carefully tap down the pistons in the bores.
|
|
| 6. |
Lubricate and fit all big-end bearing caps in their original positions, making sure that they are the right way round (number to number, groove in shell to groove in shell).
Tightening torque with nut 20 Nm + 70 (15 lbf ft + 70) Tightening torque with bolt 25 Nm + 100 (18 lbf ft + 100) |
|
| 7. |
Apply a bead of Loctite 518 about 1 mm thick on the end plate's mating surface and fit the plate in place. Mind the seal.
Tightening torque 10 Nm (7 lbf ft) 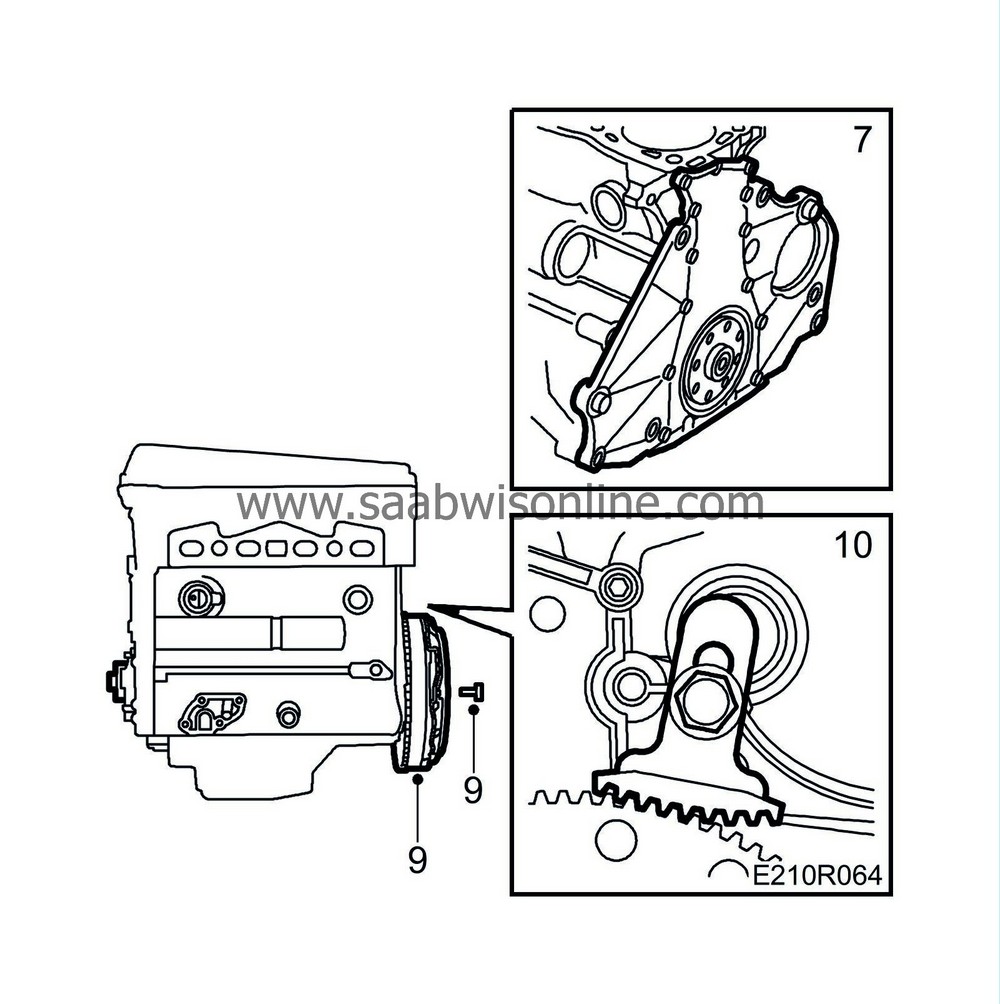
|
|
| 8. |
Align the crankshaft with the wedge straight up (corresponding to the 0 mark on the crankshaft pulley).
|
|
| 9. |
Fit the flywheel or the driven plate, using Loctite 270D on the bolts.
|
|
| 10. |
Fit
flywheel locking attachment
83 94 868 and tighten the bolts.
Tightening torque, flywheel and drive plate 20 Nm +50° (15 lbf ft +50°) |
|
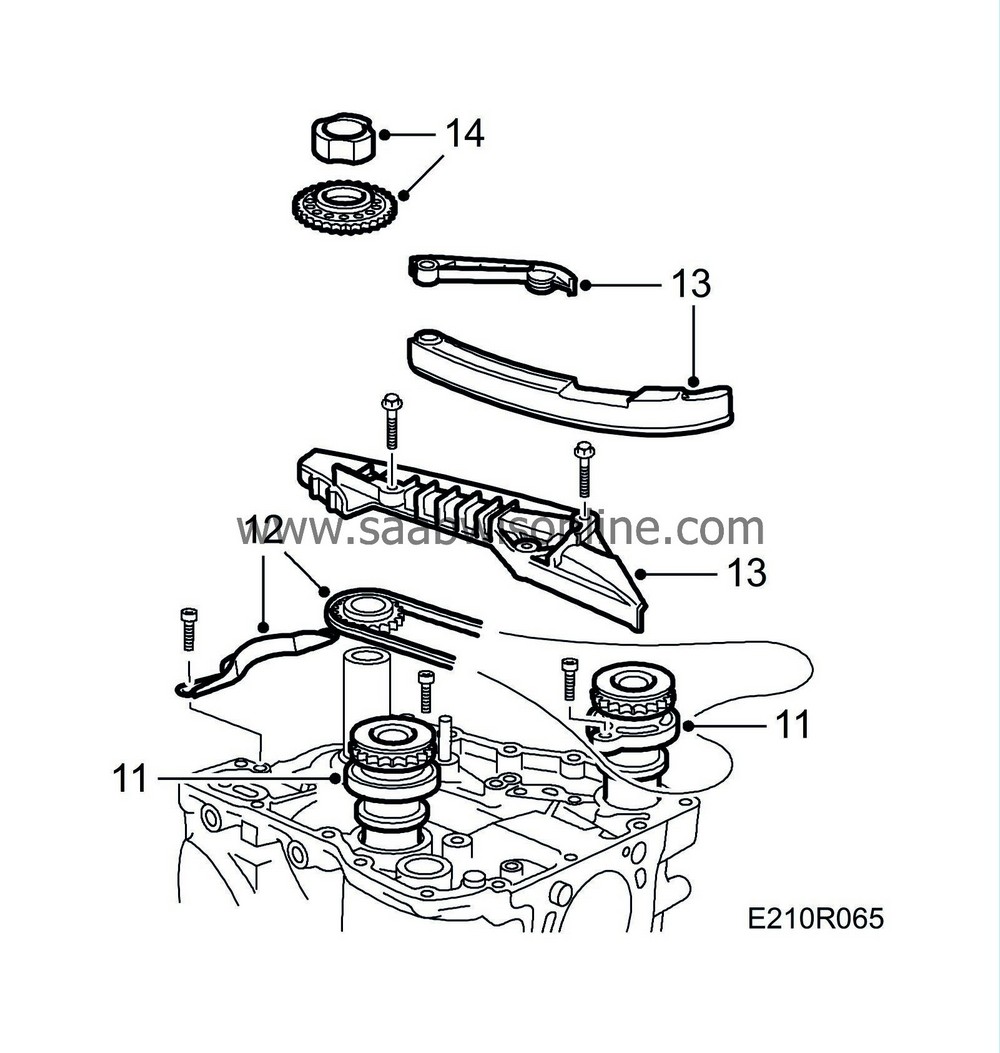
| 12. |
Check the timing chain and fit the sprocket and chain onto the crankshaft end, marking to marking, and bolt the safety plate in place.
|
|
| 13. |
First fit the fixed chain guide, which is common to the timing chain and balancer-shaft chain, and then the pivoted chain guides for the timing and balancer-shaft chains.
|
|
| 14. |
Fit the balancer-shaft sprocket and the oil-pump driver onto the crankshaft end.
|
|
| 15. |
Cock the chain tensioner and insert a paper clip or similar object through the hole in the cylinder to prevent triggering of the tensioner. Before this, check that the plunger is turned to the position where it really is pressed out by the spring.
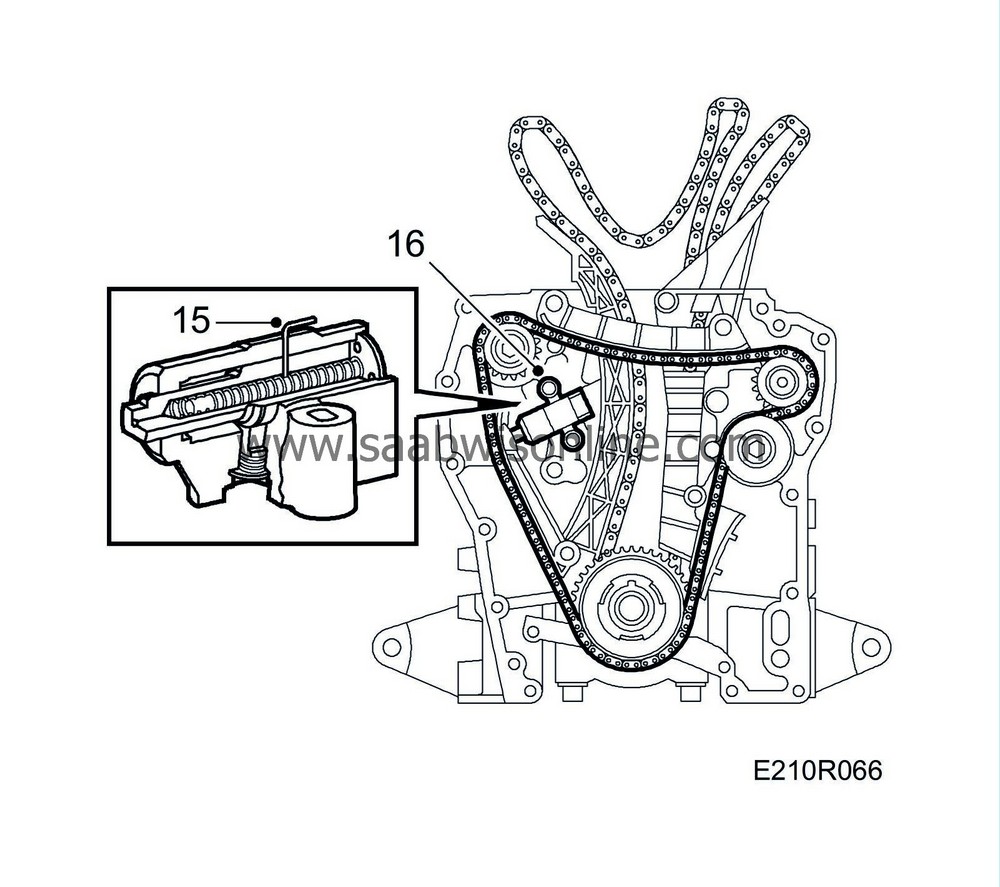
|
|
| 16. |
Fit the chain tensioner.
Tightening torque: 10 Nm (7 lbf ft).
|
|||||||||
| 17. |
Inspect the balancer-shaft chain and fit it and the idler sprocket so that the upper setting marks behind the balancer-shaft sprocket and bearing housing are in line with each other. Tauten the chain between the crankshaft and balancer shafts. Fit the idler sprocket last. Hold the bolt in place with your thumb, mesh the teeth of the sprocket with the chain and roll it along the chain into position.
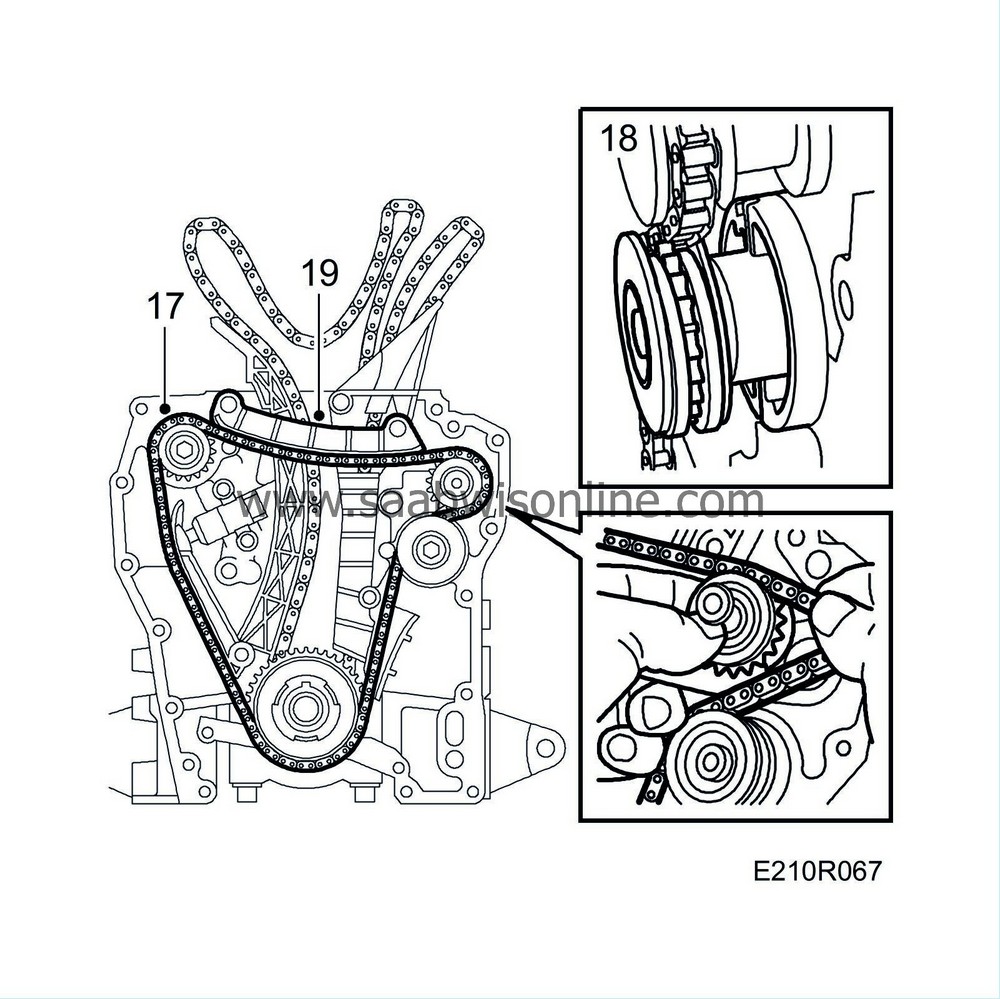
|
|
| 18. |
Check the marking on the balancer-shaft sprocket and remove the flywheel locking segment.
|
|
| 19. |
Setting: Fit the timing cover using two bolts only and do not tighten them. Mount the crankshaft pulley. Rotate the pulley one revolution. Reset the crankshaft relative to the timing cover. Remove the timing cover and crankshaft pulley carefully, making sure that the crankshaft does not move, and check the settings of the balancer shafts.
|
|
| 20. |
Check that the timing cover joint face is perfectly clean. Apply Loctite 518 in an approx. 1 mm bead on the timing cover. Apply the bead in the middle of the mating faces.
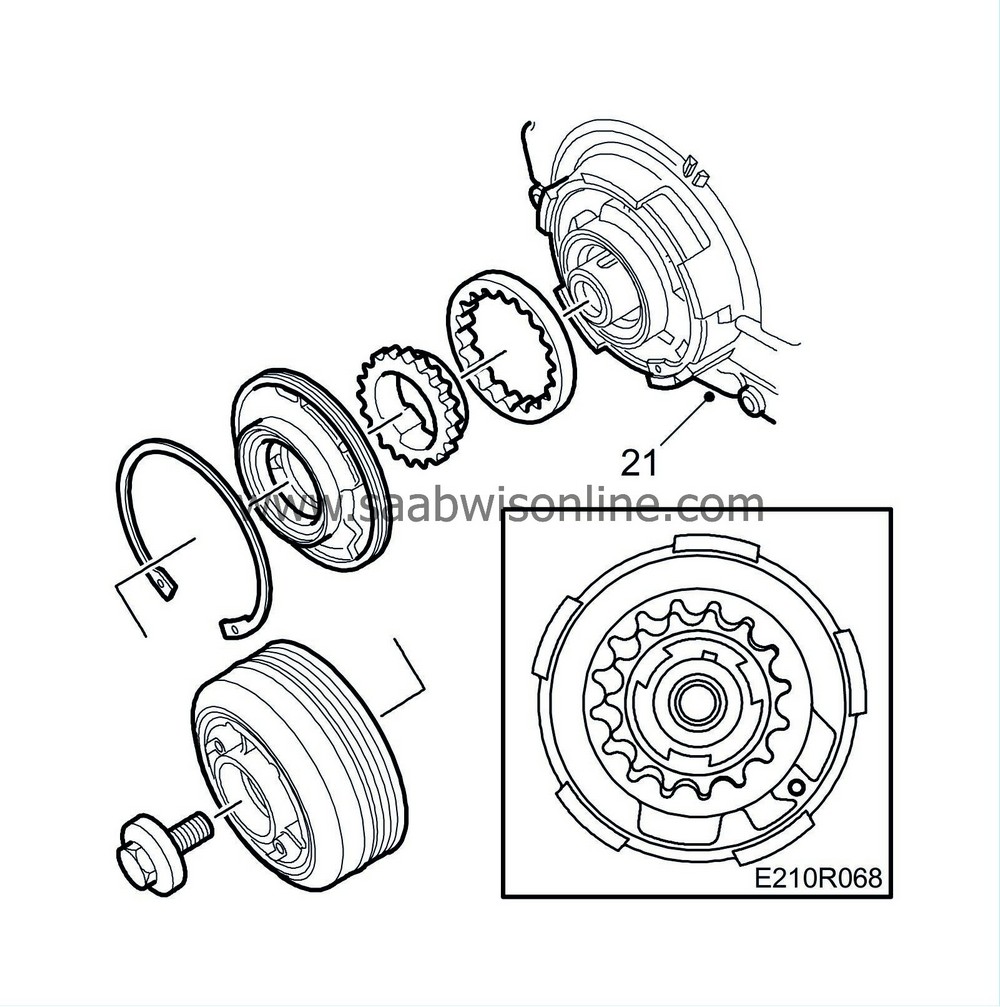
|
|
| 21. |
Fit the timing cover.
Tightening torque 22 Nm (16 lbf ft). |
|
| 22. |
Fit the oil pump, flywheel locking segment and crankshaft pulley. Remove the flywheel locking segment.
Tightening torque 175 Nm (130 lbf ft). |
|
| 23. |
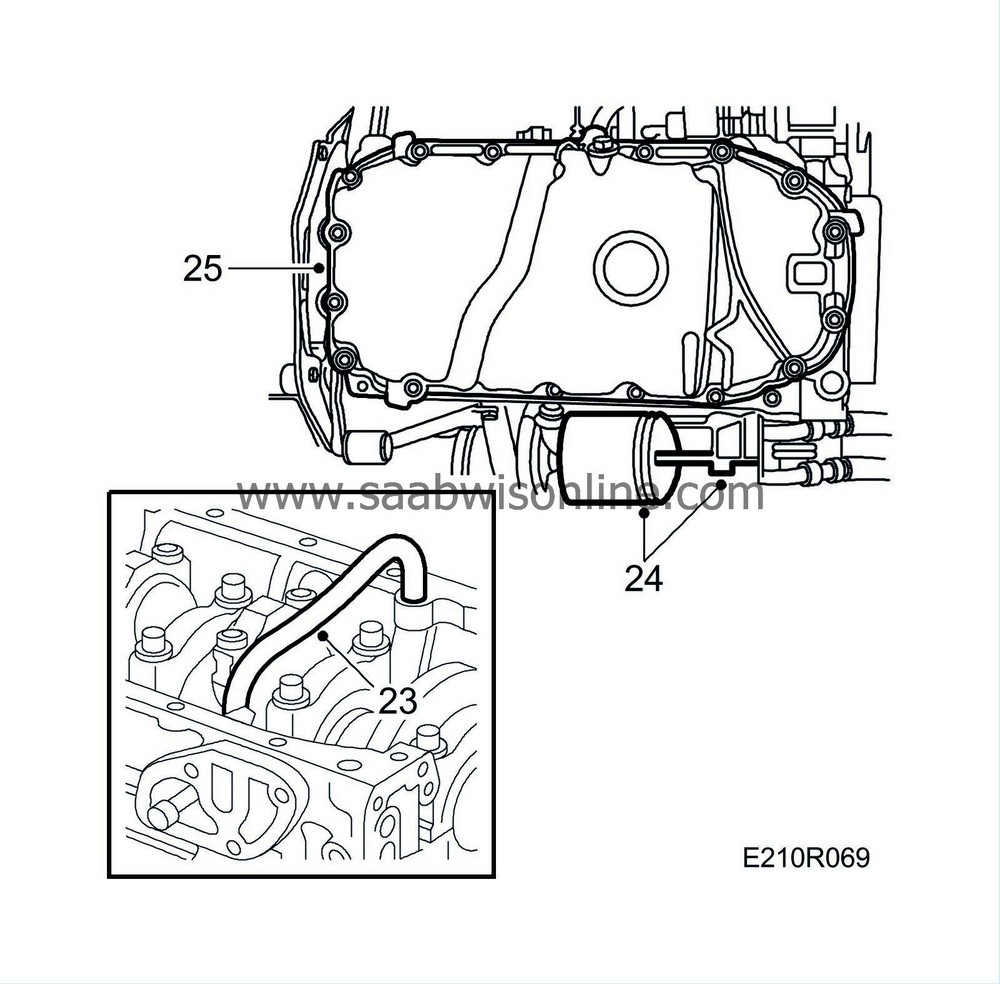
Fit the oil pump pressure pipe and check that there are no impurities or other foreign matter in the oil sump.
|
|
| 24. |
Fit the adapter housing and oil filter.
|
|
| 25. |
Check that the mating surface of the oil sump is perfectly clean and apply an even coating of Loctite 518 along it. Turn the engine to a suitable position and fit the oil sump.
Tightening torque 22 Nm (16 lbf ft). |
|
| 26. |
Carefully clean all sealing surfaces. Apply a 2 mm thick and 10-20 mm long bead of Loctite 518, part No. 93 21 795, to the inner part of the upper contact surface of the timing cover (against the cylinder head). Turn the engine in the stand, turning the crankshaft 45° to lower the pistons.
Fit a rubber band round the chain guides and fit the cylinder head using a new gasket. Check that it is correctly seated on the locating sleeves and that the chain runs freely. 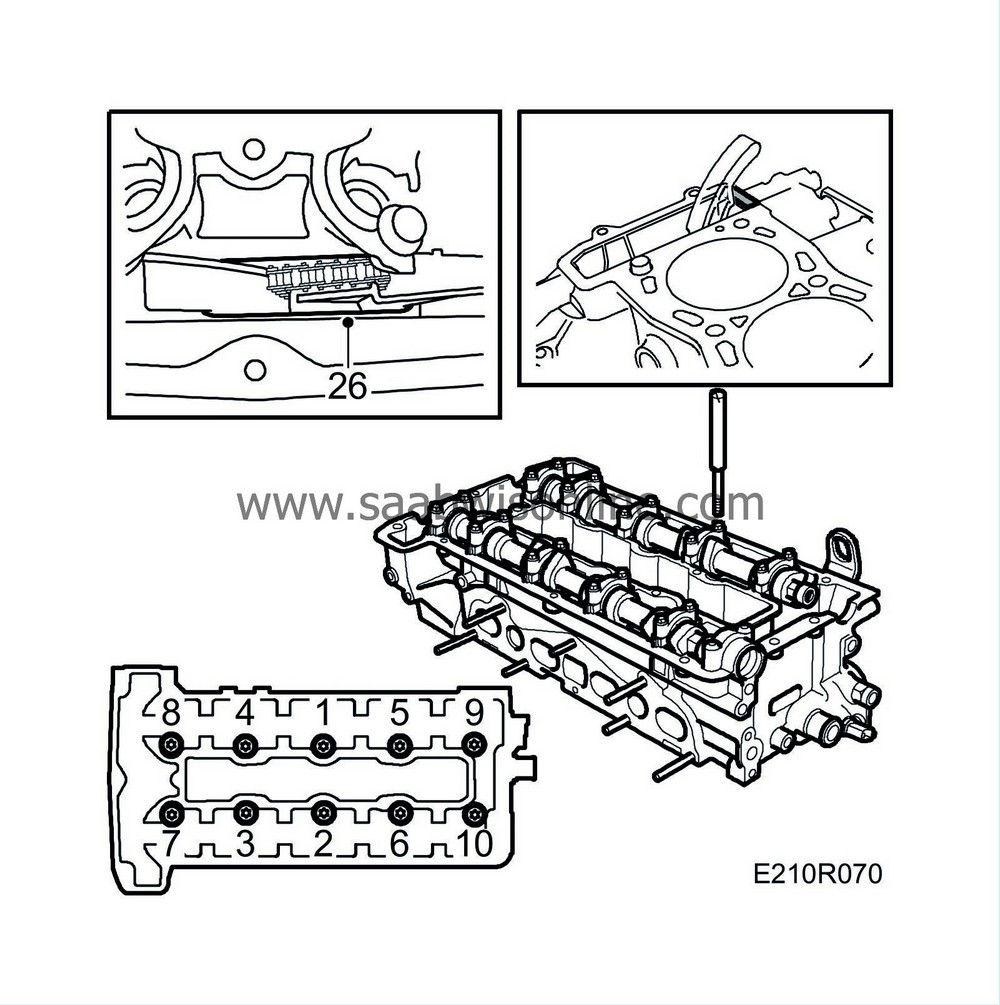
Tighten the cylinder head bolts in three stages: Step I: 40 Nm (30 lbf ft) Step II: 60 Nm (44 lbf ft) Step III: Tighten a further 90 Tighten the bolts in the order shown in the illustration. |
|
| 27. |
Fit the two screws between the timing cover and the cylinder head.
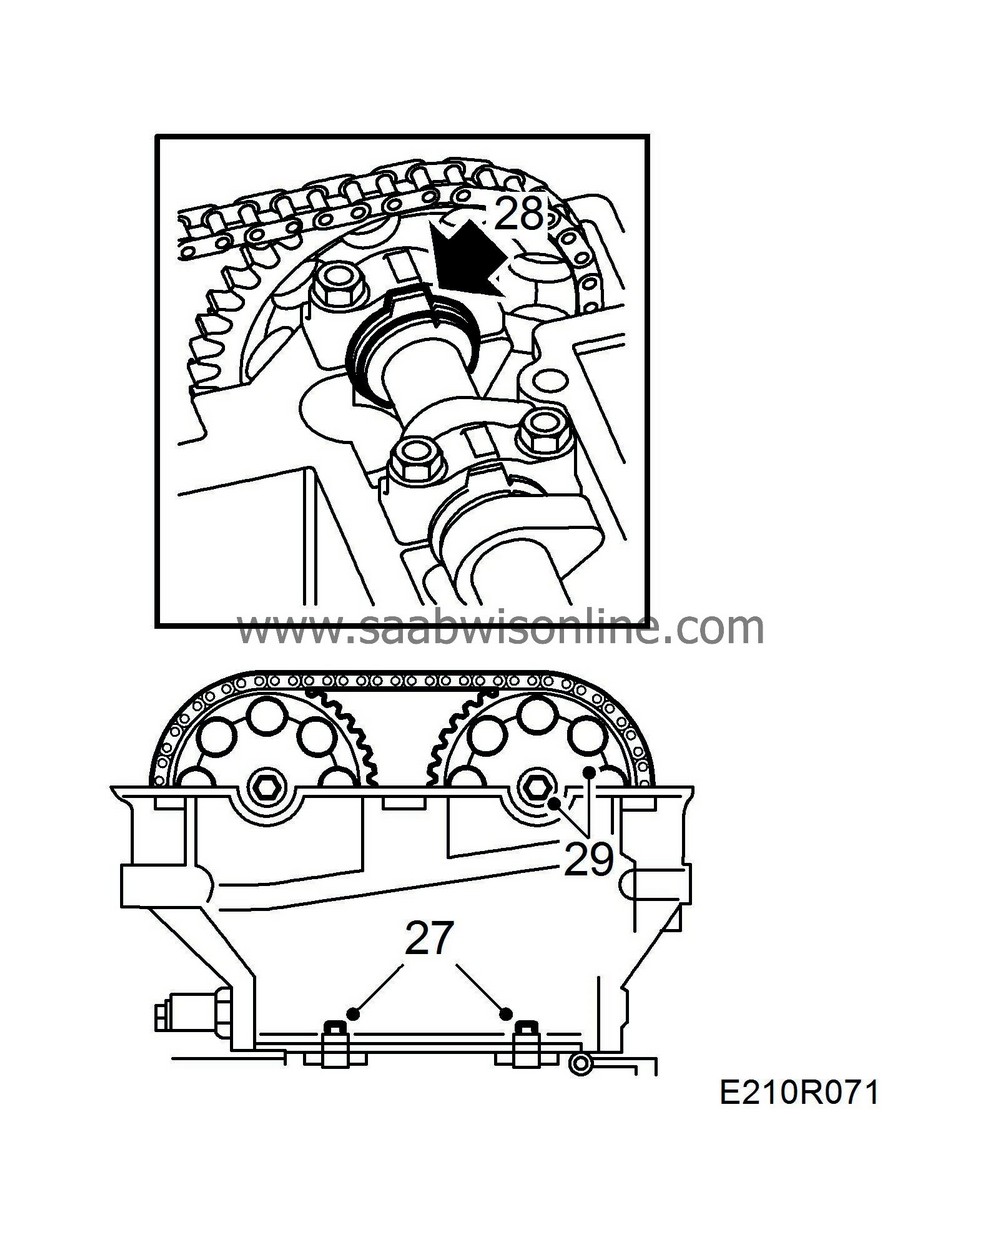
Tightening torque 22 Nm (16 lbf ft). |
|
| 28. |
Remove the rubber band and check that the camshafts are in alignment with their setting marks and turn the crankshaft back to the 0 mark.
|
|
| 29. |
Fit the camshaft sprockets and chain. Start with the camshaft on the exhaust side.
The marking on the sprockets should be in the centre of the chain markings (only when the engine is fully zeroed, i.e. crankshaft aligned with the 0 mark). Do not tighten the bolts yet. |
|
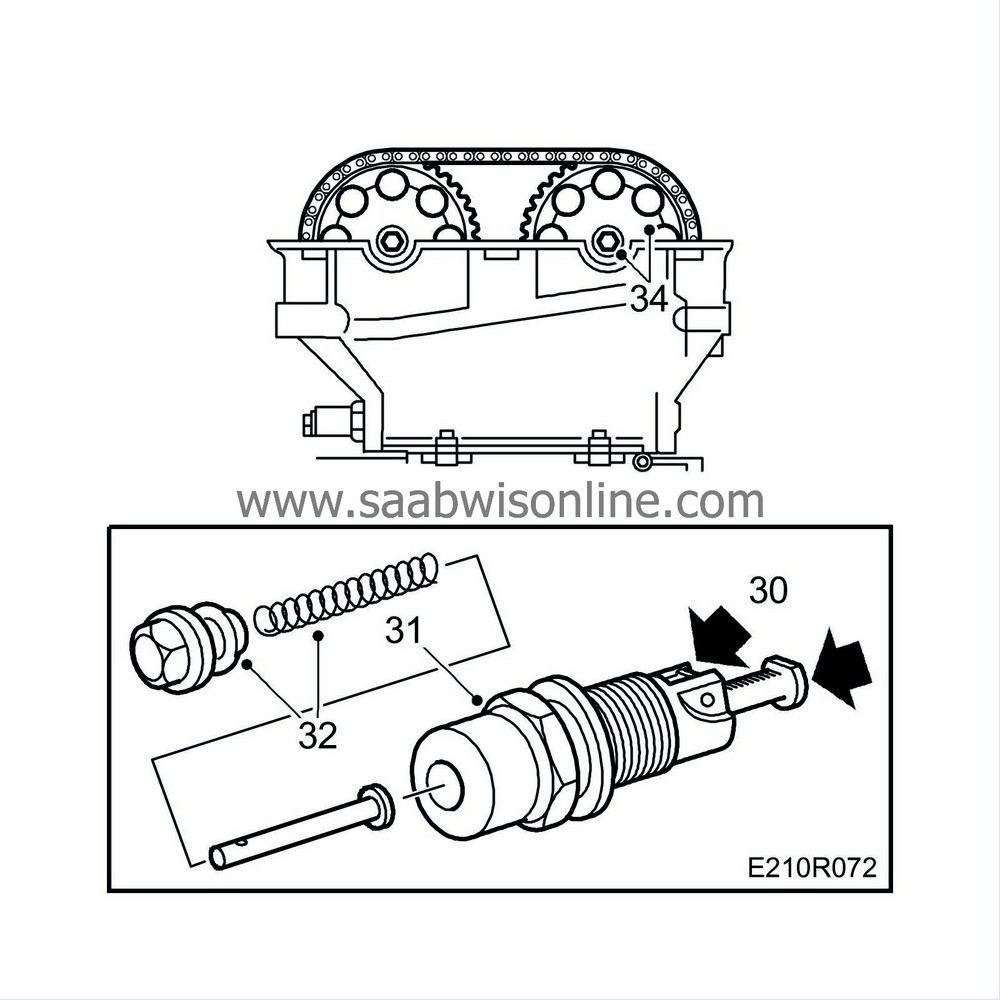
| 30. |
Prepare the chain tensioner for mounting by pressing down the catch and pressing in the chain tensioner.
|
|
| 31. |
Fit the chain tensioner, using a 27 mm socket.
Tightening torque 63 Nm (47 lbf ft). |
|
| 32. |
Fit the chain tensioner plug with push rod and spring.
Tightening torque 22 Nm (16 lbf ft). |
|
| 33. |
Check that the chain is correctly seated in the guides. Rotate the crankshaft two complete turns and check the settings of the crankshaft pulley and camshafts.
|
|
| 34. |
Tighten the camshaft sprocket bolts.
Tightening torque 63 Nm (47 lbf ft). |
|
| 35. |
Fit the spark plugs.
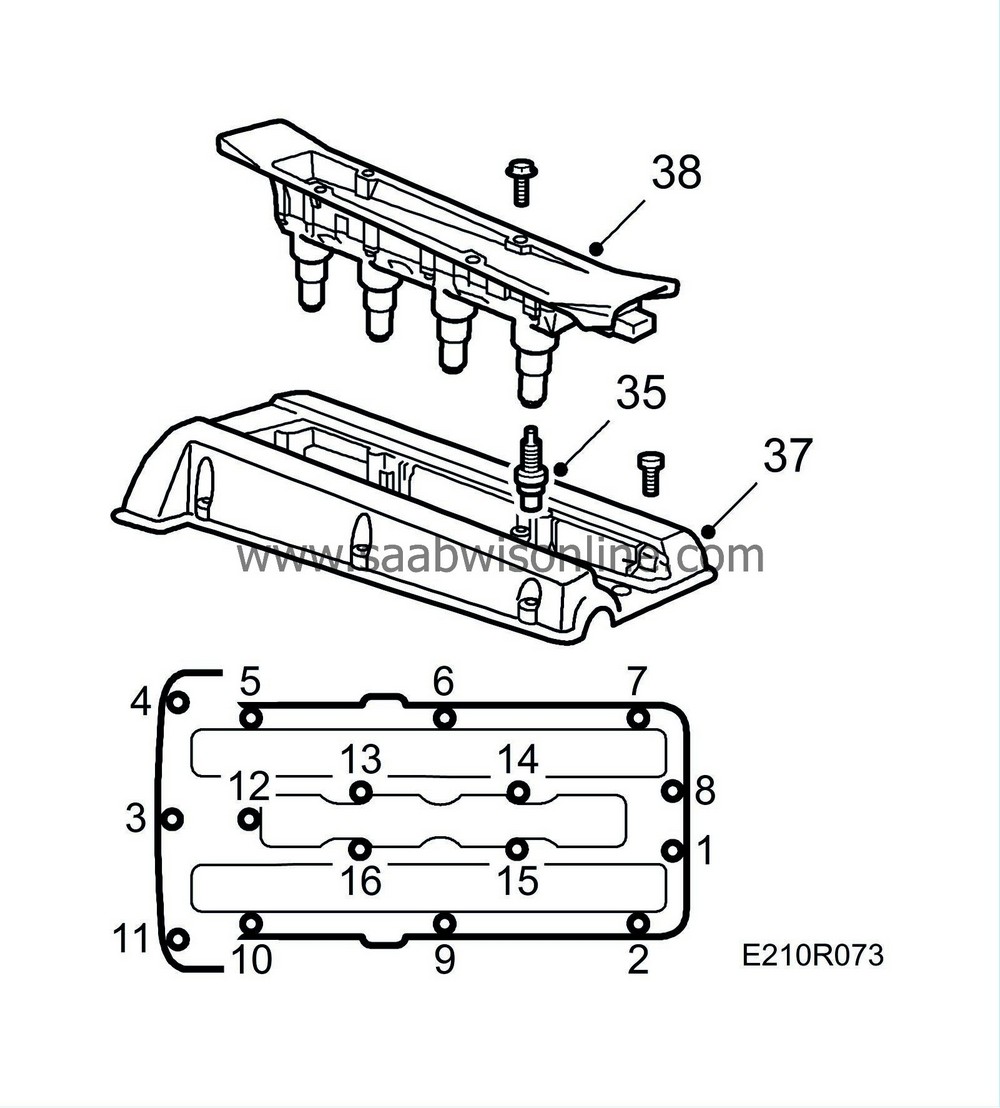
Tightening torque 28 Nm (21 lbf ft). |
|
| 36. |
Clean the sealing surface of the camshaft cover with benzine.
|
|
| 37. |
Apply oil to the camshaft cover's opening and fit the cover, starting at the opening. Then tighten the bolt located furthest to the front at the timing chain end. After that, continue all the way round on both the inside and outside.
Tightening torque 15 Nm (11 lbf ft). |
|
| 38. |
Fit the ignition discharge module.
Tightening torque 11 Nm (8 lbf ft). |
|
| 39. |
Fit the crankshaft position sensor.
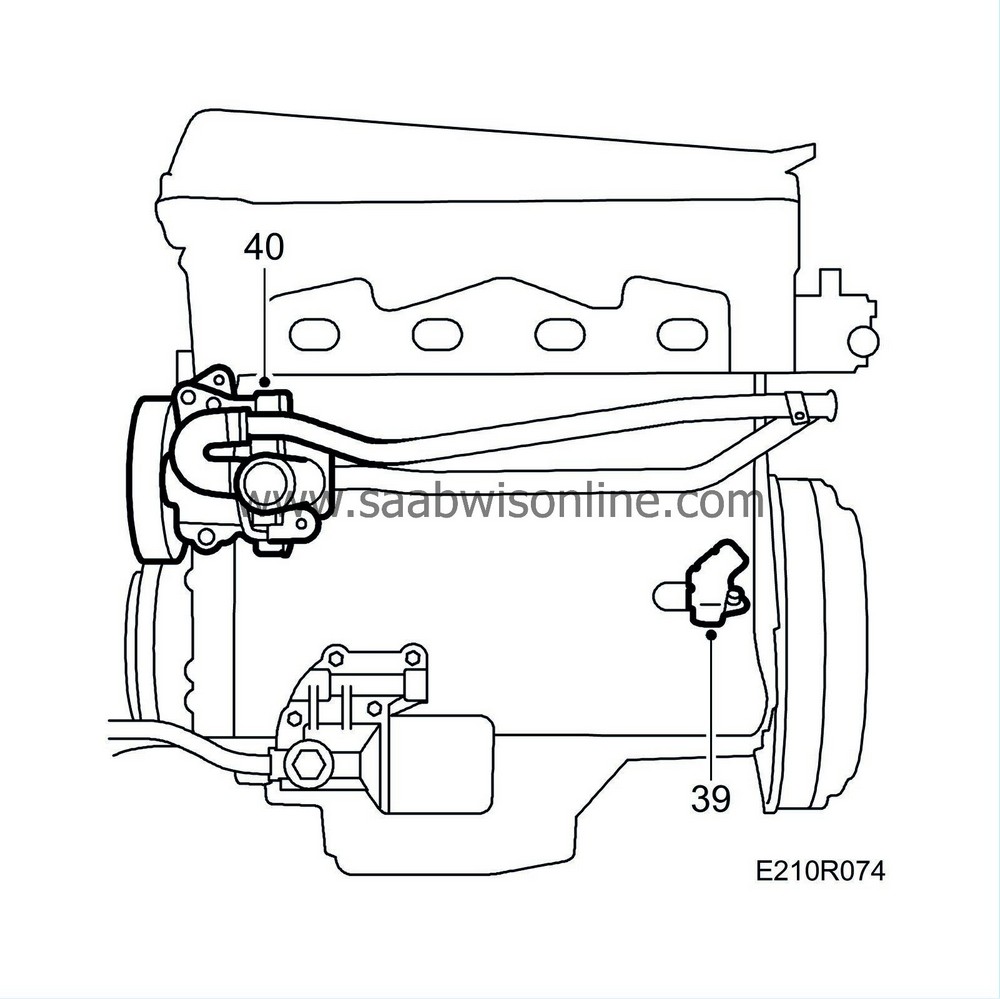
|
|
| 40. |
Check the coolant pump O-rings, and replace them if necessary.
Clean the hole in the block and tighten the sleeve, using a torque wrench, with its large wing pointing horizontally towards the flywheel end. Grease the O-rings with acid-free petroleum jelly and fit the coolant pump and coolant pipes from the expansion tank and heat exchanger. Fit the clips for the crankshaft position sensor cable at the same time. |
|
| 41. |
Fit a new gasket for the exhaust manifold.
|
|
| 42. |
Fit the turbocharger with exhaust manifold and steady bar.
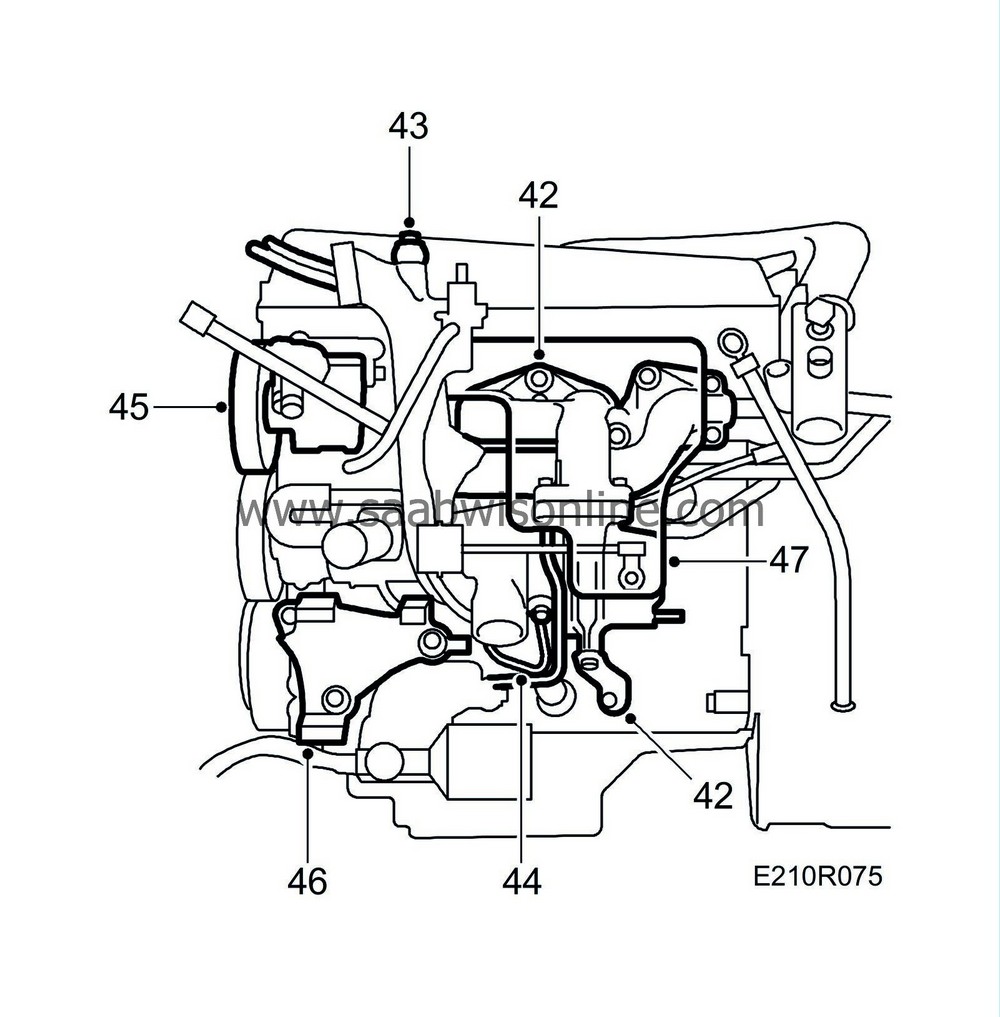
Tightening torque 25 Nm (19 lbf ft). |
|
| 43. |
Fit the crankcase breather pipe together with the intake manifold. Mind the O-ring.
|
|
| 44. |
Connect the coolant and oil pipes.
|
||||||||||
| 45. |
Fit the power steering pump with bracket and fit the turbo wastegate.
|
|
| 46. |
Fit the A/C compressor bracket.
|
|
| 47. |
Fit the heat shield over the turbocharger.
|
|
| 48. |
Clean all gasket surfaces between the intake manifold and cylinder head.
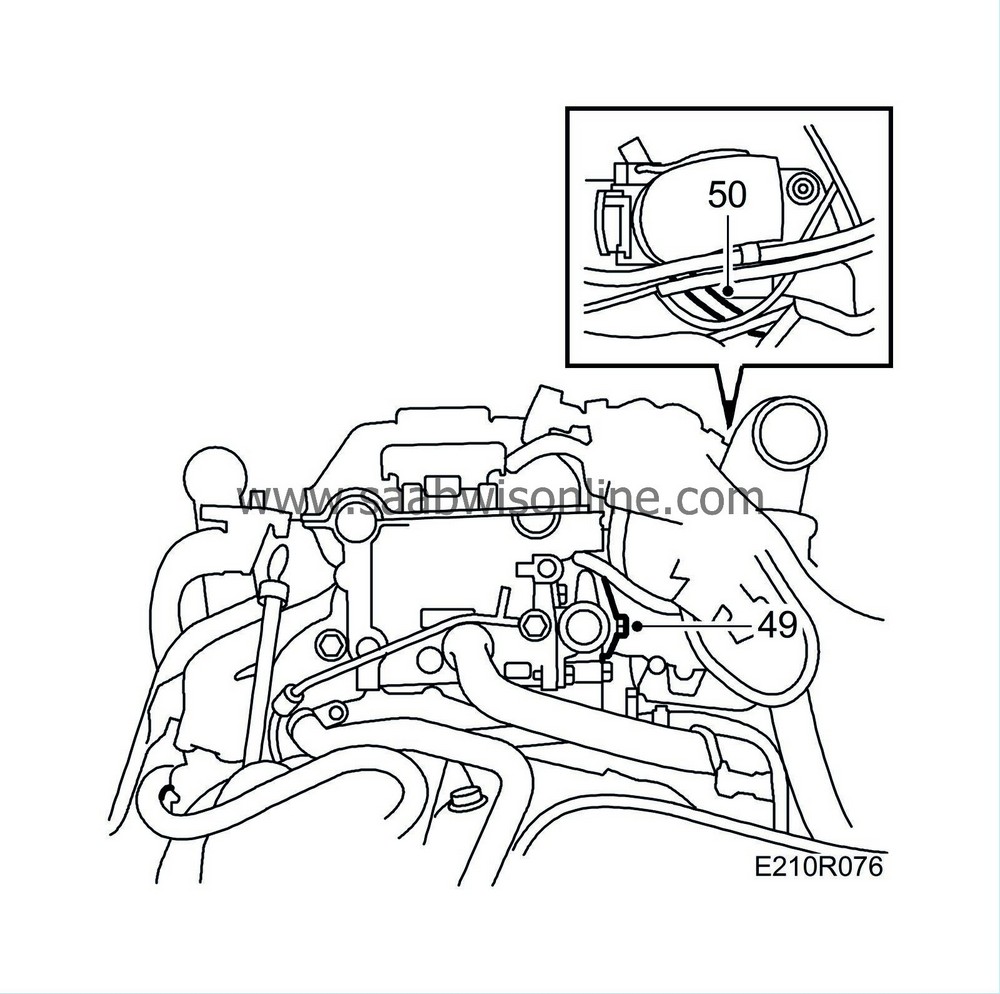
|
|
| 49. |
Align the intake manifold gasket with the aid of the outer retaining bolts and fit the intake manifold.
Tightening torque 22 Nm (16 lbf ft). |
|
| 50. |
Reconnect the hoses from the throttle body.
|
|
| 51. |
Plug in all electric connectors between the intake manifold and the remainder of the power train and fit its bracket in the lifting lug.
|
|
| 52. |
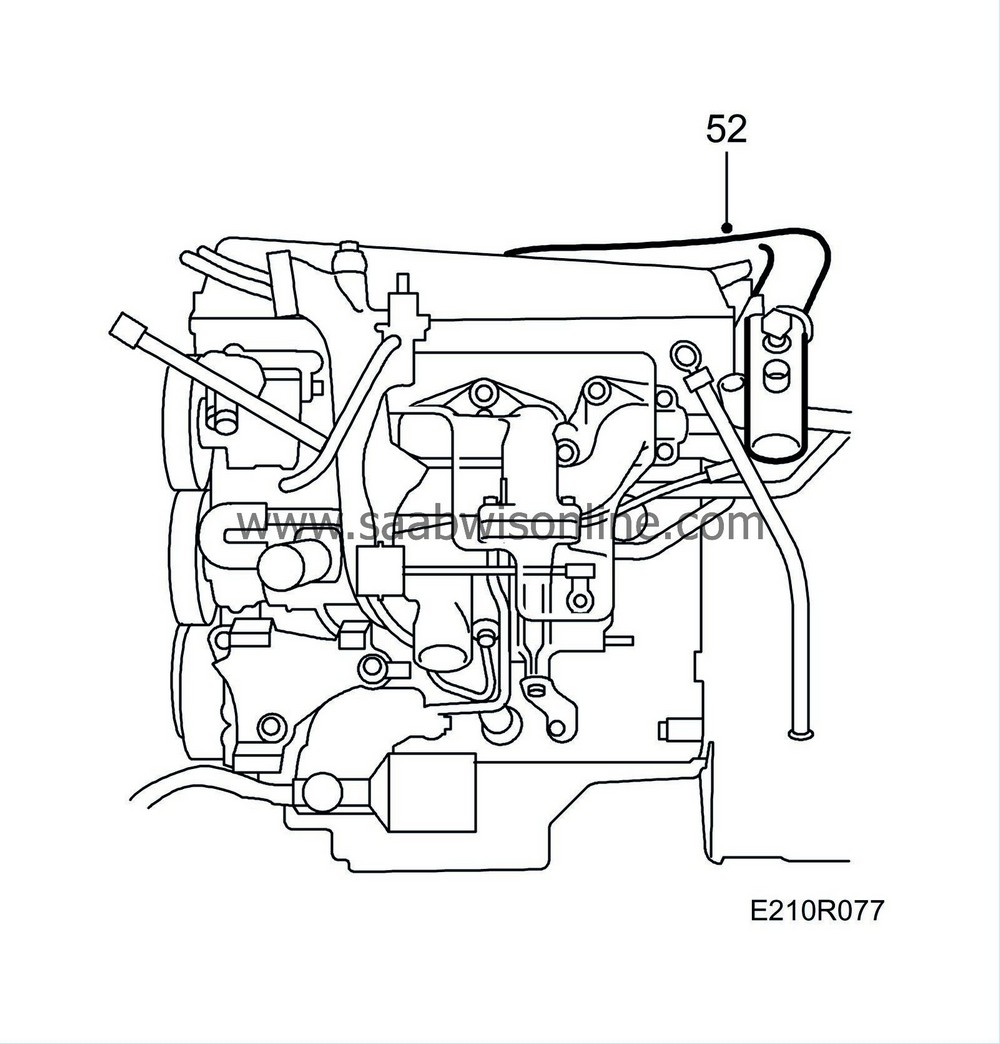
Fit the pressure pipe between the throttle body and charge air cooler.
|
|
| 53. |
Connect the crankcase breather pipe to the turbocharger's inlet pipe and plug in the wiring.
|
|
| 54. |
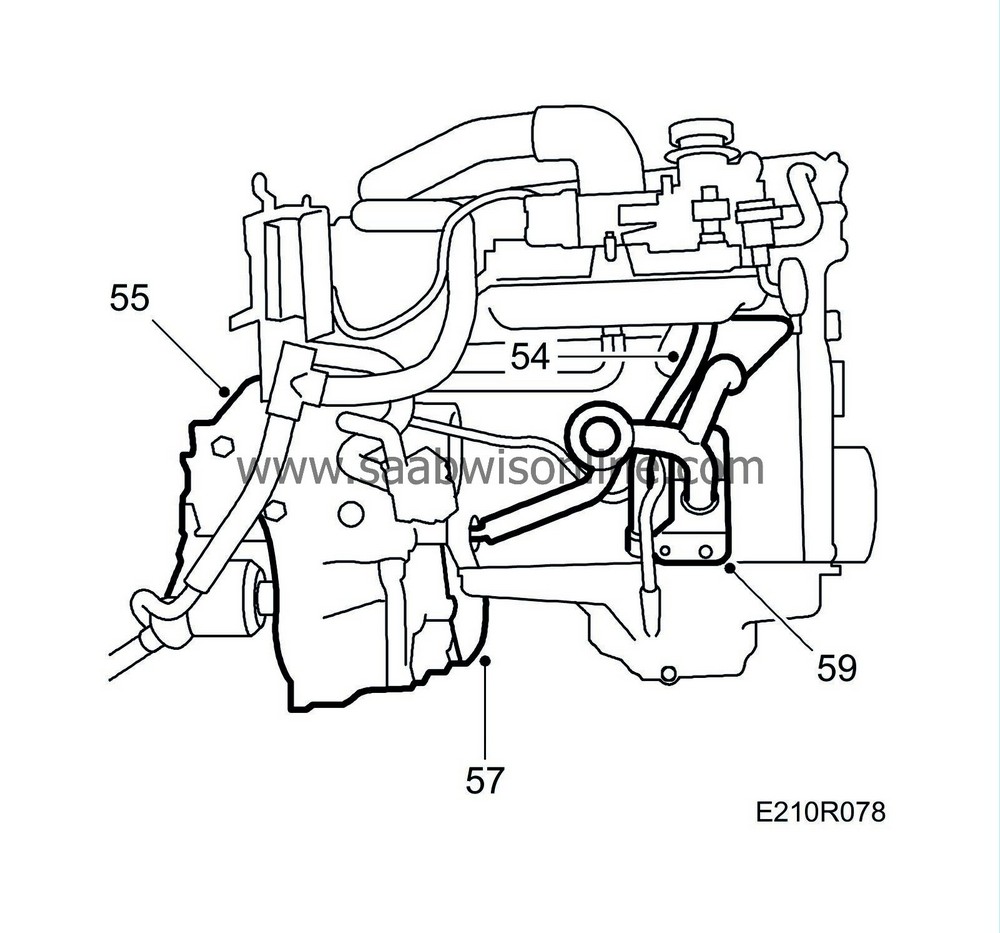
Fit the oil filler pipe with bracket.
|
|
| 55. |
Check that the torque converter bottoms in the transmission casing and that the locking screw is fitted (aut.). Fit the automatic transmission in place and tighten the bolts.
|
|
| 56. |
Fit the torque converter bolts (aut.). Apply Loctite 270D to the threads.
Turning torque 60 Nm (44 lbf ft). |
|
| 57. |
Fit the flywheel cover.
|
|
| 58. |
Fit a lifting sling to the engine and lift it off the stand.
|
|
| 59. |
Remove the holder and fit the rear engine mounting bracket and gearbox retaining bolt.
|
|
| 60. |
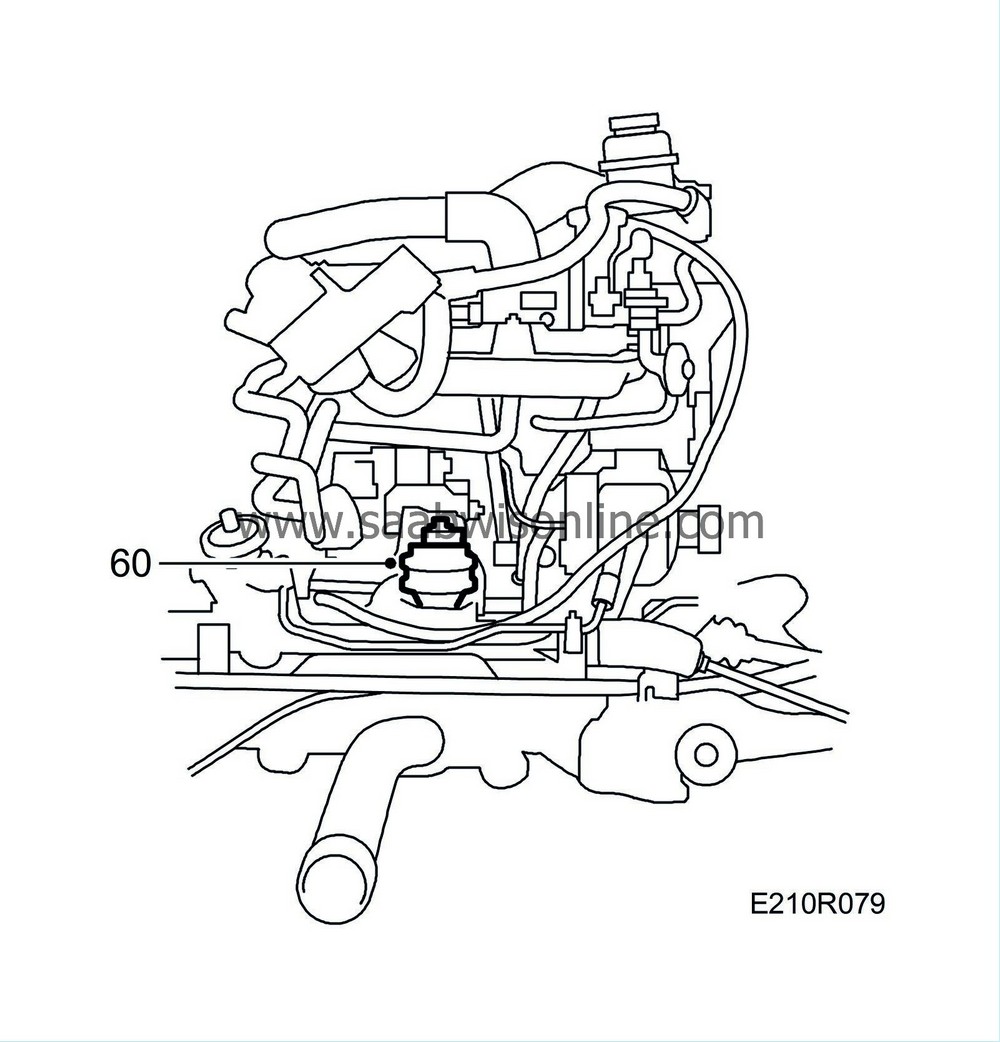
Position the engine on the subframe and fit the rear engine mounting, tightening it with a torque wrench.
Tightening torque 50 Nm (37 lbf ft). |
|
| 61. |
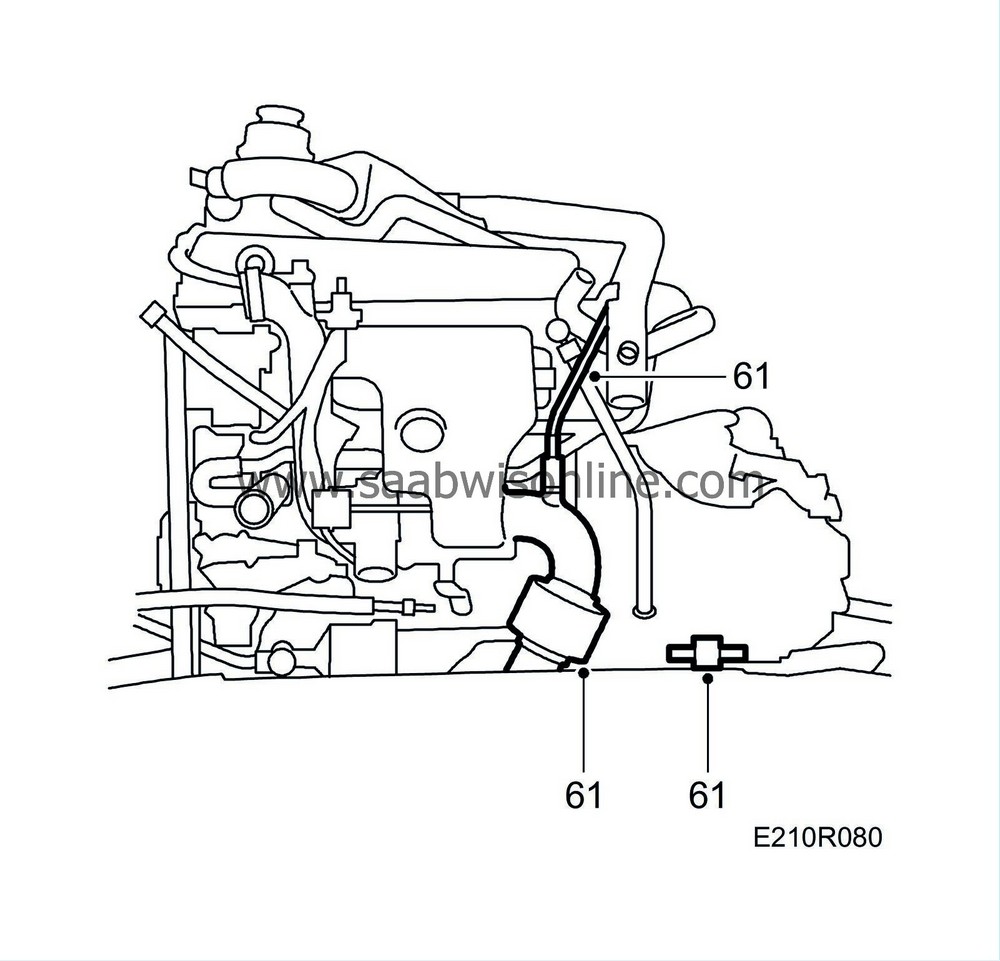
Fit the front exhaust pipe with sensor. Fit the gearbox steady bar and tighten it, using a torque wrench.
|
|
| 62. |
Fit the bearing bracket with intermediate shaft and inboard drive-shaft joint.
|
|
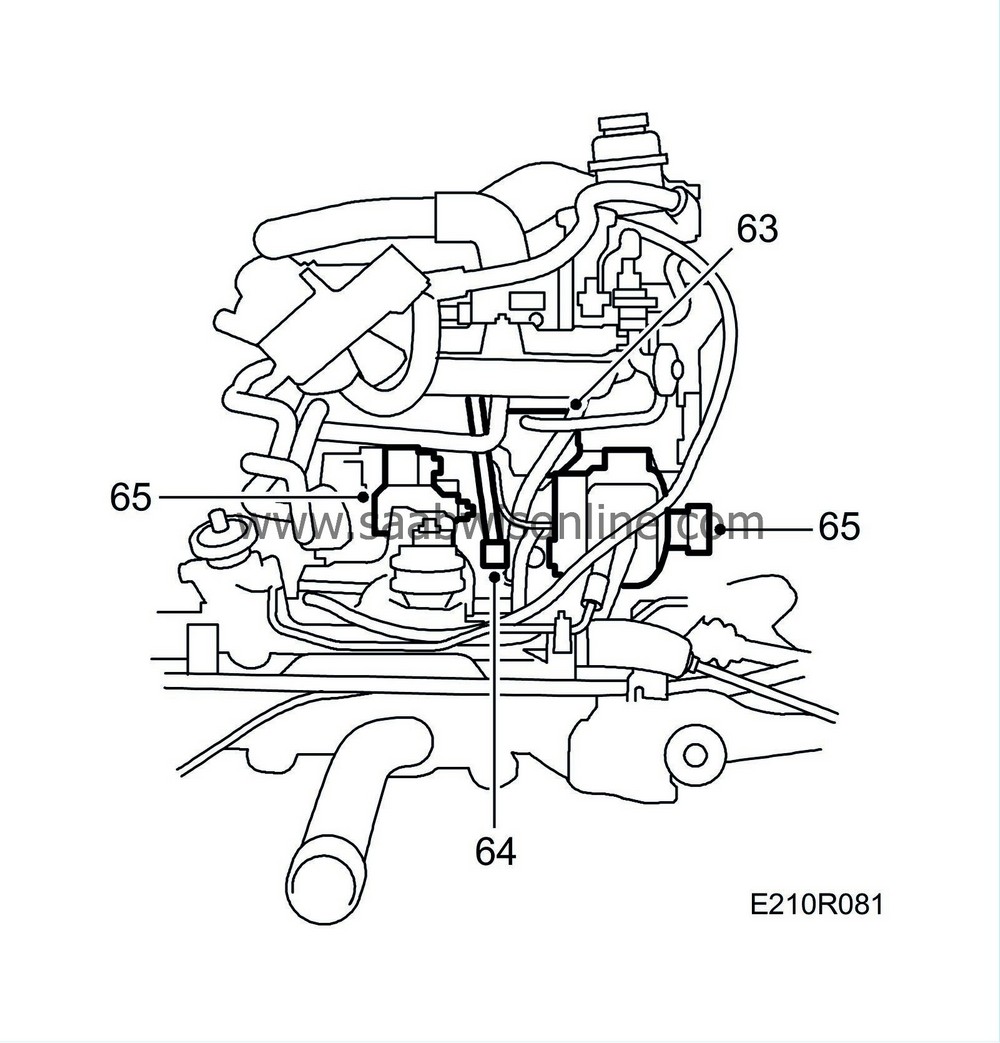
| 63. |
Fit the oil trap and connect its hoses.
|
|
| 64. |
Fit the intake manifold steady bar.
|
|
| 65. |
Fit and connect the generator, starter motor and belt tensioner.
|
|
| 66. |
Check that the oil plug is properly tightened. The power train is now ready for fitting in the car.
Tightening torque 25 Nm (19 lbf ft). |
|

 Warning

