Complete automatic transmission
|
|
Complete automatic transmission
|
|
1.
|
Place drapes over the wings to keep the paintwork clean and protect it from damage.
|
|
2.
|
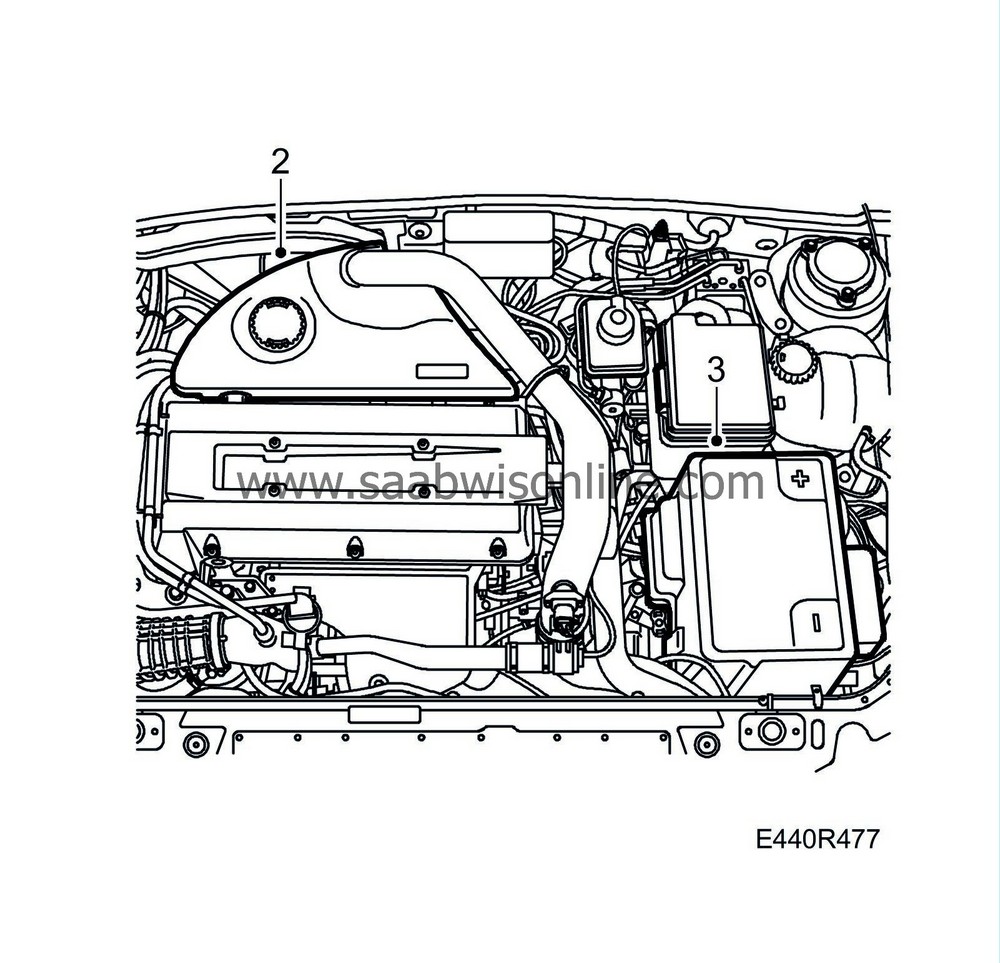
Remove the upper engine cover.
|
|
3.
|
Remove the battery cover and the battery.
|
|
4.
|
Remove the MAXI fuse board and remove the battery tray.
|
|
5.
|
Disconnect the electrical distribution unit and move it aside.

|
|
6.
|
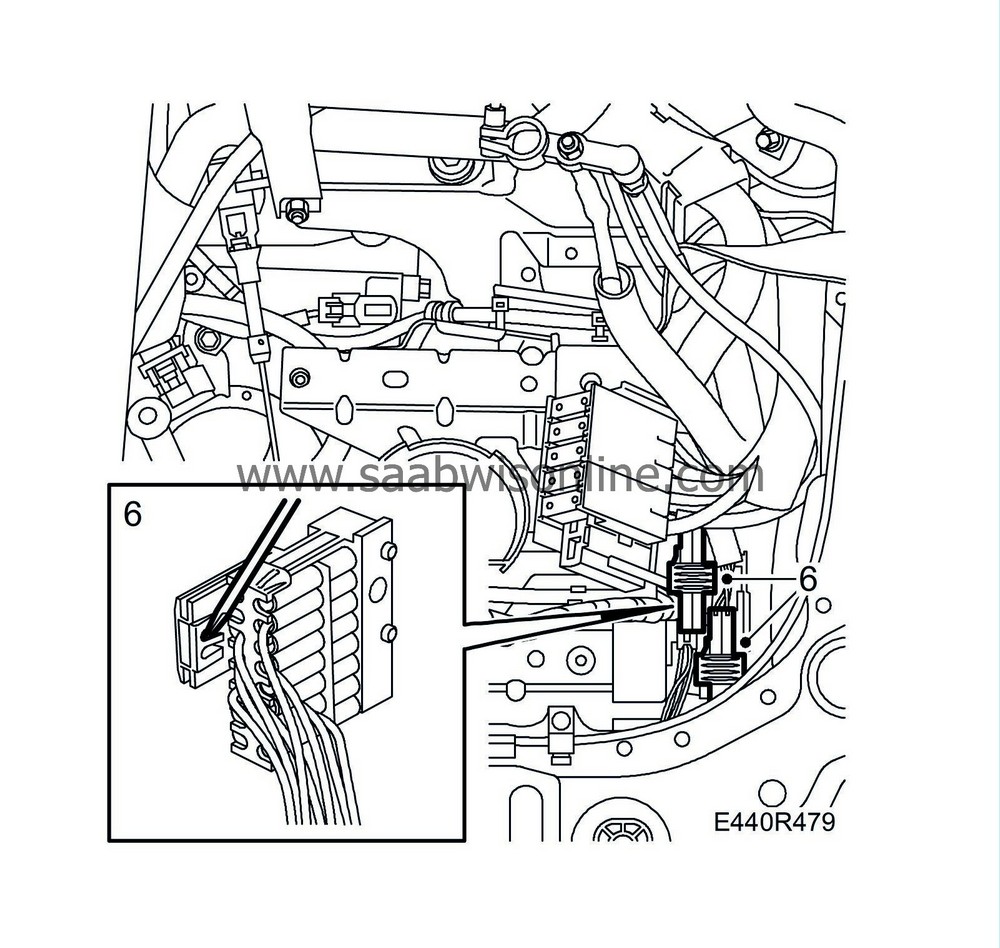
Unplug the connectors. The connectors are mounted in a holder.
|
|
7.
|
Remove the breather hose from the transmission.
|
|
8.
|
Remove the gear selector arm from the gearbox. The selector lever must be in position L.
|
|
9.
|
Remove the clamp and press out the shifting cable, using a suitable screwdriver.
|
|
11.
|
Clean the area round the dipstick tube where it enters the transmission.
|
|
12.
|
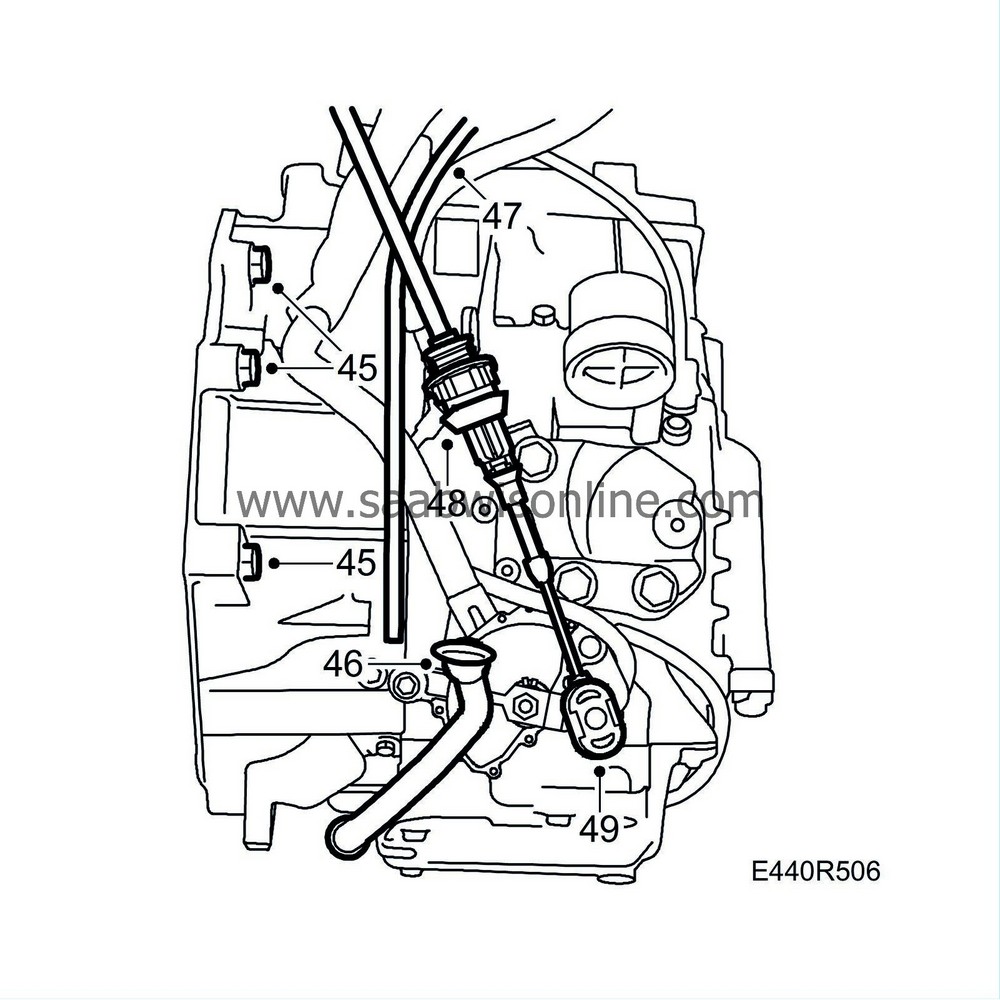
Remove the dipstick tube and plug the hole.
|
|
13.
|
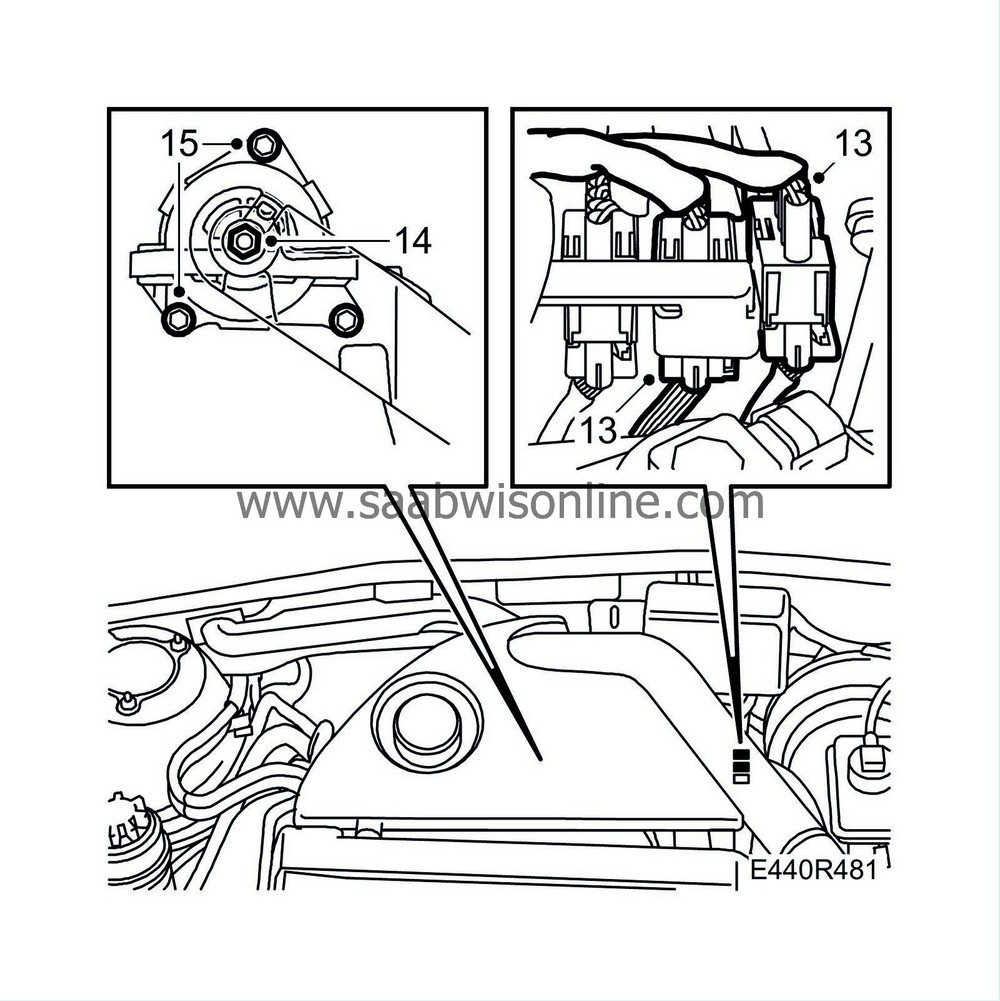
Unplug the oxygen sensor connectors.
|
|
14.
|
Remove the nut for the rear engine mounting.
|
|
15.
|
Undo the two bolts which hold the rear engine pad, do not remove the bolts. The third engine pad bolt is inaccessible because of the engine bracket and is removed from underneath when this is removed.
|
|
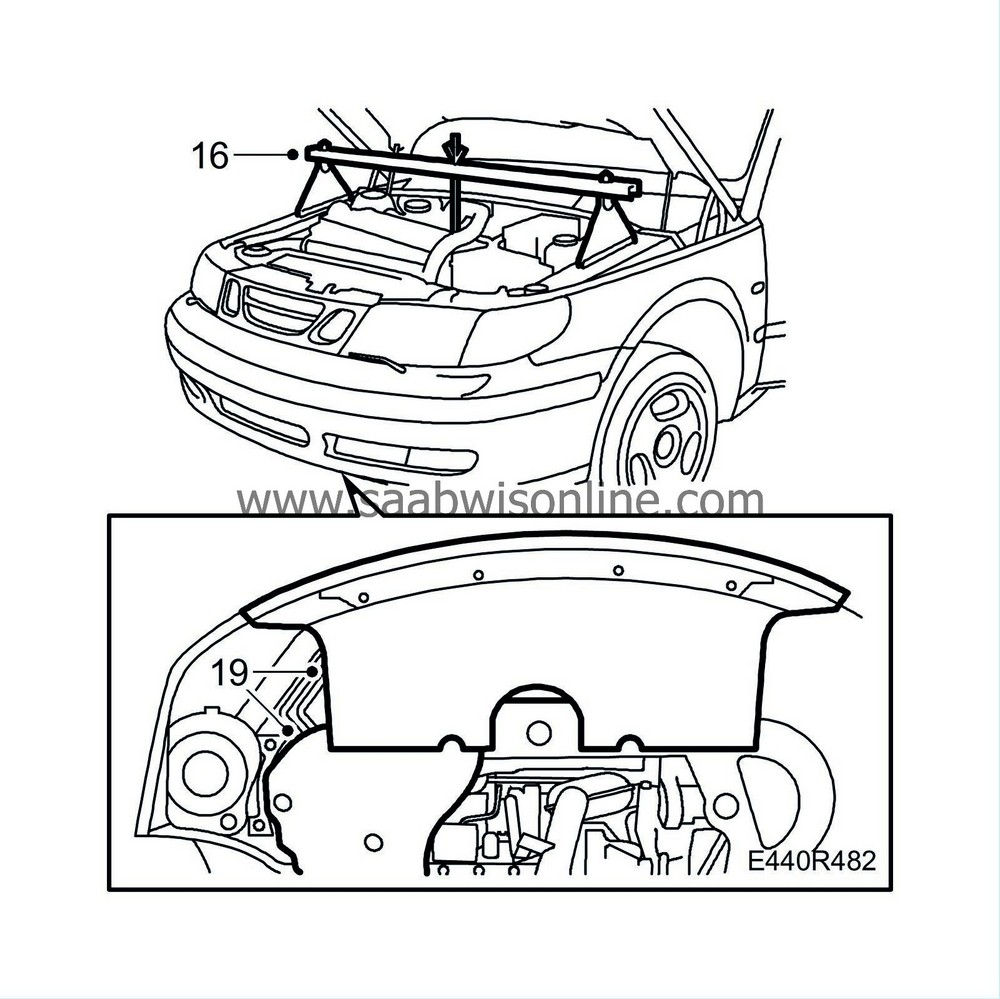
16.
|
Position
83 94 850 Lifting beam
and relieve the weight of the engine and transmission.
|
Important
|
|
Place suitable protective pads or the like under the feet of the lifting beam to avoid damaging the paintwork.
|
|
|
|
|
18.
|
Remove the front wheels.
|
|
19.
|
Remove the lower engine cover.
|
|
20.
|
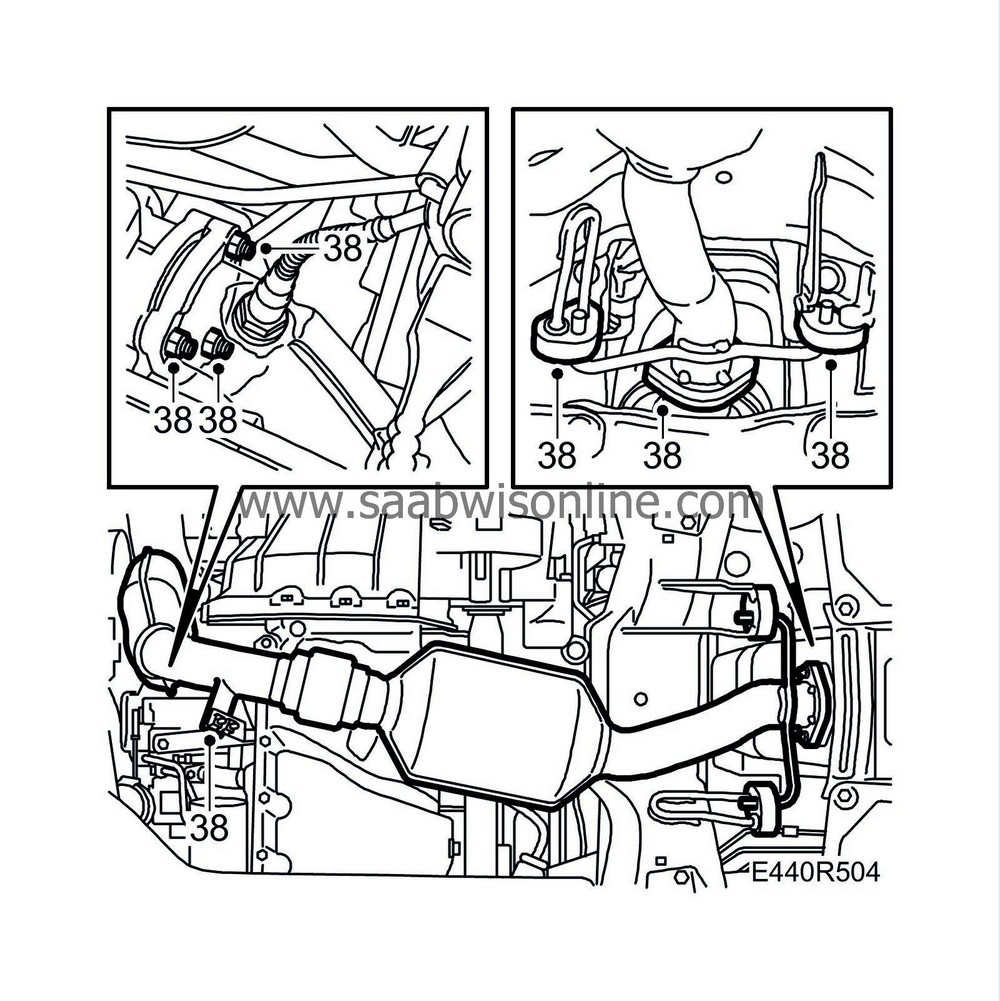
Dismantle the front exhaust system. Be careful with the oxygen sensors.
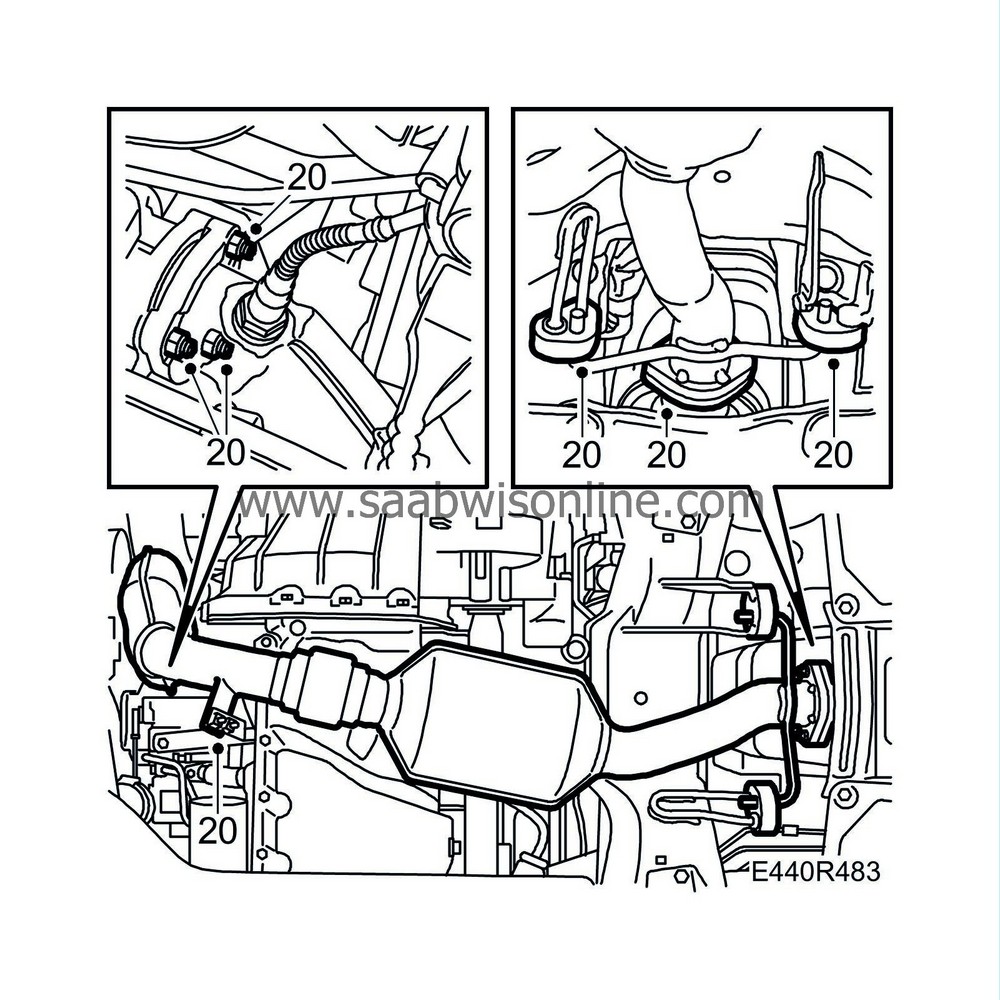
|
|
21.
|
Remove the rear engine bracket and the engine pad.
|
|
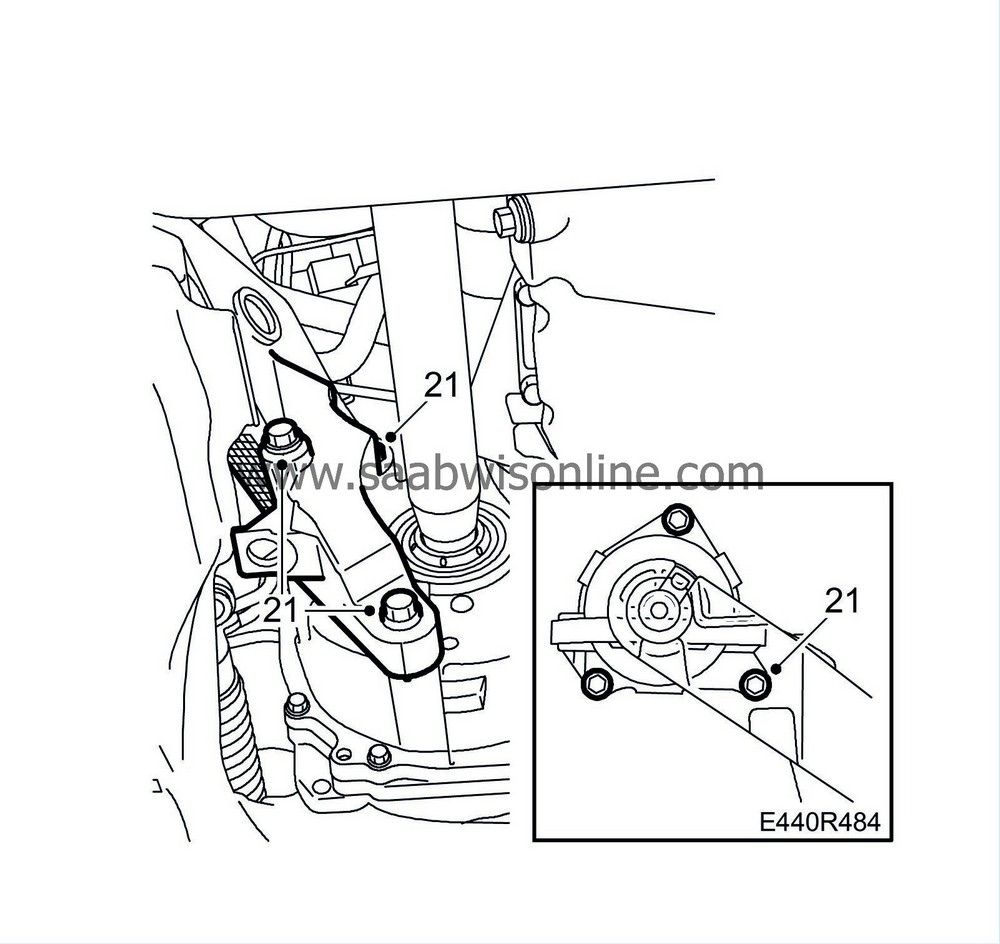
22.
|
Remove the screws securing the steering gear.
|
|
23.
|
Remove the two rear clamps securing the power steering delivery pipe to the subframe. Remove the AC pipes from the plastic clips on the subframe at the same time.
|
|
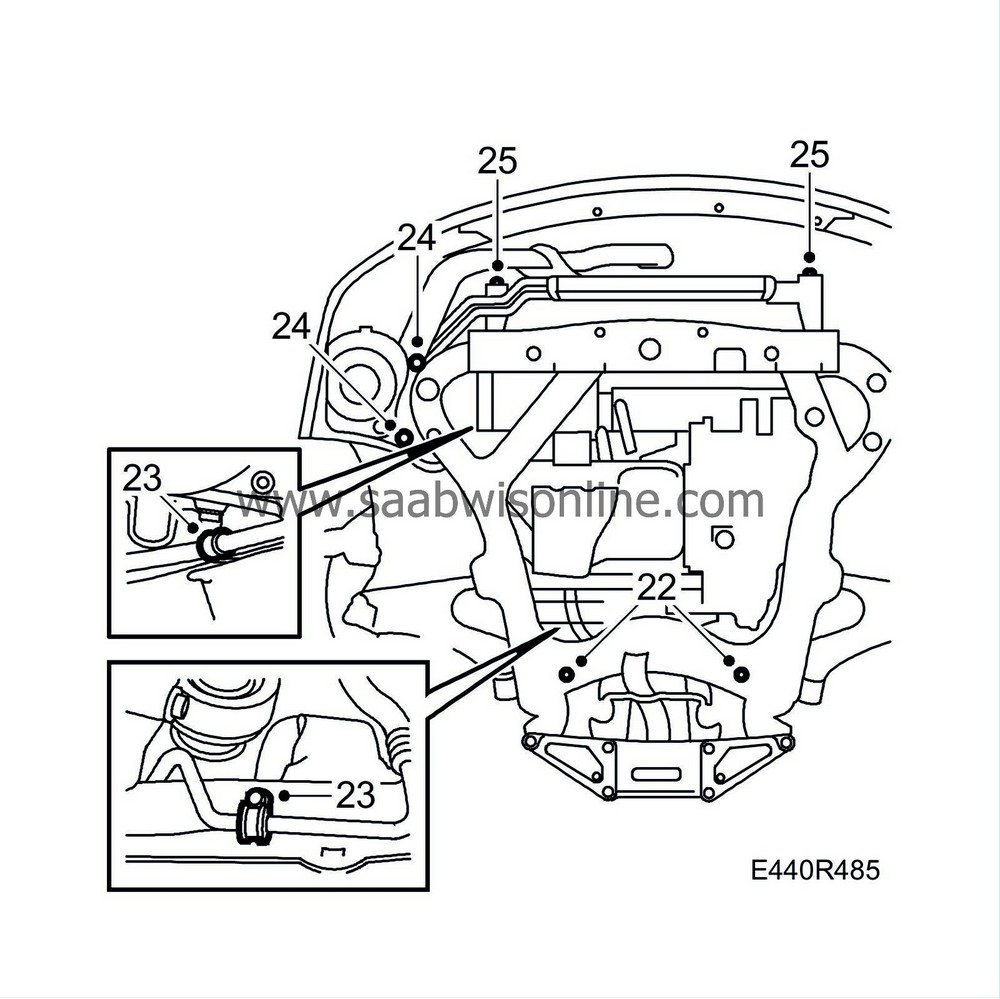
24.
|
Remove the air cleaner casing from the subframe.
|
|
25.
|
Detach the engine oil cooler from the charge air cooler.
|
|
26.
|
Fit a
83 95 212 Strap
around the radiator core and the radiator crossmember.
|
|
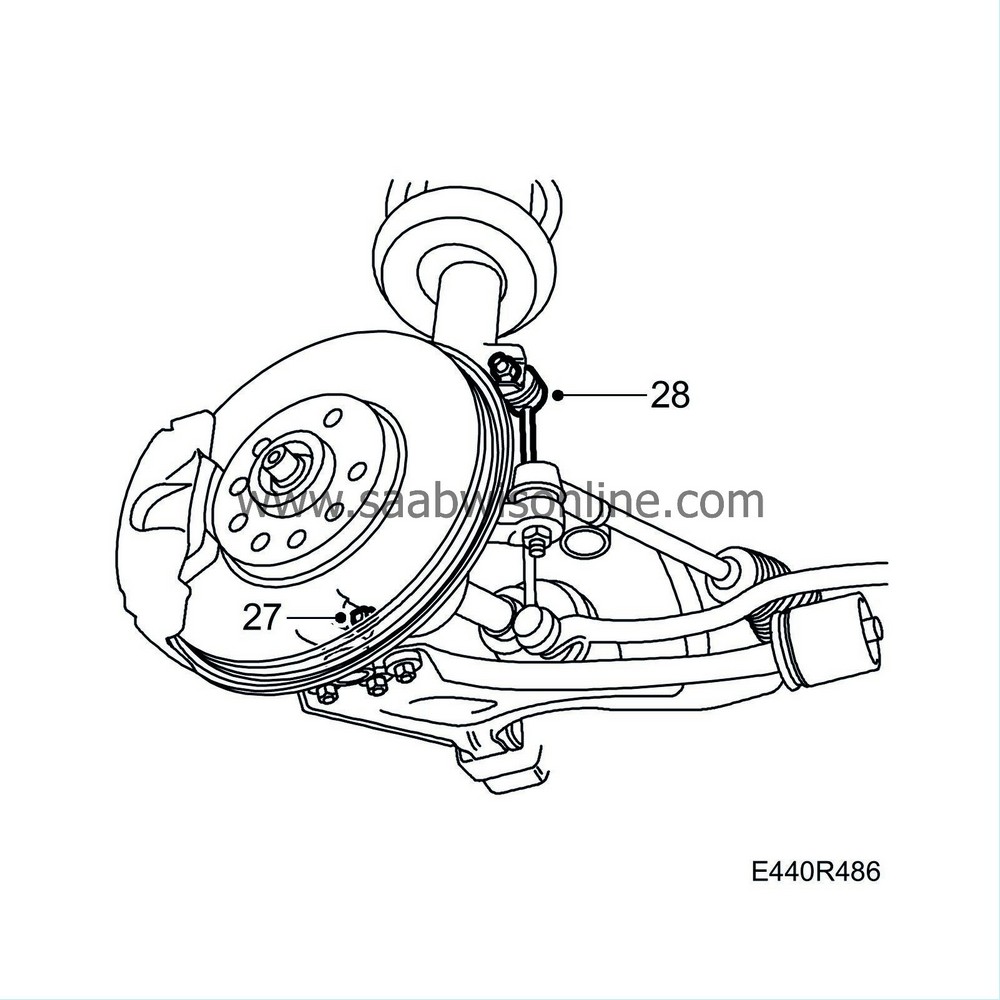
27.
|
Remove the bolts securing the outer ball joints to the steering swivel member on both sides.
|
|
28.
|
Detach the upper anti-roll bar ball joints. Use a 17 mm spanner to prevent the gaiter from twisting. If the spanner is too wide to fit between the gaiter and the MacPherson strut, it must be ground narrower. Alternatively, hold the hexagonal pin with a socket.
|
|
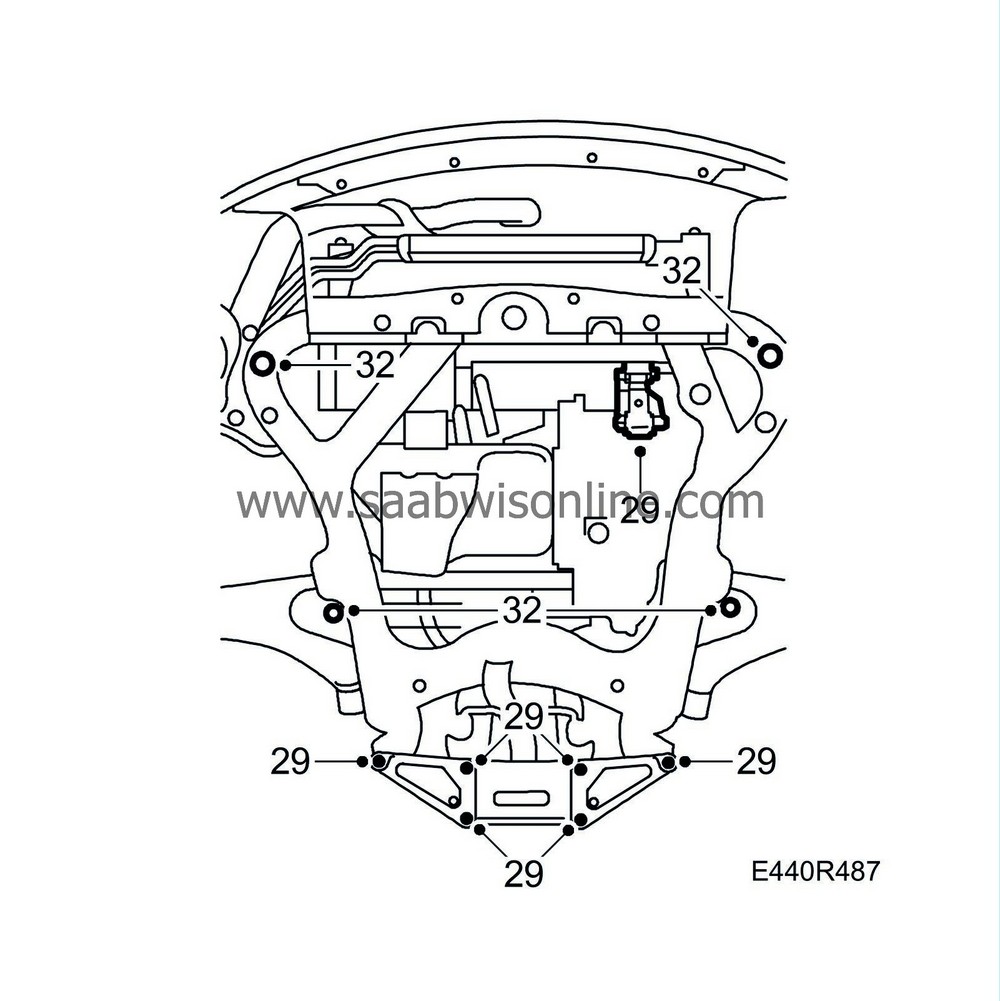
29.
|
Remove the torque arm from the subframe and remove the rear support plates.
|
|
31.
|
Place the lifting trolley with lifting table and holder under the subframe. Lift up the lifting table, be careful to position it correctly.
|
|
32.
|
Remove the last 4 bolts securing the subframe.
|
|
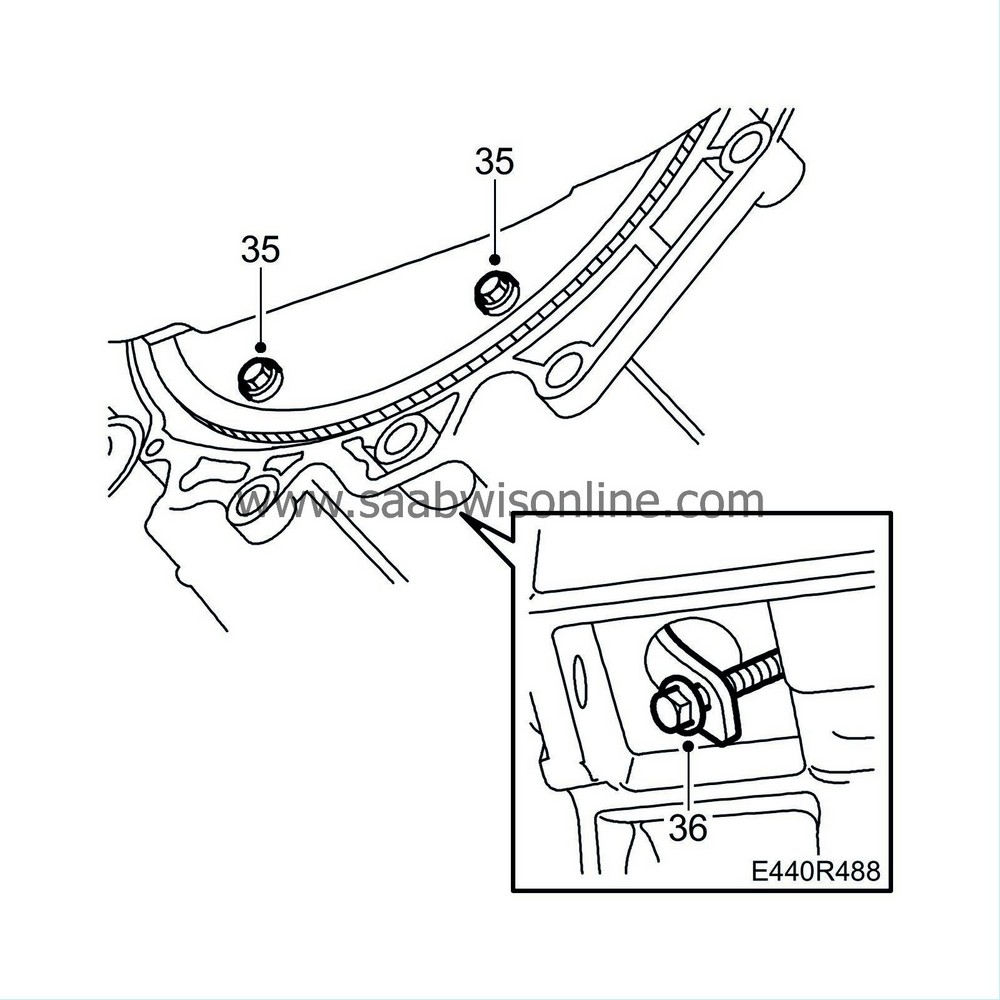
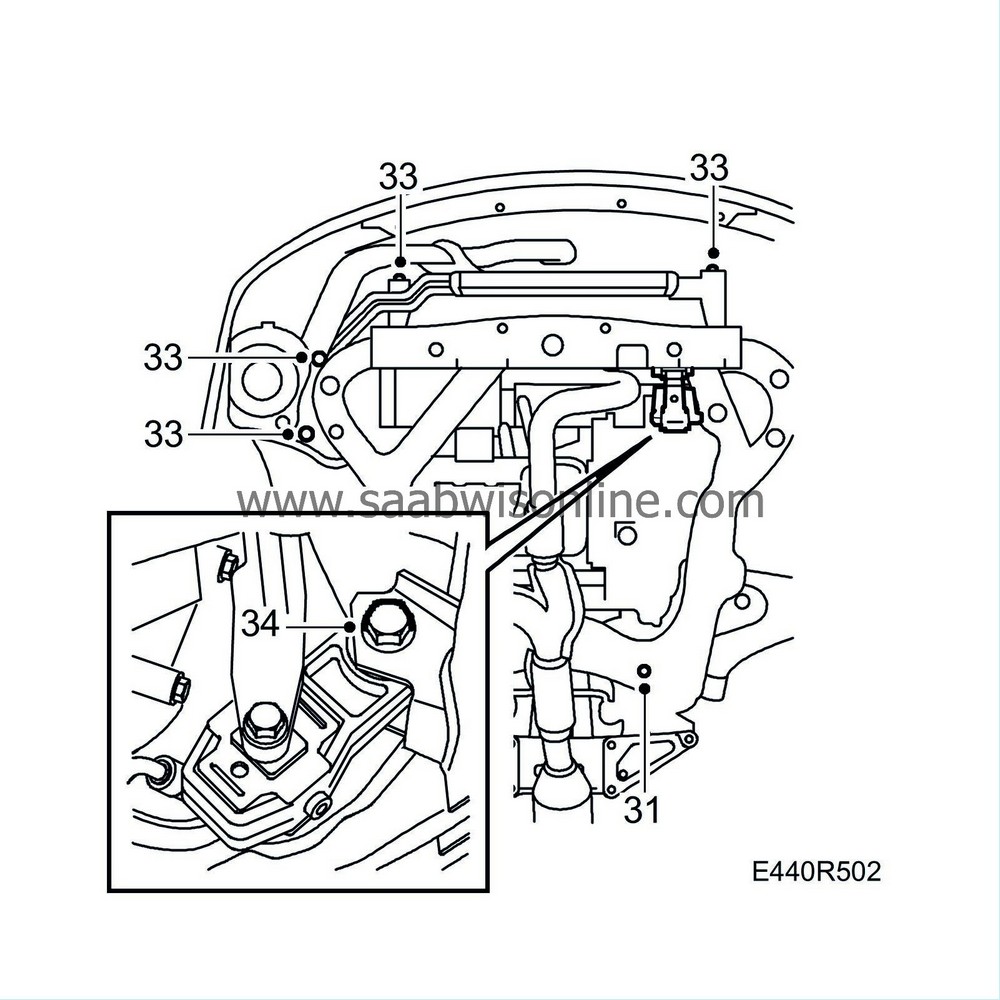
33.
|
Lower the subframe approx. 5 cm so that the two front clamps holding the power steering delivery pipe in place can be removed. Remove the clamps, lower the subframe and move the lifting trolley out of the way.
|
|
34.
|
Remove the splash plate (secured with two bolts to the transmission casing) to access the torque converter mounting on the companion disc.
|
|
35.
|
Undo the 3 bolts securing the torque converter to the companion disc. Rotate the plate together with the pulley.
|
Note
|
|
The crankshaft must be rotated to make all the bolts accessible.
|
|
|
36.
|
Press the torque converter towards the gearbox and fit
87 92 574 Holder
to keep it in place while the gearbox is removed.
|
|
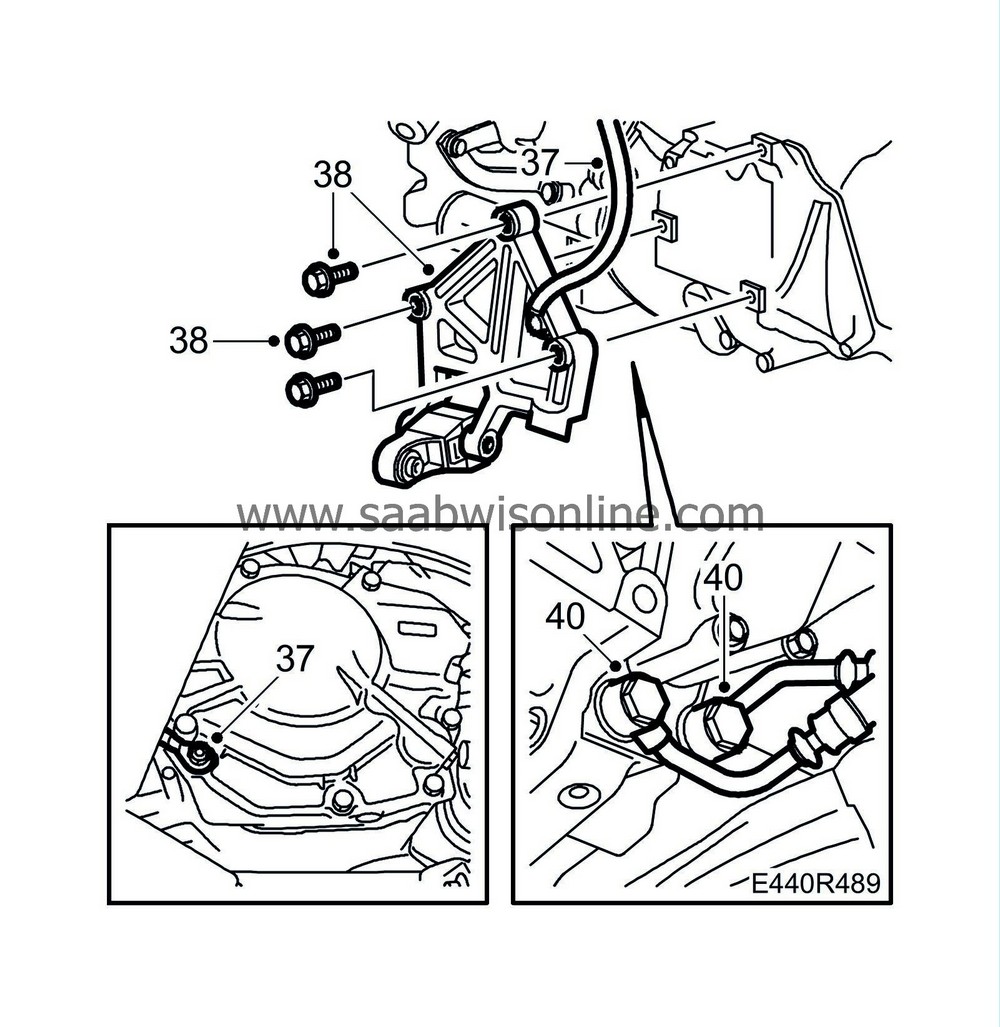
37.
|
Disconnect the ground leads.
|
|
38.
|
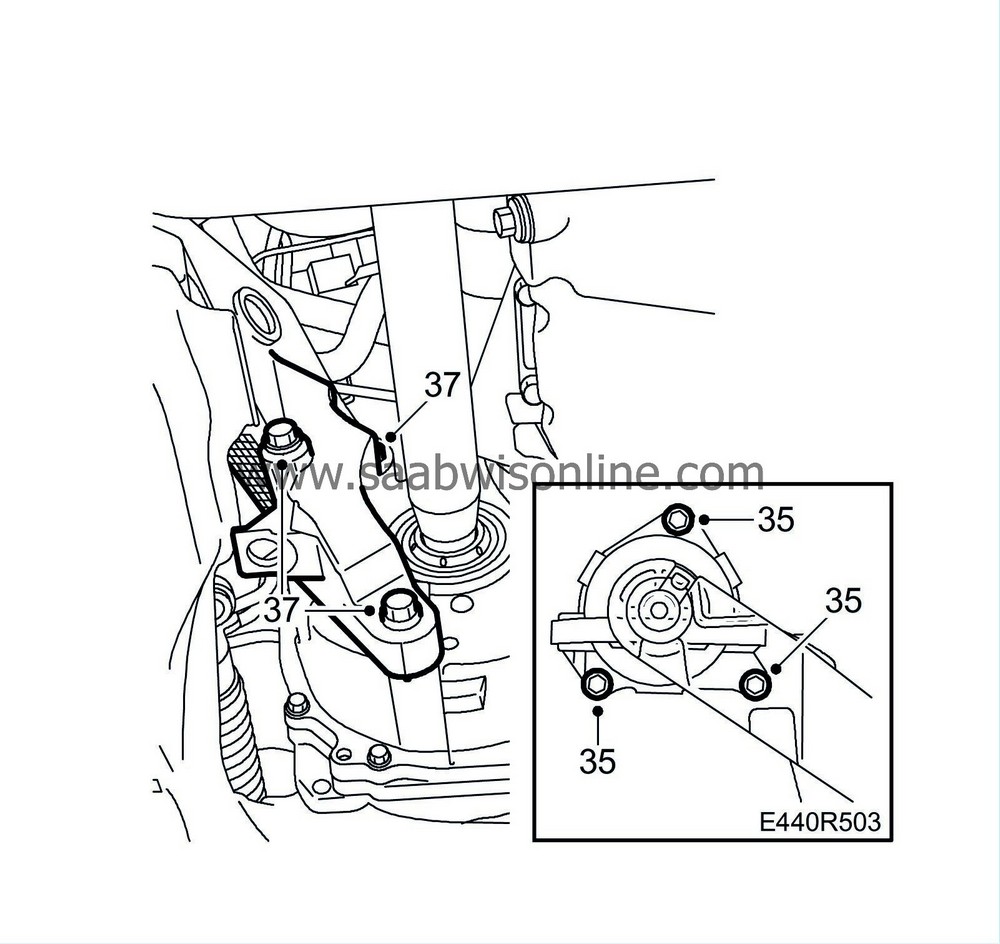
Remove the torque arm with bracket.
|
|
39.
|
Drain the transmission fluid, fit the drain plug.
Tightening torque 40 Nm (30 lbf ft)
|
|
40.
|
Disconnect the oil cooler inlet and outlet hoses. Plug the inlet and outlet passages on the transmission and also plug the hoses. Use plug no. (10) 91 32 929 and seal no. (10) 91 32 937.
|
|
42.
|
Suspend the shaft by means of a cable tie.
|
|
43.
|
Lower the car to the floor.
|
|
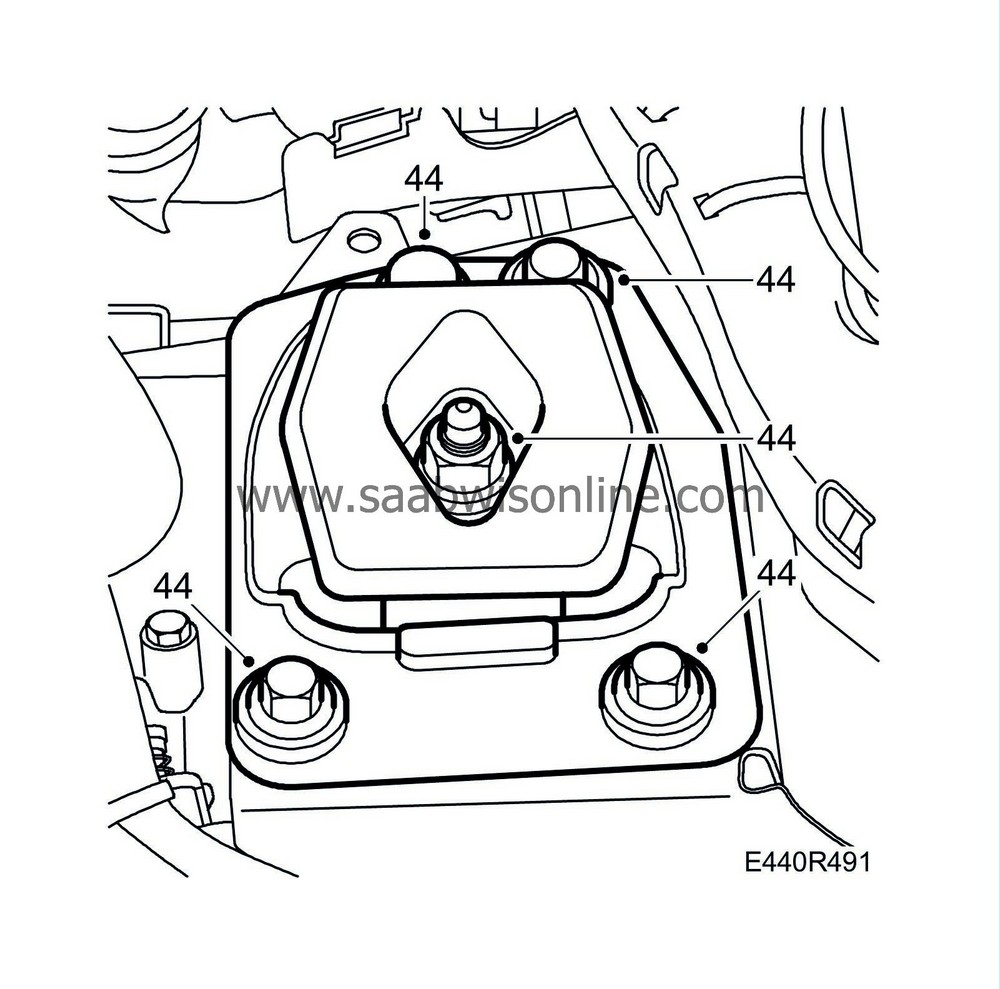
44.
|
Remove the left-hand engine pad.
|
|
45.
|
Lower the unit approx. 100 mm so that the transmission clears the structural member. Remove the transmission bracket from the transmission.

|
|
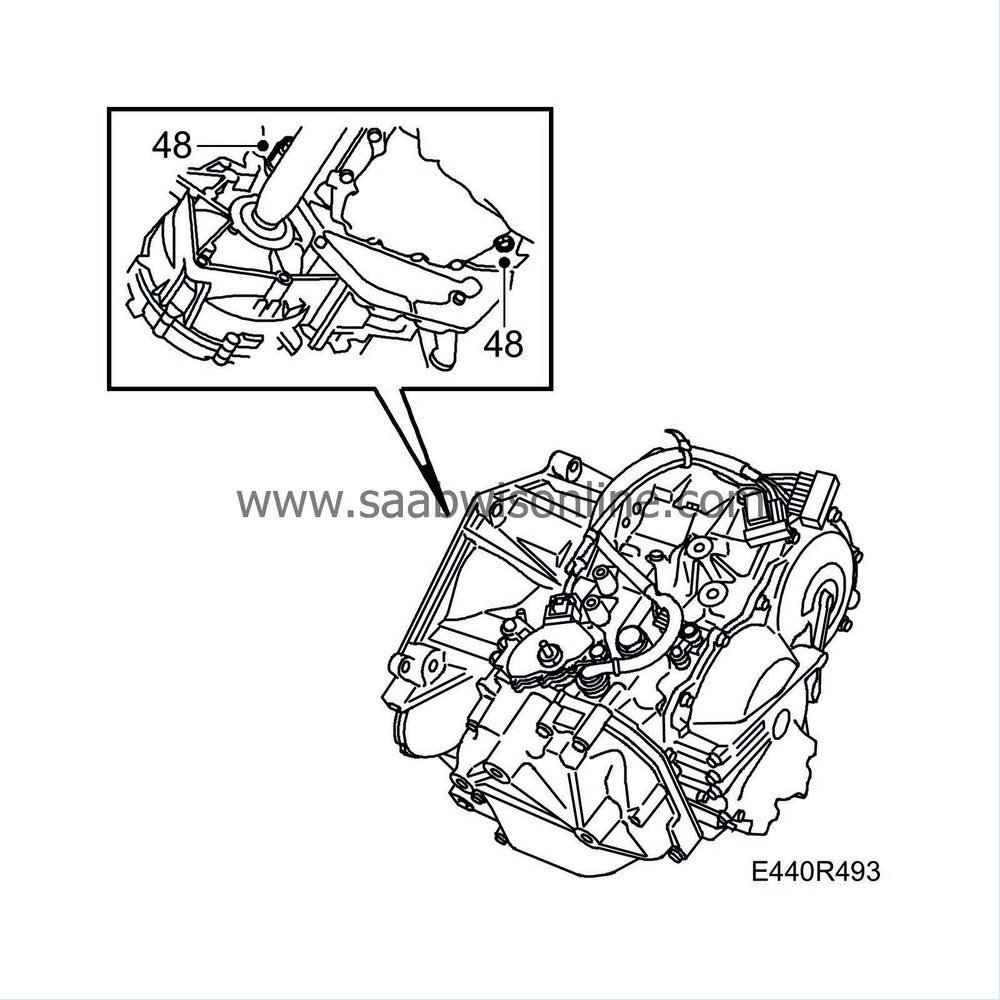
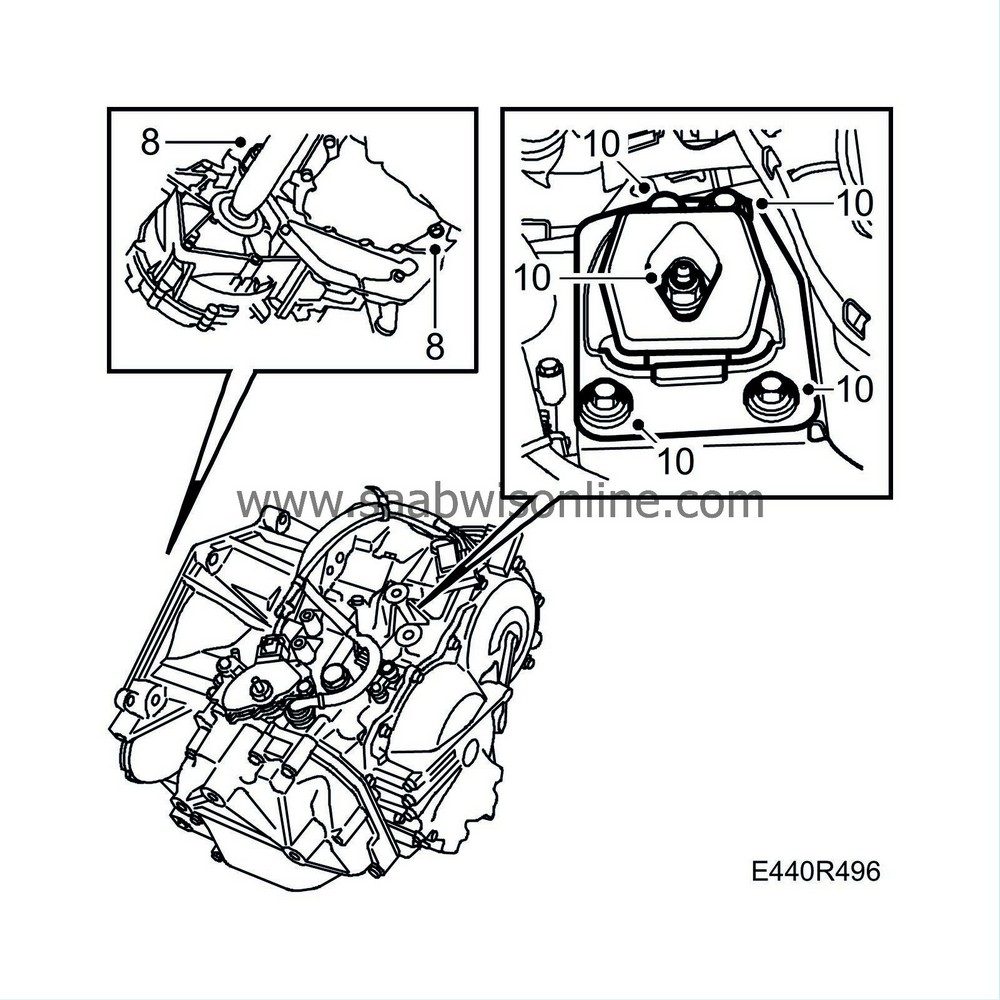
48.
|
Remove the remaining bolts securing the transmission to the engine.
|
|
49.
|
Pull out and lower the transmission casing.
|
Important
|
|
The pillar-type jack may tip over. Exercise care.
|
|
|
|
|
50.
|
Lift down the gearbox from the pillar jack using an engine hoist and
87 92 442 Lifting cable
while removing the lifting tool from the gearbox.
|
When fitting a new transmission, transfer the holder for the torque converter from the new transmission to the old one.
|
1.
|
Turn the torque converter so that the bolt holes line up with the holes in the companion disc.
Fit
87 92 574 Holder
to keep the torque converter in place while fitting.
|
|
5.
|
Secure the tool to the transmission as described for removal.
|
Important
|
|
The pillar-type jack may tip over. Exercise care.
|
|
|
|
|
7.
|
Place the transmission in position.
|
Important
|
|
Push the transmission into place until approx. 20 mm remains and then remove tool 83 95 162.
|
|
|
|
|
8.
|
Tighten the bottom bolts between the engine and the transmission.
Tightening torque 75 Nm (55 lbf ft)
|
|
9.
|
Remove the lifting beam from the transmission and move the jack out of the way. Refit the bolts in the gearbox.
Tightening torque 24 Nm (18 lbf ft)
|
|
10.
|
Lower the car and fit the engine pad mounting on the gearbox.
Tightening torque 60 Nm + 60° (44 lbf ft + 60°)
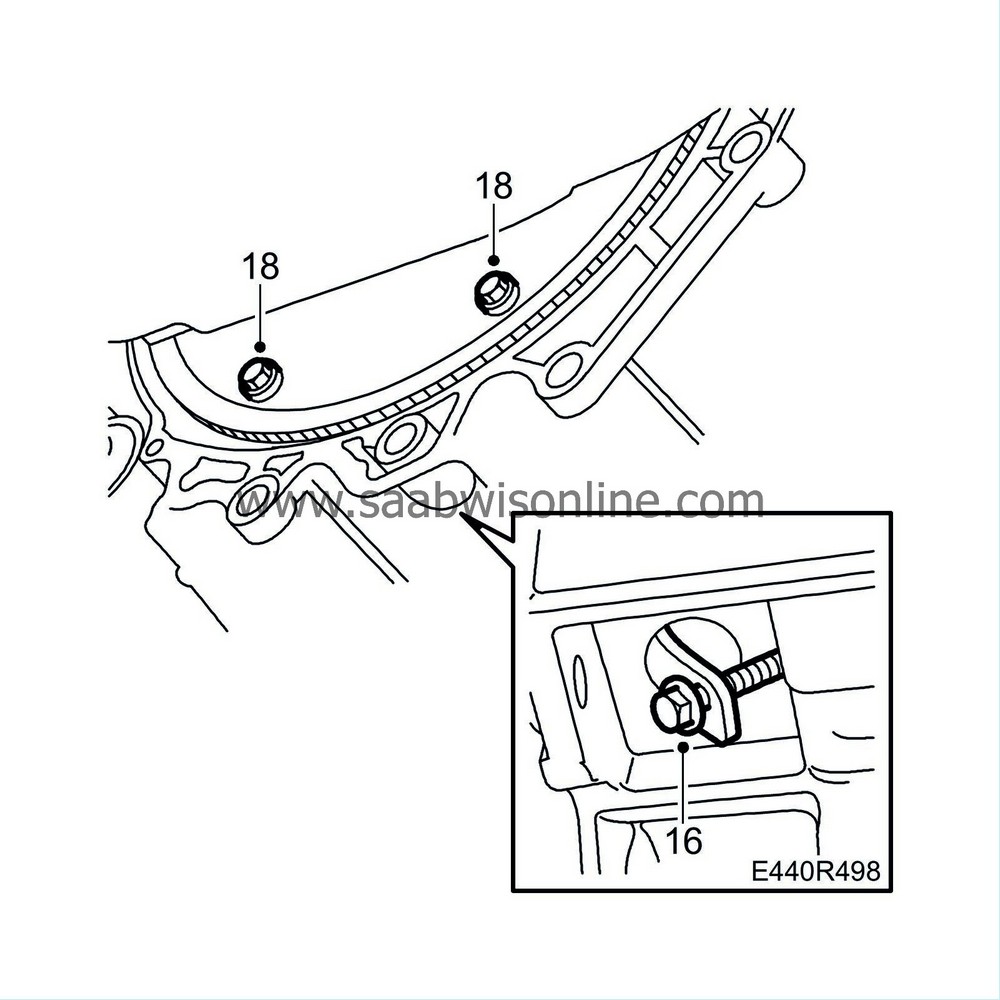
Raise the power train. Do not lift higher than necessary as this could make fitting the subframe more difficult. Fit the bolts securing the engine pad to the body.
|
Note
|
|
One of the rear bolts is shorter in order not to screw into the bottom of the hole. Ensure that the bolt holes are as close as possible to the centre of the engine pad holes without tensioning the engine pad.
|
Tightening torque, bolt with loose washer 63 Nm (46 lbf ft)
Tightening torque, bolt with captive washer 40 Nm + 30° (30 lbf ft + 30°)
Tightening torque, nut, up to and including Vehicle Identification Number 73514907:
84 Nm (62 lbf ft)
Tightening torque, nut, from and including Vehicle Identification Number 73514908:
74 Nm (55 lbf ft)
|
|
11.
|
Lower the power train so that it is almost hanging free in the lifting beam.
|
|
13.
|
Make sure that the drive shaft is clean and then align it with the tool.
|
Important
|
|
Insert all but 20 mm of the drive shaft in the transmission and then withdraw the tool before the shaft's sealing surface reaches the shaft seal.
|
|
|
|
|
14.
|
Push in the rest of the shaft until the circlip engages.
|
|
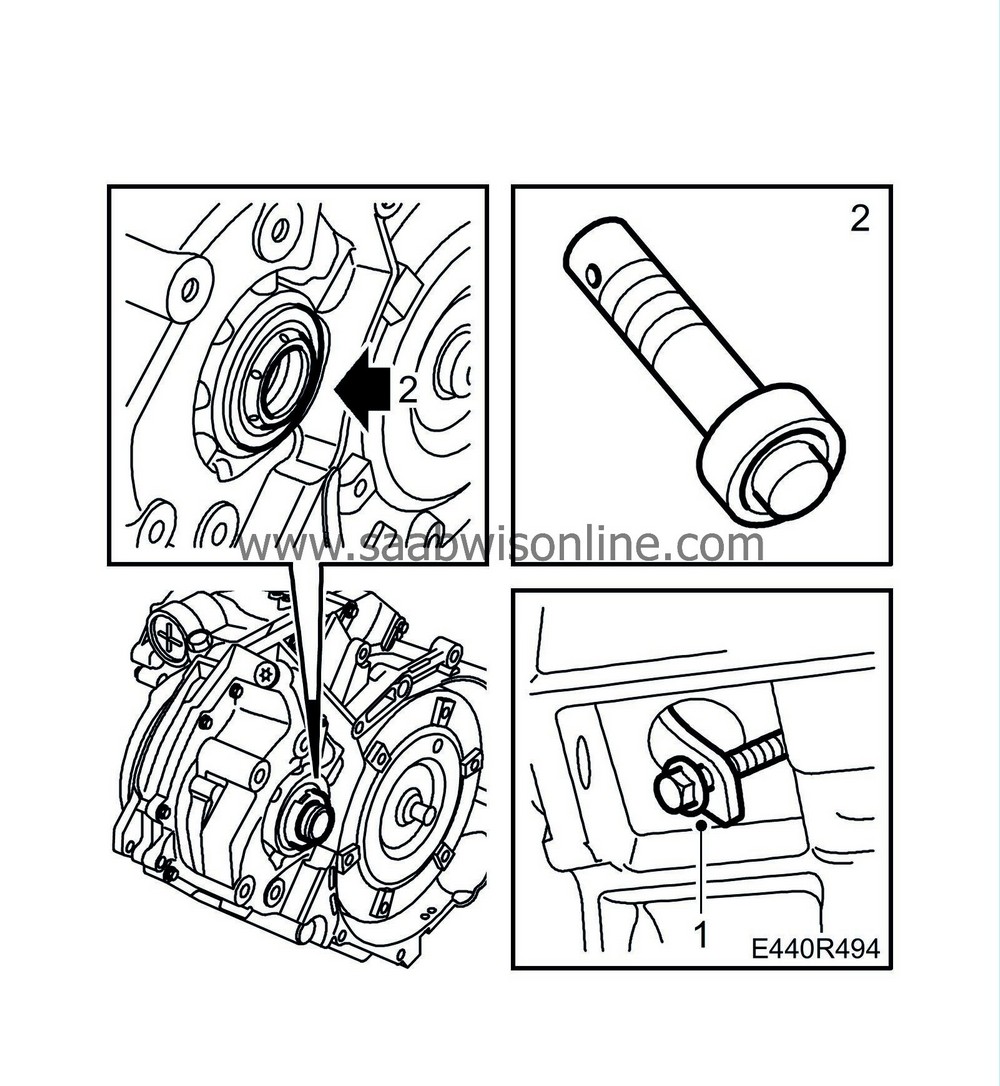
16.
|
Remove
87 92 574 Holder
that is keeping the torque converter in place and press it against the companion disc. Fit the plug.
|
|
17.
|
Apply
74 96 268 Thread locking adhesive
to the bolts securing the torque converter to the companion disc.
|
Note
|
|
Use the original bolts and their washers. If excessively long bolts are fitted, the torque converter will be damaged.
|
|
|
18.
|
Fit the 3 bolts without tightening them.
|
|
19.
|
Rotate the engine using the drive belt pulley and tighten the bolts when they are all in place.
Tightening torque 30 Nm (22 lbf ft)
|
|
20.
|
Fit the splash plate.
|
|
21.
|
Fit the oil cooler hoses. The hoses should be horizontal so that they do not chafe against the subframe. Use new seals greased with petroleum jelly.
Tightening torque 27 Nm (20 lbf ft)
|
|
22.
|
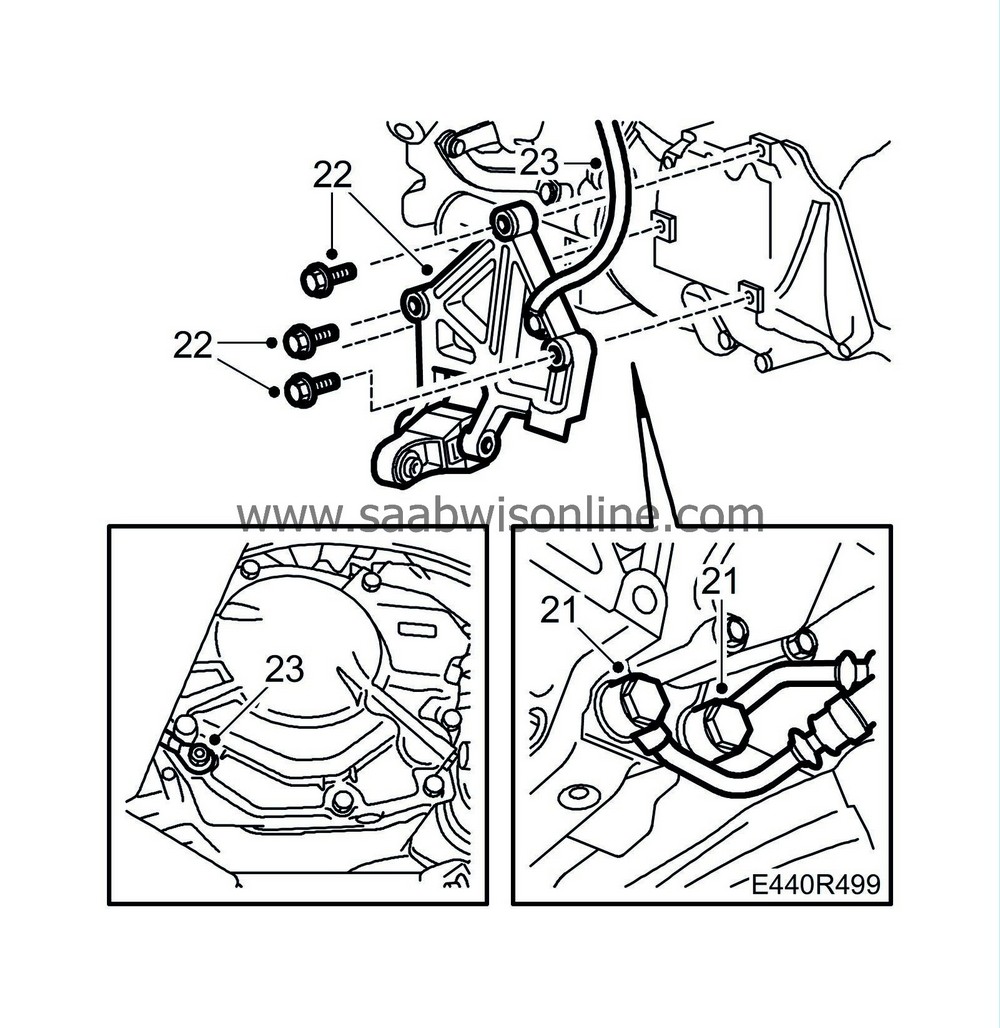
Fit the bracket for the torque arm on the transmission.
Tightening torque, up to and including Vehicle Identification Number 73514478:
47 Nm (33 lbf ft)
Tightening torque, from and including Vehicle Identification Number 73514479:
38 Nm (28 lbf ft)
|
|
23.
|
Connect the ground cable to the bracket and to the transmission.
|
|
24.
|
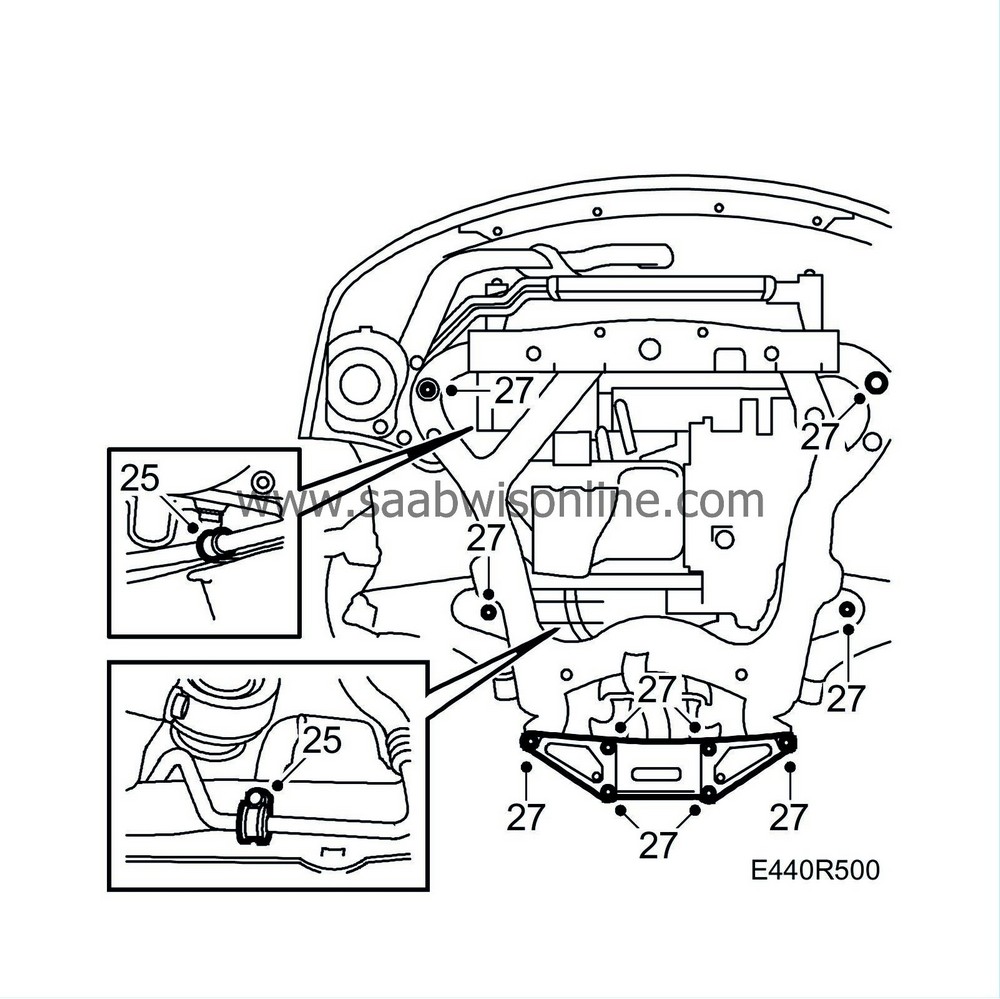
Place the subframe on the lifting trolley and raise it slightly.
|
|
25.
|
Fit the power steering delivery pipe's clamps.
|
|
26.
|
Lift up the subframe, whilst guiding it into place with the help of the pins on the holder. At the same time guide in:
|
|
|
•
|
The radiator core's studs
|
|
27.
|
Fit the bolts to the subframe and fit the rear support plates. Adjust the subframe so that the guide pins on the holder are aligned with the holes in the body before tightening the bolts.
Tightening torque, subframe bolts 100 Nm + 45° (74 lbf ft + 45°)
Tightening torque, support plate bolts 60 Nm (44 lbf ft)
|
Note
|
|
The centre bolts on the subframe must not be mixed up with the other bolts. The centre bolts have smaller washers and 20 mm heads.
|
|
Note
|
|
Make sure that the transmission's oil cooler hoses do not rest against the subframe.
|
|
|
28.
|
Remove the lifting trolley.
|
|
29.
|
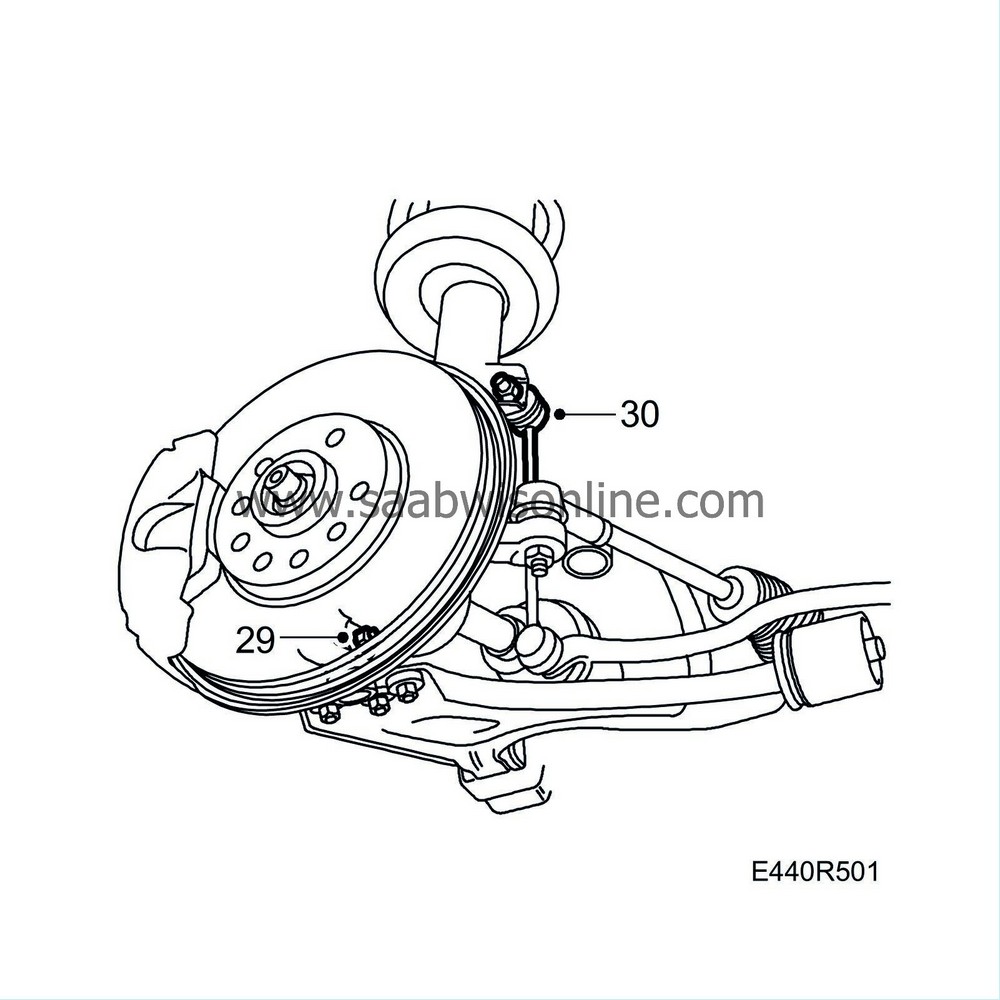
Fit the bolts securing the outer ball joint to the steering swivel member.
Tightening torque 50 Nm (37 lbf ft)
|
Important
|
|
Ensure that the steering knuckle stub is visible on the top of the steering knuckle housing before the bolt is fitted.
|
|
|
|
|
30.
|
Tighten the anti-roll bar link. If the wrench use to hold it is too wide to fit between the gaiter and the MacPherson strut, it must be ground narrower. Alternatively, hold the hexagonal pin with a socket.
Tightening torque 84 Nm (62 lbf ft)
Tightening torque, nut with steel lock: 95 Nm (66 lbf ft)
|
|
31.
|
Fit the steering gear bolts and tighten them.
Tightening torque 90 Nm (66 lbf ft)
|
|
32.
|
Remove the strap round the radiator core.
|
|
33.
|
4-cyl:
Fit the engine oil cooler. Tighten the air cleaner casing.
|
|
34.
|
Tighten the torque arm on the subframe
Tightening torque 90 Nm + 90° (66 lbf ft + 90°)
|
|
35.
|
Loosely fit the rear engine pad by putting the bolts in place.
|
|
36.
|
Lower the vehicle and tighten the engine pad bolts from above.
Tightening torque 24 Nm (18 lbf ft)
|
|
37.
|
Lift the vehicle and fit the engine bracket to the transmission.
Tightening torque 60 Nm + 60° (44 lbf ft + 60°)
|
|
38.
|
Fit the front exhaust system.
Tightening torque, 4-cyl 25 Nm (18.4 lbf ft)
|
|
39.
|
Run the wiring for the oxygen sensor into the engine bay.
|
|
41.
|
Lower the car to the floor.
|
|
42.
|
Remove the lifting beam.
|
|
43.
|
Connect the oxygen sensors

|
|
44.
|
Shake the unit to ensure there is no tension in the engine pads.
Tighten the rear engine pad nuts.
Tightening torque 45 Nm (33 lbf ft)
|
|
45.
|
Fit the bolts securing the transmission to the engine and tighten them.
Tightening torque 70 Nm (52 lbf ft)
|
|
46.
|
Clean and fit the dipstick tube.
|
|
47.
|
Fit the transmission's breather hose.
|
|
48.
|
Fit the shifting cable to the bracket on the transmission. Fit the clamp.
|
|
49.
|
Fit the shifting cable to the selector lever in position P.
|
|
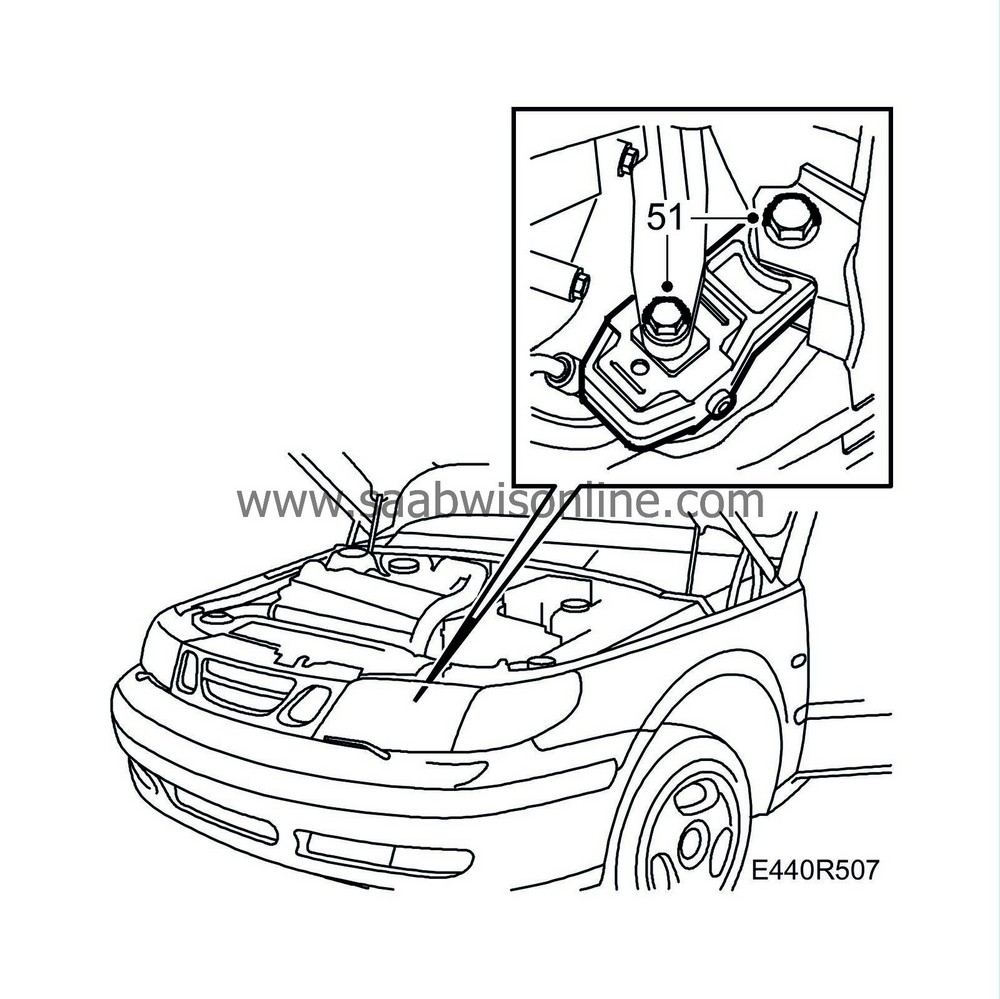
51.
|
Raise the car. Slacken the bolt securing the front torque arm and centre the rubber pad in the arm. Tighten the bolt.
Tightening torque, torque arm to subframe 90 Nm + 90° (66 lbf ft + 90°)
Tightening torque, torque arm to bracket 70 Nm + 90° (52 lbf ft + 90°)
|
|
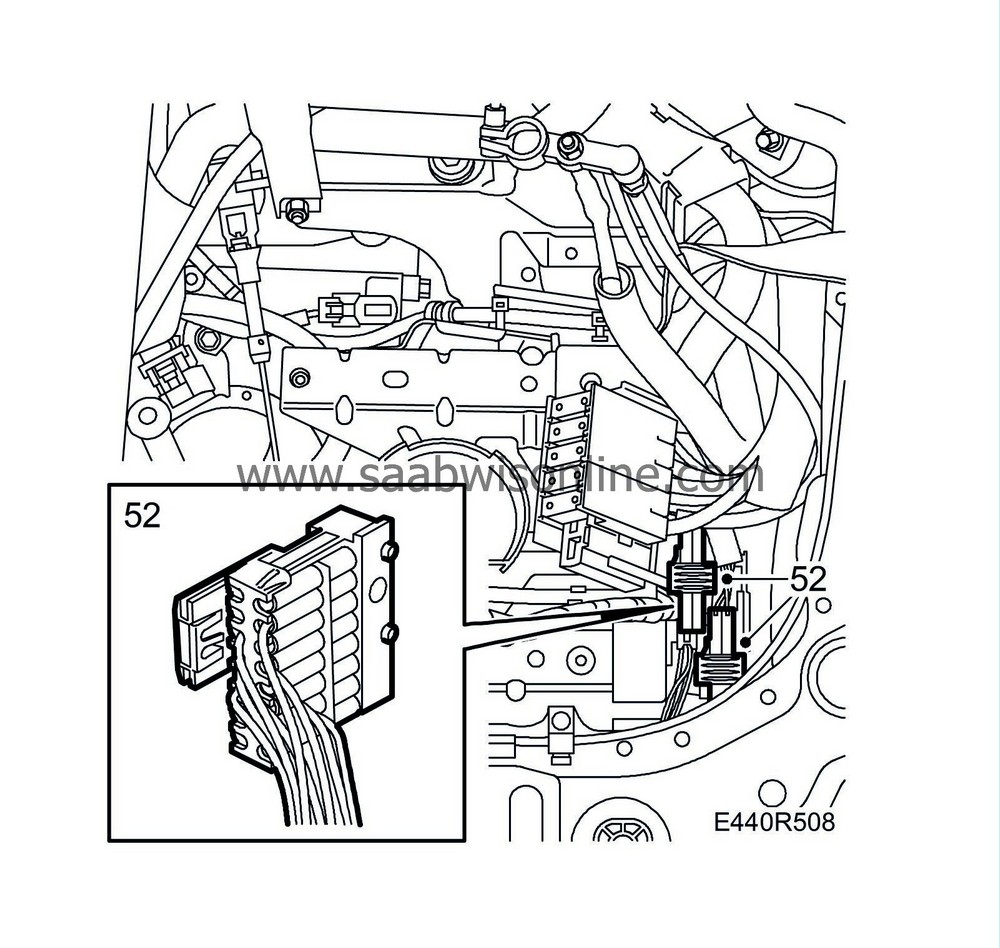
52.
|
Lower the car. Plug in the electrical connectors to the transmission.
|
|
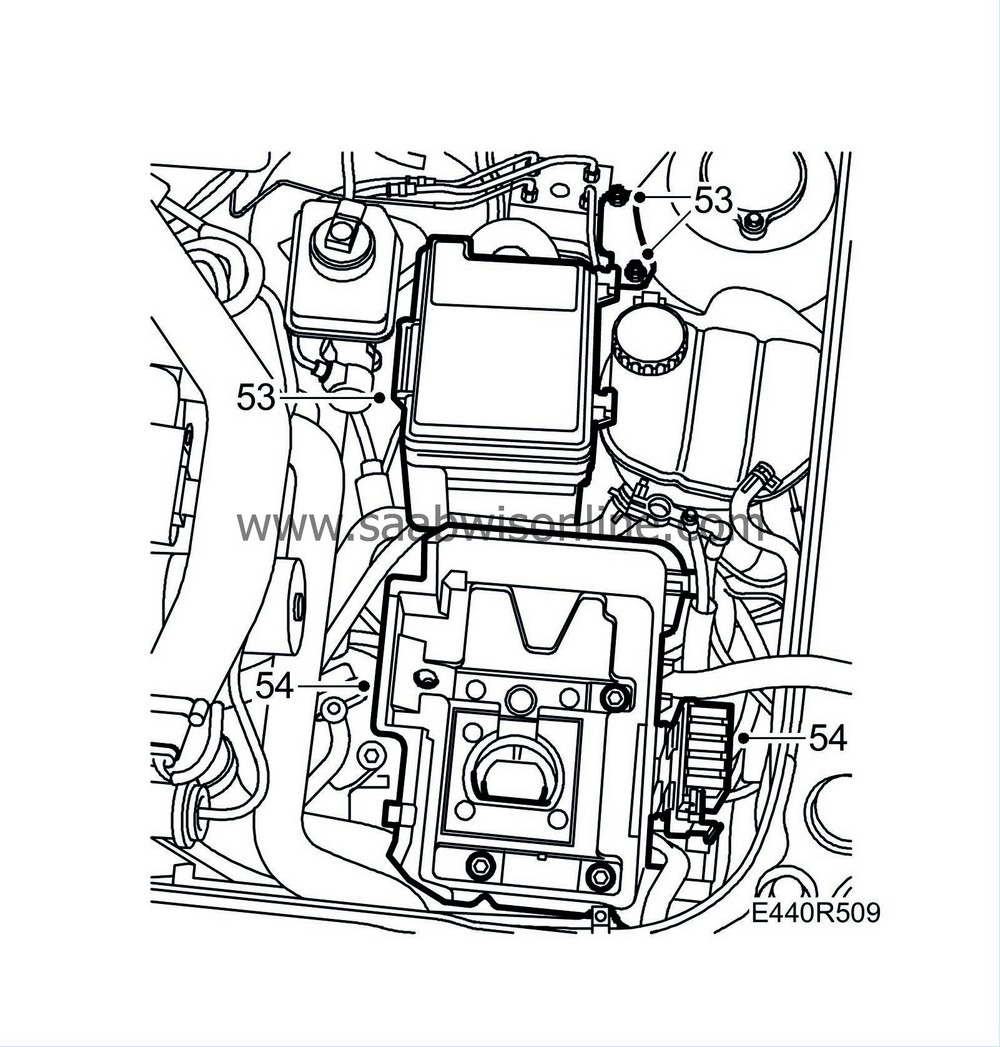
53.
|
Fit the main fuse box.
|
|
54.
|
Fit the battery tray and the Maxi fuse holder.
|
|
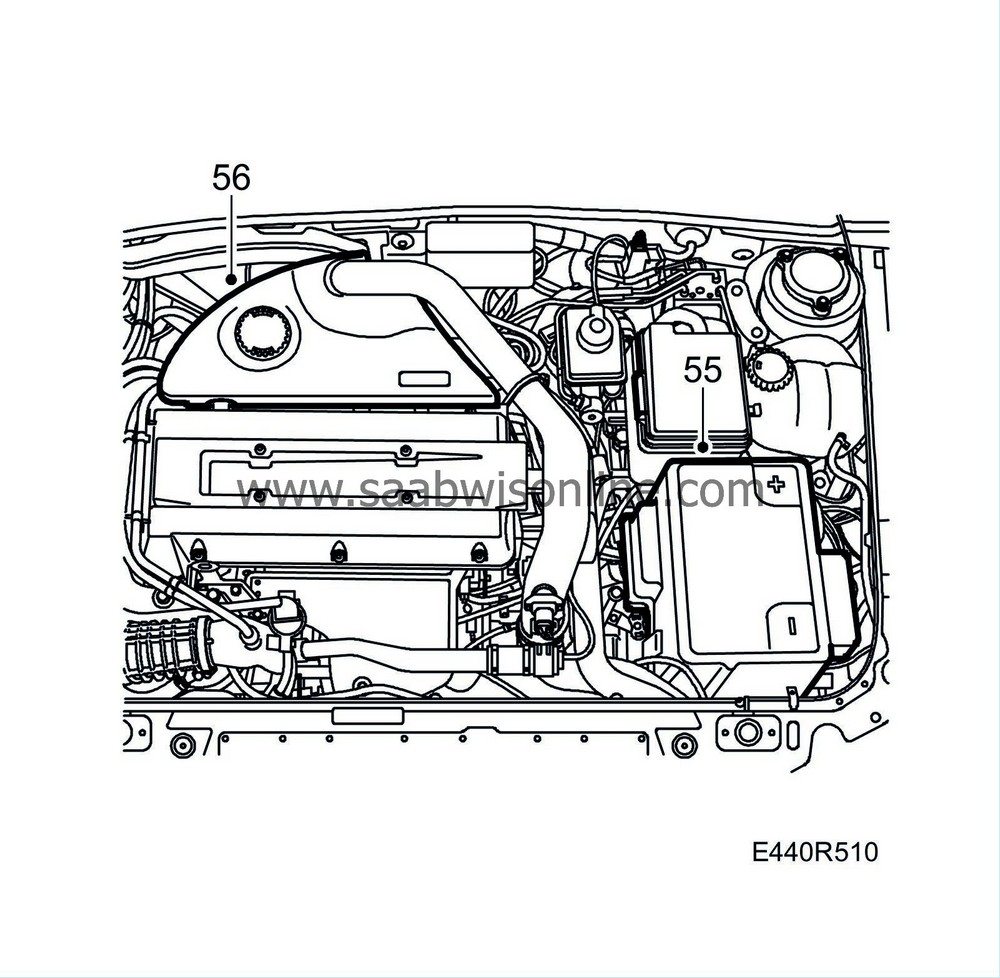
55.
|
Fit the battery and battery cover.
|
|
56.
|
Fit the upper engine cover.
|
|
60.
|
Test drive the car with varying engine loads and rpm and read any trouble codes that are generated. Also check the position of the steering wheel when driving straight ahead on a level road. Adjust if needed. Perform
Adaptation, resetting
.
|
|
61.
|
Set the right time on the clock.
|


