PRE-RELEASE
Primary Timing Chain Replacement
| Primary Timing Chain Replacement |
Special Tools
EN-49212 Camshaft FixerFor equivalent regional tools, refer to Special Tools (LDK, LHU) .
| Removal Procedure |
| 1. |
Remove the timing chain tensioner. Refer to
Timing Chain Tensioner Replacement (LDK/A20 NHT)
.
|
|
| 2. |
Remove the oil pump gear. Refer to
Oil Pump Gear Replacement
.
|
|
| 3. |
Remove the timing chain guide - adjustable. Refer to
Timing Chain Guide Replacement
.
|
|
| 4. |
Remove the timing chain guide - fixed. Refer to
Timing Chain Guide Replacement
.
|
|
| 5. |
Remove the timing chain guide - upper. Refer to
Timing Chain Guide Replacement - Upper
.
|
|
| 6. |
Remove the camshaft position actuator - exhaust. Refer to
Camshaft Position Exhaust Actuator Replacement
.
|
|
| 7. |
Remove the camshaft position actuator replacement - intake. Refer to
Camshaft Position Intake Actuator Replacement
.
|
|
| 8. |
Remove the timing chain oil nozzle. Refer to
Timing Chain Oil Nozzle Replacement
.
|
|
| 9. |
Remove the camshaft timing chain.
|
|
| Installation Procedure |
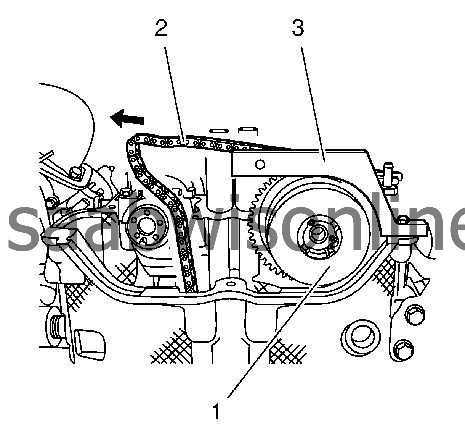
| 1. |
Install the camshaft position actuator - intake (1) but do not tighten yet. Refer to
Camshaft Position Intake Actuator Replacement
.
|
|
| 2. |
Install the timing chain (2).
|
|
| • |
Lay the timing chain (2) about the intake camshaft wheel (1).
|
| • |
Fix the intake camshaft with the
EN-49212-2
camshaft fixer (3).
|
| 3. |
Install the timing chain guide - fixed. Refer to
Timing Chain Guide Replacement
.
|
|
| 4. |
Install the timing chain guide - adjustable. Refer to
Timing Chain Guide Replacement
.
|
|
| 5. |
Install the timing chain oil nozzle. Refer to
Timing Chain Oil Nozzle Replacement
.
|
|
| 6. |
Install the oil pump gear. Refer to
Oil Pump Gear Replacement
.
Turn the crankshaft (1) on the set marks (2). 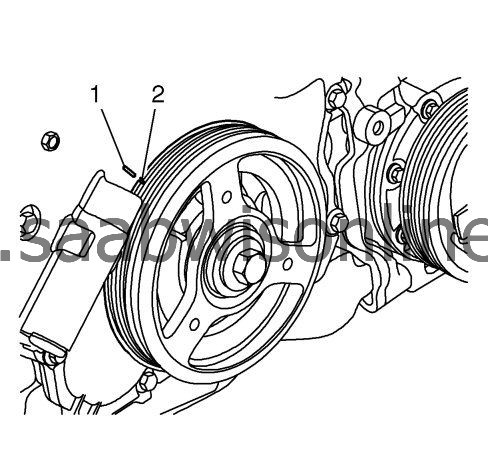
|
|
| 7. |
Install the camshaft position actuator - exhaust. Refer to
Camshaft Position Exhaust Actuator Replacement
.
|
|
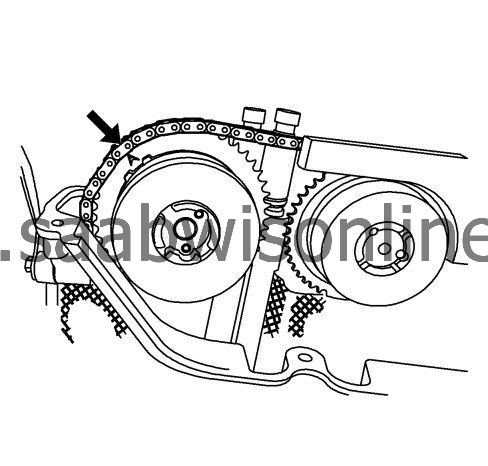
| • |
Count the number of the end to end connectors of the camshaft timing chain between the mark on the intake camshaft drive pulley and the mark on the exhaust camshaft drive pulley.
|
| • |
The timing chain must have 29 end to end connectors to guarantee a correct adjustment.
|
| • |
During assembly it is necessary to tension the timing chain.
|
| • |
Turn the camshaft in clockwise direction to install the exhaust camshaft drive pulley.
|
| • |
Install the exhaust camshaft drive pulley and fixes with that fastener in the camshaft.
|
| 8. |
Refer to
Fastener Caution
.
Tighten the camshaft position actuator - exhaust to 30 Nm (22 lb ft) 100 degrees . Hold up the exhaust camshaft with a wrench. |
|
| 9. |
Tighten the camshaft position actuator - intake to
30 Nm (22 lb ft) 100 degrees
Hold up the intake camshaft with a wrench. |
|
| 10. |
Fix the exhaust camshaft with the
EN-49212-1
camshaft fixer .
|
|
| • |
Check everything over again.
|
| • |
Remove the
EN-49212
camshaft fixer.
|
| 11. |
Install the timing chain guide - upper. Refer to
Timing Chain Guide Replacement - Upper
.
|
|
| 12. |
Install the timing chain tensioner. Refer to
Timing Chain Tensioner Replacement (LDK/A20 NHT)
.
|
|
| 13. |
Turn the crankshaft two round and examine the track tension and the attitudes again.
|
|
