Fuel Injector Replacement
|
|
Fuel Injector Replacement
|
Special Tools
|
•
|
EN-32025012
Sliding Hammer Adapter
|
|
•
|
EN-46786
Injector Removal Tool
|
For equivalent regional tools, refer to
Special Tools
.
 Warning
|
|
Always wear safety goggles when working with fuel in order to protect the eyes from fuel splash.
|
|
|
|
|
|
|
Warning
|
|
Fuel Vapors can collect while servicing fuel system parts in enclosed areas such as a trunk. To reduce the risk of fire and increased exposure to vapors:
|
|
•
|
Use forced air ventilation such as a fan set outside of the trunk.
|
|
•
|
Plug or cap any fuel system openings in order to reduce fuel vapor formation.
|
|
•
|
Clean up any spilled fuel immediately.
|
|
•
|
Avoid sparks and any source of ignition.
|
|
•
|
Use signs to alert others in the work area that fuel system work is in process.
|
|
|
|
|
|
|
Warning
|
|
Place a dry chemical (Class B) fire extinguisher nearby before performing any on-vehicle service procedures. Failure to follow these precautions may result in personal injury.
|
|
|
|
|
|
|
Warning
|
|
Do not allow smoking or the use of open flames in the area where work on the fuel or EVAP system is taking place. Anytime work is being done on the fuel system, disconnect the negative battery cable, except for those tests where battery voltage is required.
|
|
|
|
|
|
|
Warning
|
|
Fuel coming from the tank under high pressure can cause serious injuries to the skin and eyes. ALWAYS relieve the pressure in the fuel system before removing components under high fuel pressure.
|
|
|
|
|
|
|
Note
|
|
•
|
Be very thorough in terms of cleanliness when working in the fuel system. Malfunctions can also occur due to very small dirt particles. Prevent dirt from entering the fuel system by cleaning the hoses and plugging the pipes and lines upon removal. Store the components so that contaminants cannot enter.
|
|
•
|
If the injectors are to be refitted, mark the injectors so that they can be refitted to the same cylinder.
|
|
2.
|
Remove the upper engine cover and insulation.
|
|
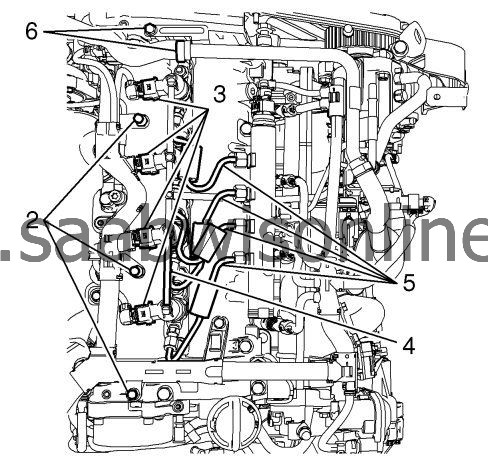
3.
|
Remove the fasteners (2) for the fuel injector harness.
|
|
4.
|
Remove the fuel return hoses (4).
|
Note
|
|
Wait 60 sec. after engine shutdown before opening the high pressure fuel system.
|
|
|
5.
|
Remove the fuel pipes from the injectors and fuel rail (5). Hold the injector with a spanner when detaching the pipe.
|
|
6.
|
Remove the crankcase ventilation pipe (6).
|
|
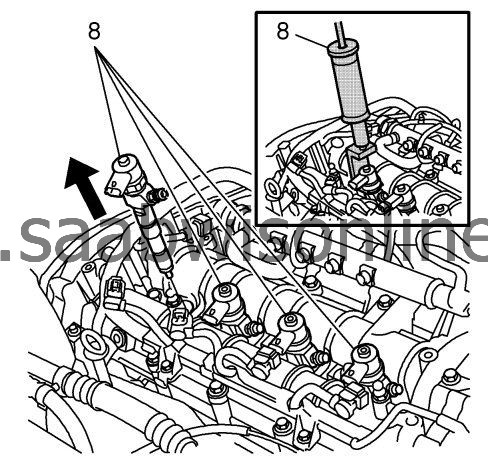
7.
|
Remove the injector with holder (8). If the nozzles cannot be lifted by hand, use
EN-46786
removal tool,
DT-49407
sliding hammer and
EN-32025012
adapter.
|
|
8.
|
|
Note
|
|
If the injectors are to be refitted, mark the injectors so that they can be refitted to the same cylinder.
|
Remove the injectors in the following order: 1-2-3-4
|
|
9.
|
Clean the injector sealing surfaces in the cylinder head using
EN-47632
cleaning tool (10).

|
|
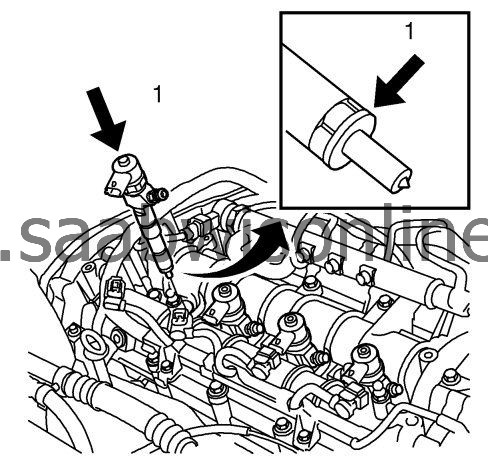
1.
|
|
Note
|
|
If new injectors are to be fitted, read and make a note of its classification code. The code is to be used when programming using the diagnostic tool.
|
Install the injectors with NEW seals in the following order: 4-3-2-1 (1). Tighten fasteners to
25 Nm (18 lb ft)
.
|
|
2.
|
Install the crankcase ventilation pipe (6).
|
|
3.
|
Check that the fuel pipe sealing surfaces are not damaged and are clean. Install the pipes (5) without force and start the nuts by hand. Tighten the injectors:
25 Nm (18 lb ft)
. Tighten to fuel rail:
19Nm (14 lb ft)
.
|
|
4.
|
Install the fuel return hoses (4).
|
|
5.
|
Install the connectors (3).
|
|
6.
|
Install the fasteners (2) for the fuel injector harness.
|
|
7.
|
If new injectors are installed, connect the diagnostic tool for programming.
|
|
8.
|
Start the engine and check that the fuel system is not leaking. Connect the diagnostic tool and erase any diagnostic trouble codes.
|
|
9.
|
Install the upper engine cover.
|
