PRE-RELEASE
Clutch Assembly Replacement
| Clutch Assembly Replacement |
Special Tools
DT-6263 Remover and InstallerFor equivalent regional tools, refer to Special Tools .
| Removal Procedure |
| 1. |
Remove the transmission. Refer to
Transmission Replacement (All Wheel Drive - LDK/A20NHT)
Transmission Replacement (Front Wheel Drive - LDK/A20NHT)
Transmission Replacement (FWD, LBS/A20DTH)
.
|
||||||||||
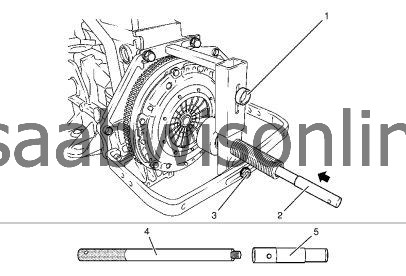
| 2. |
Attach DT-6263 remover and installer (1) to engine block. 
|
|||||||
| 3. |
Attach
DT-6263-30
remover and installer (4) to centring drift (5).
|
|
| 4. |
Refer to
Fastener Caution
.
Attach remover and installer DT-6263. |
|
| • |
Align
DT-6263
remover and installer in center.
|
| • |
Insert centring drift with
DT-6263-30
remover and installer (2) through
DT-6263
remover and installer into clutch plate and crankshaft (center).
|
| • |
Tighten fastener (1)
|
| • |
Tighten fastener (3)
|
| • |
Tighten 4x fastener
DT-6263
remover and installer on engine block.
|
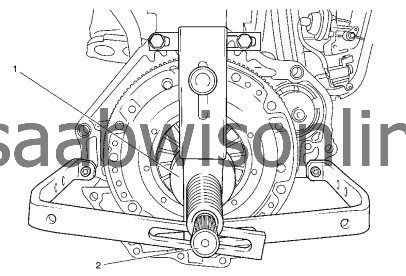
| 5. |
Relieve stress on clutch disc.

|
|
| • |
Move
DT-6263
remover and installer (1) so that it rests against spring tangs of the thrust plate.
|
| • |
Turn
DT-6263
remover and installer clockwise to the stop.
|
| 6. |
Remove thrust plate from flywheel. Remove 6 fasteners. 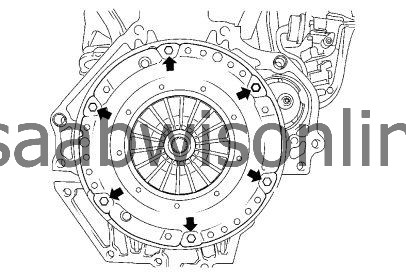
|
|||||||
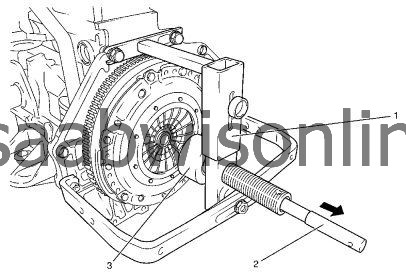
| 7. |
Detach thrust plate and clutch plate.
|
|
| • |
Turn
DT-6263
remover and installer (1) anticlockwise to the stop.
|
| • |
Pull out centring drift with
remover and installer
DT-6263-30 (2).
|
| 8. |
Check clutch plate for wear: Check the projection of the lining at the clutch lining rivets. The clutch plate must be replaced if the lining projection is less than 0.5 mm. Also, press the clutch plate onto the transmission input shaft and check for ease of movement. 
|
|||||||
| Installation Procedure |
| 1. |
Attach clutch disc and thrust plate to flywheel. Center thrust plate and clutch plate with centring drift and remover and installer DT-6263-30 (1). 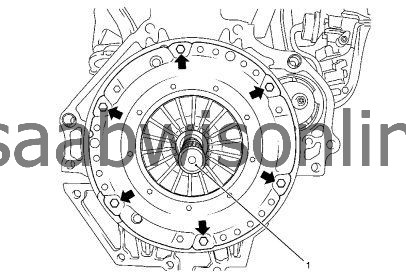
|
|||||||||||||
| 2. |
Attach thrust plate to flywheel and turn DT-6263 remover and installer (1) clockwise to the stop. 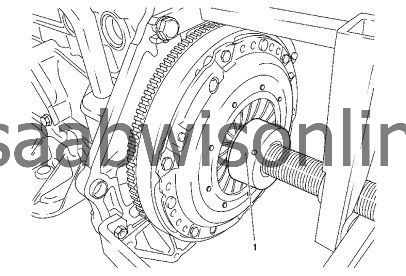
|
|||||||
| • |
Tighten the trust plate - fastener M7 to
15 Nm (11 lb ft)
.
|
| • |
Tighten the trust plate - fastener M8 to
22 Nm (16 lb ft)
.
|
| 3. |
Detach
DT-6263
remover and installer (1) from engine block.
|
|
| • |
Turn
DT-6263
remover and installer (3) anticlockwise to the stop.
|
| • |
Detach centring drift and
remover and installer
DT-6263-30 (2).
|
| • |
Remove 4x fastener
DT-6263
remover and installer on engine block.
|
| 4. |
Install the transmission. Refer to
Transmission Replacement (All Wheel Drive - LDK/A20NHT)
Transmission Replacement (Front Wheel Drive - LDK/A20NHT)
Transmission Replacement (FWD, LBS/A20DTH)
.
|
|
