Rear Window Replacement (Sedan)
|
|
Rear Window Replacement (Sedan)
|
Special Tools
|
•
|
BO-46974
Glass Removal System
|
For equivalent regional tools, refer to
Special Tools
.
 Warning
|
|
Approved safety glasses and gloves should be worn when performing this procedure to reduce the chance of personal injury.
|
|
|
|
|
|
|
Note
|
|
The following document describes the procedure for removing the rear window replacement using glass removal system BO-46974. As a supplement to the existing video VT 54, concise steps will be shown for removing the rear window replacement without destroying it. With the introduction of
BO-46974
glass removal system , the conventional glass removing methods are no longer used.
|
Position the vehicle on level ground and move the front wheels to the straight-ahead position.
BO-46974
glass removal system is recommended for removing glass without destroying it. Further information can be found in video VT 54.
Before cutting out a stationary window, apply a double layer of masking tape around the perimeter of the painted surfaces.
|
1.
|
Open the rear compartment lid.
|
|
4.
|
|
Note
|
|
•
|
The length of wire required for removing the glass is the diagonal length (1) of the rear window replacement multiplied by 4.
|
|
•
|
The circumference (2) of the roll of wire is approximately
1 m (3.28 ft)
.
|
Cut the cutting wire to length.

|
|
5.
|
Unroll
6 m (19.68 ft)
of cutting wire from the roll of wire.
|
|
6.
|
|
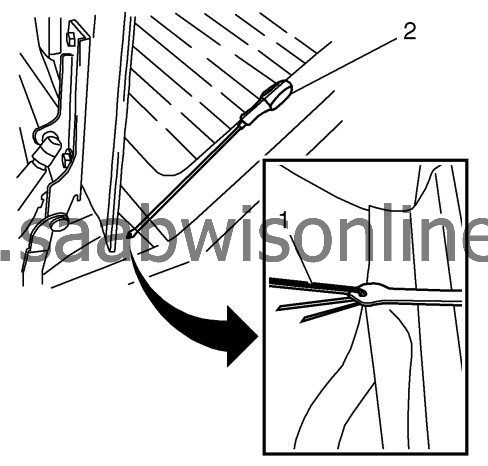
Note
|
|
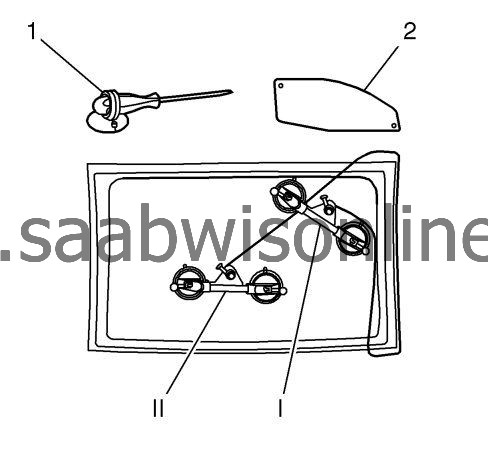
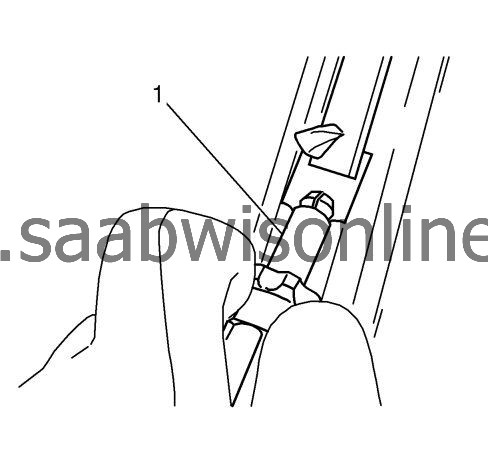
Twisting the tip of the awl (1) when inserting it will damage the rear window replacement.
|
Insert awl through the adhesive bed.

|
|
|
•
|
Insert the awl (2) (by applying pressure and making slight movements parallel with the adhesive bed).
|
|
|
•
|
To make insertion with the awl easier, heat the tip (3) of the awl.
|
|
7.
|
|
Note
|
|
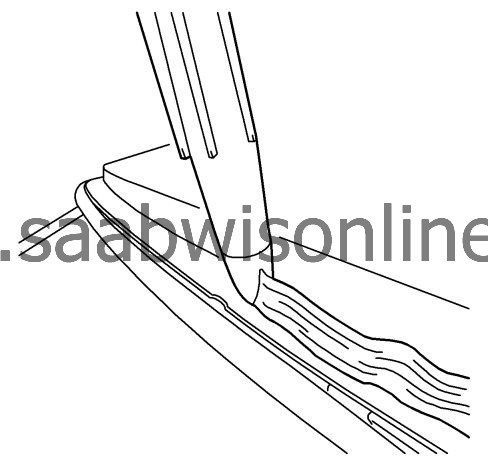
The cutting wire is bent at right angles to the "tip" of the awl, to minimize resistance when pulling it in.
|
Attach cutting wire to the awl.
|
|
|
•
|
Thread the cutting wire (1) through the hole of the awl (2).
|
|
|
•
|
Bend over the cutting wire.
|
|
8.
|
|
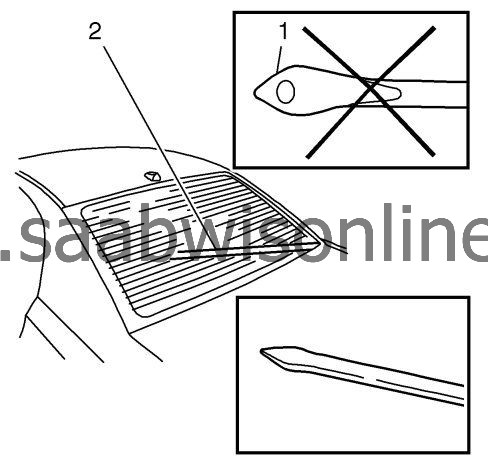
Note
|
|
•
|
When pulling in the cutting wire do not twist the "tip" (1) of the awl (to avoid damaging the rear window replacement).
|
|
•
|
When pulling through, keep the flat side of the awl "tip" (1) parallel with the edge of the rear window replacement.
|
Pull the awl and cutting wire into the vehicle.
Pull the cutting wire (2) with awl into the position shown.
|
|
9.
|
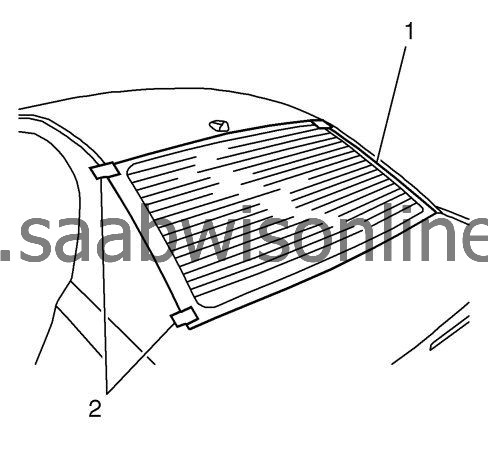
Lay the cutting wire on the rear window replacement all the way round.
|
|
|
•
|
In the area of the four radii, lay the cutting wire (1) under the rear window replacement.
|
|
|
•
|
Fix the cutting wire in position with fabric tape (2).
|
|
10.
|
|
Note
|
|
Check that the cutting wire has been laid correctly all round, correct if necessary.
|
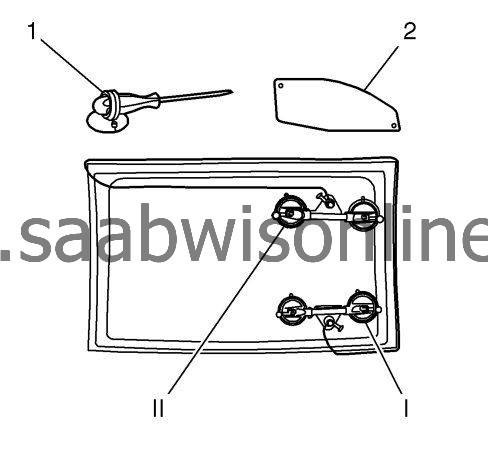
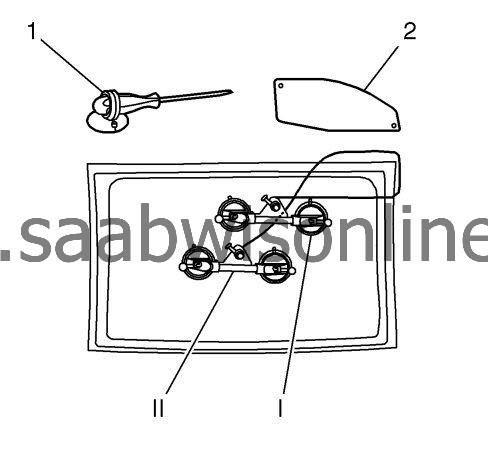
Position winches on rear window replacement.

|
|
|
•
|
Position winches (I) and (II) and attach cutting wire (1) and (2) to the winding heads of winches (I) and (II).
|
|
|
•
|
Insert the transfer ratchet on winch (I) and pre-tension the cutting wire.
|
|
|
•
|
Roll the cutting wire under the rubber seal of the rear window replacement all the way round.
|
|
11.
|
|
Note
|
|
For a rational rear window replacement cutting operation, the winches (I, II) must be positioned on the rear window replacement in the order shown.
|
|
When cutting out with the winch, more pulling force is required to cut the areas around the radii. The hold-down positioner (1) and the plastic plate (2) should also be used when cutting in the critical areas.
|
Cut out the rear window.
Cut out with winch (II).
|
|
12.
|
|
Note
|
|
Use hold-down positioner (1) and plastic plate (2) in the critical areas.
|
Cut out the rear window.
Re-position winch (II) and continue cutting with winch (I).
|
|
13.
|
|
Note
|
|
Use hold-down positioner (1) and plastic plate (2) in the critical areas.
|
Cut out the rear window.
Re-position winch (I) and finish cutting out.
|
|
14.
|
Remove rear window.
Remove rear window with second mechanic.
|
|
15.
|
Cut adhesive bead on the vehicle.
Cut the adhesive bead all round using the knife supplied (1) to around
1 mm (0.04 in)
thickness.
|
|
16.
|
Repair any paint damage.
Using a touch-up pen to match the color of the vehicle, repair any paint damage.
|
|
17.
|
Cut adhesive bead on the rear windshield.
Cut the adhesive bead all round using the knife supplied to around
1 mm (0.04 in)
thickness.
|
|
1.
|
|
Note
|
|
Only with new rear window pane.
|
Apply primer.
|
|
2.
|
Apply adhesive bead.
Cut into the tip of the cartridge in such a way that a bead of adhesive approximately
13 mm (0.5 in)
thick is produced.
|
|
3.
|
Install rear window into the opening.
|
|
|
•
|
Second mechanic required.
|
|
|
•
|
Insert rear window with
BO-641
suction holder.
|
|
|
•
|
Position using fibre tape.
|
|
4.
|
Remove
BO-641
suction holder.
|
|
7.
|
Remove the double layer of masking tape around the perimeter of the painted surfaces.
|
|
8.
|
Close the rear compartment lid.
|
