Piston, Connecting Rod, and Bearing Installation (LDK, LHU)
|
|
Piston, Connecting Rod, and Bearing Installation (LDK, LHU)
|
Special Tools
|
•
|
EN-43953
Piston Ring Compressor
|
|
•
|
EN-43966-1
Connecting Rod Guides
|
For equivalent regional tools, refer to
Special Tools (LDK, LHU)
.
|
1.
|
Install the NEW connecting rod bearings.
|
|
|
1.1.
|
Install the bearing inserts into the connecting rod and the connecting rod cap.
|
|
|
1.2.
|
Lubricate the connecting rod bearings with engine oil.
|
|
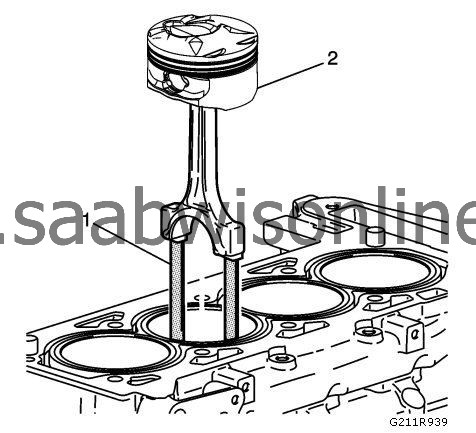
2.
|
Install the
EN-43966-1
guides (1) into the connecting rod bolt holes. This protects the crankshaft journal during piston and connecting rod installation.
|
|
3.
|
Install the
EN-43953
compressor , the piston (2), and the connecting rod to the correct bore.
|
|
|
3.1.
|
Stagger each piston ring end gap equally around the piston.
|
|
|
3.2.
|
Lubricate the piston and the piston rings with engine oil.
|
|
|
3.3.
|
Do not disturb the piston ring end gap location.
|
|
|
3.4.
|
The piston must be installed so that the mark on the top of the piston faces the front of the engine.
|
|
|
3.5.
|
Place the piston in its matching bore.
|
|
|
3.6.
|
Tap the piston into its bore with a hammer handle. Guide the connecting rod to the connecting rod journal while tapping the piston into place.
|
|
|
3.7.
|
Hold the
EN-43953
compressor against the engine block until all the rings have entered the cylinder bore.
|
|
|
3.8.
|
Remove the connecting rod guides from the connecting rod bolt holes.
|
|
4.
|
|
Note
|
|
Ensure that the connecting rod cap is properly oriented on the connecting rod.
|
Install the connecting rod cap (1).
|
|
5.
|
Refer to
Fastener Caution
.
|
Note
|
|
Always use NEW bolts.
|
Install NEW connecting rod bolts and tighten to
25 Nm (18 lb ft)
plus
100 degrees
using the
EN-45059
angle meter.
|
|
6.
|
Install the remaining connecting rods and piston assemblies.
|
|
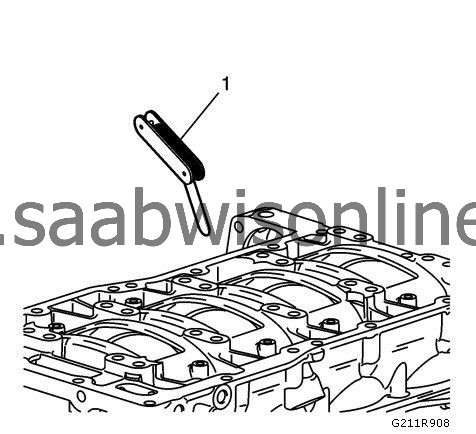
7.
|
Measure the connecting rod side clearance with a feeler gauge (1).
The correct clearance is 0.07-0.37 mm (0.0027-0.0145 in).
|
