PRE-RELEASE
Transmission Replacement (AWD, LBY/A20DTR)
| Transmission Replacement (AWD, LBY/A20DTR) |
Special Tools
| • |
DT-48783
Special Socket
|
|
| • |
EN-47649
Engine Bridge
|
|
| • |
EN 47650
Retainer Plate
|
|
| • |
DT-47648
Fixture
|
|
| • |
DT-6388
Support
|
|
| • |
CH-49647
Base Frame
|
|
| • |
CH-49290
Centring Fixture Subframe-Engine
|
|
For equivalent regional tools, refer to Special Tools .
| Removal Procedure |
| 1. |
Remove the engine cover. Refer to
Engine Shield Replacement
.
|
|
| 2. |
Remove the battery tray. Refer to
Battery Tray Replacement (Diesel)
Battery Tray Replacement (LHU/A20NFT)
.
|
|
| 3. |
Remove the shift lever cable from the selector on the transmission. Refer to
Range Selector Lever Cable Replacement
.
|
|
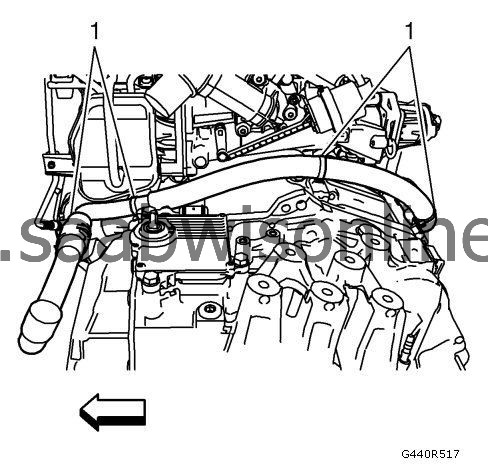
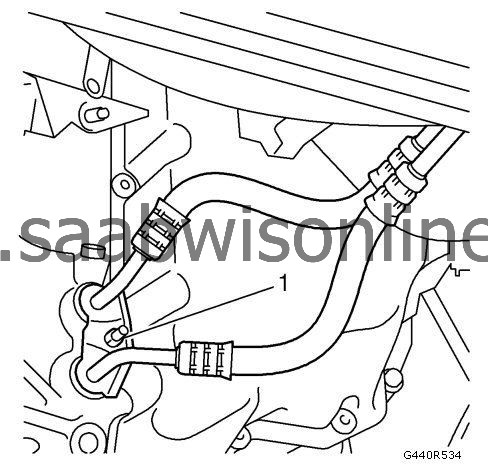
| 4. |
Release the wiring harness (1) from the transmission.
|
|
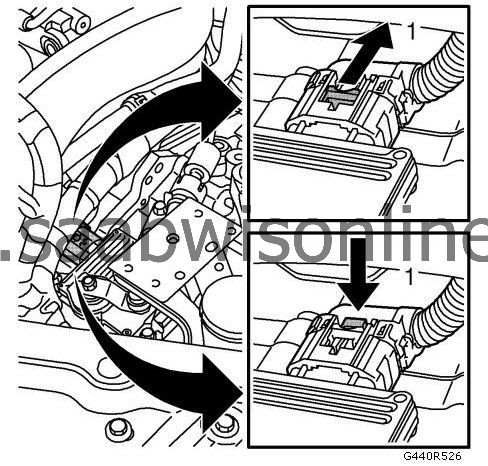
| 5. |
Remove the connector (1) to the transmission control module.
|
|
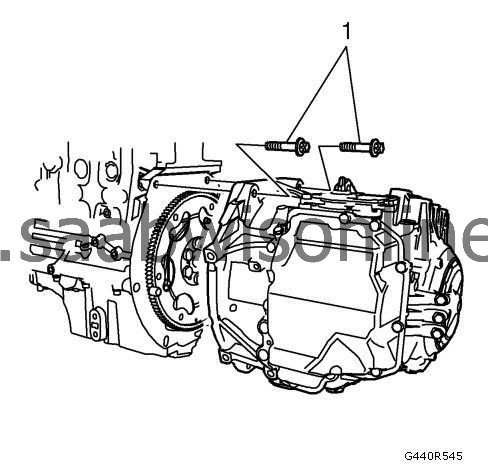
| 6. |
Remove the upper transmission fasteners (1) using the
special socket
DT-48783.
|
|
| 7. |
Remove the ground cable and the upper fasteners to the starter motor. Refer to
Starter Replacement (2.0L Diesel)
Starter Replacement (LAU/A28NER)
Starter Replacement (LDE/A16XER, LLU/A16LET, 2H0/A18XER)
Starter Replacement (LHU/A20NFT)
.
|
|
| 8. |
Support the engine with
engine bridge
EN-47649 and
retainer
EN-47650.
|
|
| 9. |
Remove the transfer Case. Refer to
Transfer Case Assembly Replacement
.
|
|
| 10. |
Remove the transmission front mount. Refer to
Transmission Front Mount Replacement
.
|
|
| 11. |
Remove the starter. Refer to
Starter Replacement (2.0L Diesel)
Starter Replacement (LAU/A28NER)
Starter Replacement (LDE/A16XER, LLU/A16LET, 2H0/A18XER)
Starter Replacement (LHU/A20NFT)
.
|
|
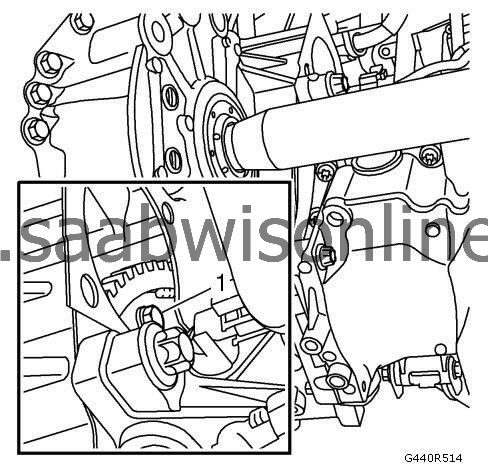
| 12. |
Remove the fasteners (1) to the converter.
|
|
| 13. |
Drain the transmission fluid. Refer to
Transmission Fluid Level and Condition Check
.
|
|
| 14. |
Remove the oil cooler hose connection (1) from the transmission.
|
|
| 15. |
Pull out the left driveshaft from the transmission. Refer to
Front Wheel Drive Shaft Replacement - Left Side (GNA)
Front Wheel Drive Shaft Replacement - Left Side (GNB)
.
|
|
| 16. |
Lower the vehicle.
|
|
| 17. |
Remove the fasteners to the transmission mount left side. Refer to
Transmission Mount Replacement - Left Side
.
|
|
| 18. |
Lower the engine enough to access the transmission.
|
|
| 19. |
Raise the vehicle.
|
|
| 20. |
Place the transmission fixture
DT-47648
on
CH-49647
and attach to the transmission in the holes where the front and rear brackets are mounted.
|
|
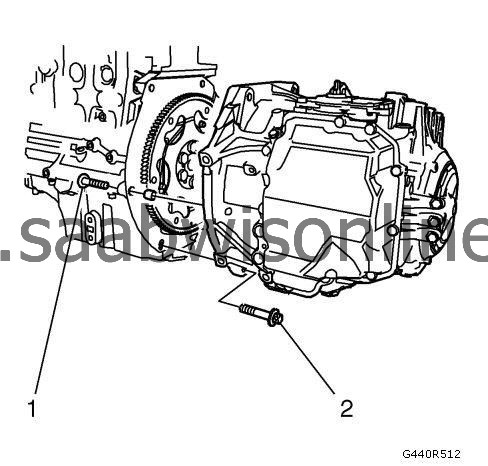
| 21. |
Remove lower transmission fasteners (1) and (2).
|
|
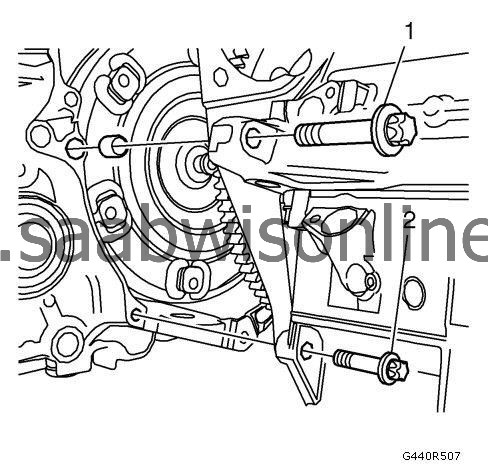
| 22. |
Remove lower transmission fasteners (1) and (2).
|
|
| 23. |
Separate the transmission from the engine.
|
|
| 24. |
Prevent the torque converter falling using the DT-6388
holder
.
|
|
| 25. |
Remove the transmission from the
fixture
DT-47648.
|
|
| Installation Procedure |
| 1. |
Position the transmission at the
fixture
DT-47648.
|
|
| 2. |
Remove
support
DT-6388.
|
|
| 3. |
Check torque converter position. Refer to
Torque Converter Replacement
.
|
|
| 4. |
Attach the transmission to the engine.
|
|
| 5. |
Lubricate the centering pin on the converter and the two guiding sleeves.
|
|
| 6. |
Refer to
Fastener Caution
.
Fit the transmission fasteners.
|
|
| • |
Tighten fastener (1) to
60 Nm (44 lb ft)
.
|
| • |
Tighten fastener (2) to
40 Nm (30 lb ft)
.
|
| 7. |
Fit the transmission fasteners.
|
|
| • |
Tighten fastener (1) to
60 Nm (44 lb ft)
.
|
| • |
Tighten fastener (2) to
40 Nm (30 lb ft)
.
|
| 8. |
Fit the oil cooler hose connection (1) to the transmission and tighten to
7 Nm (62 lb in)
.
|
|
| 9. |
Fit the fastener (1) to the converter.
Apply locking agent on the bolts and tighten to 60 Nm (44 lb ft).
|
|
| 10. |
Fit the starter motor. Refer to
Starter Replacement (2.0L Diesel)
Starter Replacement (LAU/A28NER)
Starter Replacement (LDE/A16XER, LLU/A16LET, 2H0/A18XER)
Starter Replacement (LHU/A20NFT)
.
|
|
| 11. |
Remove the transmission fixture
DT-47648
and
CH-49647
.
|
|
| 12. |
Lower the vehicle.
|
|
| 13. |
Raise the engine to the correct level with the
engine bridge
EN-47649.
|
|
| 14. |
Install the fasteners to the transmission mount left side. Refer to
Transmission Mount Replacement - Left Side
.
|
|
| 15. |
Remove
engine bridge
EN-47649 and
retainer
EN-47650.
|
|
| 16. |
Fit the ground cable and the upper fasteners to the starter motor. Refer to
Starter Replacement (2.0L Diesel)
Starter Replacement (LAU/A28NER)
Starter Replacement (LDE/A16XER, LLU/A16LET, 2H0/A18XER)
Starter Replacement (LHU/A20NFT)
.
|
|
| 17. |
Raise the vehicle.
|
|
| 18. |
Fit the transmission front mount. Refer to
Transmission Front Mount Replacement
.
|
|
| 19. |
Fit the left driveshaft to the transmission. Refer to
Front Wheel Drive Shaft Replacement - Left Side (GNA)
Front Wheel Drive Shaft Replacement - Left Side (GNB)
.
|
|
| 20. |
Fit the transfer case. Refer to
Transfer Case Assembly Replacement
.
|
|
| 21. |
Fit the
CH- 49290
centring fixture to check alignment.
|
|
| 22. |
Lower the vehicle.
|
|
| 23. |
Fit upper transmission fasteners (1), using the
special socket
DT-48783 and tighten to
60 Nm (44 lb ft)
.
|
|
| 24. |
Fit the shift lever cable from the selector on the transmission. Refer to
Range Selector Lever Cable Replacement
.
|
|
| 25. |
Fit the wiring harness (1) to the transmission.
|
|
| 26. |
Fit the connector to the transmission control module.
|
|
| 27. |
Fit the battery tray. Refer to
Battery Tray Replacement (Diesel)
Battery Tray Replacement (LHU/A20NFT)
.
|
|
| 28. |
Fill the transmission fluid. Refer to
Transmission Fluid Level and Condition Check
.
|
|
| 29. |
Fit the engine cover. Refer to
Engine Shield Replacement
.
|
|
| 30. |
If the transmission is replaced, it"s necessary to make an adaption. Refer to
Transmission Adaptive Functions
and a SPS programming.
|
|
