Subframe, removing and fitting, Z18XE
|
|
Subframe, removing and fitting, Z18XE
|
To remove
|
1.
|
Put the front wheels in the straight-ahead position and engage the steering column lock.
|
|
2.
|
Hang two straps over the radiator member.
|
|
3.
|
Remove both front wheels.
|
|
4.
|
Remove the front lower cover. Detach the front section of the wing liners and bend aside slightly. Suspend the radiator assembly using the straps.
|
|
5.
|
Remove the exhaust system.
|
|
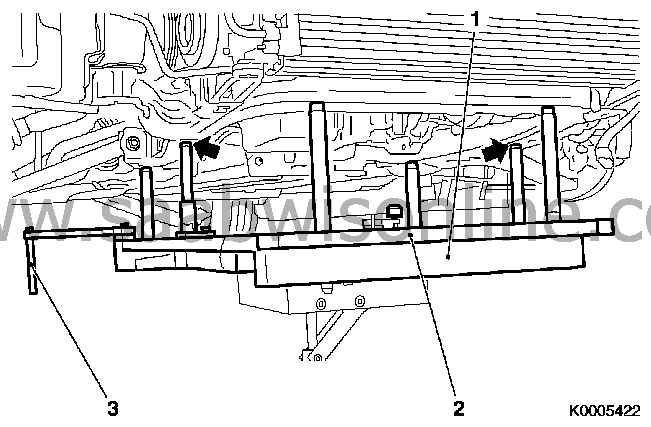
6.
|
Remove the intermediate swivel pin (1) from the steering gear.

|
|
7.
|
Remove the front engine pad (2) from the front axle member.
|
|
8.
|
Remove the engine pad holder (3) from the front axle member.
|
|
10.
|
Remove the ball joint and link arm on both sides from the steering swivel member.
|
|
11.
|
Remove the drop arm from both sides of the anti-roll bar.
|
|
12.
|
Unplug the wiring harness connector from the EHPS supply unit (1) / (2) and remove the clip and place to one side.

|
|
13.
|
On cars with Xenon headlamps:
Unplug the connector (arrowed) for the levelling sensor and remove from the front axle member.
|
|
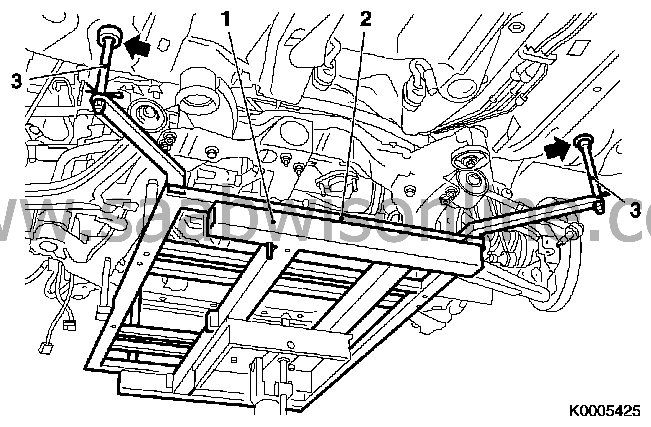
15.
|
Remove the subframe bolts on both sides. Remove the stays from the body.
|
|
16.
|
Lower the front axle beam slowly
Pull out the ball joints while the frame is lowering.
To fit
|
|
17.
|
Fit the front axle member to the undercarriage.
Instructions: Before fitting, press up the locating pins (3) on both sides.
When fitting, the locating pins must be seated in the locating holes (arrowed) in the car's undercarriage.
Check that the pins on both sides of the radiator are correctly seated in the front axle member's holder. Apply vaseline to the rubber guides.
Guide the link arms into the steering swivel members.
|
|
19.
|
Lift the subframe so that the inner sections of the bushes are pressing against the body. Fit the front subframe bolts on both sides.
Tightening torque 75 Nm +135° (55 lbf ft +135°)
|
|
20.
|
Fit the stays and the rear subframe bolts on both sides. Enter the rear stay bolts before tightening the subframe bolts.
Tightening torque 75 Nm +135° (55 lbf ft +135°)
|
|
21.
|
Lower and pull away the trolley lift.
|
|
22.
|
Tighten the rear stay bolts.
Tightening torque 90 Nm +45° (66 lbf ft +45°)
|
|
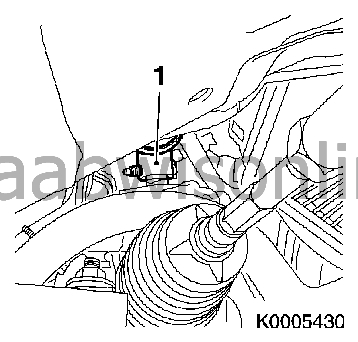
23.
|
Fit the holder for the rear engine pad (1)
Tightening torque 80 Nm (59 lbf ft)

|
|
24.
|
Fit the front engine pad (2) to the front axle member. Use a new nut.
Tightening torque 60 Nm +90° (44 lbf ft +90°)
|
|
25.
|
Fit the suspension arm on either side to the steering swivel member (3). Use new nuts and bolts.
Tightening torque 50 Nm (37 lbf ft)
 Warning
|
|
Press up the pin carefully.
|
|
The groove in the pin must be visible in the screw hole in the spindle housing.
|
|
If the rubber gaiter is pressed down, it will not seal properly to the swivel pin.
|
|
|
|
|
|
|
|
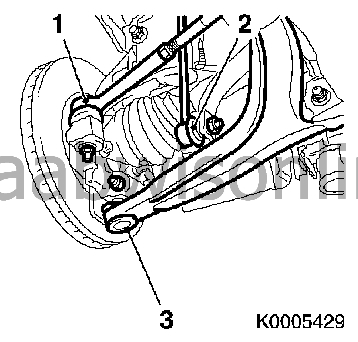
26.
|
Fit the track rod end (1) on either side to the steering swivel member. Use a new nut.
Tightening torque 35 Nm (26 lbf ft)
|
|
27.
|
Fit the drop arm (2) on either side to the anti-roll bars.
Tightening torque 65 Nm (48 lbf ft)
|
|
28.
|
Plug in the connector to the EHPS supply unit (1) /(2). Secure the wiring harness to the bracket.
|
|
29.
|
On cars with Xenon headlamps:
Plug in the connector to the headlamp levelling sensor and attach to the front axle member (arrow).
|
|
30.
|
Press on and fit the intermediate steering swivel (1) to the steering gear. Check that the front wheels are in the straight-ahead position. Clean the threads and apply
74 96 268 Threadlock
to the threads.
Tightening torque 30 Nm (22 lbf ft)
|
Warning
|
|
Check that the bolt fits into the groove on the pinion shaft.
|
|
|
|
|
|
|
|
33.
|
Fit the covers and the wheel housings.
|
|
34.
|
Fit the front wheels. See
Wheels
(110 Nm).
Tightening torque 110 Nm (81 lbf ft)
|