Spare part engine block, Z19 DTH, to fit
|
|
Spare part engine block, Z19 DTH, to fit
|
|
1.
|
Unpack the spare parts.
|
|
3.
|
Secure the engine in an engine lift.
|
|
6.
|
Remove the engine from the engine lift.
|
|
|
-
|
Unscrew the screw on the cover (oil pump)
|
|
|
-
|
Fit the stud (from fixing tool)
|
|
|
-
|
Fit the position plate and tighten the screw and nut, rotate the crankshaft until the tool aligns
|
|
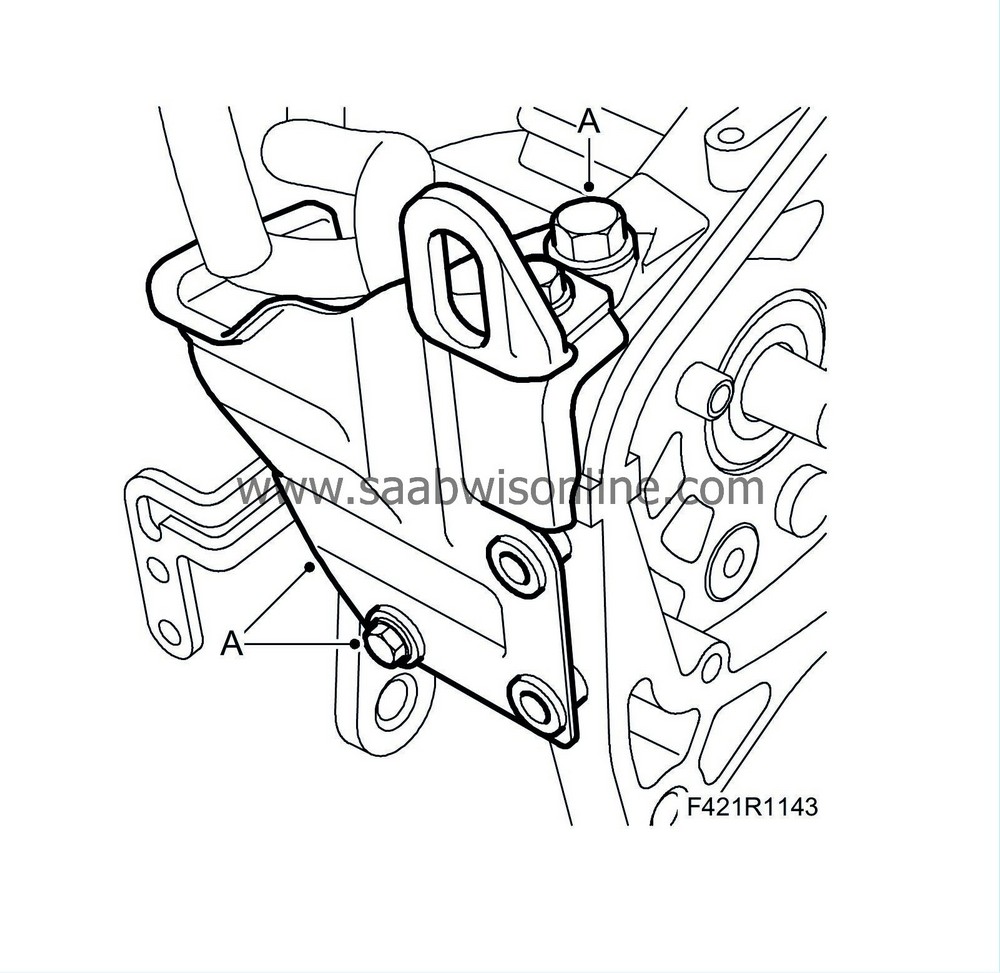
10.
|
Fit the engine cover bracket (A).
|
|
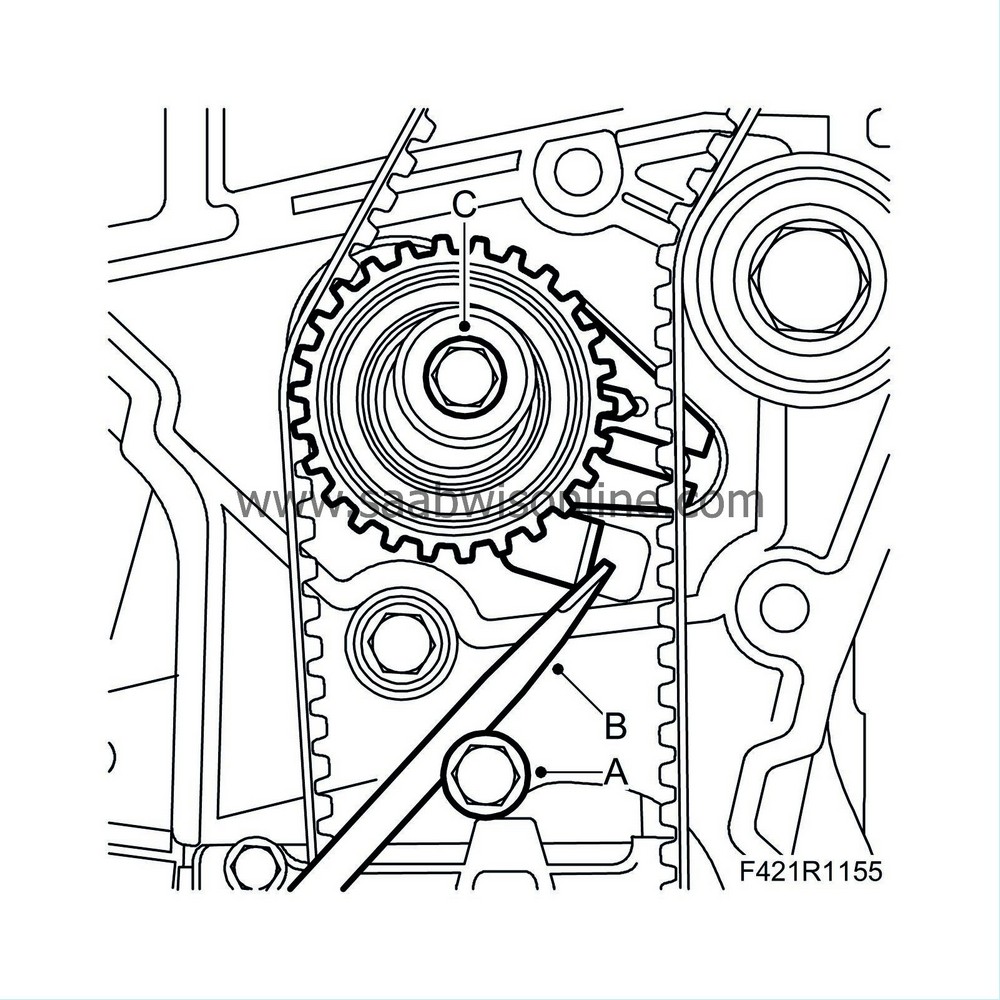
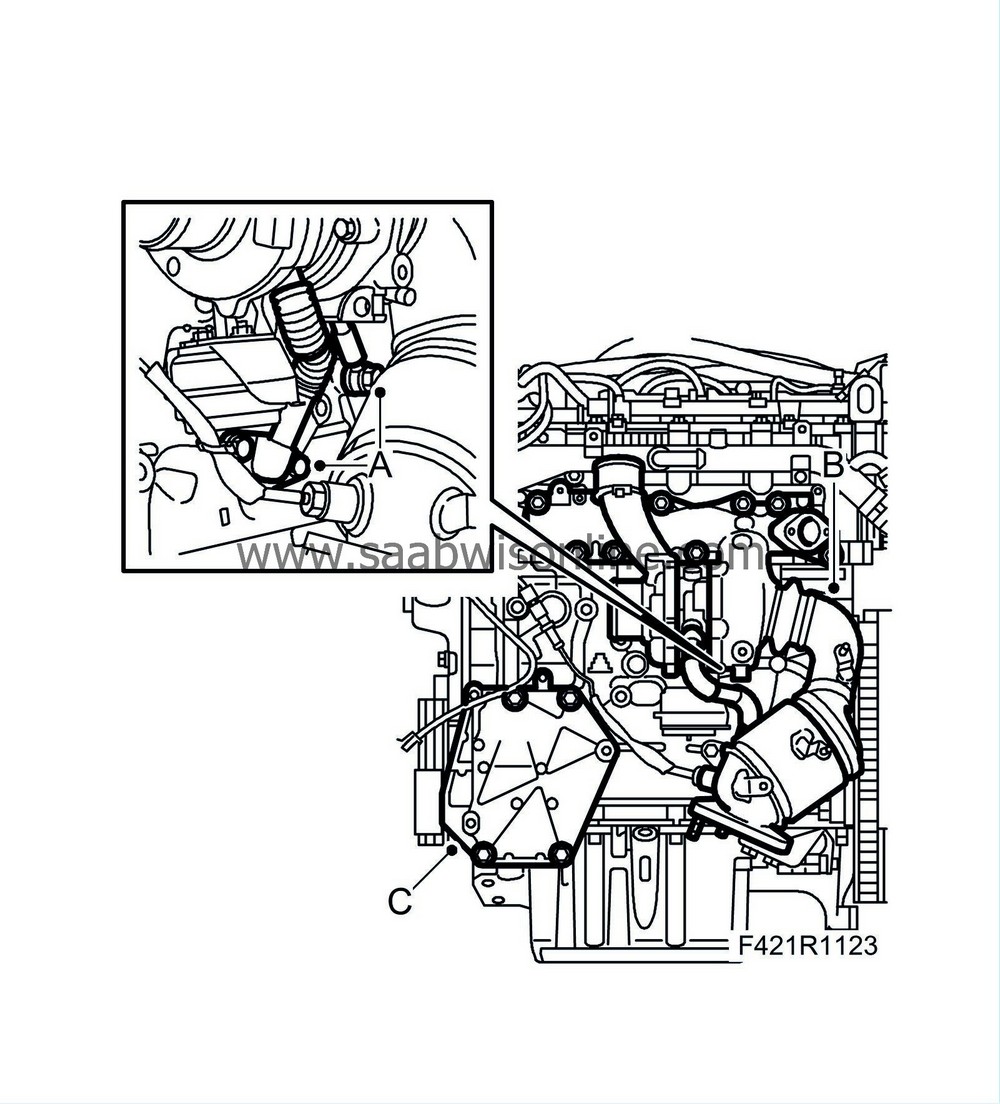
12.
|
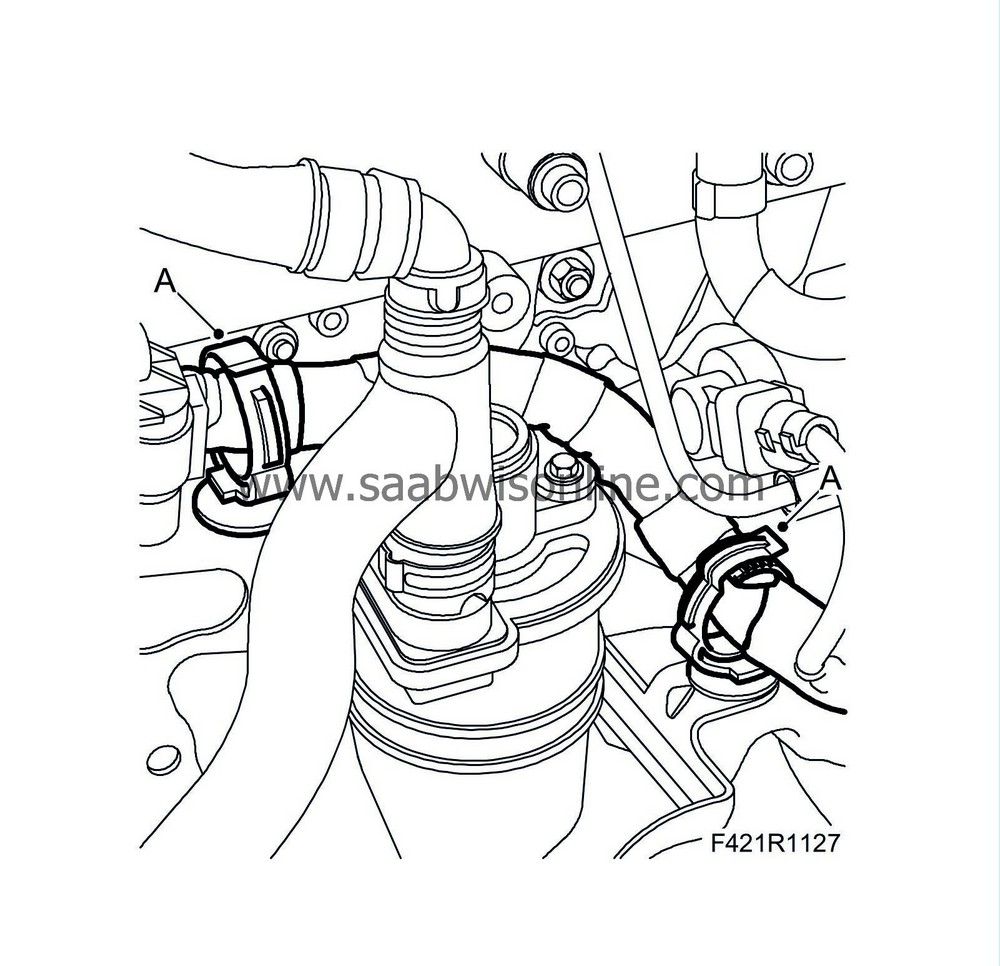
Fit the idler wheel (C).
Tightening torque 34 Nm

|
|
13.
|
Fit the tension pulley without tightening (B).
|
|
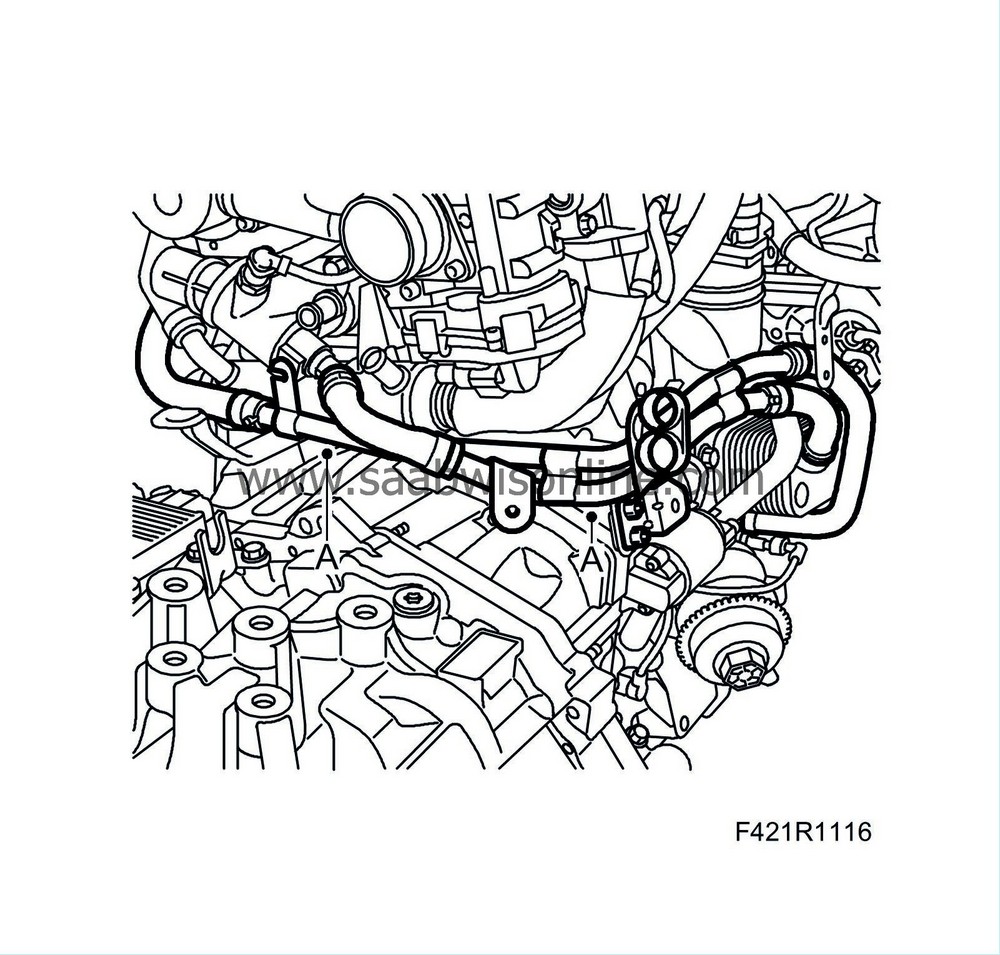
15.
|
Fit the intake manifold with throttle valve module and EGR valve (A).
Tightening torque 25 Nm
|
|
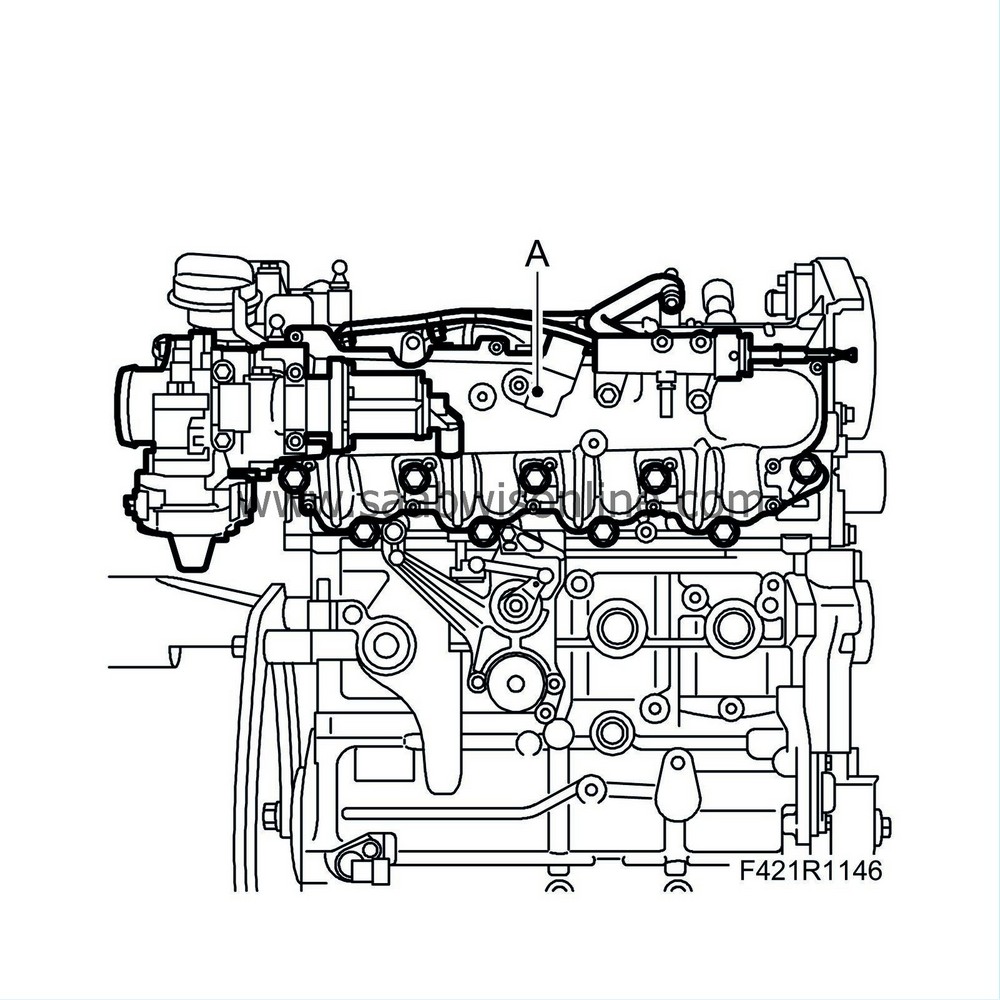
16.
|
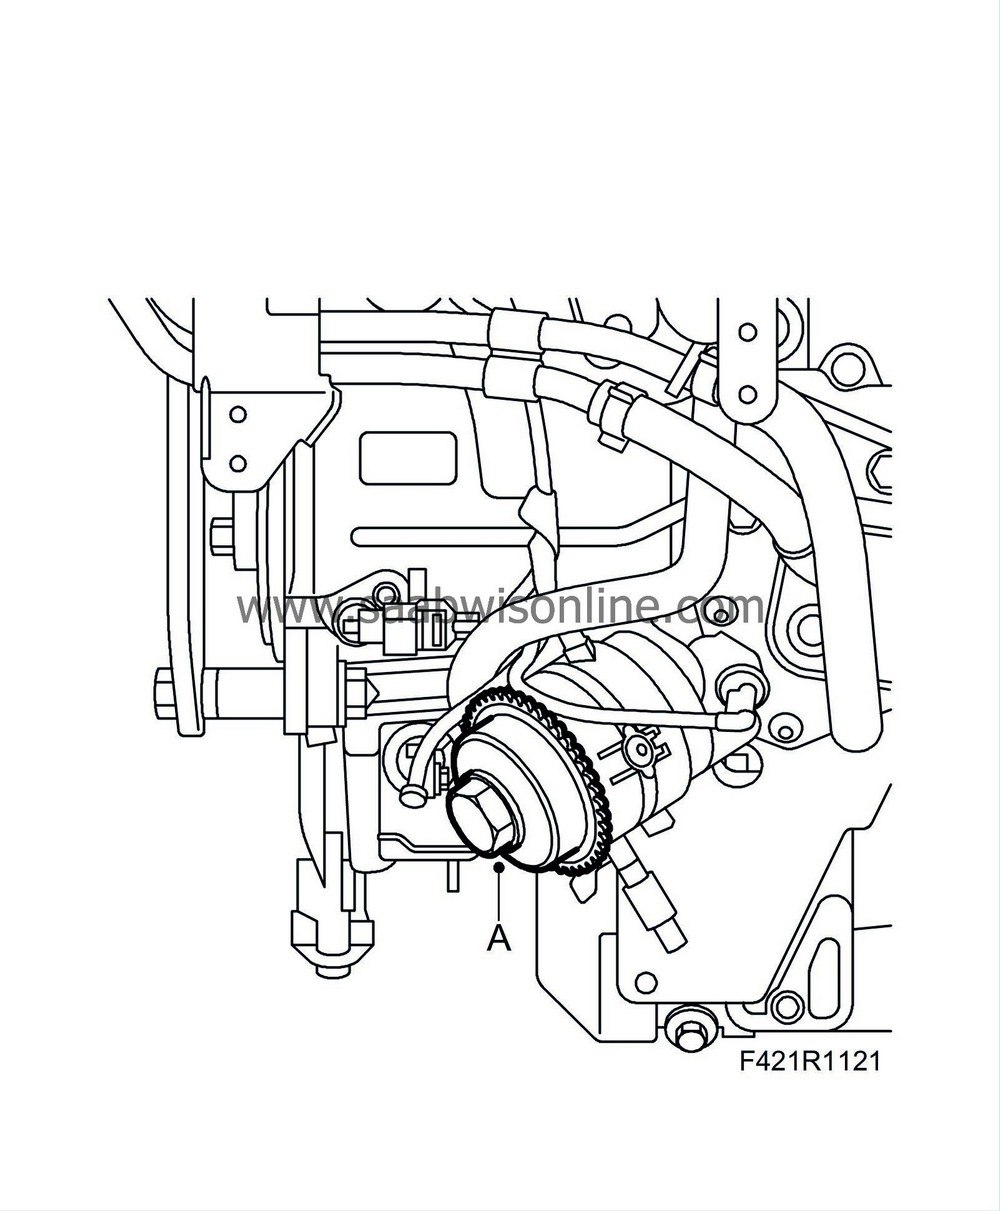
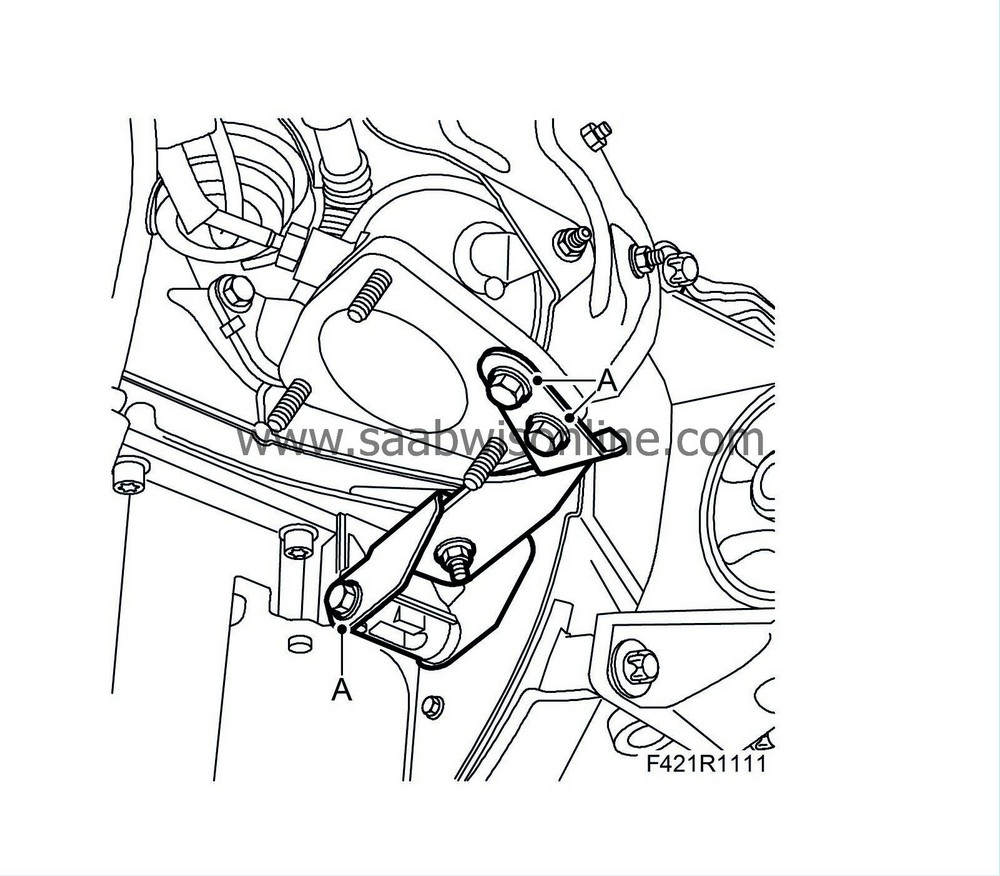
Fit the high-pressure pump bracket (A).
Tightening torque 25 Nm

|
|
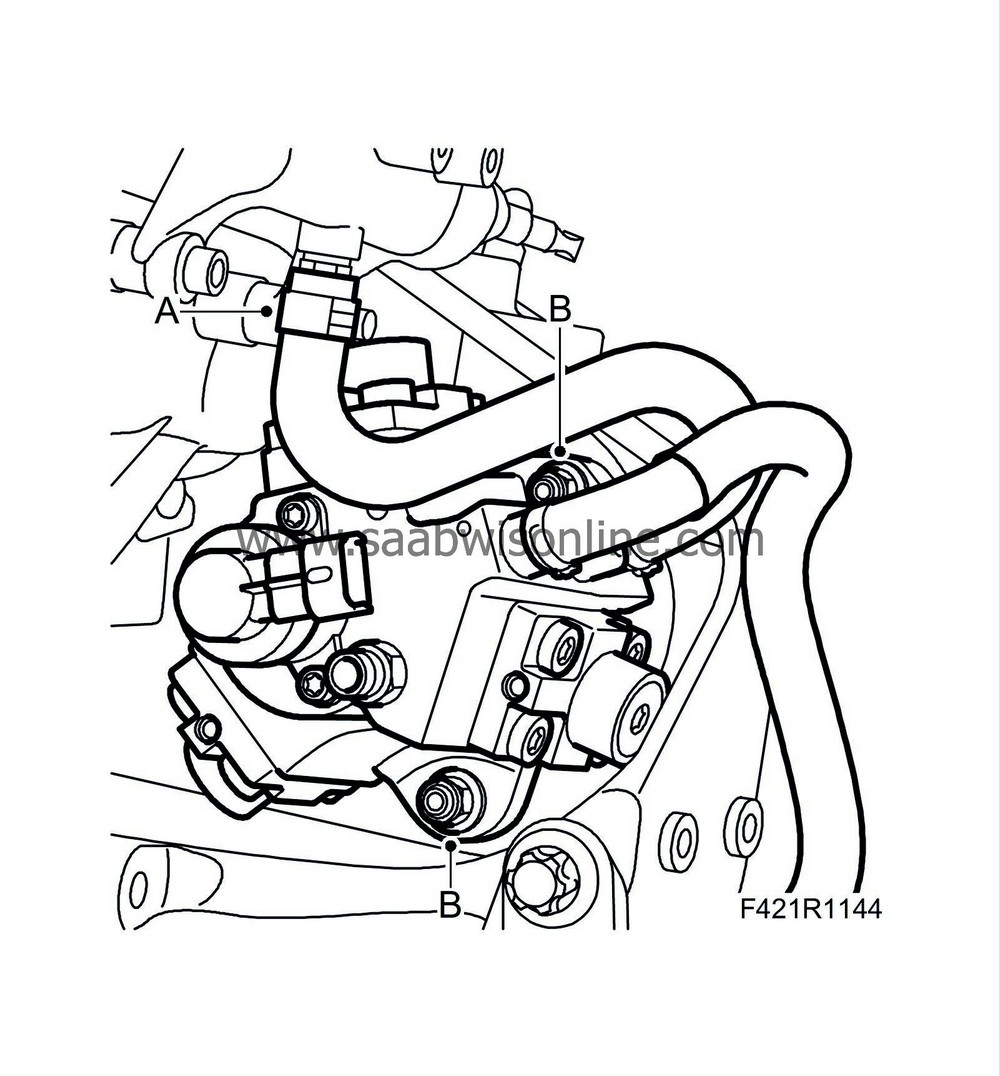
17.
|
Fit the high-pressure pump (B) and return hose (A).
Tightening torque 25 Nm
|
|
18.
|
Certain cars
: Fit the bracket (A).
|
|
20.
|
Fit the glow plugs.
Tightening torque 8 Nm
|
|
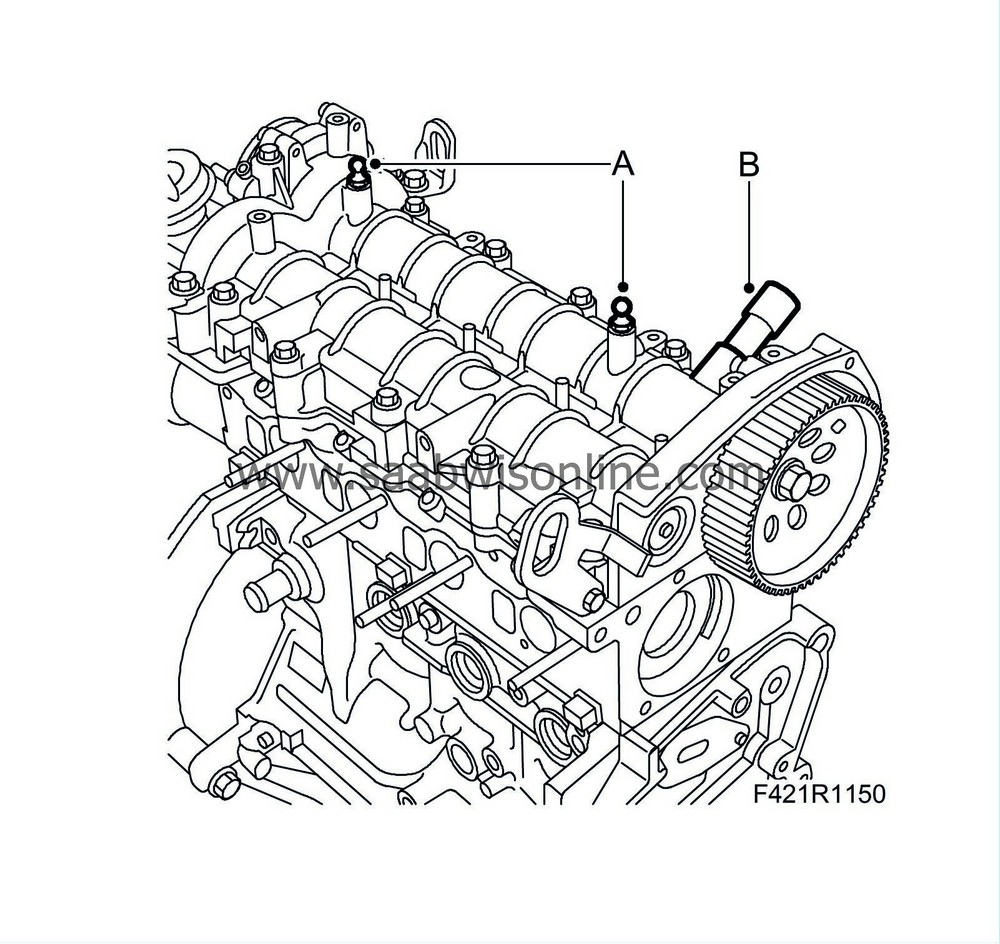
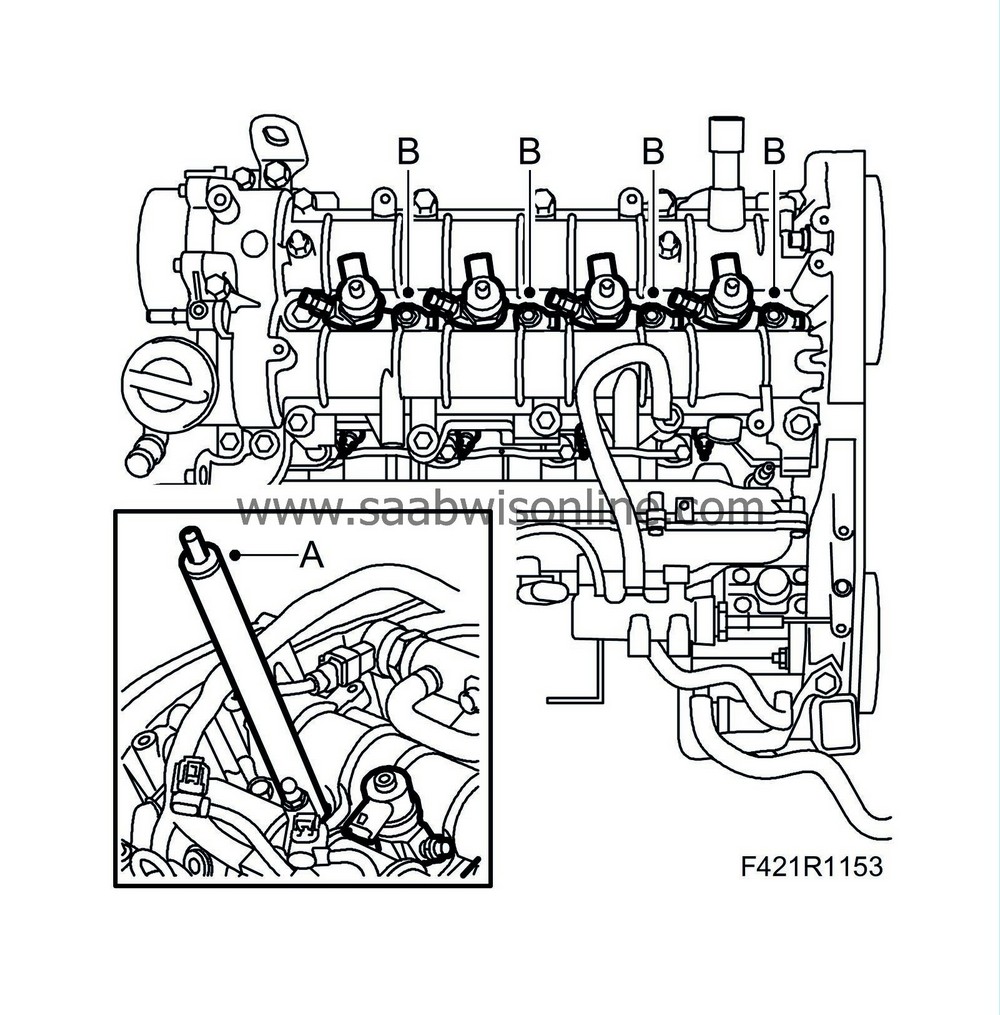
21.
|
Clean the injector sealing surfaces in the cylinder head. Use
32 025 010 Cleaning tool
. Clean the injector shaft. (A)
|
Important
|
|
If new injectors are to be fitted, read and make a note of its classification code. The code is to be used when programming using the diagnostic tool.
|
|
|
|
|
22.
|
Fit the injectors with new seals in the following order: 4-3-2-1 (B).
Tightening torque 25 Nm (18 lbf ft)
|
|
23.
|
Fit the timing belt cover's holder (B).
|
|
24.
|
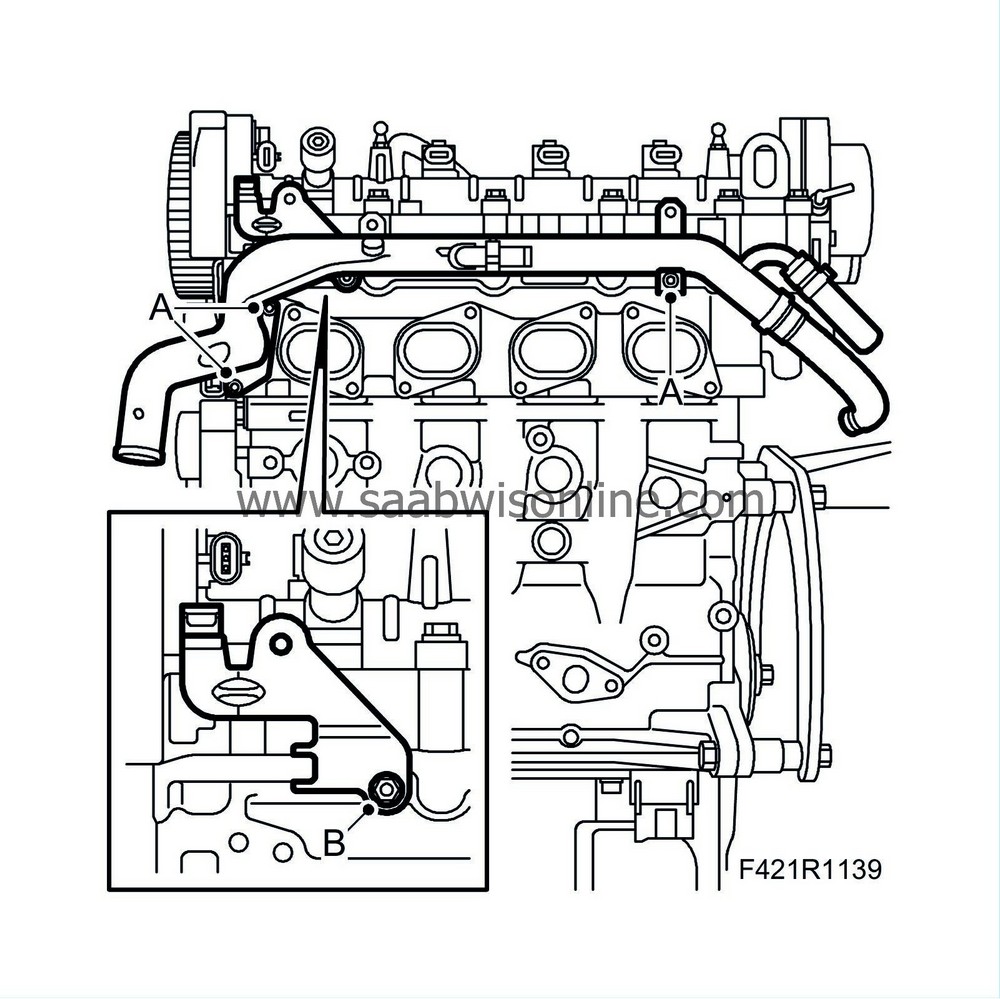
Fit the coolant pipe (A).
|
|
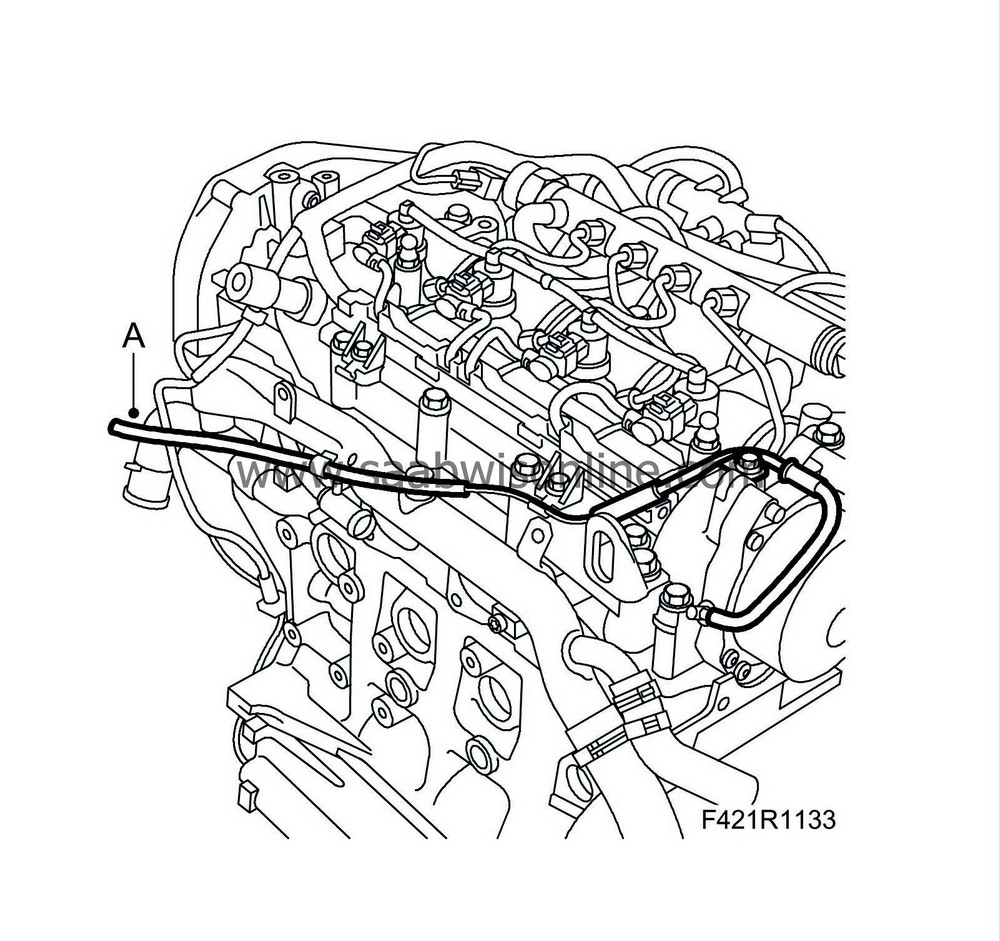
25.
|
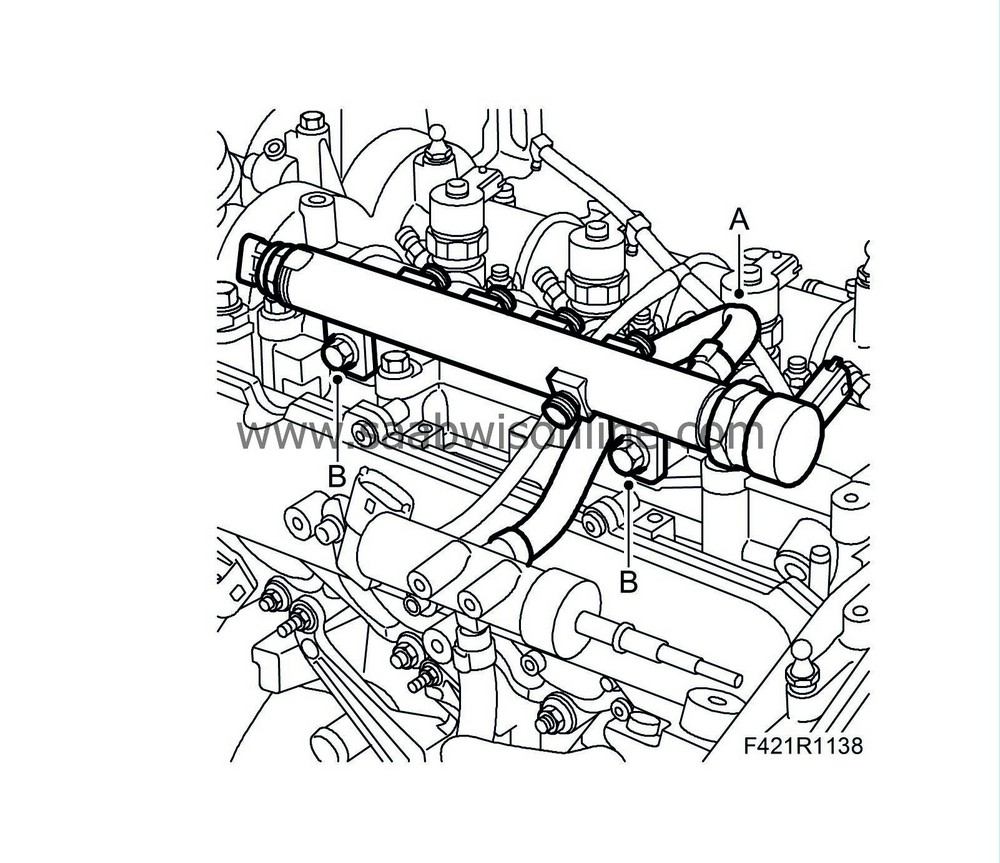
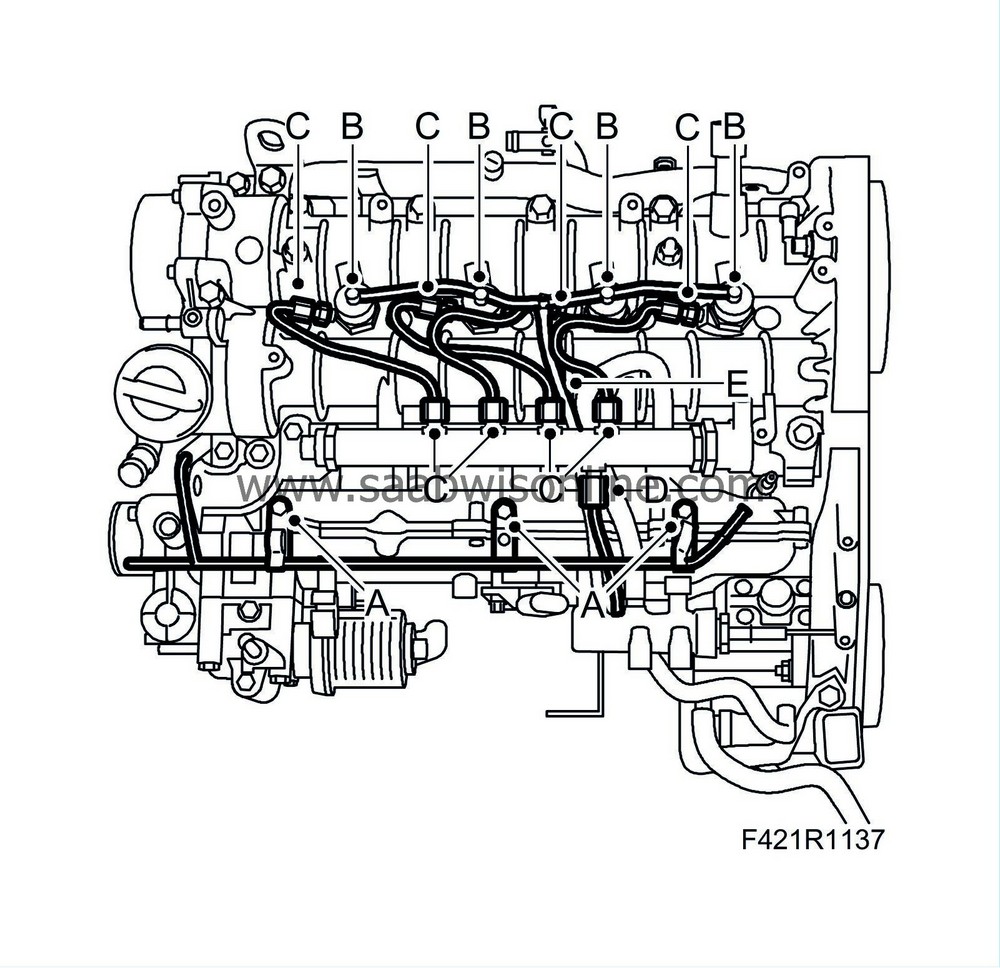
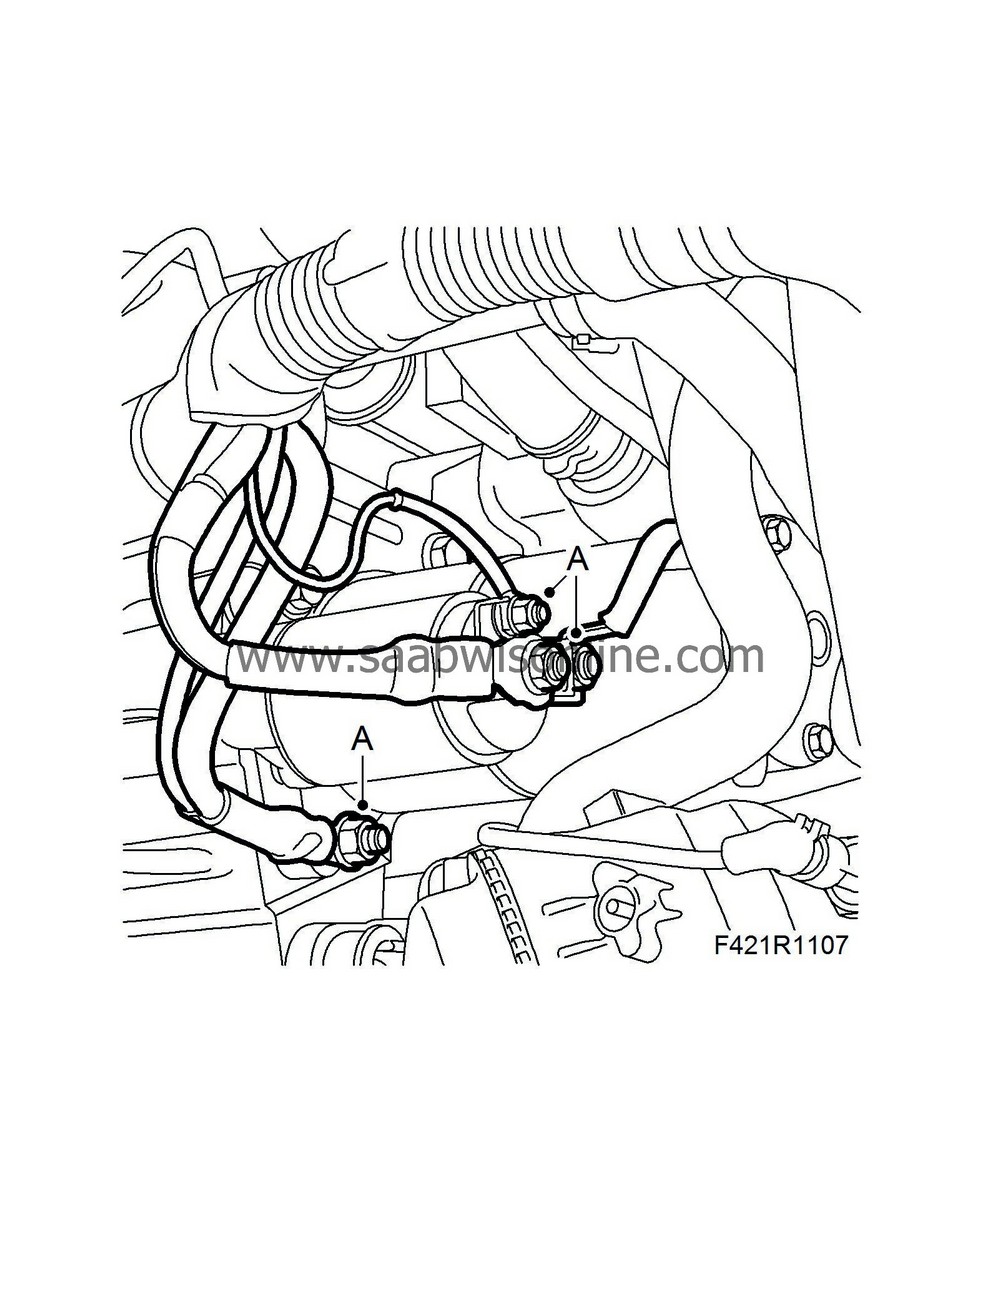
Fit the fuel rail:
|
|
|
-
|
Fit the fuel return line (A)
|
|
|
-
|
Fit the screws for the fuel rail to the camshaft cover (B).
|
|
|
-
|
Fit the fuel lines to the injectors and the fuel rail
|
|
|
-
|
Tighten the screws to the fuel rail (B)
Tightening torque 25 Nm
|
|
|
-
|
Tighten the fuel lines to the injectors (C)
Tightening torque M12 25 Nm
Tightening torque M14 23 Nm
|
|
26.
|
Fit the high-pressure hose, fuel rail - high-pressure pump (D).
Tightening torque M12 25 Nm
Tightening torque M14 23 Nm
|
|
27.
|
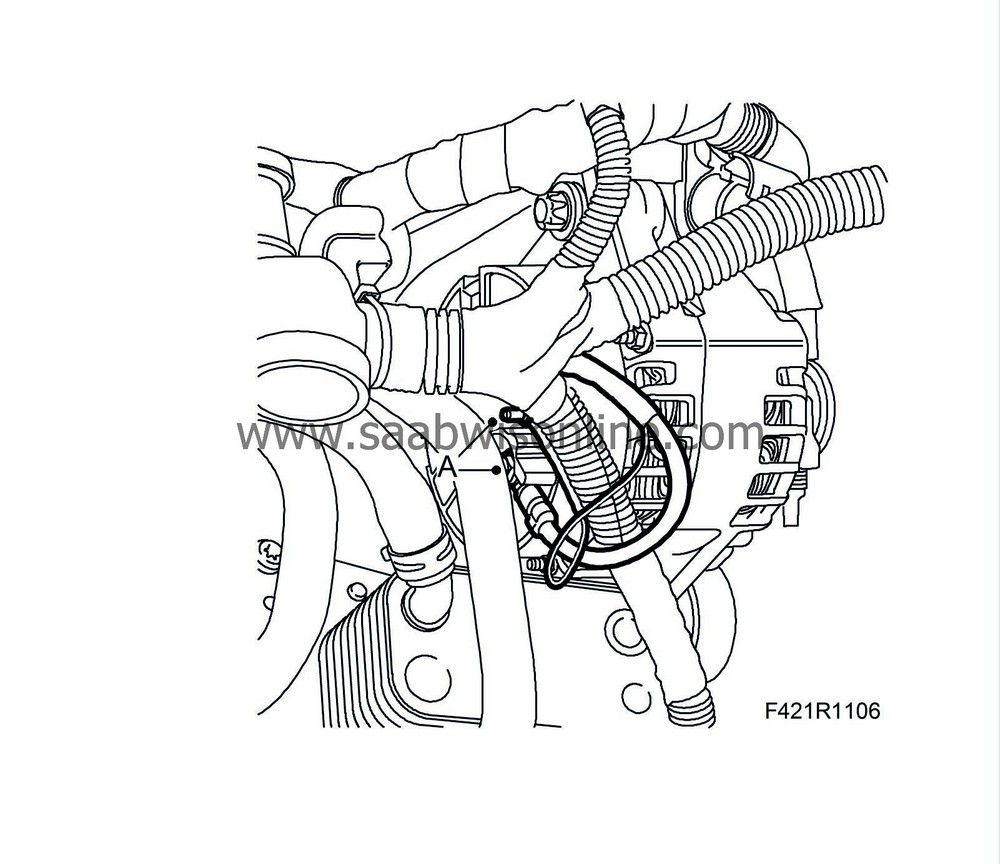
Fit the return line, injector (B).
|
|
|
-
|
Press the return line onto the injectors (E)
|
|
28.
|
Fit the coolant pipe on the intake manifold (A).
|
|
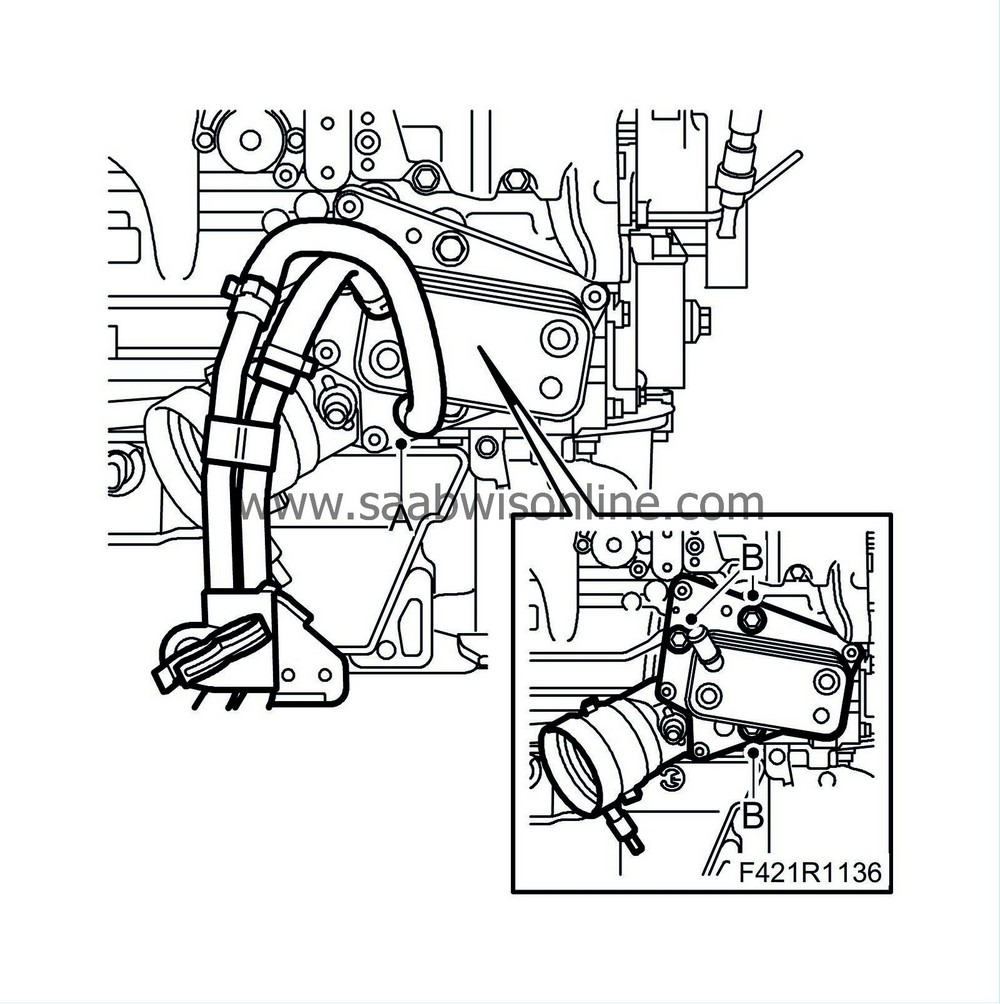
29.
|
Fit the oil cooler (B).
Tightening torque 50 Nm
|
|
30.
|
Fit the lower coolant connection to the oil cooler (A)
|
|
31.
|
Lift the wiring harness.
|
|
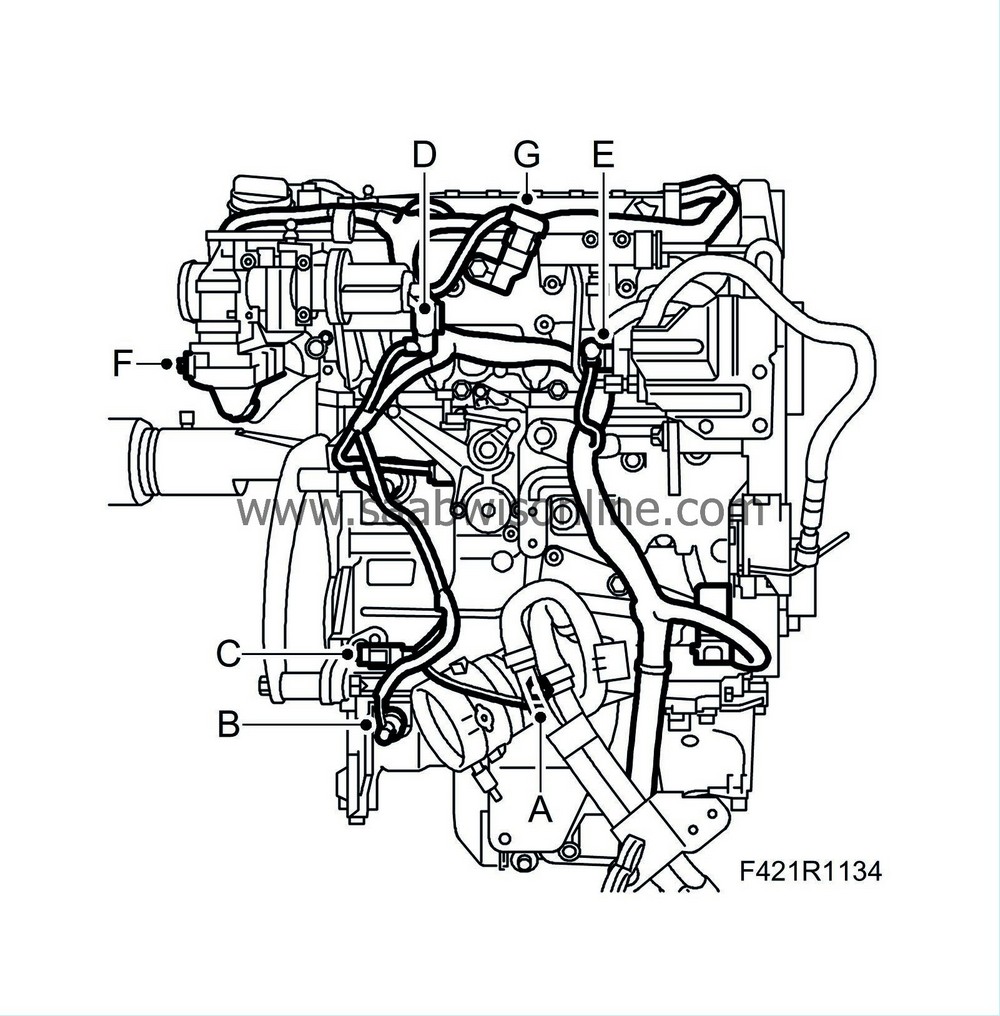
33.
|
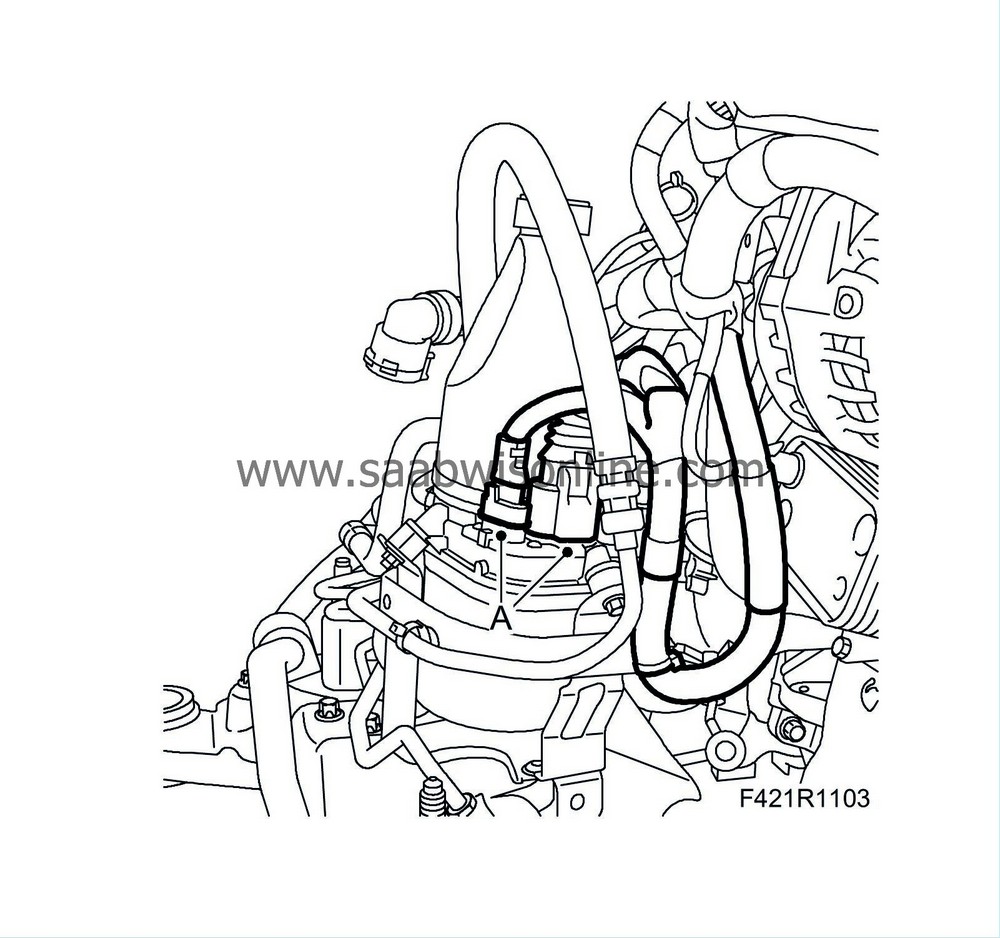
Fit the engine wiring harness by plugging in the following connectors:
|
|
|
-
|
Pressure switch, engine oil (44) (A)
|
|
|
-
|
Level sensor, engine oil (243) (B)
|
|
|
-
|
Crankshaft position sensor (345) (C)
|
|
|
-
|
EGR solenoid valve (606) (D)
|
|
|
-
|
Fuel quantity control valve, high-pressure pump (652b) (E)
|
|
|
-
|
Throttle body actuator unit (604) (F)
|
|
|
-
|
Intake air sensor (688) (G)
|
|
|
-
|
Camshaft position sensor (555) (H)

|
|
|
-
|
Fuel pressure sensor (653) (J)
|
|
|
-
|
Fuel pressure control valve (652a) (K) (certain cars)
|
|
|
-
|
Glow plug connector (L)
|
|
34.
|
Fit the vacuum line onto the cable duct.
|
|
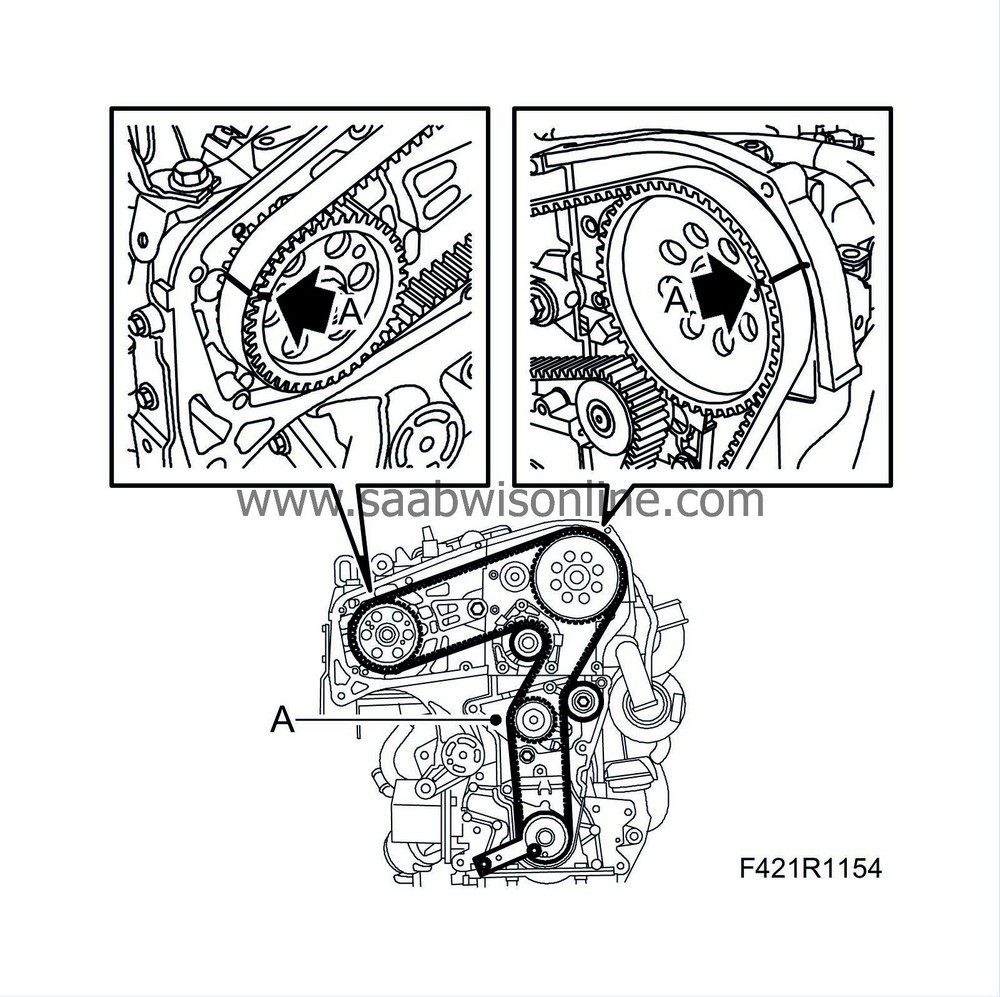
35.
|
Fit the timing belt (A):
|
|
|
-
|
Fit the timing belt so that the marking corresponds with the markings on the crankshaft's, exhaust camshaft's and fuel pump's pinions, as well as the direction of rotation.
|
|
36.
|
Tension the timing belt's tension pulley.
|
|
|
-
|
Fit a screw in the hole under the tension pulley (M8) (A)
|
|
|
-
|
Adjust so that the belt tensioner arrow is right in front of the mark by pressing the setting lever in the direction of the arrow. Tighten the belt tensioner using a large screwdriver (B) and an M8 bolt for support.
|
|
|
-
|
Tighten the bolt for the timing belt's tension pulley (C)
Tightening torque 25 Nm
|
|
37.
|
Check the crankshaft/camshaft setting:
|
|
|
-
|
Rotate the crankshaft 720° in the engine's direction of rotation until the tool engages audibly in the exhaust camshaft.
|
|
|
-
|
Unscrew the screw on the cover (oil pump)
|
|
|
-
|
Fit the position plate and tighten the screw and nut (B). If 3 2 025 008 Camshaft fixing tool cannot be fitted, the procedure for fitting the timing belt must be repeated
|
|
|
-
|
Fit the screw for the oil pump.
Tightening torque 9 Nm
|
|
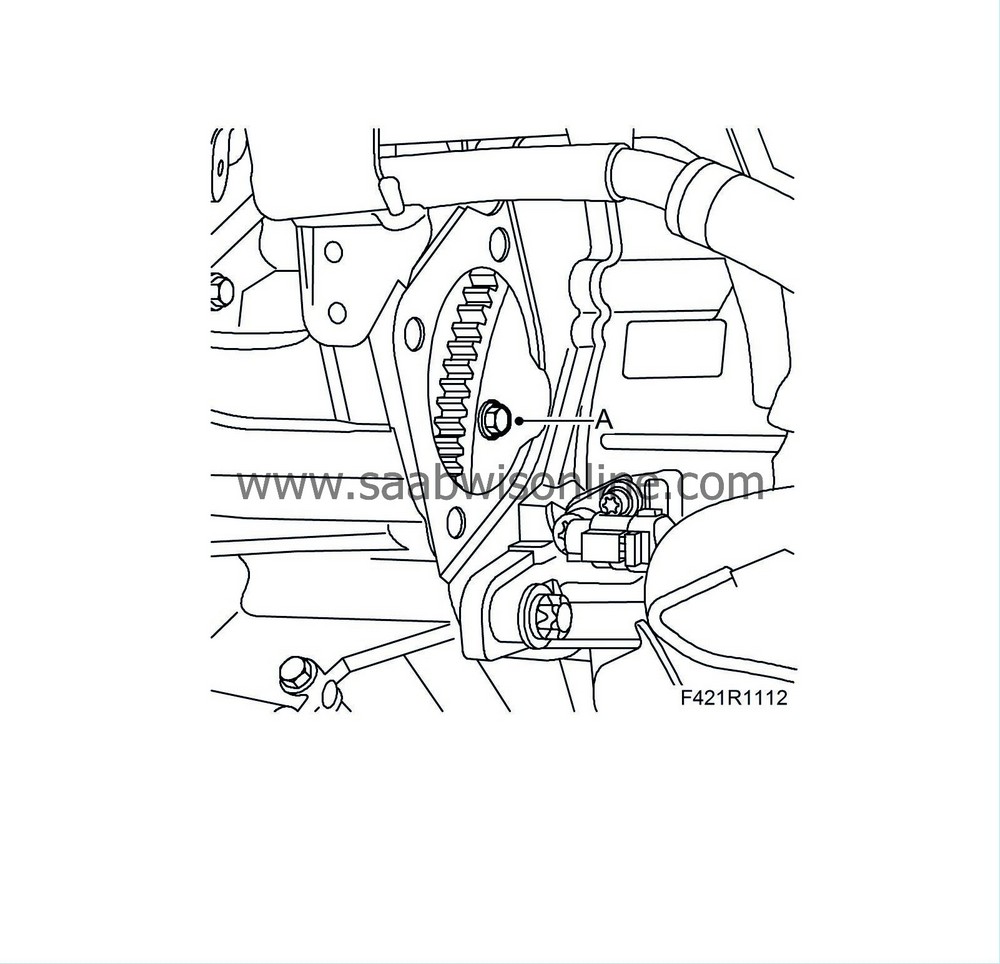
38.
|
Remove the tool EN-46789 and fit the plug.
|
|
39.
|
Fit the crankcase ventilation pipe and hose form the camshaft housing.
|
|
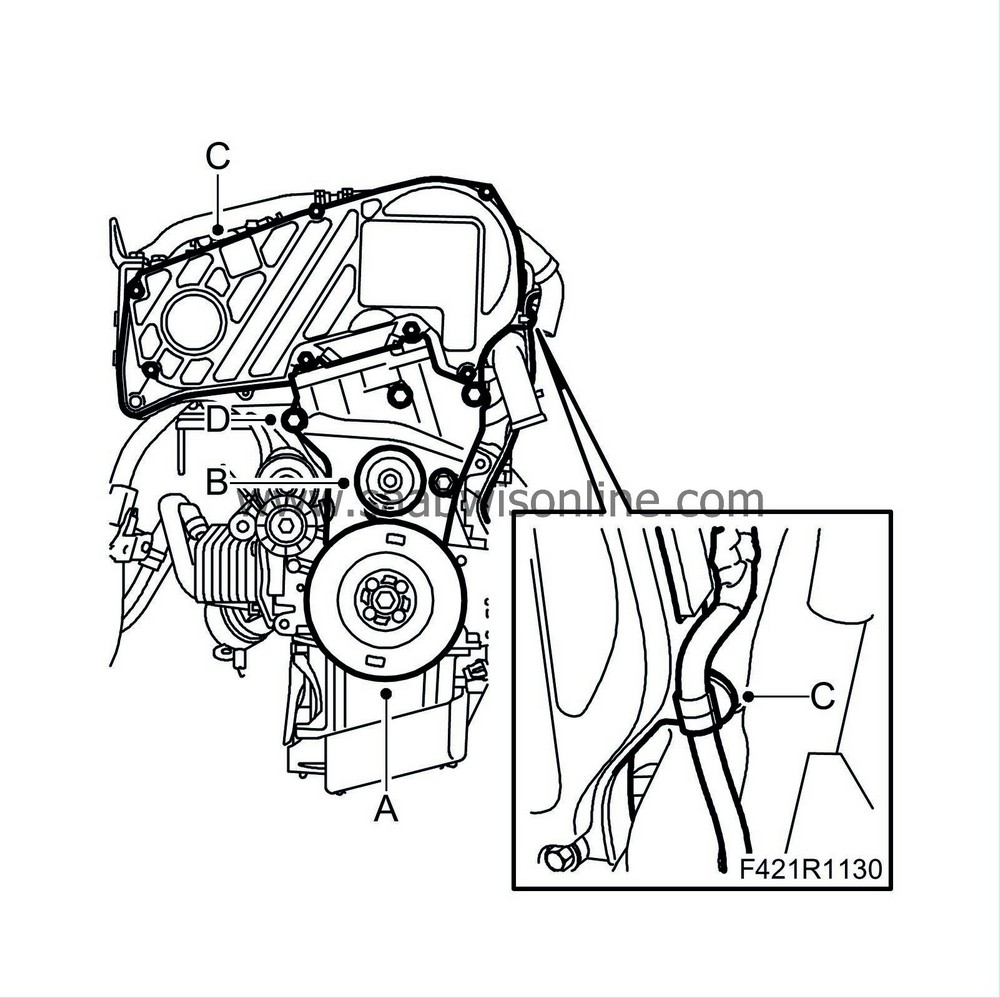
40.
|
Fit the lower timing cover (D).
Tightening torque M10 50 Nm
Tightening torque M8 25 Nm
|
|
41.
|
Fit the upper timing cover (C).
Tightening torque M6 9 Nm
Tightening torque M8 25 Nm
|
|
42.
|
Fit the cable in the cable clip (C).
|
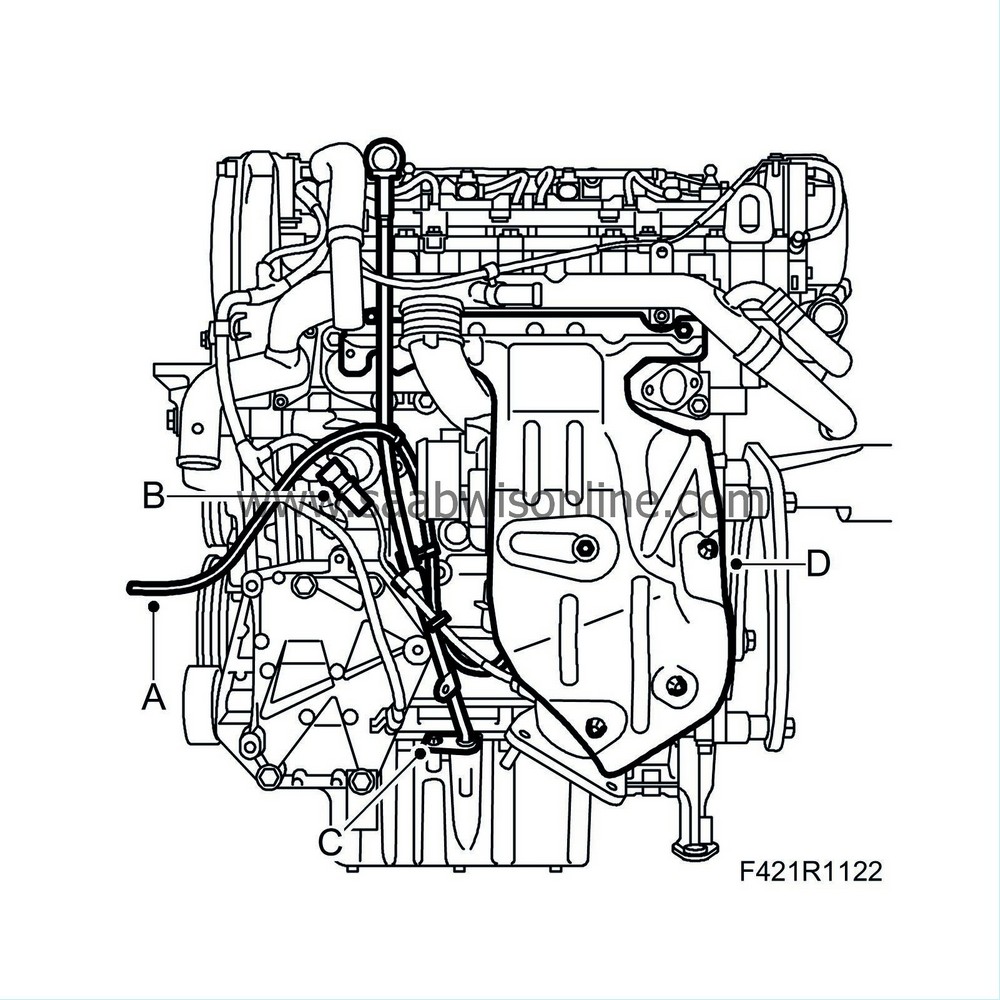
|
43.
|
Fit the idler pulley centre bolt on the lower timing cover (B).
Tightening torque 50 Nm
|
|
44.
|
Fit the crankshaft pulley (A).
Tightening torque 25 Nm
|
|
45.
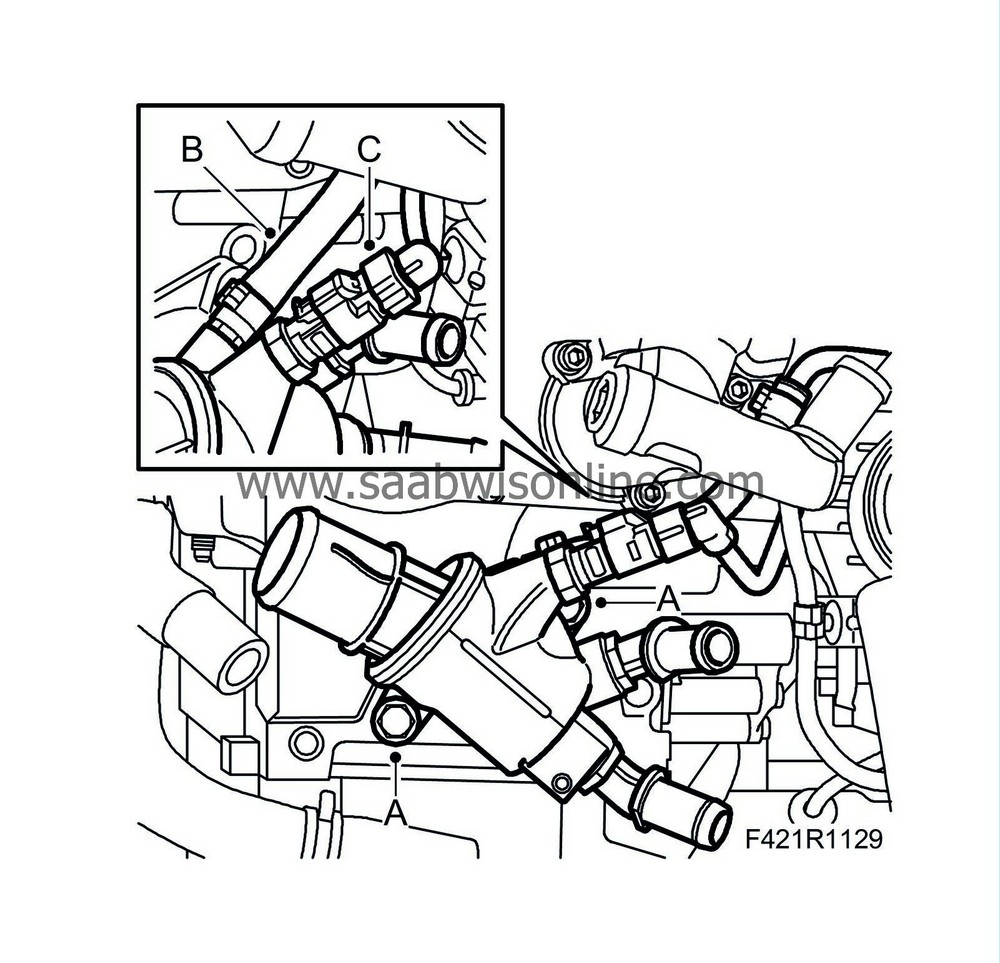
|
Fit the thermostat housing:
|
|
|
-
|
Fit the upper coolant hose that runs to the coolant pipe (B)
|
|
|
-
|
Plug in the connector for the coolant temperature sensor (C)
|
|
|
-
|
Fit the thermostat housing screws (A)
Tightening torque 25 Nm
|
|
46.
|
Fit the bracket for the oil separator (A).
|
|
47.
|
Position the wiring harness in the large clip and close. Fit the small clips to the bracket (A).
|
|
48.
|
Fit the oil trap hoses.
|
|
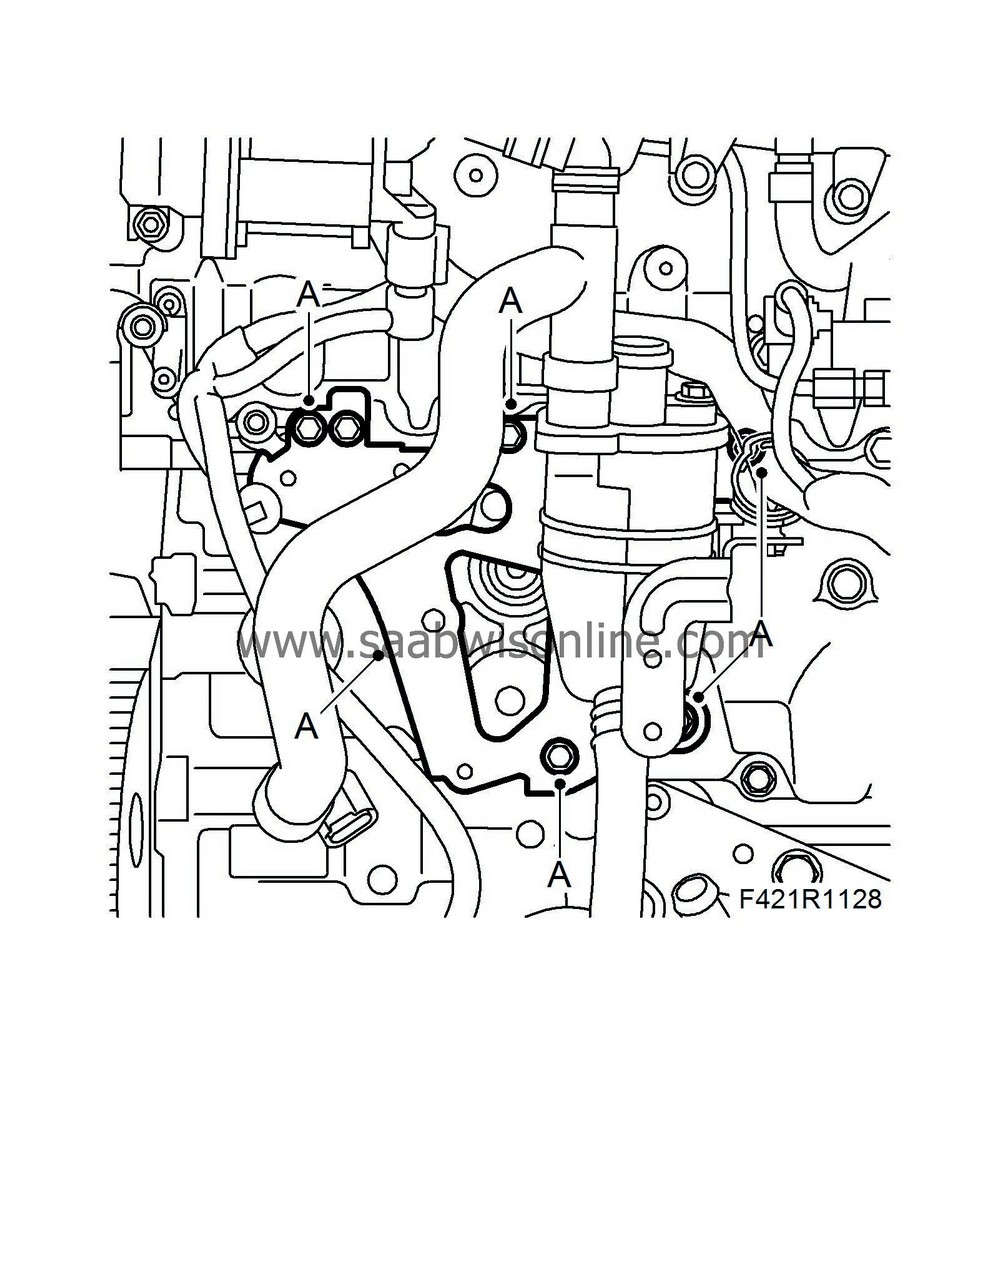
49.
|
Connect the coolant hoses from the oil cooler to the thermostat housing and the coolant pipe's hose without fitting the hose clips (A).
|
|
50.
|
Fit the alternator (A).

|
|
51.
|
Fit the turbo with catalytic converter and manifold (B)
Tightening torque, manifold nuts XX Nm
|
|
52.
|
Fit the AC bracket (C).
Tightening torque 50 Nm
|
|
53.
|
Fit the turbocharger oil delivery line and return line to the engine block (A).
|
|
54.
|
Fit the heat shield (D).
|
|
55.
|
Fit the dipstick pipe (C).
|
|
56.
|
Fit the bracket for the temperature sensor's connector:
|
|
|
-
|
Plug in the connector (B)
|
|
|
-
|
Fit the cable for the AC compressor in its clips
|
|
57.
|
Fit the vacuum hose to the turbo's diaphragm box (A).
|
|
58.
|
Fit a new oil filter and oil filter cap (A).
|
|
60.
|
Fit the protective plate (A).

|
|
62.
|
Man
: Fit the clutch plate.
|
|
63.
|
Man
: Fit the bolts holding the pressure plate and fit the clutch.
|
|
64.
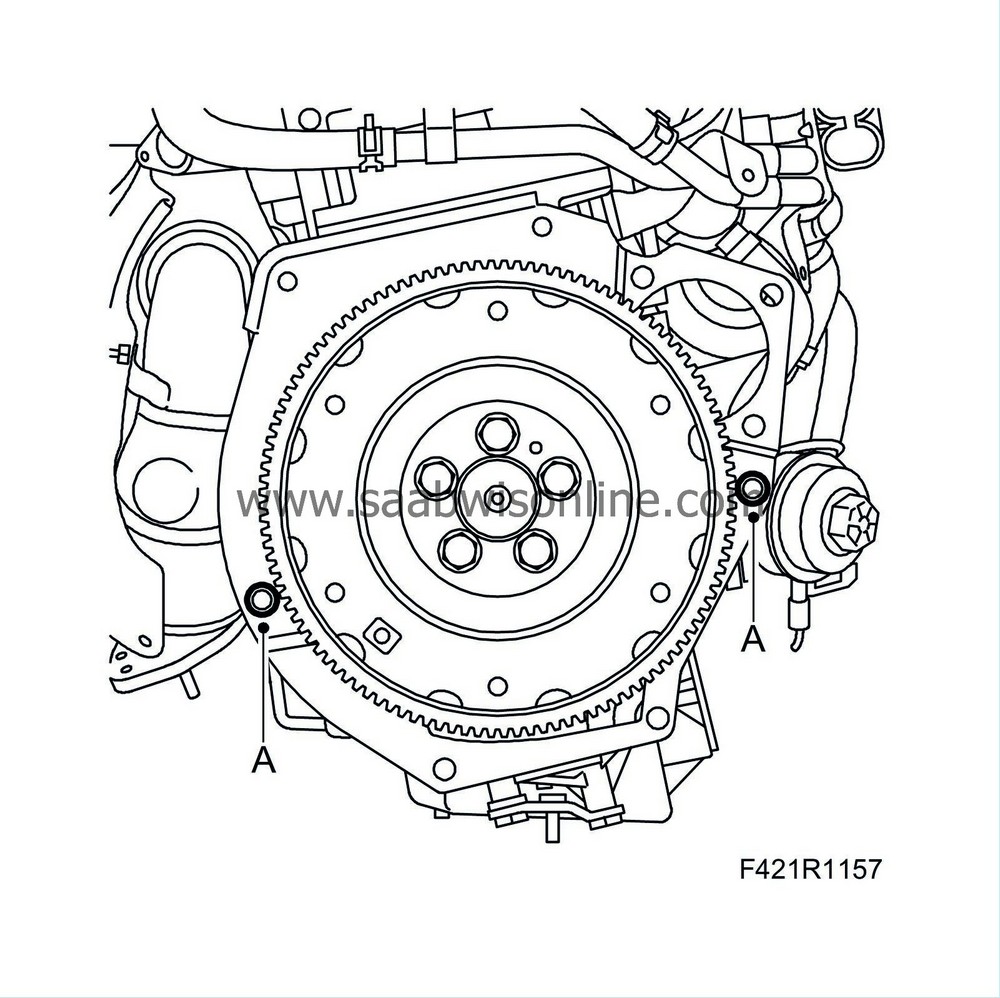
|
Man
: Fit the flywheel locking attachment (B).
|
|
65.
|
Make sure the two guide sleeves are fitted on the engine and apply grease to the guide sleeves.
|
|
67.
|
Man
: Fit the gearbox to the engine.
Tightening torque, M10 40 Nm (30 lbf ft)
Tightening torque, M12 60 Nm (44 lbf ft)
|
|
68.
|
Aut
: Turn the torque converter so that the bolt holes correspond with the holes in the driver plate and turn the engine so that the oval hole (A) in the driver plate is opposite the starter motor opening. Lubricate the torque converter guide pin with grease.
|
|
69.
|
Aut
: Fit the gearbox to the engine. Remove 87 92 574 Holder, just before the gearbox is in place. Tighten the bolts (A) between the engine and the gearbox.
Tightening torque, M10 40 Nm (30 lbf ft)
Tightening torque, M12 60 Nm (44 lbf ft)
|
|
70.
|
Aut
: Press the torque converter against the driver plate. Fit the plug.
|
|
71.
|
Aut
: Apply
Thread locking adhesive, Loctite 270
to the bolts (A) holding the torque converter to the driver plate.
|
Note
|
|
Use the original bolts with associated washers. The torque converter will be ruined if the bolts that are used that are too long.
|
|
|
72.
|
Aut
: Turn the engine clockwise with the pulley and tighten the bolts one at a time starting with the oval hole in the driver plate.
Tightening torque 30 Nm (22 lbf ft)
|
|
73.
|
Fit the front catalytic converter bracket (A).
|
|
74.
|
Fit the starter motor (B) with bracket (A) for coolant pipe and wiring harness, do not fit the nuts.
Tightening torque 24 Nm (18 lbf ft).

|
|
75.
|
Undo the coolant hoses for the oil cooler at the thermostat housing.
|
|
76.
|
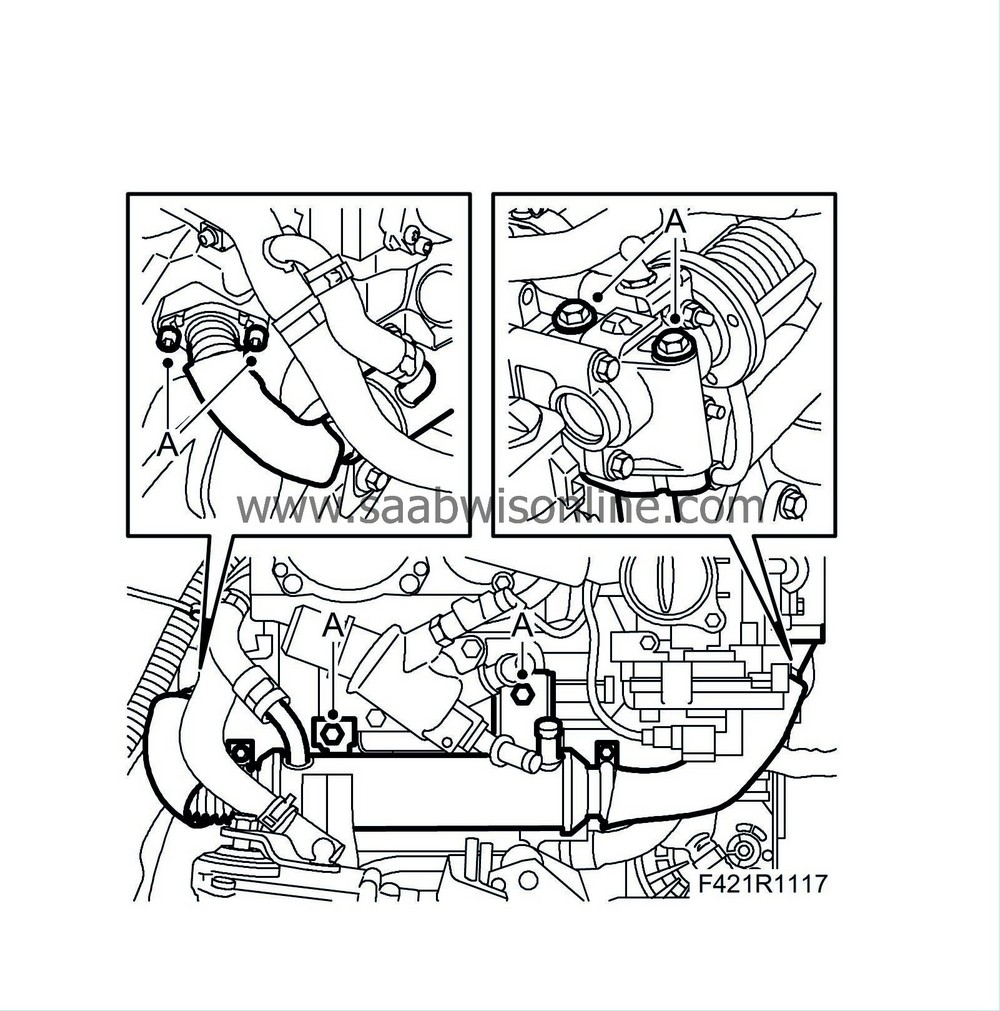
Fit the EGR cooler with new seals (A).
Tightening torque to cylinder head 25 Nm (18 lbf ft)
Tightening torque to EGR valve 20 Nm (15 lbf ft)
Tightening torque to exhaust manifold 20 Nm (15 lbf ft)
|
|
77.
|
Fit and connect the coolant pipes to the EGR cooler (A).
|
|
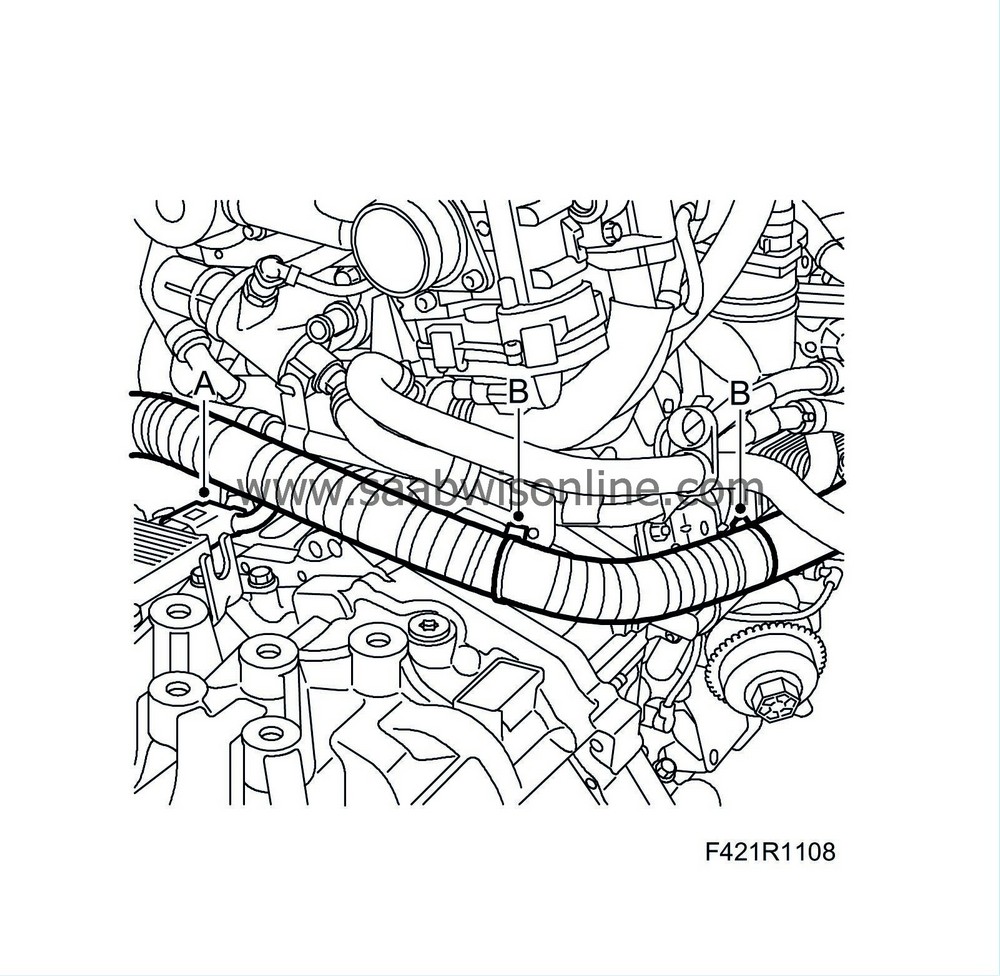
78.
|
Fit the coolant hoses from the oil cooler to the thermostat housing and the coolant pipe's hose and two nuts for the starter motor bracket (A).
|
|
79.
|
Fit the water hoses to the coolant pipe and the EGR cooler.
|
|
80.
|
Fit the wiring harness.
|
|
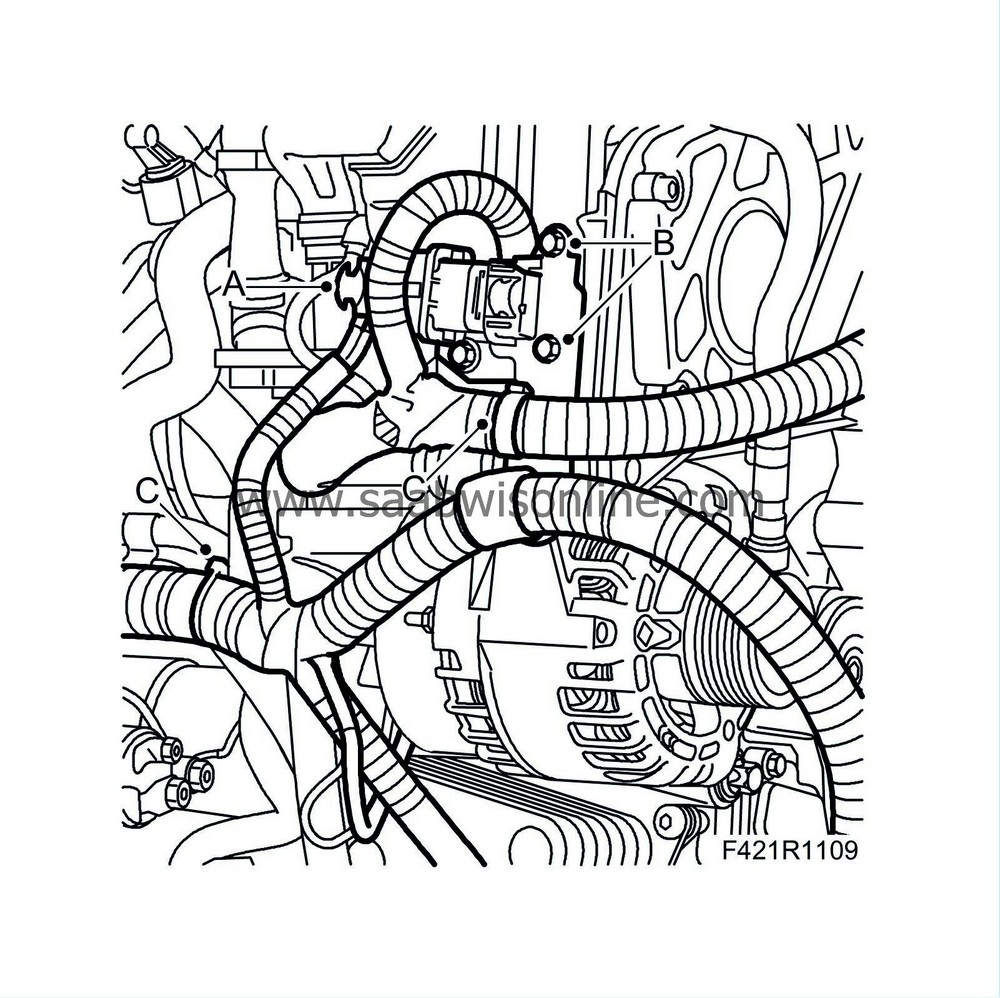
81.
|
Unplug the engine harness connector (A), remove the bracket (B) and clip (C).
|
|
82.
|
Plug in the connector for the TCM (A) and fit the clips (B).
|
|
83.
|
Plug in the starter motor's connector (A).
|
|
84.
|
Plug in the alternator's connector (A).
|
|
85.
|
Lift the power unit onto the subframe.
|
|
86.
|
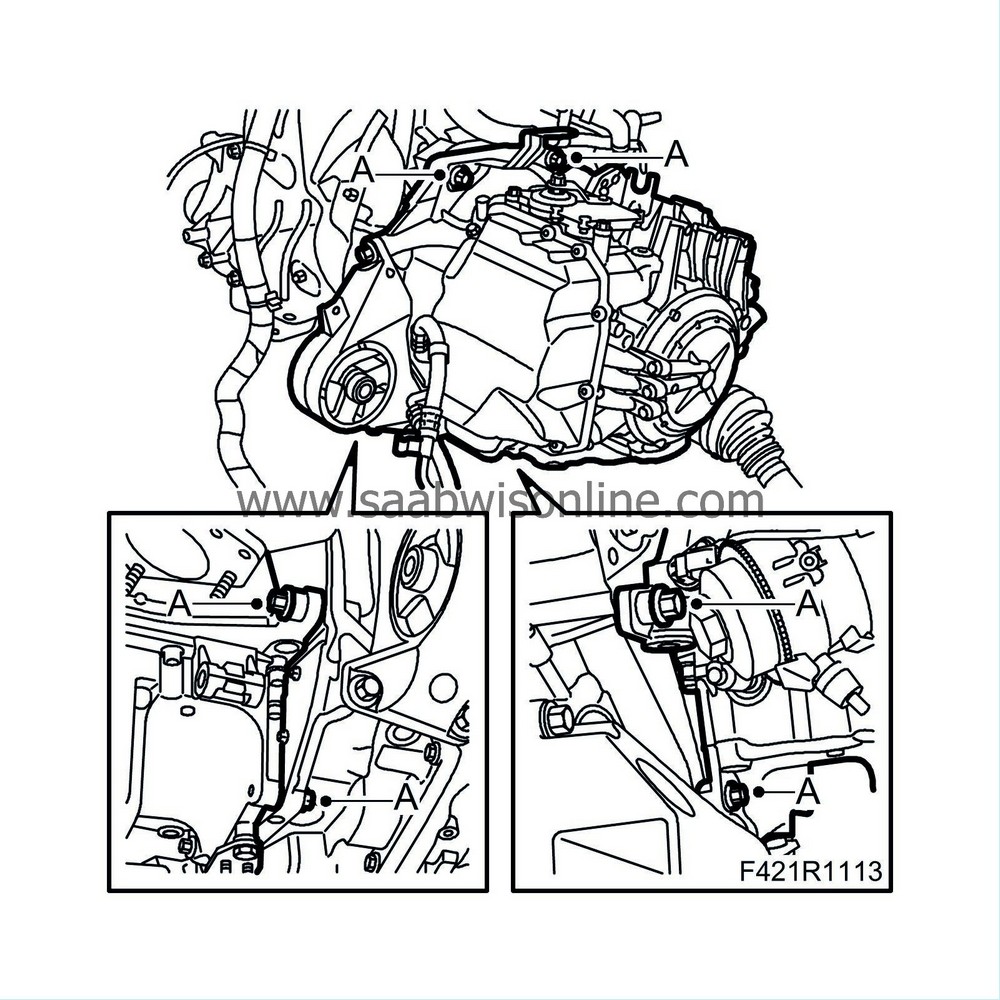
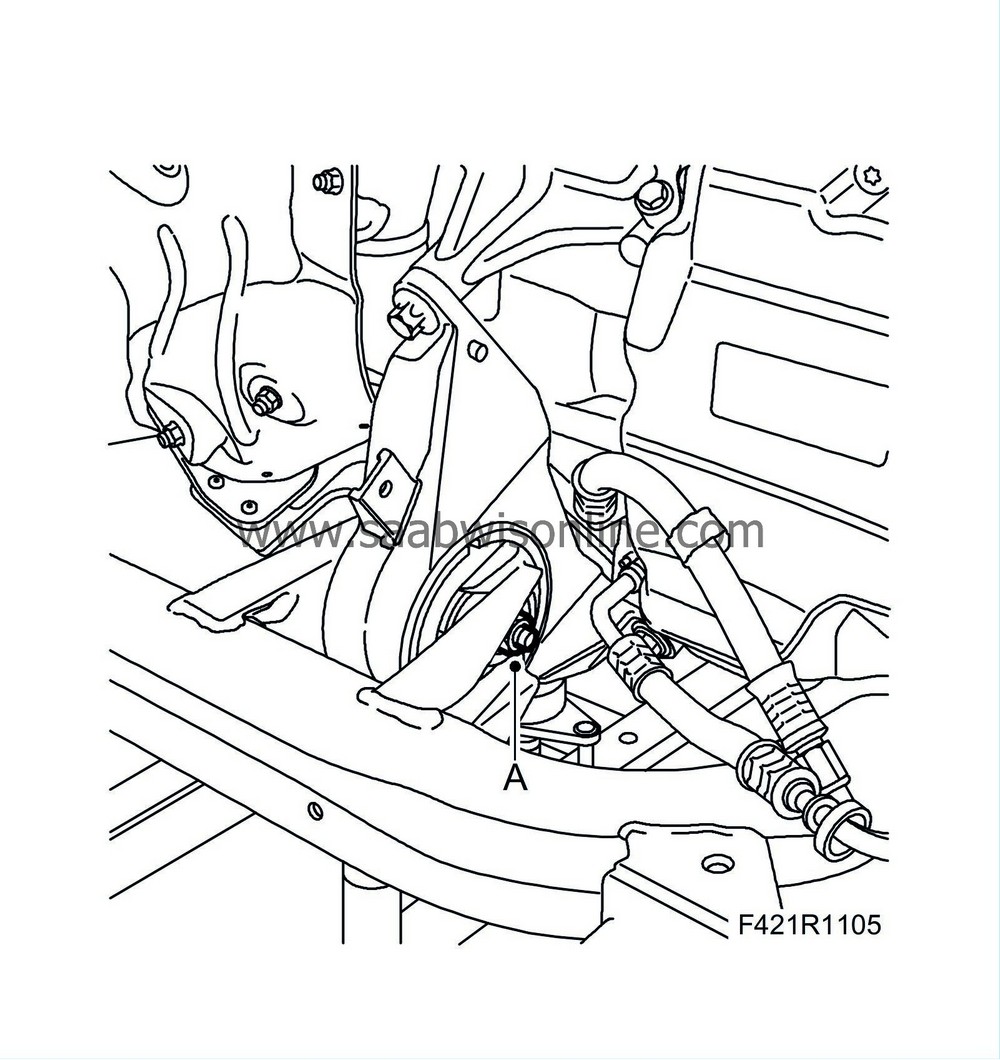
Fit the front torque arm (A) to the subframe.
Tightening torque front arm 60 Nm +90° (44 lbf ft +90°)
|
|
87.
|
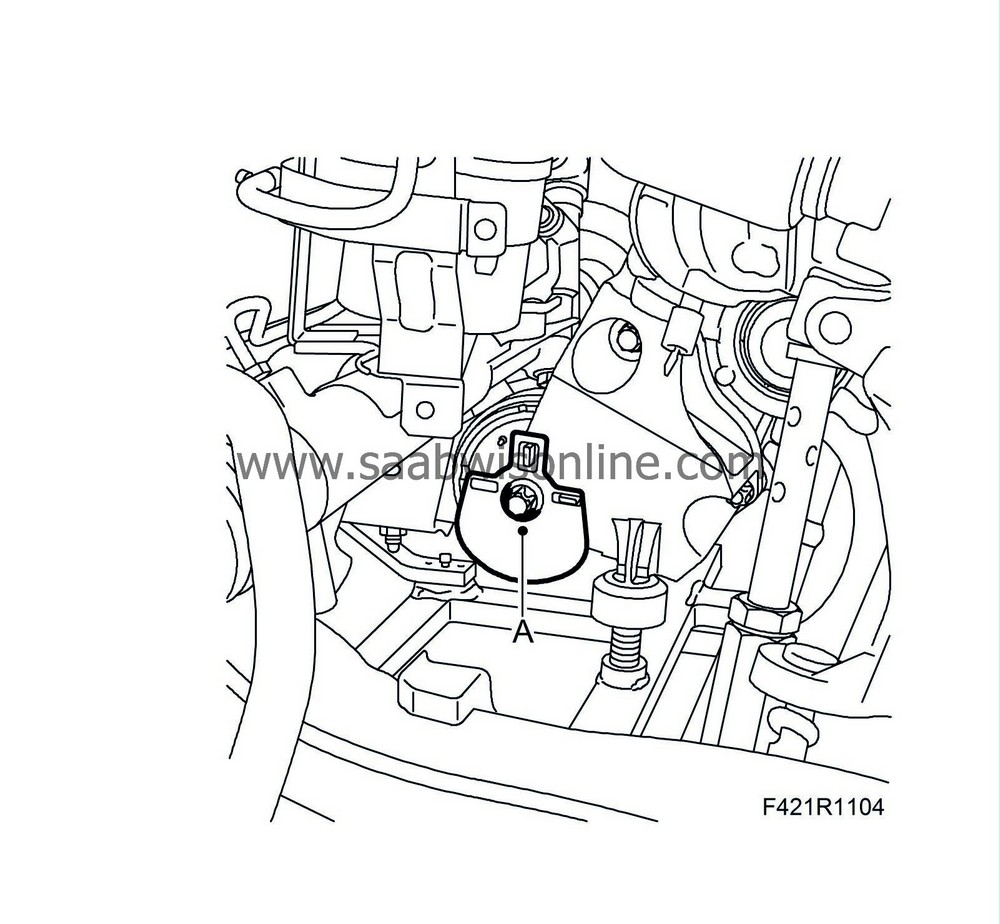
Fit the rear torque arm (A) to the subframe.
Tightening torque rear arm 80 Nm (59 lbf ft)
|
|
88.
|
Connect the wiring harness to the EHPS unit.
|


