Main shaft, dismantling and assembly
|
|
Main shaft, dismantling and assembly
|
|
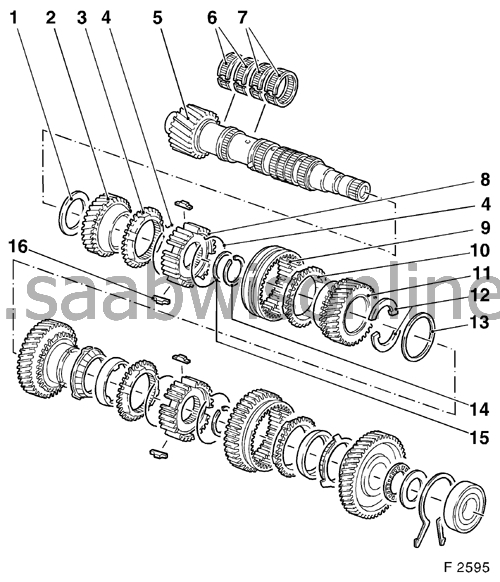
Illustration main shaft (F 17)
|
|
17
|
Gear wheel, 1st gear
|
|
18
|
Axial needle bearing
|
|
19
|
Thrust washer
|
|
20
|
Ball bearing
|
|
21
|
Circlip
|
|
22
|
Inner baulk ring, 1st gear
|
|
23
|
Intermediate ring, 1st gear
|
|
24
|
Outer baulk ring, 1st gear
|
|
25
|
Synchromesh sleeve 1st/2nd gear
|
|
26
|
Circlip
|
|
27
|
Synchromesh spring
|
|
28
|
Sliding key
|
|
29
|
Synchromesh assembly, 1st/2nd gear
|
|
30
|
Outer baulk ring, 2nd gear
|
|
31
|
Intermediate ring, 2nd gear
|
|
32
|
Inner baulk ring, 2nd gear
|
|
33
|
Gear, 2nd
|
|
Note
|
|
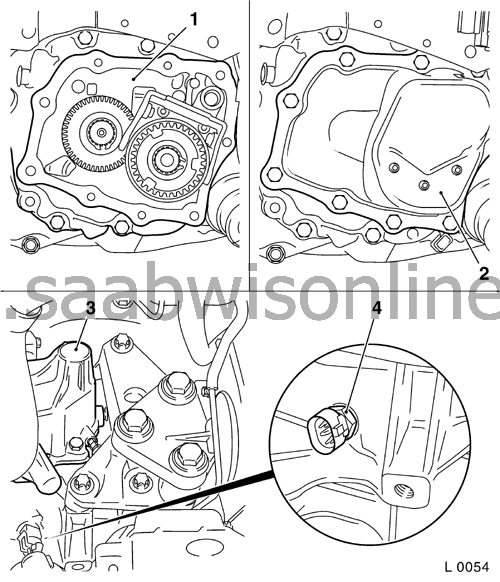
The gearbox remains in place.
|
|
1.
|
Remove the reversing light switch (2).
|
|
4.
|
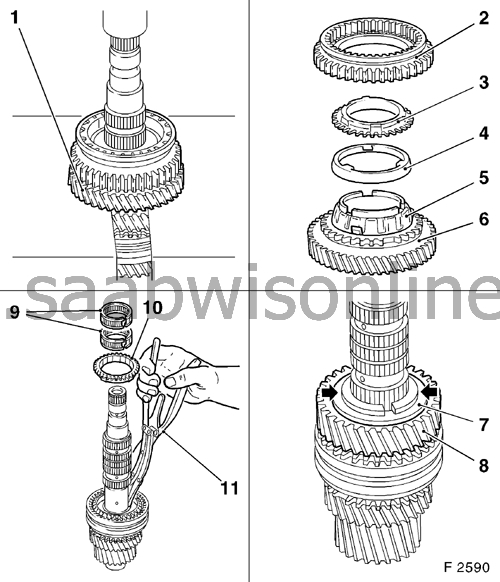
Press off the 1st gear gear-wheel from the main shaft with KM-307-B (2) and KM-736 (1).

|
|
5.
|
Remove sleeve (3), ball bearing (4), thrust washer (5), radial needle bearing (6) and circlip (7).
|
|
6.
|
Remove the 1st gear baulk rings which are: the inner baulk ring (8), the intermediate ring (9) and the outer baulk ring (10).
|
|
7.
|
Remove the circlip holding the 1st/2nd gear synchromesh assembly with KM-396 (11) or
87 90 180 Pliers
.
|
|
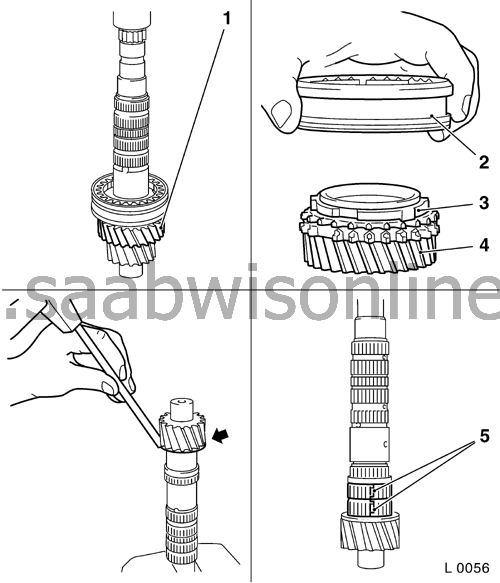
8.
|
Press off the 1st/2nd gear synchromesh assembly and the 2nd gear gear-wheel (1) from the main shaft. Support the 2nd gear gear-wheel by means of the slot in the press support plate.
|
|
9.
|
Remove the 1st/2nd gear synchromesh assembly (2) and the outer baulk ring (3), intermediate ring (4) and inner baulk ring (5) from the 2nd gear gear-wheel (6).
|
|
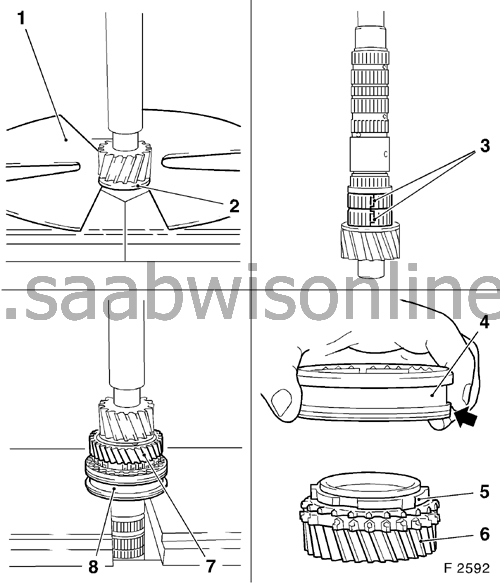
10.
|
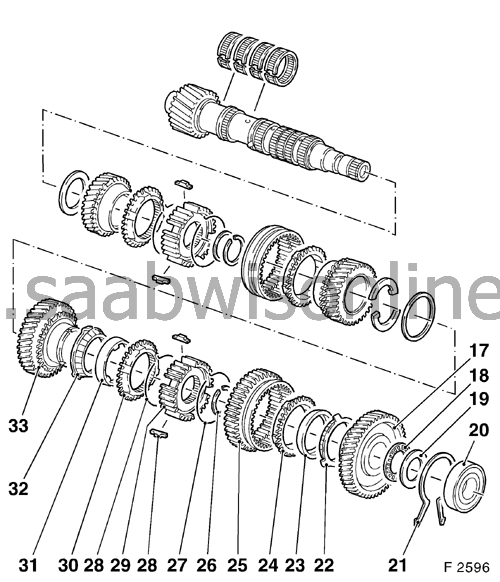
Remove the thrust washer circlip (7) and both parts of the thrust washer (arrowed) from the main shaft
|
|
11.
|
Remove the 3rd gear gear-wheel (8).
|
|
12.
|
Remove the split needle bearing (9) and the 3rd gear baulk ring (10). Remove the circlip for the 3rd/4th gear synchromesh assembly with KM-396 (11). Remove the spacer ring from under the synchromesh assembly.
|
|
13.
|
Press off the 3rd/4th gear synchromesh assembly from the main shaft. Support the 4th gear gear-wheel (4) using the slot in the press support plate.
|
|
14.
|
Remove the 3rd/4th gear synchromesh assembly (2) and the 4th gear baulk ring (3) from the 4th gear gear-wheel. Remove the split needle bearing (5) from the main shaft.
|
|
15.
|
Tap off the thrust washer (arrowed) evenly from the main shaft using a suitable hammer and a soft metal drift.
|
|
17.
|
Check for damage and wear on all dismantled components.
|
Note
|
|
Dip all components in gearbox oil before assembling.
|
Check all parts for wear, pitting or damage. Replace if necessary.
|
Note
If a gear wheel is damaged the teeth on the corresponding pinion must always be checked and if necessary the pinion (i.e. complete drive shaft) replaced.
|
Note
|
|
If the synchromesh assembly has been dismantled, the following assembly procedure should be followed.
|
|
1.
|
Fit the sliding keys into the synchromesh hub and fit the synchromesh sleeve onto the hub.
|
|
2.
|
Press the thrust washer (2) on to the main shaft (1)
|
|
3.
|
Fit the split needle bearing (3) onto the main shaft.
|
|
4.
|
Locate the 4th gear baulk ring (5) and synchromesh assembly (4) on the 4th gear gear-wheel (6).
Note
The groove on the synchromesh sleeve (arrowed) should be towards the 4th gear gear-wheel.
Press the 3rd/4th gear synchromesh assembly (8), together with the baulk ring and 4th gear gear-wheel (7), onto the main shaft. Ensure that the baulk ring teeth align with the corresponding grooves in the synchromesh assembly.
|
|
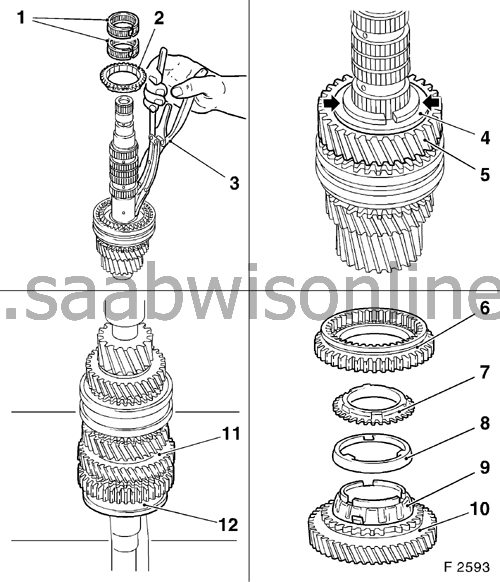
5.
|
Fit the spacer ring on the synchromesh assembly and the new circlip with KM-396 or
87 90 180 Pliers
(3). Check that the circlip is firmly located in the groove. Fit the 3rd gear baulk ring (2) onto the synchromesh assembly and fit the split needle bearing (1) on the main shaft. Fit the 3rd gear gear-wheel (5) onto the shaft.
|
|
6.
|
Fit both parts of the thrust washer (arrowed) and the circlip (4).
|
|
7.
|
Fit the outer baulk ring (9), the intermediate ring (8), the inner baulk ring (7) and the synchromesh assembly (6) onto the 2nd gear gear-wheel (10).
|
|
8.
|
Press the 1st/2nd synchromesh assembly (12) together with the 2nd gear gear-wheel (11) onto the main shaft so that the teeth on the outer baulk ring align with the corresponding grooves in the synchromesh assembly.
|
|
9.
|
Fit a new circlip (1) to hold the 1st/2nd gear synchromesh assembly with KM-396 or
87 90 180 Pliers
.
|
|
10.
|
Fit the 1st gear gear-wheel (2) together with the baulk rings (inner, intermediate and outer) onto the 1st/2nd gear synchromesh assembly . Check that the teeth on the outer baulk ring align with the corresponding grooves in the synchromesh assembly.
|
|
11.
|
Fit a new circlip, axial needle bearing and thrust washer on the 1st gear gear-wheel. Press the ball bearing on the main shaft with KM-258 (3).
|
|
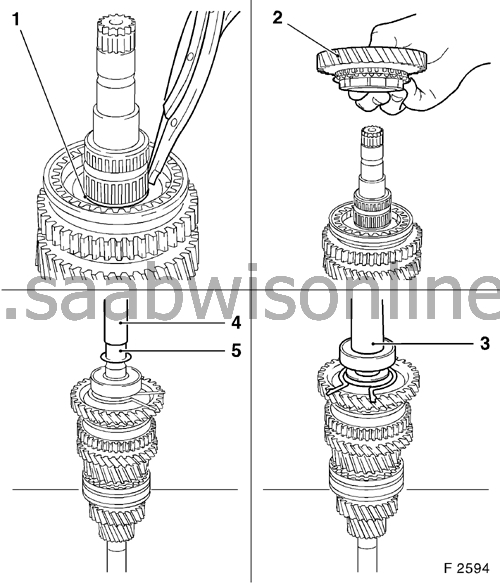
12.
|
Press sleeve (5) on the main shaft (4).
|
|
13.
|
It should be possible to rotate all the gear wheels easily.
|
|
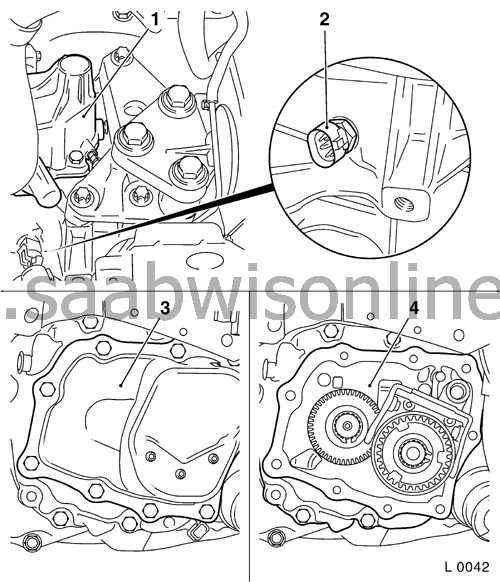
16.
|
Re-fit the reversing light switch (4) to the gearbox with a new sealing ring. Tightening torque 20 Nm.
|