PRE-RELEASE
Camshaft Position Actuator Replacement - Bank 1 (Right Side) Intake (LAU)
| Camshaft Position Actuator Replacement - Bank 1 (Right Side) Intake (LAU) |
| Removal Procedure |
| 1. |
Remove the right exhaust camshaft actuator (2). Refer to
Camshaft Position Actuator Replacement - Bank 1 (Right Side) Exhaust (LAU)
.

|
|
| 2. |
Remove the intake camshaft position actuator bolt.
|
|
| 3. |
Remove the right intake camshaft position actuator.
|
|
| Installation Procedure |
| 1. |
Ensure the proper camshaft position actuator is installed. Observe the body of the camshaft position actuator for the IN marking (3).
The marking is for an exhaust camshaft position actuator. 
|
|
| 2. |
Ensure the proper camshaft position actuator is being installed. The reluctor wheel on the right intake camshaft position actuator (1) is indexed in a different position compared to the left intake camshaft position actuator (2). 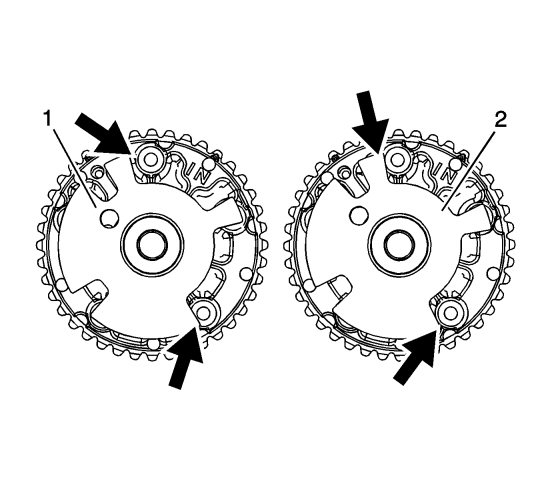
|
|||||||||
 Warning
| 3. |
On the right intake camshaft actuator the edge of the reluctor wheel (1) lines up with the valley (2) of the sprocket tooth.

|
|
| 4. |
Ensure the proper timing mark is used. Observe the outer ring of the camshaft position actuator for the triangle marking (2).
The triangle marking is for alignment to the highlighted timing chain link on the right side of the engine.
|
|
| 5. |
Locate the intake camshaft position actuator (2) to the camshaft and loosely install the bolt.
|
|
| 6. |
Refer to
Fastener Caution
.
Tighten the camshaft position actuator bolt. Refer to Camshaft Position Actuator Installation - Right Side Intake . |
|||||||
| 7. |
Install the right exhaust camshaft actuator. Refer to
Camshaft Position Actuator Replacement - Bank 1 (Right Side) Exhaust (LAU)
.
|
|
