Camshaft Timing Drive Components Cleaning and Inspection
|
|
Camshaft Timing Drive Components Cleaning and Inspection
|
|
1.
|
Clean all the following components with solvent:
|
|
|
•
|
Primary timing drive chain
|
|
|
•
|
Primary timing drive chain shoe
|
|
|
•
|
Primary timing drive chain guides
|
|
|
•
|
Primary timing drive chain tensioner
|
|
|
•
|
Secondary timing drive chains
|
|
|
•
|
Secondary timing drive chain shoes
|
|
|
•
|
Secondary timing drive chain guides
|
|
|
•
|
Secondary timing drive chain tensioners
|
|
|
•
|
Timing component fastening bolts
|
|
2.
|
Clean each camshaft position actuator's exterior with solvent.
|
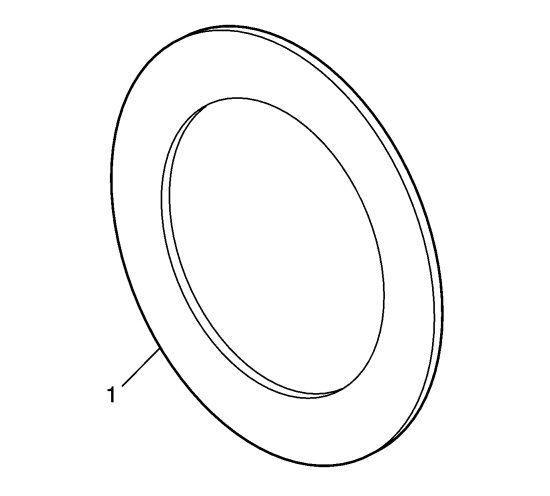
Camshaft Thrust Washers
|
1.
|
Inspect the camshaft thrust washers for deep scoring or uneven wear (1).
|
Camshaft Position Actuators
|
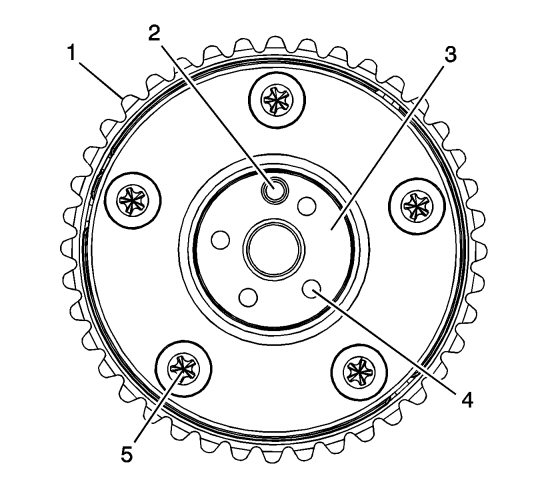
1.
|
|
Note
|
|
Actual camshaft position actuators may vary in appearance from the ones shown.
|
Inspect the front of the exhaust camshaft position actuators for the following:

|
|
|
•
|
Reluctor/sensor wheel damage (2)
|
|
|
•
|
Camshaft position actuator bolt seating/sealing inner hub flange damage (3)
|
|
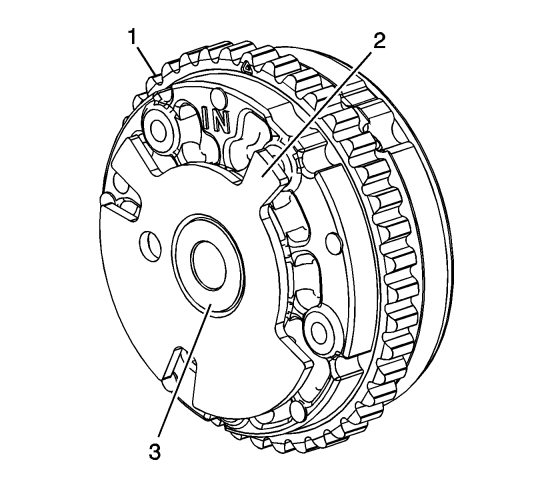
2.
|
Inspect the back of the exhaust camshaft position actuators for the following:

|
|
|
•
|
Camshaft locating pin damage (2)
|
|
|
•
|
Camshaft seating/sealing inner hub flange damage (3)
|
|
|
•
|
Blockage to the oil passages (4)
|
|
|
•
|
Loose or missing housing bolts (5)
|
|
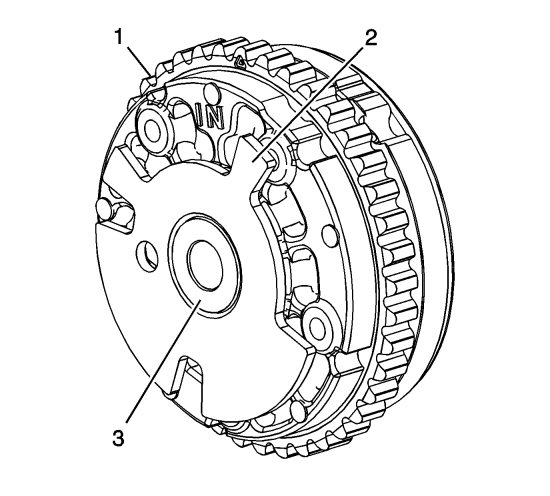
3.
|
Inspect the front of the left intake camshaft position actuators for the following:
|
|
|
•
|
Reluctor/sensor wheel damage (2)
|
|
|
•
|
Camshaft position actuator oil control valve bolt seating/sealing inner hub flange damage (3)
|
|
4.
|
Inspect the back of the left intake camshaft position actuators for the following:
|
|
|
•
|
Camshaft locating pin damage (2)
|
|
|
•
|
Camshaft seating/sealing inner hub flange damage (3)
|
|
|
•
|
Blockage to the oil passages (4)
|
|
|
•
|
Loose or missing housing bolts (5)
|
|
5.
|
Inspect the front of the right intake camshaft position actuators for the following:
|
|
|
•
|
Reluctor/sensor wheel damage (2)
|
|
|
•
|
Camshaft position actuator oil control valve bolt seating/sealing inner hub flange damage (3)
|
|
6.
|
Inspect the back of the right intake camshaft position actuators for the following:
|
|
|
•
|
Camshaft locating pin damage (2)
|
|
|
•
|
Camshaft seating/sealing inner hub flange damage (3)
|
|
|
•
|
Blockage to the oil passages (4)
|
|
|
•
|
Loose or missing housing bolts (5)
|
|
7.
|
Replace a damaged camshaft position actuator.
|
Camshaft Position Actuator Oil Control Valves
|
1.
|
Inspect the camshaft position actuator oil control valves for the following:

|
|
|
•
|
Blockage to the oil passage (1)
|
|
|
•
|
Missing or damaged oil screen clip (2)
|
|
|
•
|
Blockage or damage to the oil screen (3)
|
|
|
•
|
Damage to the sealing surface for the camshaft position actuator oil control valve solenoid oil seal (4)
|
|
|
•
|
Damage to the bracket (5)
|
|
|
•
|
Damage to the wiring harness connection and/or terminals (6)
|
|
2.
|
Replace a damaged camshaft position actuator oil control valve.
|
Left Intermediate Sprocket with Primary and Secondary Inverted Tooth (IT) Chain
|
1.
|
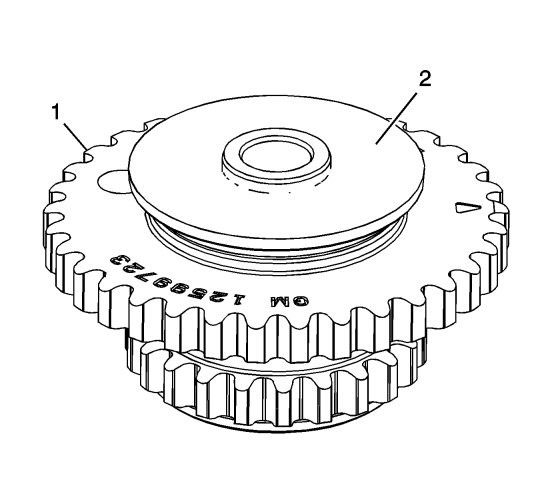
Inspect the front of the left intermediate sprocket for the following:

|
|
|
•
|
Damage to the primary camshaft drive chain sprocket (1)
|
|
|
•
|
Damage to the hub bearing (2)-Ensure the hub bearing spins freely. If the hub bearing wobbles, is noisy, or feels rough when rotated, replace the intermediate sprocket.
|
|
|
•
|
Damage to the bolt flange seating/sealing surface (3)
|
|
2.
|
Inspect the back of the left intermediate sprocket for the following:

|
|
|
•
|
Damage to the left secondary camshaft drive chain sprocket (1)
|
|
|
•
|
Damage to the bearing hub-to-engine block sealing surface (2)
|
|
3.
|
Replace a damaged left intermediate sprocket.
|
Right Intermediate Sprocket with Primary and Secondary Inverted Tooth (IT) Chain
|
1.
|
Inspect the front of the right intermediate sprocket for the following:

|
|
|
•
|
Damage to the right secondary camshaft drive chain sprocket (1)
|
|
|
•
|
Damage to the hub bearing (2)-Ensure the hub bearing spins freely. If the hub bearing wobbles, is noisy, or feels rough when rotated, replace the intermediate sprocket.
|
|
|
•
|
Damage to the bolt flange seating/sealing surface (3)
|
|
2.
|
Inspect the back of the right intermediate sprocket for the following:
|
|
|
•
|
Damage to the primary camshaft drive chain sprocket (1)
|
|
|
•
|
Damage to the bearing hub-to-engine block sealing surface (2)
|
|
3.
|
Replace a damaged right intermediate sprocket.
|
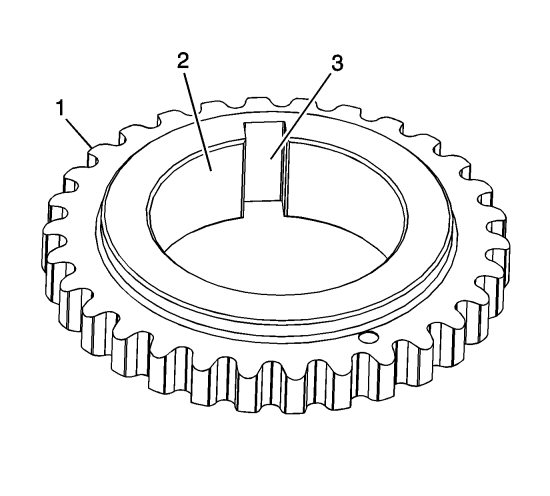
Crankshaft Sprocket with Primary Inverted Tooth (IT) Chain
|
1.
|
Inspect the crankshaft sprocket for the following:
|
|
2.
|
Replace a damaged crankshaft sprocket.
|
Secondary Timing Chains with Inverted Tooth (IT) Chain
|
1.
|
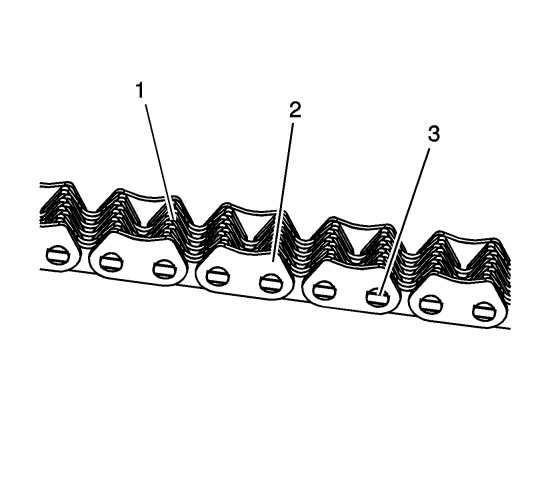
Inspect the secondary timing chain for the following:
|
|
|
•
|
Binding or worn links (1)
|
|
2.
|
Replace a damaged secondary timing chain.
|
Primary Timing Chain with Inverted Tooth (IT) Chain
|
1.
|
Inspect the primary timing chain for the following:
|
|
|
•
|
Binding or worn links (1)
|
|
2.
|
Replace a damaged primary timing chain.
|
Primary Timing Chain Upper Guide
|
1.
|
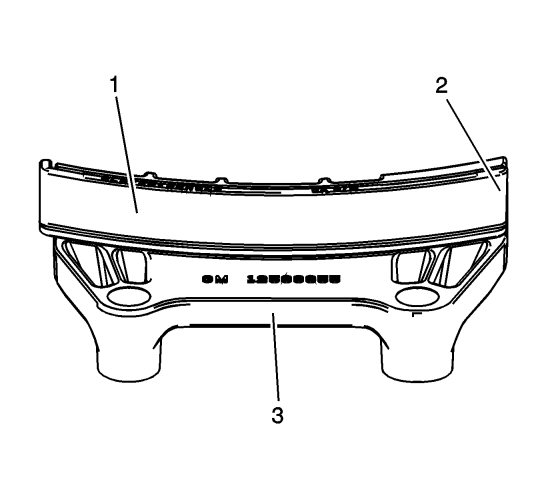
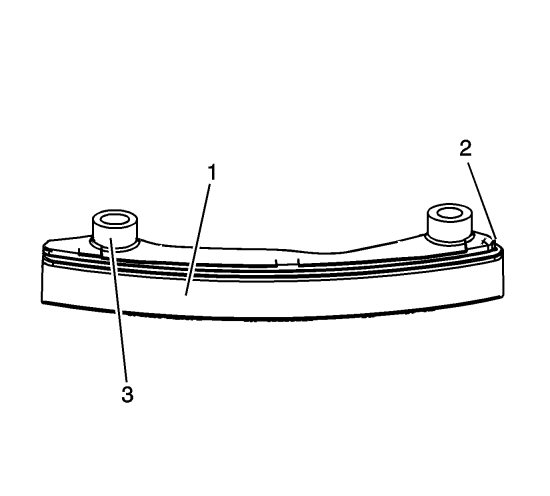
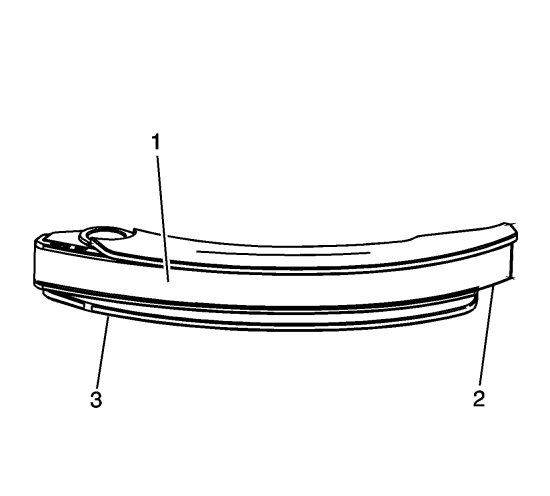
Inspect the primary timing chain upper guide for the following:
|
|
|
•
|
Cracked or broken guide surface (2)
|
|
|
•
|
Cracked or damaged guide base (3)
|
|
2.
|
Replace a damaged primary timing chain upper guide.
|
Primary Timing Chain Lower Guide
|
1.
|
Inspect the primary timing chain lower guide for the following:
|
|
|
•
|
Cracked or broken guide surface (2)
|
|
|
•
|
Cracked or damaged guide base (3)
|
|
2.
|
Replace a damaged primary timing chain lower guide.
|
Left Secondary Timing Chain Guide
|
1.
|
Inspect the left secondary timing chain guides for the following:

|
|
|
•
|
Cracked or broken guide surface (2)
|
|
|
•
|
Cracked or damaged guide base (3)
|
|
2.
|
Replace a damaged left secondary timing chain guide.
|
Right Secondary Timing Chain Guide
|
1.
|
Inspect the right secondary timing chain guides for the following:
|
|
|
•
|
Cracked or broken guide surface (2)
|
|
|
•
|
Cracked or damaged guide base (3)
|
|
2.
|
Replace a damaged right secondary timing chain guide.
|
Left Secondary Timing Chain Shoe
|
1.
|
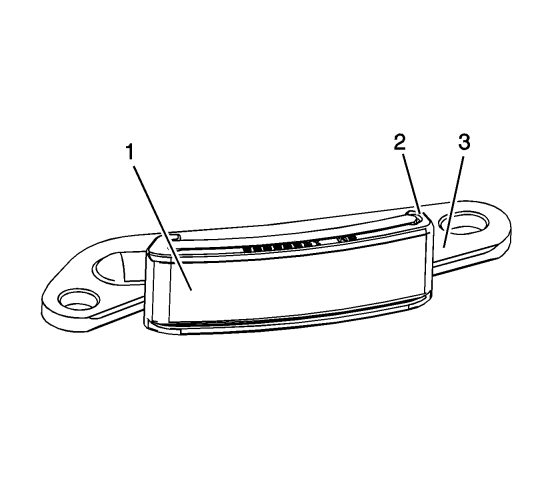
Inspect the front of the left secondary timing chain shoe for the following:
|
|
|
•
|
Cracked or broken shoe surface (2)
|
|
|
•
|
Cracked or damaged shoe (3)
|
|
2.
|
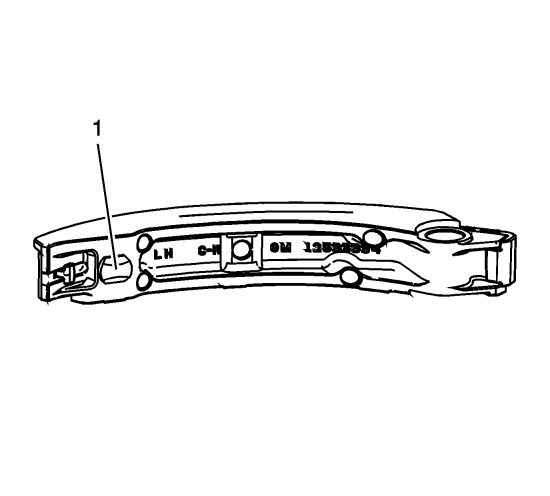
Inspect the back of the left secondary timing chain shoe for a damaged, worn, or missing left secondary timing chain tensioner contact pad (1).
|
|
3.
|
Replace a damaged left secondary timing chain shoe.
|
Right Secondary Timing Chain Shoe
|
1.
|
Inspect the front of the right secondary timing chain shoe for the following:
|
|
|
•
|
Cracked or broken shoe surface (2)
|
|
|
•
|
Cracked or damaged shoe (3)
|
|
2.
|
Inspect the back of the right secondary timing chain shoe for a damaged, worn, or missing right secondary timing chain tensioner contact pad (1).

|
|
3.
|
Replace a damaged right secondary timing chain shoe.
|
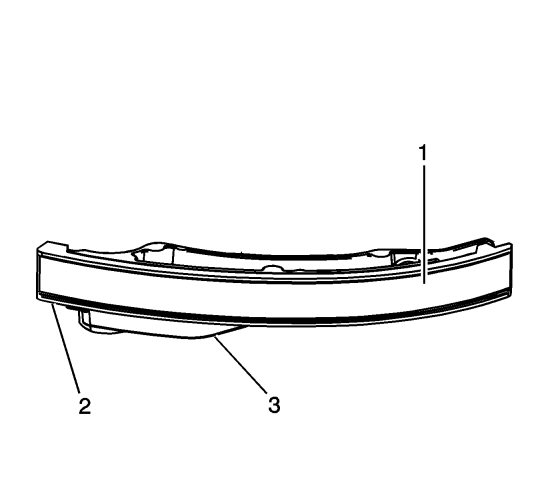
Primary Timing Chain Tensioner
|
1.
|
Inspect the primary timing chain tensioner for worn primary timing chain tensioner shoe surface (1).
|
|
3.
|
Replace a damaged primary timing chain tensioner.
|
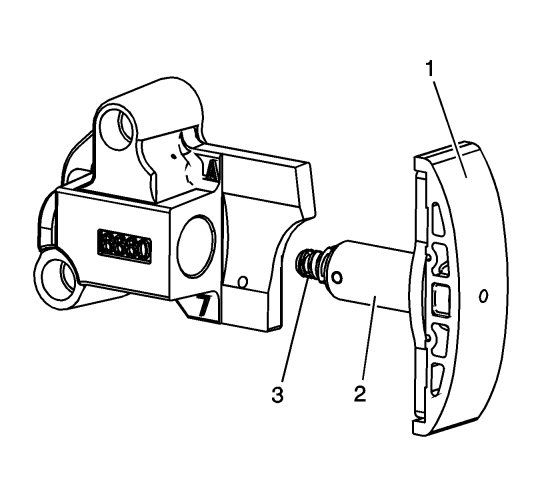
Left Secondary Timing Chain Tensioner
|
1.
|
Inspect the left secondary timing chain tensioner for damaged plunger-to-shoe contact surface (1).
|
|
3.
|
Replace a damaged left secondary timing chain tensioner.
|
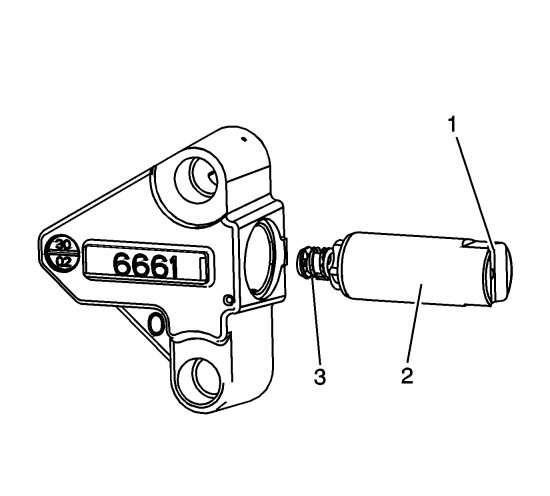
Right Secondary Timing Chain Tensioner
|
1.
|
Inspect the right secondary timing chain tensioner for damaged plunger-to-shoe contact surface (1).

|
|
3.
|
Replace a damaged right secondary timing chain tensioner.
|
