PRE-RELEASE
Subframe, replace
| Subframe, replace |
| Special Tools |
| • |
CH-49289
Support frame fixture
|
|
| • |
CH-904
Basic tool
|
|
For equivalent regional tools, refer to Special Tools
| Removal Procedure |
| 1. |
Disconnect the battery negative cable.
|
|
| 2. |
Remove the bolt (1) from the coupler and disconnect the steering shaft coupling from the steering gear. Refer to
Intermediate Steering Shaft Replacement
|
|
| 3. |
Remove the left catalytic converter and pipe assembly. Refer to
Catalytic Converter Replacement - Left Side (LF1)
.
|
|
| 4. |
On AWD vehicles, remove the propeller shaft. Refer to
Propeller Shaft Replacement
|
|
| 5. |
Raise and support the vehicle. Refer to
Lifting and Jacking the Vehicle
|
|
| 6. |
Remove the front wheels. Refer to
Tire and Wheel Removal and Installation
.
|
|
| 7. |
Remove the radiator air lower deflector. Refer to
Radiator Air Lower Deflector Replacement
.
|
|
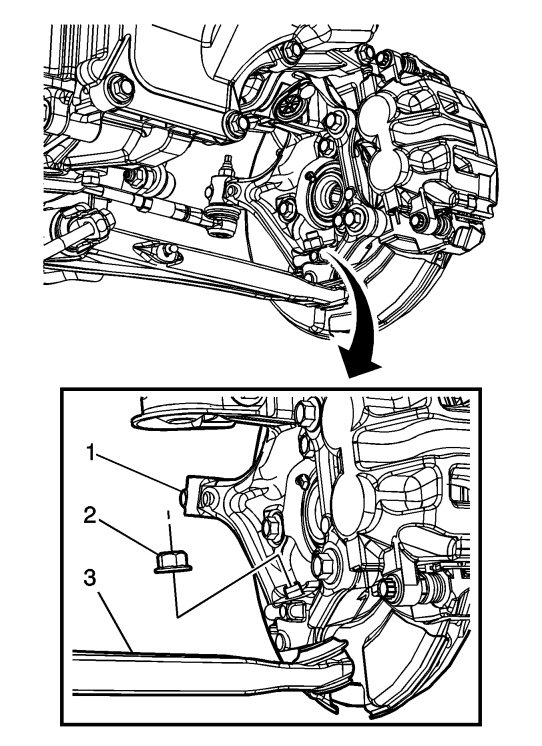
| 8. |
Remove the lower ball joint fastener (2).
|
|
| 9. |
Separate the lower ball joints from the steering knuckles (1). Refer to
Lower Control Arm Replacement
.
|
|
| 10. |
Remove the electrical harness and the power steering cooler line from the clips in the frame.
|
|
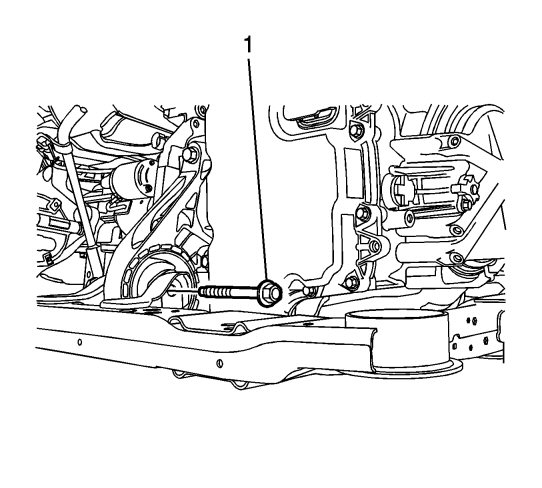
| 11. |
Remove the front transmission mount through bolt (1).
|
|
| 12. |
Prepare the
CH-904
Basic tool and the
CH-49289
Support frame fixture according to the SPX instructions
|
|
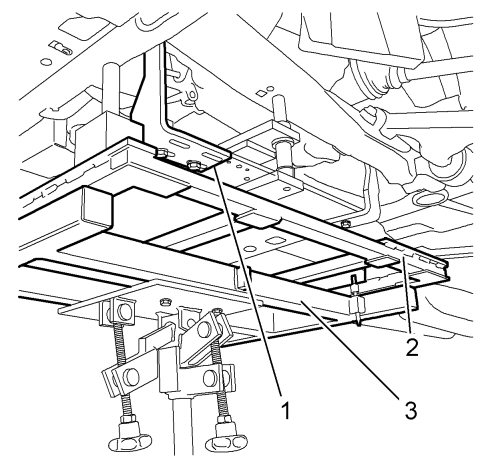
| 13. |
Install
CH-49289
Support frame fixture (2) at the front suspension frame
|
|
| 14. |
Remove the frame-to-body bolts.
|
|
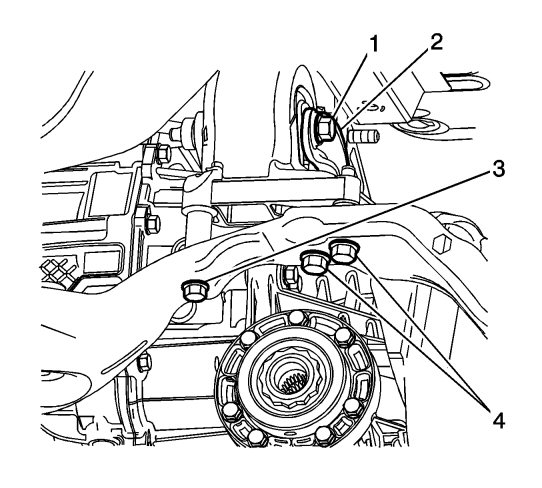
| 15. |
Remove the rear transmission mount through bolt (1).
|
|
| 16. |
Carefully lower the suspension frame with the Hydraulic lifter
|
|
| 17. |
If replacing the frame, transfer components as necessary.
|
|
| Installation Procedure |
| 1. |
Carefully raise the frame until it contacts the vehicle.
|
|
| 2. |
Position the support frame using the guide pins.
|
|
| 3. |
Refer to
Fastener Caution
.
Install the 2 rear frame to body bolts and tighten to 100 Nm (74 lb ft) plus 90 degrees . |
|
| 4. |
Install the 2 front frame to body bolts and tighten to
100 Nm (74 lb ft) plus 90 degrees
.
|
|
| 5. |
Install the reinforcement bolts and tighten to
45 Nm (33 lb ft) plus 30 degrees
.
|
|
| 6. |
Install the electrical harness and the power steering cooler line to the clips in the frame.
|
|
| 7. |
Connect the ball joint studs to the steering knuckles (1). Refer to
Lower Control Arm Replacement
.
|
|
| 8. |
Install the ball joint fastener (2) to the ball joint and tighten to
30 Nm (22 lb ft) plus an additional 130 degrees
.
|
|
| 9. |
Install the rear transmission mount through bolt (1) and tighten to
100 Nm (74 lb ft)
.
|
|
| 10. |
Install the front transmission mount through bolt (1) and nut. Tighten to
100 Nm (74 lb ft)
.
|
|
| 11. |
Remove the special tools.
|
|
| 12. |
On AWD vehicles, install the propeller shaft. Refer to
Propeller Shaft Replacement
.
|
|
| 13. |
Install the left catalytic converter and pipe assembly. Refer to
Catalytic Converter Replacement - Left Side (LF1)
.
|
|
| 14. |
Install the radiator air lower deflector. Refer to
Radiator Air Lower Deflector Replacement
.
|
|
| 15. |
Install the front wheels. Refer to
Tire and Wheel Removal and Installation
.
|
|
| 16. |
Lower the vehicle.
|
|
| 17. |
Check the wheel alignment.
|
|
