PRE-RELEASE
Instrument Panel Assembly Removal
| Instrument Panel Assembly Removal |
| Removal Procedure |
| 1. |
Remove the front seats. Refer to
Driver or Passenger Seat Replacement
.
|
|
| 2. |
Remove the front floor console. Refer to
Front Floor Console Replacement
.
|
|
| 3. |
Disconnect the negative battery cable. Refer to:
Battery, negative cable, disconnecting and connecting
.
|
|
| 4. |
Remove the right and left instrument panel side trim panels. Refer to
Instrument Panel, Side Trim Panel Replacement
.
|
|
| 5. |
Remove the right and left A pillar trim panels. Refer to
A pillar trim panels, replacement
.
|
|
| 6. |
Remove the steering column assembly. Refer to
Steering Column Replacement
.
|
|
| 7. |
Remove the instrument cluster. Refer to
Instrument Cluster Replacement
.
|
|
| 8. |
Remove the radio. Refer to
Radio Replacement
.
|
|
| 9. |
Remove the instrument panel compartment assembly. Refer to
Instrument Panel Compartment Replacement
.
|
|
| 10. |
Remove the windshield defroster nozzle grille. Refer to
Windshield Defroster Nozzle Grille Replacement
.
|
|
| 11. |
Remove the right and left windshield garnish moldings. Refer to
Windshield Garnish Molding Replacement
.
|
|
| 12. |
Note location and routing of the instrument panel wiring harness prior to removal in order to ensure proper installation.
|
|
| 13. |
Disconnect the electrical connectors.
|
|
| 14. |
Remove the 2 nuts (1) securing the instrument panel inflatable restraint to the instrument panel assembly.
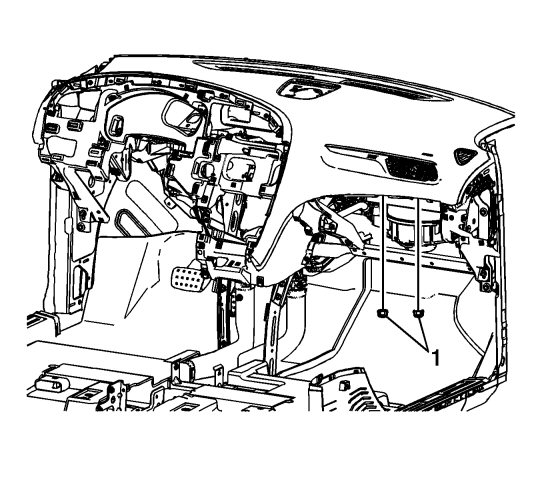
|
|
| 15. |
Remove the 7 bolts/screws (1) securing the instrument panel assembly to the vehicle.
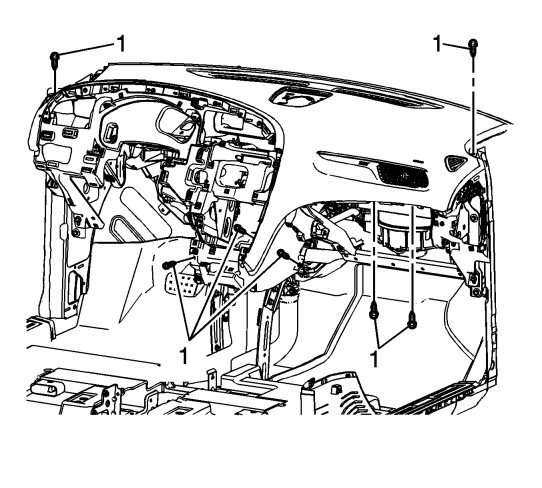
|
|
| 16. |
Remove the 4 nuts (1) securing the instrument panel assembly to the vehicle.
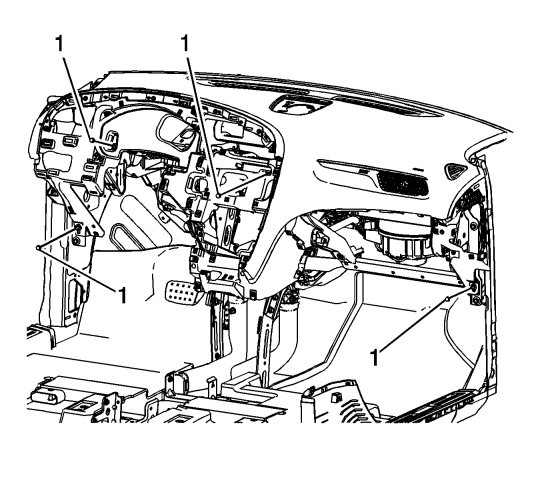
|
|
| 17. |
With the aid of an assistant, remove the instrument panel assembly (1) from the vehicle.
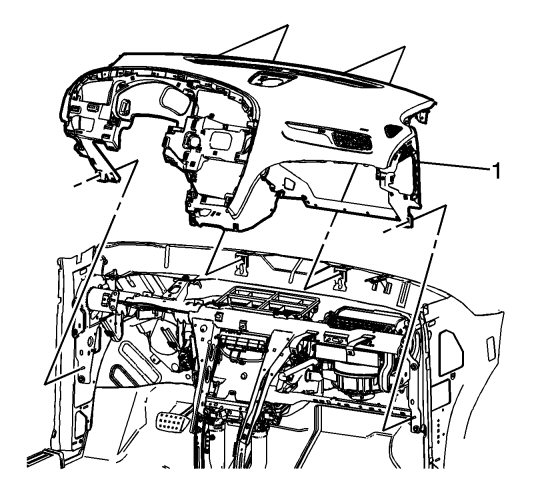
|
|
| 18. |
Set the instrument panel assembly down and adequately support it in order to prevent any damage.
|
|
| Installation Procedure |
| 1. |
With the aid of an assistant, align the instrument panel assembly (1) to the vehicle.
|
|
| 2. |
Loosely install the 4 nuts (1) .
|
|
| 3. |
Loosely install the 7 bolts/screws (1).
|
|
| 4. |
Refer to
Fastener Caution
.
Tighten the 7 bolt/screws securing the instrument panel to the vehicle 2.5 Nm (22 lb in) . |
|
| 5. |
Tighten the 4 nuts securing the instrument panel to the vehicle to
9 Nm (80 lb in)
.
|
|
| 6. |
Install the 2 nuts (1) securing the instrument panel inflatable restraint to the instrument panel assembly, tighten to
9 Nm (80 lb in)
.
|
|
| 7. |
Ensure the wiring harness is routed properly as was noted in the removal procedures.
|
|
| 8. |
Connect the electrical connections.
|
|
| 9. |
Install the right and left windshield garnish moldings. Refer to
Windshield Garnish Molding Replacement
.
|
|
| 10. |
Install the windshield defroster nozzle grille. Refer to
Windshield Defroster Nozzle Grille Replacement
.
|
|
| 11. |
Install the instrument panel compartment assembly. Refer to
Instrument Panel Compartment Replacement
.
|
|
| 12. |
Install the radio. Refer to
Radio Replacement
.
|
|
| 13. |
Install the instrument cluster. Refer to
Instrument Cluster Replacement
.
|
|
| 14. |
Install the steering column assembly. Refer to
Steering Column Replacement
.
|
|
| 15. |
Fit the right and left A pillar trim panels. Refer to
A pillar trim panels, replacement
.
|
|
| 16. |
Install the right and left instrument panel side trim panels. Refer to
Instrument Panel, Side Trim Panel Replacement
.
|
|
| 17. |
Connect the negative battery cable. Refer to
Battery Negative Cable Disconnection and Connection
.
|
|
| 18. |
Install the front floor console. Refer to
Front Floor Console Replacement
.
|
|
| 19. |
Install the front seats. Refer to
Driver or Passenger Seat Replacement
.
|
|
