PRE-RELEASE
Timing Belt Replacement
| Timing Belt Replacement |
Special Tools
| • |
CH-49290
Centering Fixture Subframe - Engine
|
|
| • |
EN-956-1
Extension
|
|
| • |
EN-46788
Crankshaft Fixing tool
|
|
| • |
EN-46789
Camshaft Fixer
|
|
| • |
EN-49826
Extension Tool High-Pressure Pump Sprocket
|
|
For equivalent regional tools, refer to Special Tools .
| Removal Procedure |
| 1. |
Protect the wings with covers.
|
|
| 2. |
Remove the battery cover and the negative battery cable. Refer to
Battery Negative Cable Disconnection and Connection
.
|
|
| 3. |
Raise and support the vehicle. Refer to
Lifting and Jacking the Vehicle
.
|
|
| 4. |
Remove the front right wheel. Refer to
Tire and Wheel Removal and Installation
.
|
|
| 5. |
Remove the front wheelhouse front liner. Refer to
Front Wheelhouse Front Liner Replacement
.
|
|
| 6. |
Remove the engine shield. Refer to
Engine Shield Replacement
.
|
|
| 7. |
Install
CH-49290
centering fixture to support the engine to the subframe. Take the strain off the engine bracket by adjusting the fixture.
Refer to Engine Support Fixture (Mounting Engine/Transmission) Engine Support Fixture (Centering Adapter) Engine Support Fixture (Engine Bridge, Retainer Frame) . |
|
| 8. |
Remove the drive belt for the auxiliaries. Refer to
Drive Belt Replacement
.
|
|
| 9. |
Remove the crankshaft pulley. Refer to
Crankshaft Balancer Replacement
.
|
|||||||
| 10. |
Remove the idler pulley center bolt on the lower timing cover. Use, for example, 2 screwdrivers to carefully pry off from two directions.
|
|
| 11. |
Lower the vehicle.
|
|
| 12. |
Remove the engine cover. Refer to
Engine Cover Replacement
.
|
|
| 13. |
Remove the air cleaner casing. Refer to
Air Cleaner Assembly Replacement
.
|
|
| 14. |
Remove the right hand engine mounting. Refer to
Engine Mount Replacement - Right Side
.
|
|
| 15. |
Remove the upper and lower timing covers. Refer to
Timing Belt Upper Front Cover Replacement
and
Timing Belt Lower Front Cover Replacement
.
|
|
| 16. |
Remove the crankcase ventilation pipe (17) and hose (17) from the camshaft housing. 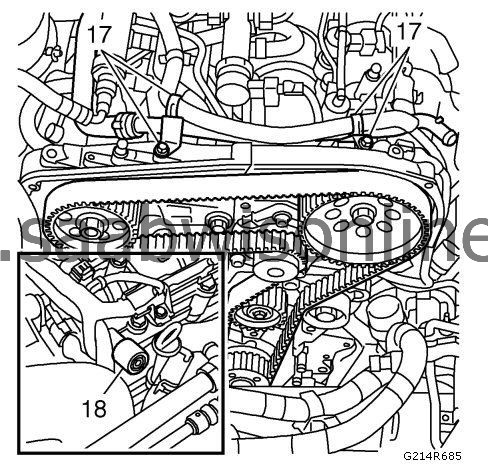
|
|||||||
| 17. |
Zero the engine by removing the plug and fitting
EN-46789
camshaft fixing tool (18).
|
|
| 18. |
Turn round the engine until the tool engages and locks the exhaust camshaft.
|
|
| 19. |
Relieve the belt tensioner (20) and remove the timing belt.
|
|
| Installation Procedure |
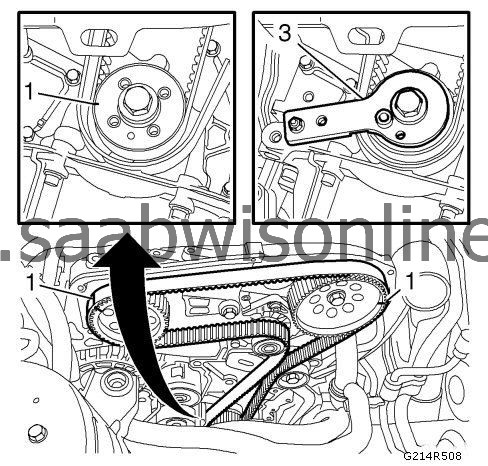
| 1. |
Install the timing belt so that the marks on the belt agree with the marks on the crankshaft (1), exhaust camshaft (1) and fuel pump sprockets (1).
|
|
| 2. |
Raise and support the vehicle. Refer to
Lifting and Jacking the Vehicle
.
|
|
| 3. |
Remove the bolt from the oil pump and fit
EN-46788
crankshaft fixing tool (3) to the crankshaft sprocket.
|
|
| 4. |
Install the belt tensioner without tightening the bolt.
|
|
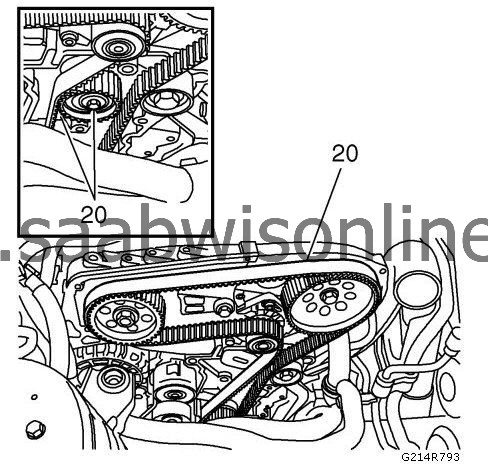
| 5. |
Adjust so that the belt tensioner arrow is right in front of the mark (5) by pressing the setting lever in the direction of the arrow. Tighten the belt tensioner using a large screwdriver and an M8 bolt for support.
Tighten25 Nm (18 lb ft)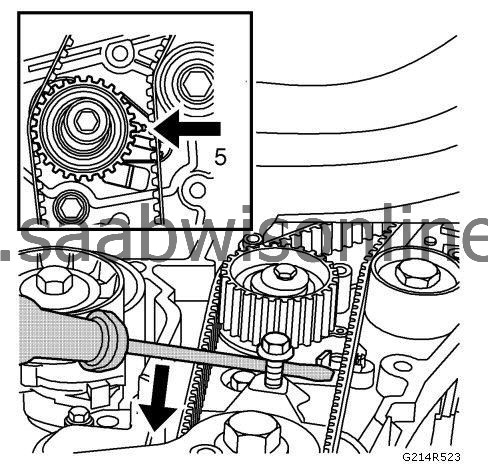
|
|
| 6. |
Remove the adjustment tool and turn the crankshaft 2 turns.
|
|
| 7. |
Refit
EN-46788
crankshaft fixing tool and
EN-46789
camshaft fixing tool. Check that the belt is fitted correctly and that the tension roller setting arrow is in front of the mark.
|
|
| 8. |
Remove the tool and fit the plug on the camshaft cover and the bolt to the oil pump.
|
|
| 9. |
Install the crankcase ventilation pipe and hose on the camshaft housing.
|
|
| 10. |
Install the lower timing cover. Refer to
Timing Belt Lower Front Cover Replacement
.
|
|
| 11. |
Install the upper timing cover. Refer to
Timing Belt Upper Front Cover Replacement
.
|
|
| 12. |
Install the right hand engine mounting. Refer to
Engine Mount Replacement - Right Side
.
TightenFasteners to body 58 Nm (43 lb ft)TightenFasteners to engine 50 Nm + 65° (37 lb ft + 65°) |
|
| 13. |
Install the air filter housing with cover and the connector on the intake hose. Refer to
Air Cleaner Assembly Replacement
.
|
|
| 14. |
Install the insulation and the engine cover. Refer to
Engine Cover Replacement
.
|
|
| 15. |
Raise and support the vehicle. Refer to
Lifting and Jacking the Vehicle
.
|
|
| 16. |
Install the idler pulley center bolt on the lower timing cover.
Tighten25 Nm (18 lb ft) |
|
| 17. |
Install the crankshaft pulley. Refer to
Crankshaft Balancer Replacement
.
|
|||||||
| 18. |
Install the drive belt for the auxiliaries. Refer to
Drive Belt Replacement
.
|
|
| 19. |
Remove the engine fixing tool from the subframe.
|
|
| 20. |
Install the engine sight shield. Refer to
Engine Shield Replacement
.
|
|
| 21. |
Refit the front wheelhouse liner. Refer to
Front Wheelhouse Front Liner Replacement
.
|
|
| 22. |
Install the right front wheel. Refer to
Tire and Wheel Removal and Installation
.
|
|
| 23. |
Lower the vehicle.
|
|
| 24. |
Connect the negative battery cable and install the battery cover. Refer to
Battery Negative Cable Disconnection and Connection
.
|
|
| 25. |
Start the engine and turn it off.
|
|
| 26. |
Remove the wing cover.
|
|
