PRE-RELEASE
Rear Suspension Support Replacement (GNE, AWD)
| Rear Suspension Support Replacement (GNE, AWD) |
| Removal Procedure |
| 1. |
Raise and support the vehicle. Refer to
Lifting and Jacking the Vehicle
.
|
|
| 2. |
Remove the tires and wheels. Refer to
Tire and Wheel Removal and Installation
.
|
|
| 4. |
Remove the park brake cables from the support. Refer to
Parking Brake Rear Cable Replacement (J71)
.
|
|
| 5. |
Remove the shock absorber lower fastener. Refer to
Shock Absorber Replacement (GNC)
Shock Absorber Replacement (GNE)
.
|
|
| 6. |
Remove the rear wheel hub brackets.
|
|
| 7. |
Remove the lower control arms from the vehicle.
|
|
| 8. |
Remove the upper control arms from the vehicle.
|
|
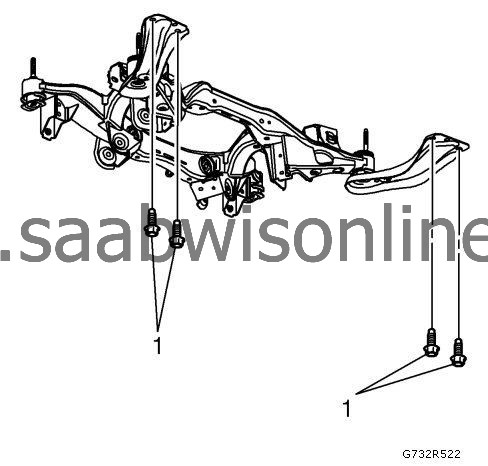
| 9. |
Remove reinforcement arm bolts (1) to body.
|
|
| 10. |
Remove the outer fastener adjustment links. Refer to
Adjust Link Replacement (GNC)
Adjust Link Replacement (GNE)
.
|
|
| 11. |
Remove the rear wheel drive shafts. Refer to
Rear Wheel Drive Shaft Replacement
.
|
|
| 12. |
Remove the differential carrier assembly. Refer to
Differential Carrier Assembly Replacement
.
|
|
| 13. |
Position a transmission jack under the rear support and firmly secure the support to the jack with straps.
|
|
| 14. |
Mark the location of the frame using spray paint for correct positioning during installation.
|
|
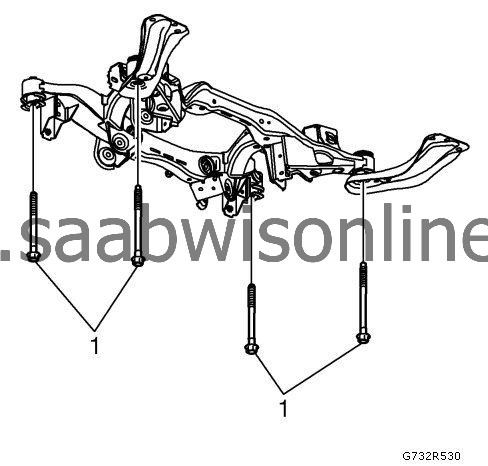
| 15. |
Remove the 4 rear support to body bolts (1).
|
|
| 16. |
Remove the rear support assembly from the vehicle.
|
|
| 17. |
Remove the inner fastener from adjustments links. Refer to
Adjust Link Replacement (GNC)
Adjust Link Replacement (GNE)
.
|
|
| 18. |
With the aid of an assistant, remove the rear support from the transmission jack and place it on the floor.
|
|
| Installation Procedure |
| 1. |
With the aid of an assistant, position the rear support onto the transmission jack and firmly secure the support to the jack with straps. |
|||||||
| 2. |
Install the inner fastener to adjustments links. Refer to
Adjust Link Replacement (GNC)
Adjust Link Replacement (GNE)
.
|
|
| 3. |
Carefully lower the vehicle until contacts the frame assembly and is correctly positioned within the spray painted areas.
|
|
| 4. |
Refer to
Fastener Caution
.
Install 4 NEW rear support to body bolts (1) and tighten to 90 Nm (66 lb ft) + 180 degrees + 15 degrees .
|
|
| 5. |
Install the differential. Refer to
Differential Carrier Assembly Replacement
.
|
|
| 6. |
Install the rear wheel drive shafts. Refer to
Rear Wheel Drive Shaft Replacement
.
|
|
| 7. |
Install the outer fastener adjustment links. Refer to
Adjust Link Replacement (GNC)
Adjust Link Replacement (GNE)
.
|
|
| 8. |
Install NEW reinforcements arm bolts (1) to body and tighten to
150 Nm (111 lb ft) + 30 degrees + 15 degrees
.
|
|
| 9. |
Install the upper control arms.
|
|
| 10. |
Install the lower control arms.
|
|
| 11. |
Install the rear wheel hub brackets.
|
|
| 12. |
Install shock absorber lower fastener. Refer to
Shock Absorber Replacement (GNC)
Shock Absorber Replacement (GNE)
.
|
|
| 13. |
Install the park brake cable. Refer to
Parking Brake Rear Cable Replacement (J71)
.
|
|
| 15. |
Install the tires and wheels. Refer to
Tire and Wheel Removal and Installation
.
|
|
| 16. |
Check the rear alignment. Refer to
Wheel Alignment Measurement
.
|
|
