PRE-RELEASE
Differential Carrier Assembly Replacement
| Differential Carrier Assembly Replacement |
| Removal Procedure |
| Note | ||
|
The following service procedure is also to include those vehicles with RPO G96. |
| 1. |
Raise and support the vehicle. Refer to
Lifting and Jacking the Vehicle
.
|
|
| 2. |
If replacing the rear differential assembly, drain the rear differential fluid. Refer to
Differential Clutch Oil Replacement
and
Differential Oil Replacement
.
|
|
| 3. |
Remove the propeller shaft assembly. Refer to
Propeller Shaft Replacement
.
|
|
| 4. |
Remove the exhaust muffler assembly. Refer to
Exhaust Muffler Replacement (LAU)
Exhaust Muffler Replacement (LF1)
.
|
|
| 5. |
Remove the electronic park brake control module. Refer to
Electronic Parking Brake Control Module Replacement
.
|
|
| 6. |
Remove the wheel drive shaft. Refer to
Rear Wheel Drive Shaft Replacement
.
|
|
| 7. |
Disconnect the electrical connectors from the rear differential assembly to the chassis.
|
|
| 8. |
Support the rear differential assembly with a hydraulic transmission jack. |
|||||||
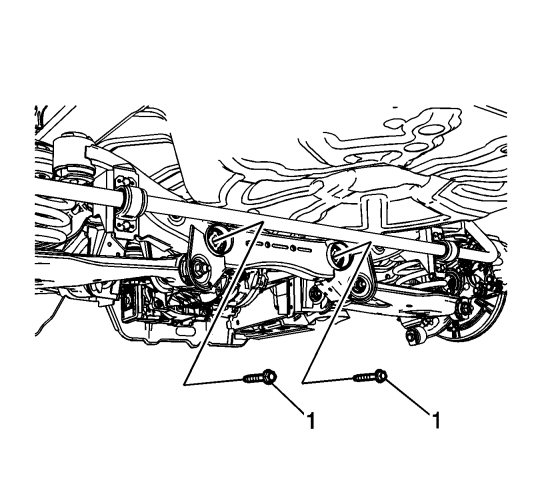
| 9. |
Remove the rear differential assembly mounting bolts (1).
|
|
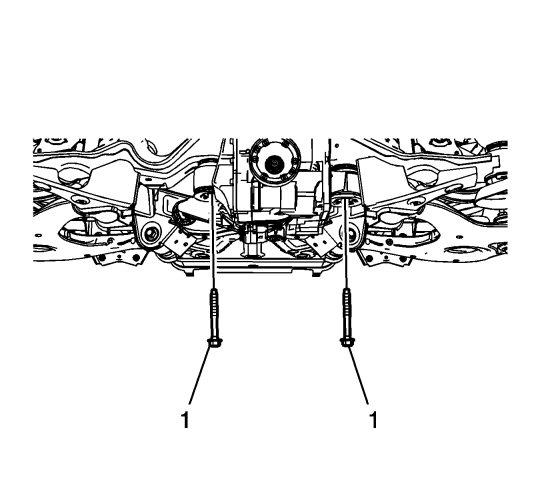
| 10. |
Remove the front differential mounting bolts (1).
|
|
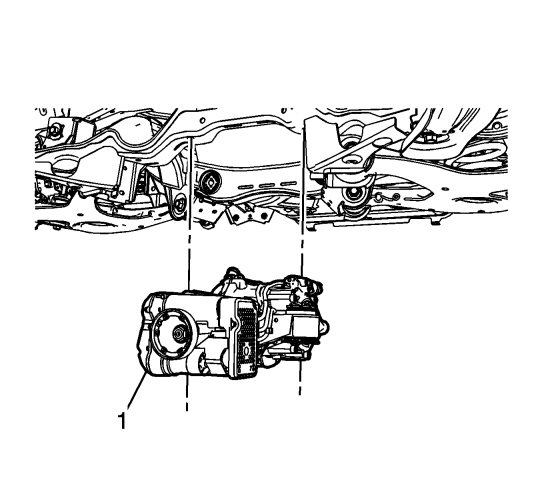
| 11. |
Using the hydraulic jack stand, remove the rear differential assembly (1) from the vehicle.
|
|
| 12. |
Remove the differential clutch assembly, if needed. Refer to
Differential Clutch Replacement
|
|
| Installation Procedure |
| 1. |
Install the differential clutch assembly, if removed. Refer to
Differential Clutch Replacement
|
|
| 2. |
Using the hydraulic jack stand, position the rear differential assembly (1) in the vehicle.
|
|
| 3. |
Clean the bolts and apply thread locker on the threads. Refer to
Adhesives, Fluids, Lubricants, and Sealers
|
|
| 4. |
Refer to
Fastener Caution
.
Install the front differential mounting bolts (1) and tighten to 40 Nm (30 lb ft) + 90 degrees. |
|
| 5. |
Install the rear differential unit's mounting bolts (1) and tighten to
40 Nm (30 lb ft) + 90 degrees.
|
|
| 6. |
Remove the hydraulic jack stand.
|
|
| 7. |
Install the wheel drive shafts. Refer to
Rear Wheel Drive Shaft Replacement
.
|
|
| 8. |
Install the electronic park brake control module. Refer to
Electronic Parking Brake Control Module Replacement
.
|
|
| 9. |
Reconnect the electrical connectors from the rear differential assembly to the chassis.
|
|
| 10. |
Install the exhaust muffler assembly. Refer to
Exhaust Muffler Replacement (LAU)
Exhaust Muffler Replacement (LF1)
.
|
|
| 11. |
Install the propeller shaft assembly. Refer to
Propeller Shaft Replacement
.
|
|
| 12. |
Check the fluid level of the rear differential assembly. Refer to
Differential Clutch Oil Inspection
and
Rear Axle Lubricant Level Inspection
.
|
|
| 13. |
If installing a NEW rear differential assembly, fill with the proper fluid. Refer to
Differential Clutch Oil Replacement
and
Differential Oil Replacement
.
|
|
| 14. |
Remove the supports and lower the vehicle.
|
|
| 15. |
Program the differential assembly. Refer to
Control Module References
.
|
|
