PRE-RELEASE
Radiator Replacement (LAU/A28NER)
| Radiator Replacement (LAU/A28NER) |
| Removal Procedure |
| 1. |
Turn the ignition OFF. |
|||||||||
 Warning
| 2. |
Disconnect the battery negative cable. Refer to
Battery Negative Cable Disconnection and Connection
.
|
|
| 3. |
Remove the front bumper fascia. Refer to
Front Bumper Fascia Replacement
.
|
|
| 4. |
Drain the cooling system. Refer to
Cooling System Draining and Filling (LAU/A28NER)
Cooling System Draining and Filling (LBS/A20DTH)
Cooling System Draining and Filling (LHU/A20NFT)
.
|
|
| 5. |
Remove the air cleaner outlet duct. Refer to
Air Cleaner Outlet Duct Replacement
.
|
|
| 6. |
Remove the secondary air injection pipe. Refer to
Secondary Air Injection Pump Replacement
.
|
|
| 7. |
Remove the radiator air side baffle and radiator air lower baffle.
|
|
| 8. |
Remove the air conditioning compressor and the condenser hose and the air conditioning evaporator hose. Refer to Air Conditioning Compressor and Condenser Hose Replacement (LBS/A20DTH) Air Conditioning Compressor and Condenser Hose Replacement (LAU/A28NER) Air Conditioning Compressor and Condenser Hose Replacement (LLU/A16LET) Air Conditioning Compressor and Condenser Hose Replacement (LBY/A20DTR) Air Conditioning Compressor and Condenser Hose Replacement (LHU/A20NFT) . |
|||||||
| 9. |
Remove the radiator inlet hose (1) from the radiator.

|
|
| 10. |
Remove the engine coolant fan motor wiring harness from the radiator.
|
|
| 11. |
Raise and support the vehicle. Refer to
Lifting and Jacking the Vehicle
.
|
|
| 12. |
Remove the bracket of the power steering fluid cooler. Refer to Power Steering Fluid Cooler Replacement . |
|||||||
| 13. |
Vehicles equipped with an automatic transmission, remove the upper transmission fluid cooler pipe and the lower transmission fluid cooler pipe from the radiator. |
|||||||
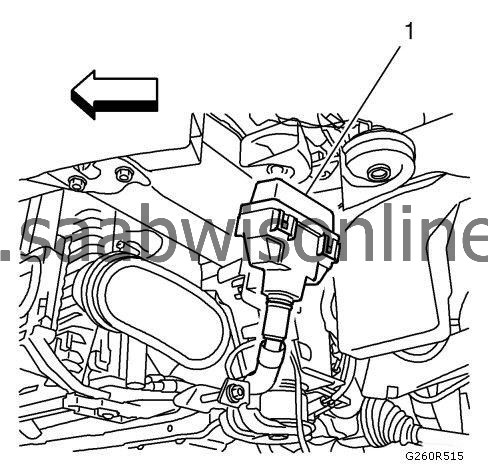
| 14. |
Remove the relay box (1).
|
|
| 15. |
Remove the radiator wiring harness connectors.
|
|
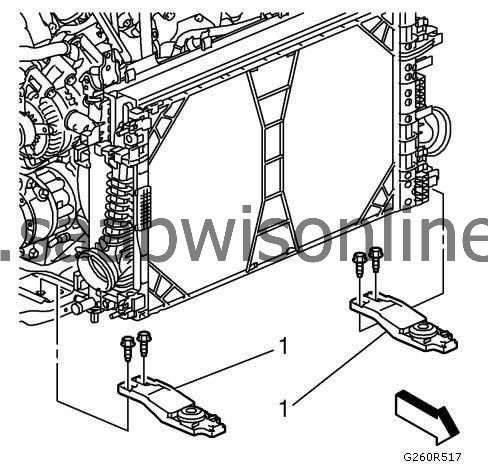
| 17. |
With the aid of an assistant, remove the radiator support brackets (1).
|
|
| 18. |
Remove the radiator.
|
|
| 19. |
Remove the engine coolant fan shroud from the radiator. Refer to
Engine Coolant Fan Shroud Replacement (Diesel)
Engine Coolant Fan Shroud Replacement (LAU/A28NER)
Engine Coolant Fan Shroud Replacement (LHU/A20NFT)
.
|
|
| Installation Procedure |
| Note | ||
|
Ensure that all the hoses, wires, pipes and shock modules clear the vehicle during the installation process. |
| 1. |
Install the engine coolant fan shroud to the radiator. Refer to
Engine Coolant Fan Shroud Replacement (Diesel)
Engine Coolant Fan Shroud Replacement (LAU/A28NER)
Engine Coolant Fan Shroud Replacement (LHU/A20NFT)
.
|
|
| 2. |
With the aid of an assistant, install the radiator.
|
|
| 3. |
Refer to
Fastener Caution
.
Install the radiator fastener (1) and tighten to 25 Nm (18 lb ft) .
|
|
| 4. |
Install the radiator wiring harness connectors.
|
|
| 5. |
Install the radiator outlet hose to the radiator.
|
|
| 6. |
Install the relay box (1).
|
|
| 7. |
Install the bracket of the power steering fluid cooler. Refer to
Power Steering Fluid Cooler Replacement
.
|
|
| 8. |
Install the engine coolant fan motor wiring harness to the radiator.
|
|
| 10. |
Vehicles equipped with an automatic transmission, install the upper transmission fluid cooler pipe and the lower transmission fluid cooler pipe to the radiator.
|
|
| 11. |
Install the radiator ground cable and tighten to
10 Nm (89 lb in)
.
|
|
| 13. |
Install the radiator air side baffle and the radiator air lower baffle.
|
|
| 14. |
Install the secondary air injection pipe. Refer to
Secondary Air Injection Pump Replacement
.
|
|
| 15. |
Install the air cleaner outlet duct. Refer to
Air Cleaner Outlet Duct Replacement
.
|
|
| 16. |
Install the radiator inlet hose (1) to the radiator.
|
|
| 17. |
Install the front bumper fascia. Refer to
Front Bumper Fascia Replacement
.
|
|
| 18. |
Connect the battery negative cable. Refer to
Battery Negative Cable Disconnection and Connection
.
|
|
| 19. |
Fill the cooling system. Refer to
Cooling System Draining and Filling (LAU/A28NER)
Cooling System Draining and Filling (LBS/A20DTH)
Cooling System Draining and Filling (LHU/A20NFT)
.
|
|
