PRE-RELEASE
Rear Suspension Support Replacement (AWD)
| Rear Suspension Support Replacement (AWD) |
| Removal Procedure |
| 1. |
Raise and support the vehicle. Refer to
Lifting and Jacking the Vehicle
.
|
|
| 2. |
Remove the tires and wheels. Refer to
Tire and Wheel Removal and Installation
.
|
|
| 3. |
Remove the exhaust muffler. Refer to
Exhaust Muffler Replacement (LAU)
Exhaust Muffler Replacement (LF1)
.
|
|
| 4. |
Remove the left park brake cable from the support. Refer to
Parking Brake Rear Cable Replacement - Left Side (Front Wheel Drive)
Parking Brake Rear Cable Replacement - Left Side (All Wheel Drive)
.
|
|
| 5. |
Remove the right park brake cable from the support. Refer to
Parking Brake Rear Cable Replacement - Right Side (FWD)
Parking Brake Rear Cable Replacement - Right Side (All Wheel Drive)
.
|
|
| 6. |
Remove shock absorber lower fastener. Refer to
Shock Absorber Replacement
.
|
|
| 7. |
Remove rear wheel speed sensor. Refer to
Rear Wheel Speed Sensor Replacement
.
|
|
| 8. |
Remove the lower control arms from the vehicle. Refer to
Rear Axle Lower Control Arm Replacement
.
|
|
| 9. |
Remove the upper control arms from the vehicle. Refer to
Rear Axle Upper Control Arm Replacement
.
|
|
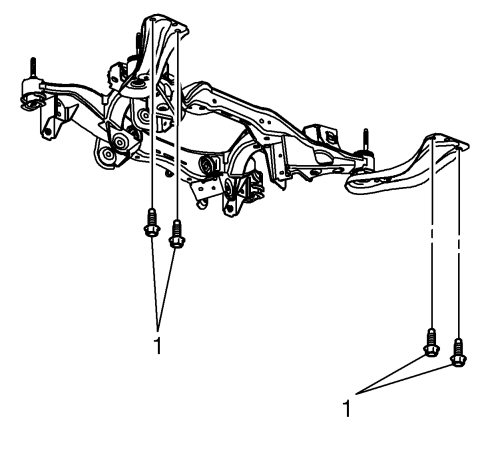
| 10. |
Remove reinforcement arm bolts to body (1).
|
|
| 11. |
Remove the outer fastener adjustment links. Refer to
Adjust Link Replacement
.
|
|
| 12. |
Remove the rear wheel drive shafts. Refer to
Rear Wheel Drive Shaft Replacement
.
|
|
| 13. |
Remove the differential carrier assembly. Refer to
Differential Carrier Assembly Replacement
.
|
|
| 14. |
Remove the stabilizer bar. Refer to
Stabilizer Shaft Replacement
.
|
|
| 15. |
Position a transmission jack under the rear support and firmly secure the support to the jack with straps.
|
|
| 16. |
Mark up support position to body with spray paint.
|
|
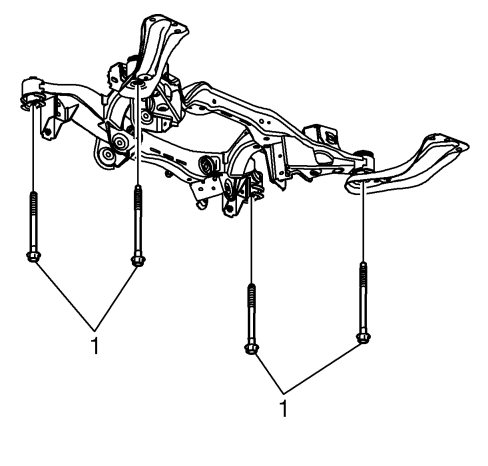
| 17. |
Remove the 4 rear support to body bolts (1).
|
|
| 18. |
Remove the rear support assembly from the vehicle.
|
|
| 19. |
Remove the inner fastener from adjustments links. Refer to
Adjust Link Replacement
.
|
|
| 20. |
With the aid of an assistant, remove the rear support from the transmission jack and place it on the floor.
|
|
| Installation Procedure |
| 1. |
With the aid of an assistant, position the rear support onto the transmission jack and firmly secure the support to the jack with straps. |
|||||||
| 2. |
Install the inner fastener to adjustment links. Refer to
Adjust Link Replacement
.
|
|
| 3. |
Position the rear support assembly to the vehicle.
|
|
| 4. |
Refer to
Fastener Caution
.
Install 4 NEW rear support to body bolts (1) and tighten to:
|
|
| • |
First Pass:
100 Nm (74 lb ft)
|
| • |
Final Pass:
plus 90 degrees
|
| 5. |
Install the differential carrier assembly. Refer to
Differential Carrier Assembly Replacement
.
|
|
| 6. |
Install the rear wheel drive shafts. Refer to
Rear Wheel Drive Shaft Replacement
.
|
|
| 7. |
Install the outer fastener adjustment links. Refer to
Adjust Link Replacement
.
|
|
| 8. |
Install NEW reinforcement arm bolts (1) to body and tighten to
58 Nm (43 lb ft)
.
|
|
| 9. |
Install upper control arms. Refer to
Rear Axle Upper Control Arm Replacement
.
|
|
| 10. |
Install lower control arms. Refer to
Rear Axle Lower Control Arm Replacement
.
|
|
| 11. |
Install the Rear wheel speed sensor. Refer to
Rear Wheel Speed Sensor Replacement
.
|
|
| 12. |
Install shock absorber lower fastener. Refer to
Shock Absorber Replacement
.
|
|
| 13. |
Install the stabilizer bar. Refer to
Stabilizer Shaft Replacement
.
|
|
| 14. |
Install the left park brake cable to the support. Refer to
Parking Brake Rear Cable Replacement - Left Side (Front Wheel Drive)
Parking Brake Rear Cable Replacement - Left Side (All Wheel Drive)
.
|
|
| 15. |
Install the right park brake cable to the support. Refer to
Parking Brake Rear Cable Replacement - Right Side (FWD)
Parking Brake Rear Cable Replacement - Right Side (All Wheel Drive)
.
|
|
| 16. |
Install the exhaust muffler. Refer to
Exhaust Muffler Replacement (LAU)
Exhaust Muffler Replacement (LF1)
.
|
|
| 17. |
Install the tires and wheels. Refer to
Tire and Wheel Removal and Installation
.
|
|
| 18. |
Check the rear alignment. Refer to
Wheel Alignment Measurement
.
|
|
