PRE-RELEASE
Transmission Replacement (All Wheel Drive)
| Transmission Replacement (All Wheel Drive) |
Special Tools
| • |
CH-49290
Engine fixture
|
|
| • |
CH-49289
Support frame fixture
|
|
| • |
CH-904
Basic tool
|
|
| • |
DT-47648
Transmission fixture
|
|
| • |
EN-47649
Engine Bridge
|
|
| • |
EN-47650
Retainer Frame
|
|
For equivalent regional tools, refer to Special Tools .
| Removal Procedure |
| 1. |
Remove the battery tray. Refer to
Battery Tray Replacement
.
|
|
| 2. |
Remove the bolt from the coupler and disconnect the steering shaft coupling from the steering gear. Refer to
Intermediate Steering Shaft Replacement
|
|
| 3. |
Place the vehicle on a hoist.
|
|
| 4. |
Remove the propeller shaft. Refer to
Propeller Shaft Replacement
|
|
| 5. |
Remove the transmission range select lever cable and bracket.
|
|
| 6. |
Drain the transmission fluid. Refer to Transmission Fluid Replacement . |
|||||||
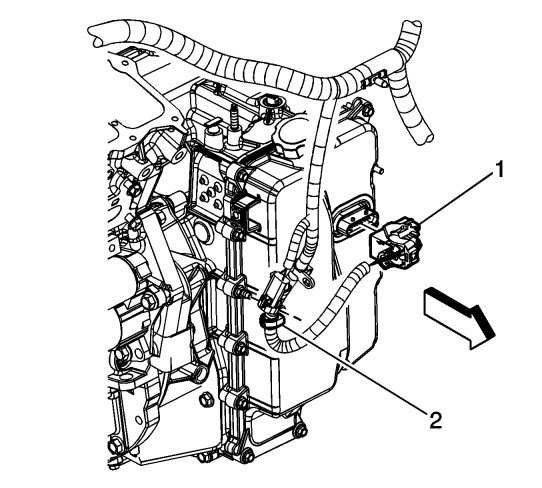
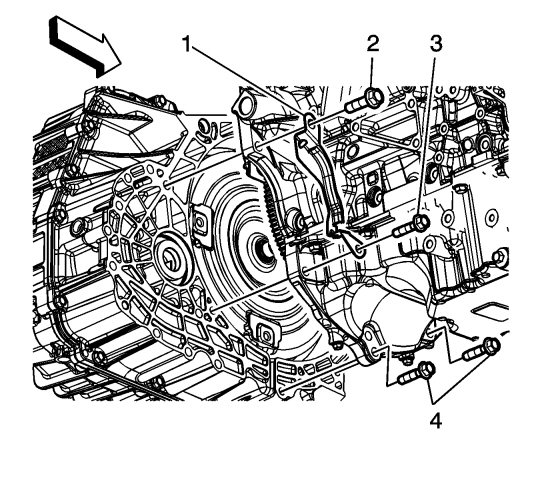
| 7. |
Remove the wire harness retainer (2) from the control valve body cover stud.
|
|
| 8. |
Disconnect the electrical connector (1) for the control valve body transmission control module (TCM)
|
|
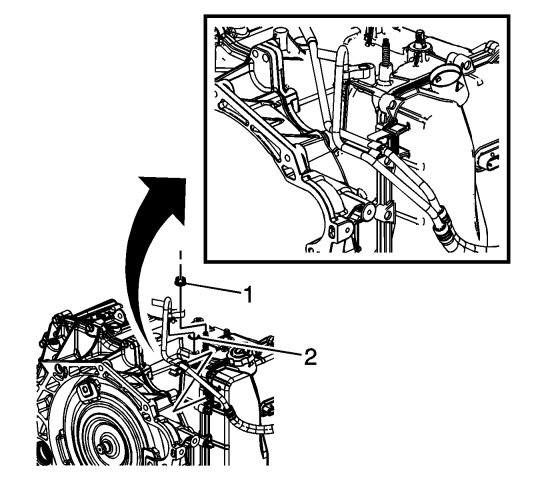
| 9. |
Remove the transmission fluid cooler pipe retainer nut (1).
|
|
| 10. |
Plug and/or cap the hose and transmission to prevent contamination.
|
|
| 11. |
Install the engine support fixture. Refer to
Engine Support Fixture (Engine Bridge, Retainer Frame)
Engine Support Fixture (Centering Adapter)
.
|
|
| 12. |
Remove the left catalytic converter and pipe assembly. Refer to
Catalytic Converter Replacement - Left Side (LF1)
.
|
|
| 13. |
Remove the starter. Refer to
Starter Replacement (LAU)
Starter Replacement (LF1)
.
|
|
| 14. |
Mark the relationship of the flywheel to the torque converter for reassembly.
|
|
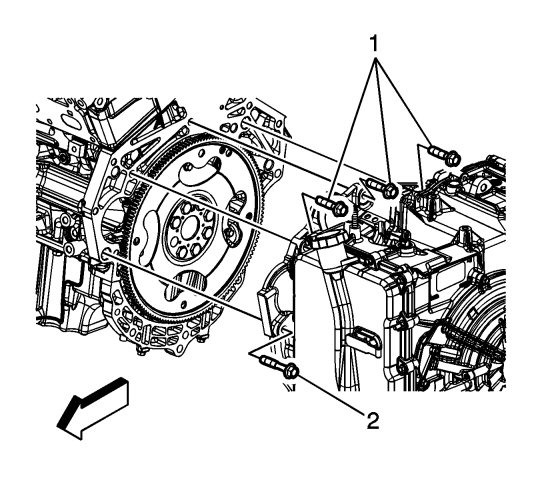
| 15. |
Remove the torque converter to flywheel bolts by turning the engine crankshaft. 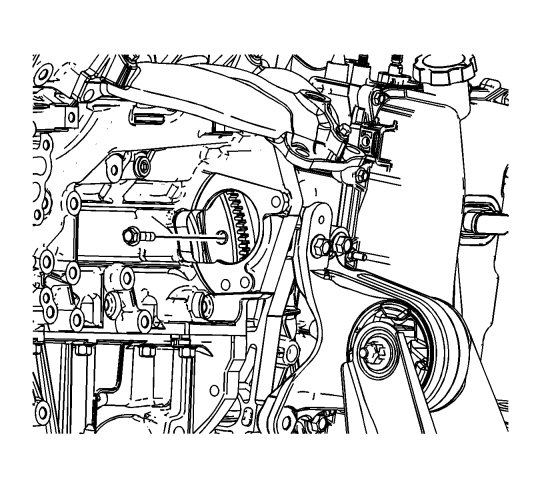
|
|||||||
| 16. |
Remove the rear transmission mount from the transmission. Refer to
Transmission Rear Mount Replacement (AWD)
Transmission Rear Mount Replacement (FWD)
.
|
|
| 17. |
Remove the front transmission mount from the transmission. Refer to
Transmission Front Mount Replacement
.
|
|
| 18. |
Remove the left transmission mount from the transmission. Refer to
Transmission Mount Replacement - Left Side
.
|
|
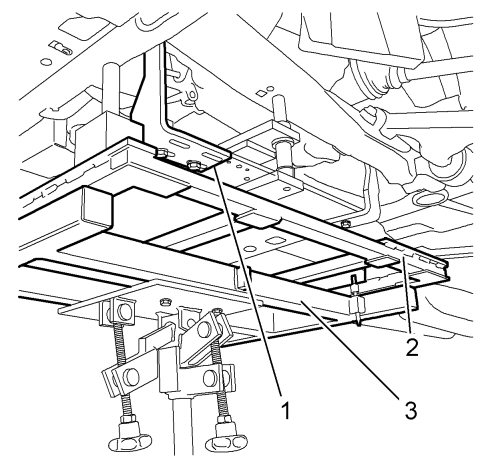
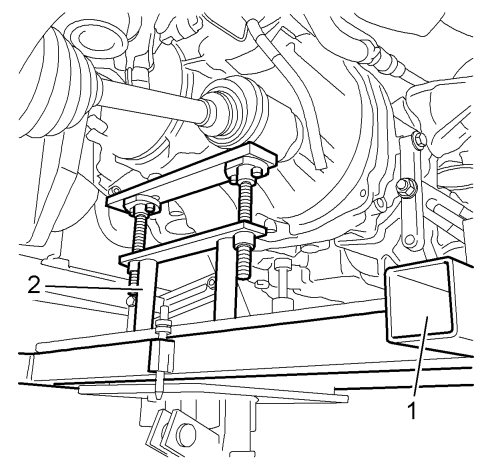
| 19. |
Install
CH-49290
Engine fixture (1) and
CH-49289
Support frame fixture (2)
|
|
| 20. |
Remove the frame. Refer to
Drivetrain and Front Suspension Frame Replacement
.
|
|
| 21. |
Remove the transfer case from the transmission. Refer to
Transfer Case Replacement
.
|
|
| 22. |
Disconnect the wheel drive shafts from the transmission and transfer case. Refer to
Transfer Case Replacement
|
|
| 23. |
Remove the upper transmission to engine bolts (1, 2).
|
|
| 24. |
Adjust the settings of the
CH-904
Basic tool (1) and lower the transmission far enough to remove the transmission.
|
|
| 25. |
Support the transmission with
DT-47648
Transmission fixture (2).
|
|
| 26. |
Remove the remaining transmission bolts (4)
|
|
| 27. |
Separate the transmission from the engine. |
|||||||
| 28. |
Flush the transmission cooler lines. Refer to
Transmission Fluid Cooler Flushing and Flow Test
.
|
|
| Installation Procedure |
| 1. |
Raise the transmission with the transmission jack and position the transmission to the engine.
|
|
| 2. |
Attach the transmission to the engine
|
|
| 3. |
Refer to
Fastener Caution
.
Install the transmission bolts (4) and tighten to 75 Nm (55 lb ft) .
|
|
| 4. |
Install the wheel drive shafts to the transmission. Refer to
Front Wheel Drive Shaft Replacement
.
|
|
| 5. |
Raise the transmission
|
|
| 6. |
Install the transmission's upper bolt (1, 2) on the engine and tighten to
75 Nm (55 lb ft)
.
|
|
| 7. |
Install the
CH-49290
Engine fixture to the
CH-49289
Support frame fixture.
|
|
| 8. |
Install the frame. Refer to
Drivetrain and Front Suspension Frame Replacement
.
|
|
| 9. |
Remove the
CH-49290
Engine fixture and the
CH-49289
Support frame fixture.
|
|
| 10. |
Install the left transmission mount to the transmission. Refer to
Transmission Mount Replacement - Left Side
.
|
|
| 11. |
Install the front transmission mount to the transmission. Refer to
Transmission Front Mount Replacement
.
|
|
| 12. |
Install the rear transmission mount to the transmission. Refer to
Transmission Rear Mount Replacement (AWD)
Transmission Rear Mount Replacement (FWD)
.
|
|
| 13. |
Install the flywheel inspection cover bolts (2, 3) according to the previous marking and tighten to
75 Nm (55 lb ft)
.
|
|
| 14. |
Install the starter. Refer to
Starter Replacement (LAU)
Starter Replacement (LF1)
.
|
|
| 15. |
Install the left catalytic converter and pipe assembly. Refer to
Catalytic Converter Replacement - Left Side (LF1)
.
|
|
| 16. |
Remove the engine support fixture.
|
|
| 17. |
Install the transfer case to the transmission. Refer to
Transfer Case Replacement
.
|
|
| 18. |
Connect the control valve body TCM electrical connector (1).
|
|
| 19. |
Install the wire harness retainer (2) to the control valve body cover stud and tighten the nut to
12 Nm (106 lb in)
.
|
|
| 20. |
Remove the transmission jack.
|
|
| 21. |
Install the bolts that fasten the torque converter on the flywheel and tighten to 62 Nm (46 lb ft) .
|
|||||||
| 22. |
Install the transmission's upper bolt (1, 2) on the engine and tighten to
75 Nm (55 lb ft)
.
|
|
| 23. |
Lower the vehicle.
|
|
| 24. |
Install the transmission range select lever cable and bracket.
|
|
| 25. |
Install the propeller shaft. Refer to
Propeller Shaft Replacement
|
|
| 26. |
Adjust the automatic transmission range selector lever cable. Refer to
Range Selector Lever Cable Adjustment
.
|
|
| 27. |
Install the bolt to the coupler and connect the steering shaft coupling to the steering gear. Refer to
Intermediate Steering Shaft Replacement
|
|
| 28. |
Install the battery tray. Refer to
Battery Tray Replacement
.
|
|
| 29. |
Fill the transmission with fluid. Refer to
Transmission Fluid Replacement
.
|
|
| 30. |
If a NEW TCM has been installed into the vehicle, the NEW module needs to be reprogrammed. Refer to
Service Programming System (SPS)
.
|
|
| 31. |
Perform Resetting of the transmission's adaption . |
||||||||||||||||||||||
| 32. |
Road test the vehicle.
|
|
