PRE-RELEASE
Engine Replacement
| Engine Replacement |
| Special Tools |
| • |
CH-49290
Engine fixture
|
|
| • |
CH-49289
Support frame fixture
|
|
| • |
CH-904
Basic tool
|
|
For equivalent regional tools, refer to Special Tools
| Removal Procedure |
| 1. |
Disconnect the negative battery cable. See
Battery, negative cable , disconnection and connection
.
|
|
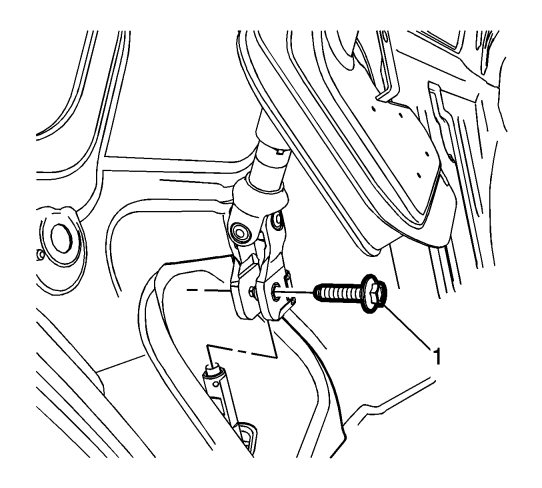
| 2. |
Remove the bolt (1) from the coupler and disconnect the steering shaft coupling from the steering gear. Refer to
Intermediate Steering Shaft Replacement
|
|
| 3. |
Place the vehicle on the hoist.
|
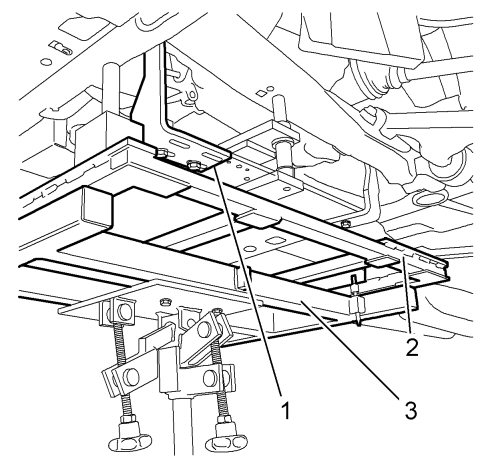
|
| 4. |
Recover the refrigerant. Refer to
Refrigerant Recovery and Recharging (Belt Driven Compressor)
|
|
| 5. |
Remove the intake manifold cover. Refer to
Intake Manifold Cover Replacement
.

|
|
| 6. |
Drain the cooling system. Refer to
Cooling System, Draining and Filling (GE 47716)
Cooling System, Draining and Filling (Static Fill LAU)
Cooling System, Draining and Filling (Static Fill LF1)
.
|
|
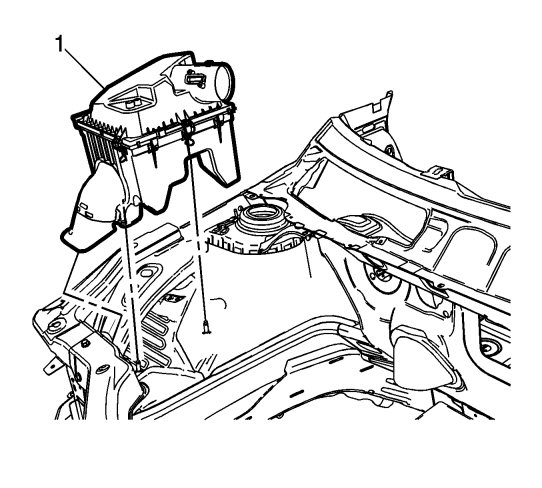
| 7. |
Remove the air cleaner assembly. Refer to
Air Cleaner Assembly Replacement (LAU)
Air Cleaner Assembly Replacement (LF1)
.
|
|
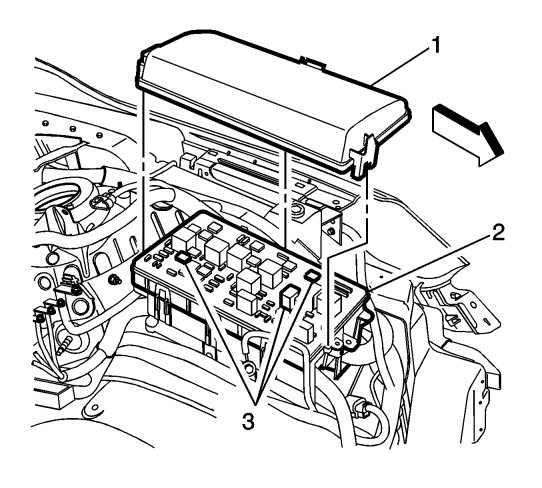
| 8. |
Remove the front compartment fuse block (2). Refer to
Front Compartment Fuse Block Replacement
.
|
|
| 9. |
Remove the battery. Refer to
Battery Replacement
.

|
|
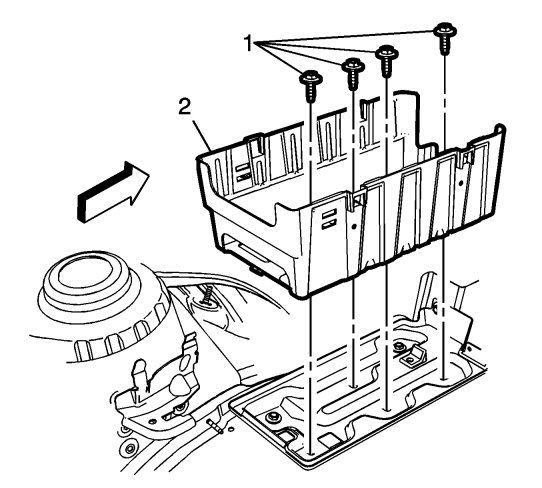
| 10. |
Remove the battery tray. Refer to
Battery Tray Replacement
|
|
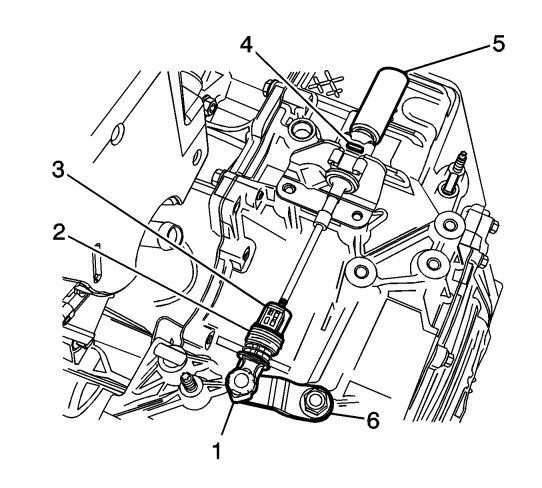
| 11. |
Disconnect the transmission shiftier cable.
|
|
| 12. |
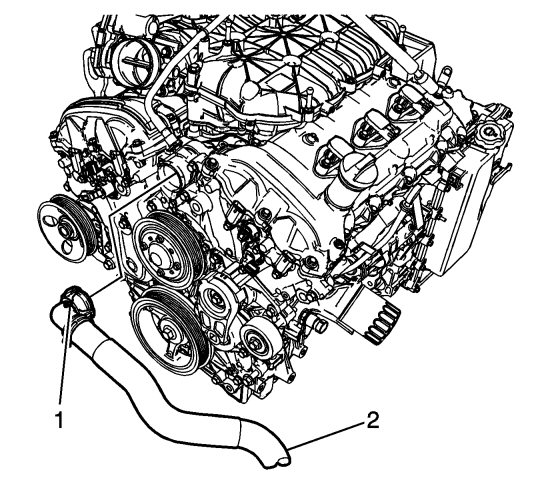
Disconnect the radiator outlet hose from the engine. Refer to
Radiator Outlet Hose Replacement (LAU)
Radiator Outlet Hose Replacement (LF1)
.
|
|
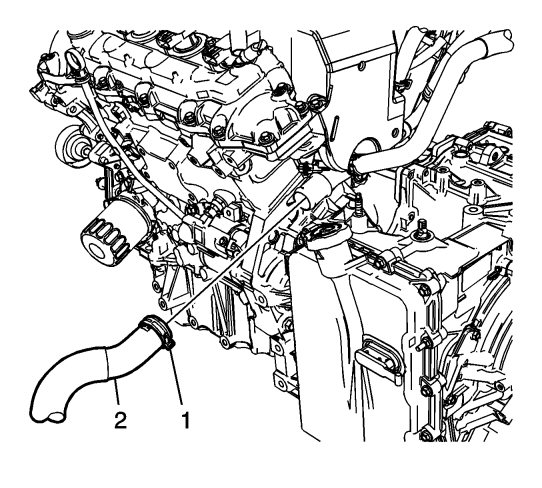
| 13. |
Disconnect the radiator inlet hose from the engine. Refer to
Radiator Inlet Hose Replacement (LAU)
Radiator Inlet Hose Replacement (LF1)
.
|
|
| 14. |
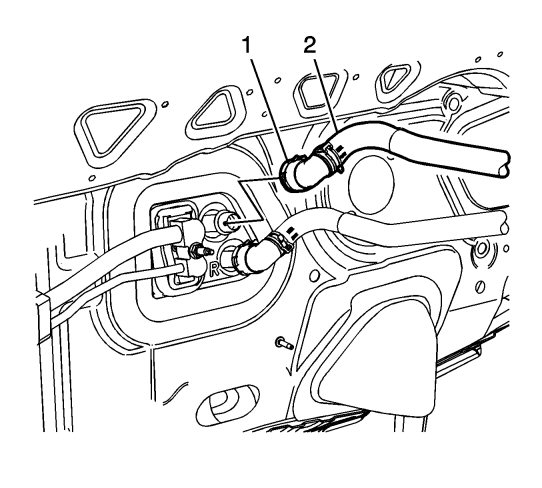
Release the clip from the quick disconnect (1) and remove the heater inlet hose (2) from the heater core tube.
|
|
| 15. |
Release the clip from the quick disconnect (1) and remove the heater outlet hose (2) from the heater core tube.

|
|
| 16. |
Remove the A/C connectors from the service ports.
|
|
| 17. |
Remove the radiator surge tank. Refer to
Radiator Surge Tank Replacement (LAU)
Radiator Surge Tank Replacement (LF1)
.

|
|
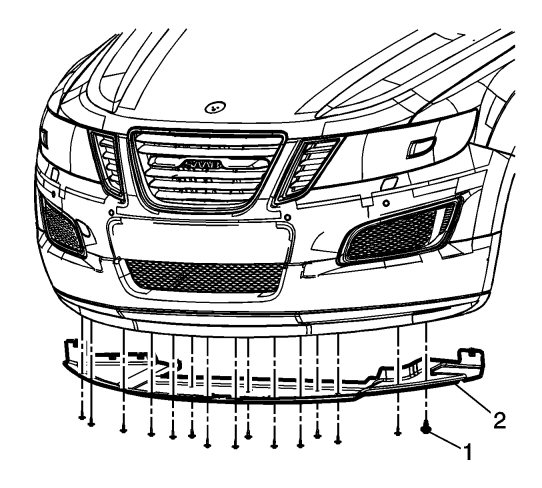
| 18. |
Remove the radiator air lower deflector. Refer to
Radiator Air Lower Deflector Replacement
.
|
|
| 19. |
Remove both front wheels. Refer to
Tire and Wheel Removal and Installation
.
|
|
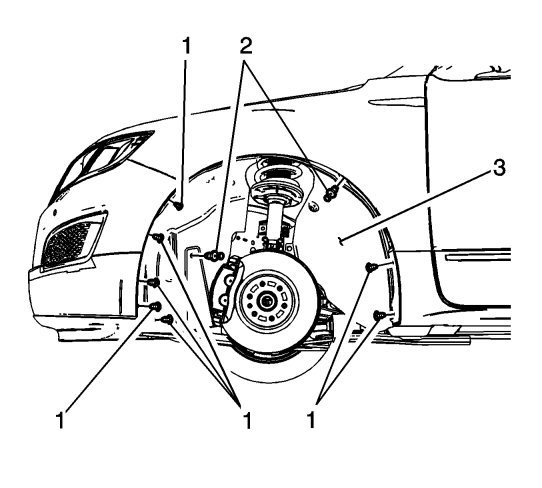
| 20. |
Remove right side front wheelhouse liner front fasteners. Refer to
Front Wheelhouse Liner Replacement
.
|
|
| 21. |
Remove the catalytic converter(s). Refer to
Catalytic Converter Replacement - Left Side (LF1)
and
Catalytic Converter Replacement - Right Side (LF1)
or
Catalytic Converter Replacement (LAU)
|
|
| 22. |
For AWD, remove the propeller shaft. Refer to
Propeller Shaft Replacement
.
|
|
| 23. |
Prepare
CH-49290
and
CH-49289
tools according to the SPX instruction.
|
|
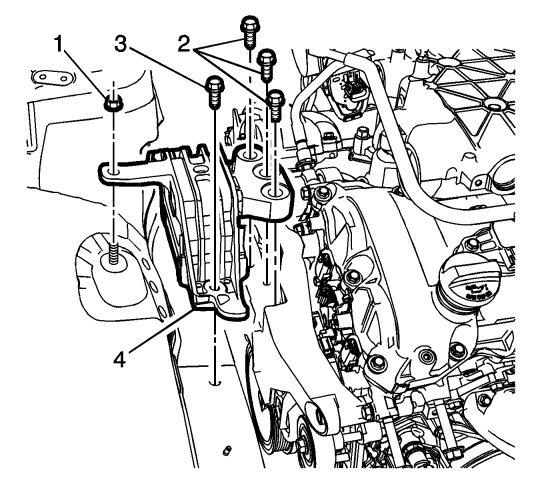
| 24. |
Install the tool
CH-49290
Engine fixture (1) and
CH-904
Basic tool to the engine attaching the hooks to the support frame.
|
|
| 25. |
Remove the right side engine mount. Refer to
Engine Mount Replacement - Right Side
.
|
|
| 26. |
Disconnect the fuel feed line (1). Refer to
Metal Collar Quick Connect Fitting Service
.

|
|
| 27. |
Disconnect the evaporative emission line (1). Refer to
Plastic Collar Quick Connect Fitting Service

|
|
| 28. |
Disconnect the transmission fluid cooler pipes . Refer to
Transmission Fluid Cooler Inlet Pipe Replacement
and
Transmission Fluid Cooler Outlet Pipe Replacement
.
|
|
| 29. |
Mark the torque converter to flexplate relationship.
|
|||||||
| 30. |
Remove the bolt (1) from the coupler and disconnect the steering shaft coupling from the steering gear. Refer to
Intermediate Steering Shaft Replacement
.
|
|
| 31. |
Remove the wheel drive shafts from the hub/ bearing assemblies. See
Front wheel drive shaft, replacement
.
|
|
| 32. |
Disconnect the power steering cooler lines from the cooler.
|
|
| 33. |
Disconnect and reposition harnesses as required.
|
|
| 34. |
Disconnect the steering pump hydraulic lines
|
|
| 35. |
Install
CH 49289
Support frame fixture (1) to the
CH-904
Basic tool (3) and position the tool to the
CH-49290
Engine fixture (2) and the zero holes in the body.
|
|
| 36. |
Remove the support frame fasteners.
|
|
| 37. |
Remove the front and rear frame to the body bolts. Refer to
Drivetrain and Front Suspension Frame Replacement
|
|
| 38. |
Lower the powertrain from the vehicle.
|
|
| 39. |
Lift the powertrain assembly off the frame and place on the floor.
|
|
| 40. |
Separate the engine from the transmission.
|
|
| 41. |
Disconnect electrical connectors as necessary.
|
|
| Installation Procedure |
| 1. |
Install the engine to the transmission and tighten the upper bolts to
75 Nm (55 lb ft)
.
|
|
| 2. |
Place the powertrain assembly on the frame.
|
|
| 3. |
Install the rear transmission through bolt.
|
|
| 4. |
Place the powertrain and frame assembly on the engine support table.
|
|
| 5. |
Align the engine to the transmission
|
|
| 6. |
Lift the powertrain assembly to the vehicle
|
|
| 7. |
Align the
CH-49289
Support frame fixture wings to the zero holes
|
|
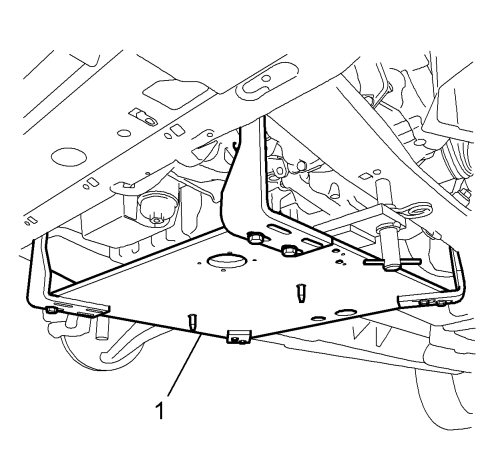
| 8. |
Install NEW reinforcement arm bolts (1) to body and tighten to
58 Nm (43 lb ft).
Install the front and rear frame bolts. Refer to Drivetrain and Front Suspension Frame Replacement . 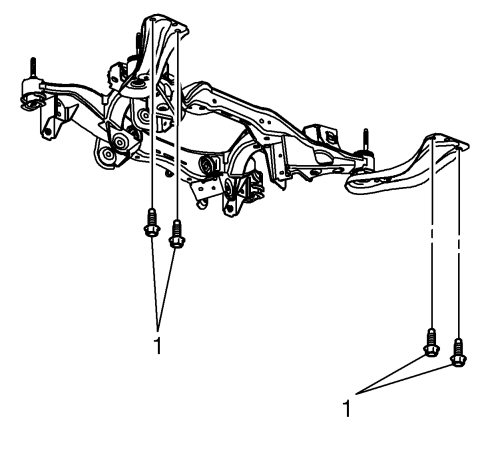
|
|
| 9. |
Install the body to frame reinforcement fasteners. Tighten to
58 (43 lb ft)
.
|
|
| 10. |
Remove the engine support tools.
|
|
| 11. |
Install the lower transaxle-to-engine bolts and tighten to
75 Nm (55 lb ft)
.
|
|
| 12. |
Install the right side engine mount. Refer to
Engine Mount Replacement - Right Side
.
|
|
| 13. |
Connect the steering pump hydraulic lines.
|
|
| 14. |
Connect the power steering cooler lines to the cooler.
|
|
| 15. |
For AWD, install the propeller shaft. Refer to
Propeller Shaft Replacement
.
|
|
| 16. |
Align the torque converter and flexplate marks and install the torque convertor-to-flexplate bolts and tighten to
62 Nm (46 lb ft)
.
|
|
| 17. |
Install the catalytic converter(s). Refer to
Catalytic Converter Replacement - Left Side (LF1)
and
Catalytic Converter Replacement - Right Side (LF1)
or
Catalytic Converter Replacement (LAU)
|
|
| 18. |
Install the left and right wheel drive shafts. Refer to
Front Wheel Drive Shaft Replacement
.
|
|
| 19. |
Connect the steering shaft coupling to the steering gear and install the bolt (1). Refer to
Intermediate Steering Shaft Replacement
.
|
|
| 20. |
Install the right side front wheelhouse liner. Refer to
Front Wheelhouse Liner Replacement
.
|
|
| 21. |
Install the front wheels. Refer to
Tire and Wheel Removal and Installation
.
|
|
| 22. |
Install the radiator air lower deflector. Refer to
Radiator Air Lower Deflector Replacement
.
|
|
| 23. |
Install the radiator outlet hose. Refer to
Radiator Outlet Hose Replacement (LAU)
Radiator Outlet Hose Replacement (LF1)
|
|
| 24. |
Install the radiator inlet hose. Refer to
Radiator Inlet Hose Replacement (LAU)
Radiator Inlet Hose Replacement (LF1)
|
|
| 25. |
Install the heater inlet hose (2) to the heater core tube and clip the quick disconnect (1) .
|
|
| 26. |
Install the heater outlet hose (2) to the heater core tube and clip the quick disconnect (1) .
|
|
| 27. |
Install the radiator surge tank. Refer to
Radiator Surge Tank Replacement (LAU)
Radiator Surge Tank Replacement (LF1)
.
|
|
| 28. |
Connect the transmission fluid cooler pipes. Refer to
Transmission Fluid Cooler Inlet Pipe Replacement
and
Transmission Fluid Cooler Outlet Pipe Replacement
.
|
|
| 29. |
Install the fuel EVAP line.
|
|
| 30. |
Connect the fuel feed line. Refer to
Fuel Feed Pipe Replacement
.
|
|
| 31. |
Connect the transmission shiftier cable.
|
|
| 32. |
Install the air cleaner assembly. Refer to
Air Cleaner Assembly Replacement (LAU)
Air Cleaner Assembly Replacement (LF1)
.
|
|
| 33. |
Connect the wiring harness to the underhood junction block. Refer to
Front Compartment Fuse Block Replacement
.
|
|
| 34. |
Install the battery tray. Refer to
Battery Tray Replacement
|
|
| 35. |
Install the battery. Refer to
Battery Replacement
.
|
|
| 36. |
Connect the negative battery cable. Refer to
Battery Negative Cable Disconnection and Connection
.
|
|
| 37. |
Fill the vehicle with coolant. Refer to
Cooling System, Draining and Filling (GE 47716)
Cooling System, Draining and Filling (Static Fill LAU)
Cooling System, Draining and Filling (Static Fill LF1)
.
|
|
| 38. |
Check the engine oil. Refer to
Engine Oil and Oil Filter Replacement (LAU)
Engine Oil and Oil Filter Replacement (LF1 or LFW)
.
|
|
| 39. |
Install the intake manifold cover. Refer to
Intake Manifold Cover Replacement
.
|
|
| 40. |
Perform the throttle learn procedure. Refer to
Throttle/Idle Learn (LF1, LFW)
Throttle/Idle Learn (Without LF1, LFW)
.
|
|
